speed sensor CHEVROLET CAPTIVA SPORT 2014 Owner's Manual
[x] Cancel search | Manufacturer: CHEVROLET, Model Year: 2014, Model line: CAPTIVA SPORT, Model: CHEVROLET CAPTIVA SPORT 2014Pages: 382, PDF Size: 4.12 MB
Page 25 of 382
Black plate (19,1)Chevrolet Captiva Sport Owner Manual (GMNA-Localizing-U.S./Mexico-
6014141) - 2014 - crc - 8/13/13
In Brief 1-19
Vehicle Personalization
Some vehicle features can be
programmed by using the DIC
buttons on the instrument panel to
the left of the steering wheel. These
features include:
.Language
.Door Lock and Unlock Settings
.Lighting
.Chime Volume
.Remote Start
See Vehicle Personalization on
page 5-36.
Rear Vision
Camera (RVC)
If equipped, RVC displays a view of
the area behind the vehicle, on the
center stack display, when the
vehicle is shifted into R (Reverse).
See Rear Vision Camera (RVC) on
page 9-34.
Ultrasonic Parking Assist
If equipped, this system uses
sensors on the rear bumper to
assist with parking and avoiding
objects while in R (Reverse).
It operates at speeds less than
8 km/h (5 mph). Ultrasonic Rear
Parking Assist (URPA) uses audible
beeps to provide distance and
system information.
Keep the sensors on the vehicle's
rear bumper clean to ensure proper
operation.
See Ultrasonic Parking Assist on
page 9-32.
Power Outlets
The accessory power outlets can be
used to plug in electrical equipment,
such as a cell phone or MP3 player.
The power outlets are located inside
the center floor console, on the rear
of the center floor console, and in
the rear cargo compartment. Remove the cover to access and
replace when not in use.
See
Power Outlets on page 5-7.
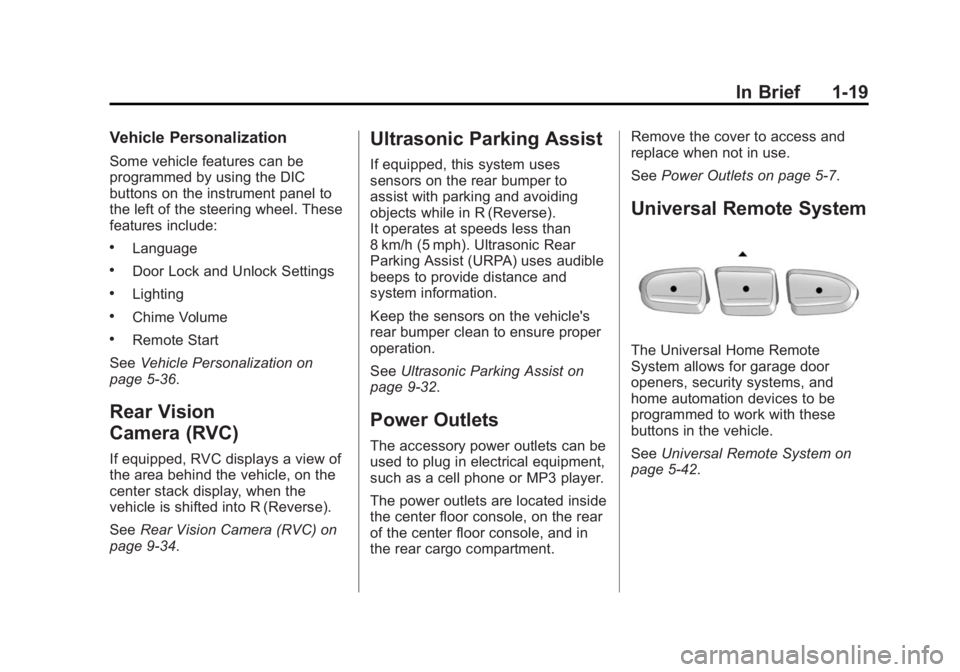
Universal Remote System
The Universal Home Remote
System allows for garage door
openers, security systems, and
home automation devices to be
programmed to work with these
buttons in the vehicle.
SeeUniversal Remote System on
page 5-42.
Page 65 of 382
Black plate (21,1)Chevrolet Captiva Sport Owner Manual (GMNA-Localizing-U.S./Mexico-
6014141) - 2014 - crc - 8/13/13
Seats and Restraints 3-21
Warning (Continued)
that person causing severe injury
or even death. The path of an
inflating airbag must be kept
clear. Do not put anything
between an occupant and an
airbag, and do not attach or put
anything on the steering wheel
hub or on or near any other
airbag covering.
Do not use seat accessories that
block the inflation path of a
seat-mounted side impact airbag.
Never secure anything to the roof
of a vehicle with roof-rail airbags
by routing a rope or tie‐down
through any door or window
opening. If you do, the path of an
inflating roof-rail airbag will be
blocked.
When Should an Airbag
Inflate?
This vehicle is equipped with
airbags. SeeAirbag System on
page 3-17. Airbags are designed to
inflate if the impact exceeds the
specific airbag system's deployment
threshold. Deployment thresholds
are used to predict how severe a
crash is likely to be in time for the
airbags to inflate and help restrain
the occupants. The vehicle has
electronic sensors that help the
airbag system determine the
severity of the impact. Deployment
thresholds can vary with specific
vehicle design.
Frontal airbags are designed to
inflate in moderate to severe frontal
or near frontal crashes to help
reduce the potential for severe
injuries, mainly to the driver's or
front outboard passenger's head
and chest.
Whether the frontal airbags will or
should inflate is not based primarily
on how fast the vehicle is traveling. It depends on what is hit, the
direction of the impact, and how
quickly the vehicle slows down.
Frontal airbags may inflate at
different crash speeds depending on
whether the vehicle hits an object
straight on or at an angle, and
whether the object is fixed or
moving, rigid or deformable, narrow
or wide.
Frontal airbags are not intended to
inflate during vehicle rollovers, in
rear impacts, or in many side
impacts.
In addition, the vehicle has
advanced technology frontal
airbags. Advanced technology
frontal airbags adjust the restraint
according to crash severity.
Seat-mounted side impact airbags
are designed to inflate in moderate
to severe side crashes depending
on the location of the impact.
Seat-mounted side impact airbags
are not designed to inflate in frontal
impacts, near frontal impacts,
rollovers, or rear impacts.
Page 102 of 382
Black plate (4,1)Chevrolet Captiva Sport Owner Manual (GMNA-Localizing-U.S./Mexico-
6014141) - 2014 - crc - 8/13/13
5-4 Instruments and Controls
If equipped with Rainsense™
windshield wipers, the moisture
sensor is next to the inside rearview
mirror and is mounted on the
windshield. When active, these
sensors are able to detect moisture
on the windshield and automatically
turn on the wipers.
To turn on the Rainsense feature,
the wipers must be set to one of the
five delay settings on the lever.
Each of the five settings adjusts the
sensitivity of the sensor.
Since different drivers have different
setting preferences, it is
recommended that the mid-range
setting (position 3) be used initially.
For more wipes, select the higher
settings; for fewer wipes, select the
lower settings located closer to the
off position on the lever.
The sensor automatically controls
the frequency of the wipes from the
off setting to the high speed setting
according to the weather conditions.The wipers can be left in a
Rainsense mode even when it is not
raining.
Windshield Washer
{Warning
In freezing weather, do not use
the washer until the windshield is
warmed. Otherwise the washer
fluid can form ice on the
windshield, blocking your vision.
Pull the windshield wiper lever to
spray windshield washer fluid and
activate the wipers. The wipers will
continue until the lever is released
or the maximum wash time is
reached.
Rear Window Wiper/
Washer
The rear wiper and rear wash button
is on the instrument panel above the
climate control system.
=(Rear Wiper/Washer): Press to
wash and wipe the rear window.
The rear window washer uses the
same reservoir as the windshield
washer. Check the windshield
washer reservoir level if the front
windshield can be worked, but no
fluid is sprayed when the rear
washer is activated. See Washer
Fluid on page 10-20.
5(Delay): Press to turn the
delayed wiping on or off.
Compass
The vehicle may have a compass in
the Driver Information Center (DIC).
Compass Zone
The zone is set to Zone 8 upon
leaving the factory. Your dealer will
set the correct zone for your
location.
Under certain circumstances, such
as during a long distance
cross-country trip or moving to a
new state or province, it will be
Page 147 of 382
Black plate (3,1)Chevrolet Captiva Sport Owner Manual (GMNA-Localizing-U.S./Mexico-
6014141) - 2014 - crc - 8/13/13
Lighting 6-3
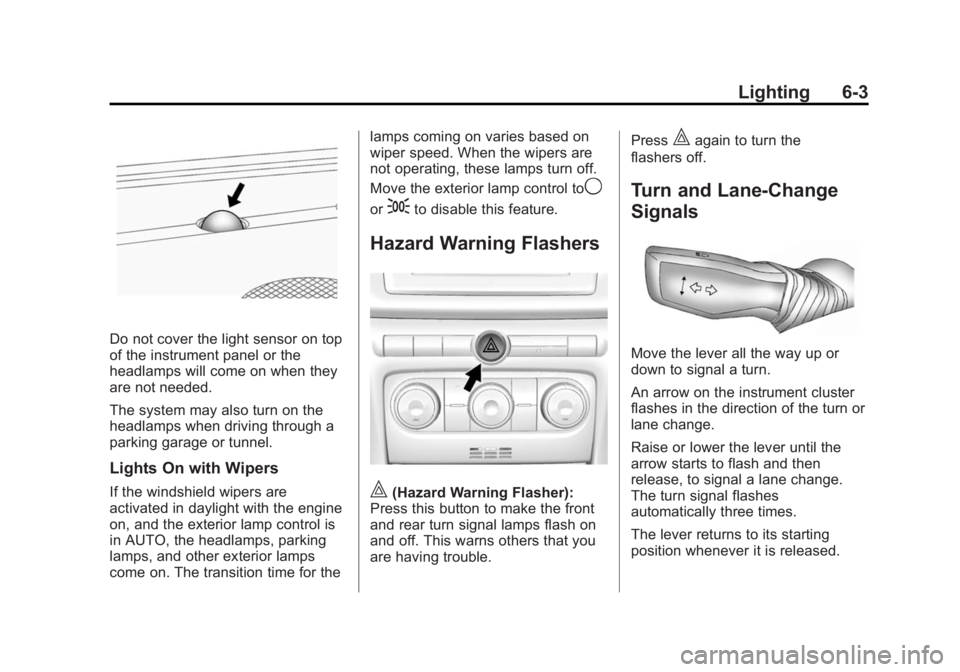
Do not cover the light sensor on top
of the instrument panel or the
headlamps will come on when they
are not needed.
The system may also turn on the
headlamps when driving through a
parking garage or tunnel.
Lights On with Wipers
If the windshield wipers are
activated in daylight with the engine
on, and the exterior lamp control is
in AUTO, the headlamps, parking
lamps, and other exterior lamps
come on. The transition time for thelamps coming on varies based on
wiper speed. When the wipers are
not operating, these lamps turn off.
Move the exterior lamp control to
9
or;to disable this feature.
Hazard Warning Flashers
|(Hazard Warning Flasher):
Press this button to make the front
and rear turn signal lamps flash on
and off. This warns others that you
are having trouble. Press
|again to turn the
flashers off.
Turn and Lane-Change
Signals
Move the lever all the way up or
down to signal a turn.
An arrow on the instrument cluster
flashes in the direction of the turn or
lane change.
Raise or lower the lever until the
arrow starts to flash and then
release, to signal a lane change.
The turn signal flashes
automatically three times.
The lever returns to its starting
position whenever it is released.
Page 187 of 382
Black plate (5,1)Chevrolet Captiva Sport Owner Manual (GMNA-Localizing-U.S./Mexico-
6014141) - 2014 - crc - 8/13/13
Climate Controls 8-5
Automatic Climate Control System
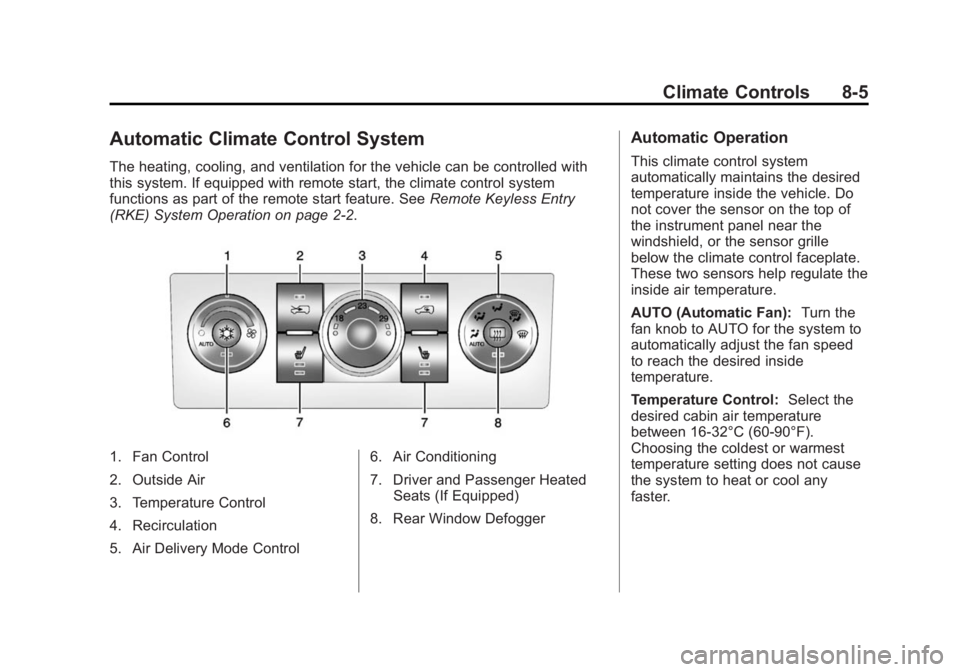
The heating, cooling, and ventilation for the vehicle can be controlled with
this system. If equipped with remote start, the climate control system
functions as part of the remote start feature. SeeRemote Keyless Entry
(RKE) System Operation on page 2-2.
1. Fan Control
2. Outside Air
3. Temperature Control
4. Recirculation
5. Air Delivery Mode Control 6. Air Conditioning
7. Driver and Passenger Heated
Seats (If Equipped)
8. Rear Window Defogger
Automatic Operation
This climate control system
automatically maintains the desired
temperature inside the vehicle. Do
not cover the sensor on the top of
the instrument panel near the
windshield, or the sensor grille
below the climate control faceplate.
These two sensors help regulate the
inside air temperature.
AUTO (Automatic Fan): Turn the
fan knob to AUTO for the system to
automatically adjust the fan speed
to reach the desired inside
temperature.
Temperature Control: Select the
desired cabin air temperature
between 16-32°C (60-90°F).
Choosing the coldest or warmest
temperature setting does not cause
the system to heat or cool any
faster.
Page 224 of 382
Black plate (32,1)Chevrolet Captiva Sport Owner Manual (GMNA-Localizing-U.S./Mexico-
6014141) - 2014 - crc - 8/13/13
9-32 Driving and Operating
.To slow down in small
increments, move the
thumbwheel toward−SET briefly.
Each time this is done, the
vehicle goes about 1.6 km/h
(1 mph) slower.
Passing Another Vehicle While
Using Cruise Control
Use the accelerator pedal to
increase the vehicle speed. When
you take your foot off the pedal, the
vehicle slows down to the previous
set cruise control speed. While
pressing the accelerator pedal or
shortly following the release to
override cruise control, briefly
moving the thumbwheel toward –
SET will result in cruise control set
to the current vehicle speed.
Using Cruise Control on Hills
How well the cruise control works
on hills depends upon the vehicle's
speed, load, and the steepness of
the hills. When going up steep hills,
you might have to step on the
accelerator pedal to maintain the
vehicle's speed. When going downhill, you might have to brake or
shift to a lower gear to maintain the
vehicle's speed. For some vehicles
the transmission may automatically
downshift when going down hills to
help maintain the vehicle's speed.
When the brakes are applied, the
cruise control shuts off.
Ending Cruise Control
There are two ways to disengage
the cruise control:
.Step lightly on the brake pedal;
when cruise control disengages,
the indicator light on the
instrument cluster goes out.
.PressEto turn off the cruise
control system.
Erasing Speed Memory
The cruise control set speed
memory is erased when the cruise
control or the ignition is turned off.
Driver Assistance
Systems
Ultrasonic Parking Assist
If available, the Ultrasonic Rear
Parking Assist (URPA) system
assists the driver with parking and
avoiding objects while in
R (Reverse). URPA operates at
speeds less than 8 km/h (5 mph).
The sensors on the rear bumper are
used to detect objects up to
2.5 m (8 ft) behind the vehicle, and
at least 25 cm (10 in) off the ground
and below liftgate level. Detection
distances may be less during
warmer or humid weather.
{Warning
The URPA system does not
detect children, pedestrians,
bicyclists, animals, or objects
below the bumper or that are too
close or too far from the vehicle. (Continued)
Page 225 of 382
Black plate (33,1)Chevrolet Captiva Sport Owner Manual (GMNA-Localizing-U.S./Mexico-
6014141) - 2014 - crc - 8/13/13
Driving and Operating 9-33
Warning (Continued)
It is not available at speeds
greater than 8 km/h (5 mph). To
prevent injury, death, or vehicle
damage, even with URPA, always
check the area around the vehicle
and check all mirrors before
backing.
How the System Works
URPA comes on automatically when
the shift lever is moved into
R (Reverse). A single beep sounds
to indicate the system is working.
An obstacle is indicated by audible
beeps. The interval between the
beeps becomes shorter as the
vehicle gets closer to the obstacle.
When the distance is less than
30 cm (12 in) the beeping is
continuous for five seconds.
Turning the System On and Off
The system can be disabled through
the Driver Information Center (DIC).
See“Park Assist” underDriver
Information Center (DIC) on
page 5-24 for more information.
Turn off URPA when towing a trailer.
URPA defaults to the on setting
each time the vehicle is started.
When the System Does Not
Seem to Work Properly
The following messages may be
displayed on the DIC:
SERVICE PARK ASSIST: If this
message occurs, take the vehicle to
your dealer to repair the system.
PARK ASST BLOCKED SEE
OWNERS MANUAL: This
message can occur under the
following conditions:
.The ultrasonic sensors are not
clean. Keep the vehicle's rear
bumper free of mud, dirt, snow, ice, and slush. For cleaning
instructions, see
Exterior Care
on page 10-74.
.The park assist sensors are
covered by frost or ice. Frost or
ice can form around and behind
the sensors and may not always
be seen; this can occur after
washing the vehicle in cold
weather. The message may not
clear until the frost or ice has
melted.
.A trailer was attached to the
vehicle, or an object was
hanging out of the liftgate during
the last drive cycle. Once the
object is removed, URPA will
return to normal operation.
.A tow bar is attached to the
vehicle.
.The bumper is damaged. Take
the vehicle to your dealer to
repair the system.
Page 286 of 382
Black plate (46,1)Chevrolet Captiva Sport Owner Manual (GMNA-Localizing-U.S./Mexico-
6014141) - 2014 - crc - 8/13/13
10-46 Vehicle Care
Tire Pressure for
High-Speed Operation
{Warning
Driving at high speeds, 160 km/h
(100 mph) or higher, puts an
additional strain on tires.
Sustained high-speed driving
causes excessive heat buildup
and can cause sudden tire failure.
You could have a crash and you
or others could be killed. Some
high-speed rated tires require
inflation pressure adjustment for
high-speed operation. When
speed limits and road conditions
are such that a vehicle can be
driven at high speeds, make sure
the tires are rated for high-speed
operation, in excellent condition,
and set to the correct cold tire
inflation pressure for the
vehicle load.Vehicles with P235/55R18 size tires
require inflation pressure adjustment
when driving the vehicle at speeds
of 160 km/h (100 mph) or higher.
Set the cold inflation pressure to the
maximum inflation pressure shown
on the tire sidewall,
or 262 kPa (38 psi), whichever is
lower. See the example following.
Return the tires to the
recommended cold tire inflation
pressure when high-speed driving
has ended. See
Vehicle Load Limits
on page 9-10 andTire Pressure on
page 10-44.
Example:
The maximum load and inflation
pressure is molded on the tire
sidewall, in small letters, near the
rim flange. It will read something like
this: Maximum load
690 kg (1521 lbs) 300 kPa (44 psi)
Max. Press.
For this example, set the inflation
pressure for high‐speed driving at
262 kPa (38 psi).
Tire Pressure Monitor
System
The Tire Pressure Monitor System
(TPMS) uses radio and sensor
technology to check tire pressure
levels. The TPMS sensors monitor
the air pressure in your tires and
transmit tire pressure readings to a
receiver located in the vehicle.
Each tire, including the spare (if
provided), should be checked
monthly when cold and inflated to
the inflation pressure recommended
by the vehicle manufacturer on the
vehicle placard or tire inflation
pressure label. (If your vehicle has
tires of a different size than the size
indicated on the vehicle placard or
tire inflation pressure label, you
should determine the proper tire
inflation pressure for those tires.)
As an added safety feature, your
vehicle has been equipped with a
tire pressure monitoring system
(TPMS) that illuminates a low tire
Page 296 of 382
Black plate (56,1)Chevrolet Captiva Sport Owner Manual (GMNA-Localizing-U.S./Mexico-
6014141) - 2014 - crc - 8/13/13
10-56 Vehicle Care
performance on the laboratory
test wheel than the minimum
required by law. Warning: The
temperature grade for this tire is
established for a tire that is
properly inflated and not
overloaded. Excessive speed,
underinflation, or excessive
loading, either separately or in
combination, can cause heat
buildup and possible tire failure.
Wheel Alignment and Tire
Balance
The tires and wheels were aligned
and balanced at the factory to
provide the longest tire life and best
overall performance. Adjustments to
wheel alignment and tire balancing
are not necessary on a regular
basis. Consider an alignment check
if there is unusual tire wear or the
vehicle is significantly pulling to one
side or the other. Some slight pull to
the left or right, depending on the
crown of the road and/or other roadsurface variations such as troughs
or ruts, is normal. If the vehicle is
vibrating when driving on a smooth
road, the tires and wheels may need
to be rebalanced. See your dealer
for proper diagnosis.
Wheel Replacement
Replace any wheel that is bent,
cracked, or badly rusted or
corroded. If wheel nuts keep coming
loose, the wheel, wheel bolts, and
wheel nuts should be replaced.
If the wheel leaks air, replace it.
Some aluminum wheels can be
repaired. See your dealer if any of
these conditions exist.
Your dealer will know the kind of
wheel that is needed.
Each new wheel should have the
same load-carrying capacity,
diameter, width, offset, and be
mounted the same way as the one it
replaces.
Replace wheels, wheel bolts, wheel
nuts, or Tire Pressure Monitor
System (TPMS) sensors with new
GM original equipment parts.
{Warning
Using the wrong replacement
wheels, wheel bolts, or wheel
nuts can be dangerous. It could
affect the braking and handling of
the vehicle. Tires can lose air,
and cause loss of control, causing
a crash. Always use the correct
wheel, wheel bolts, and wheel
nuts for replacement.