automatic transmission CHEVROLET CAVALIER 1984 1.G Owners Manual
[x] Cancel search | Manufacturer: CHEVROLET, Model Year: 1984, Model line: CAVALIER, Model: CHEVROLET CAVALIER 1984 1.GPages: 105, PDF Size: 24.23 MB
Page 60 of 105

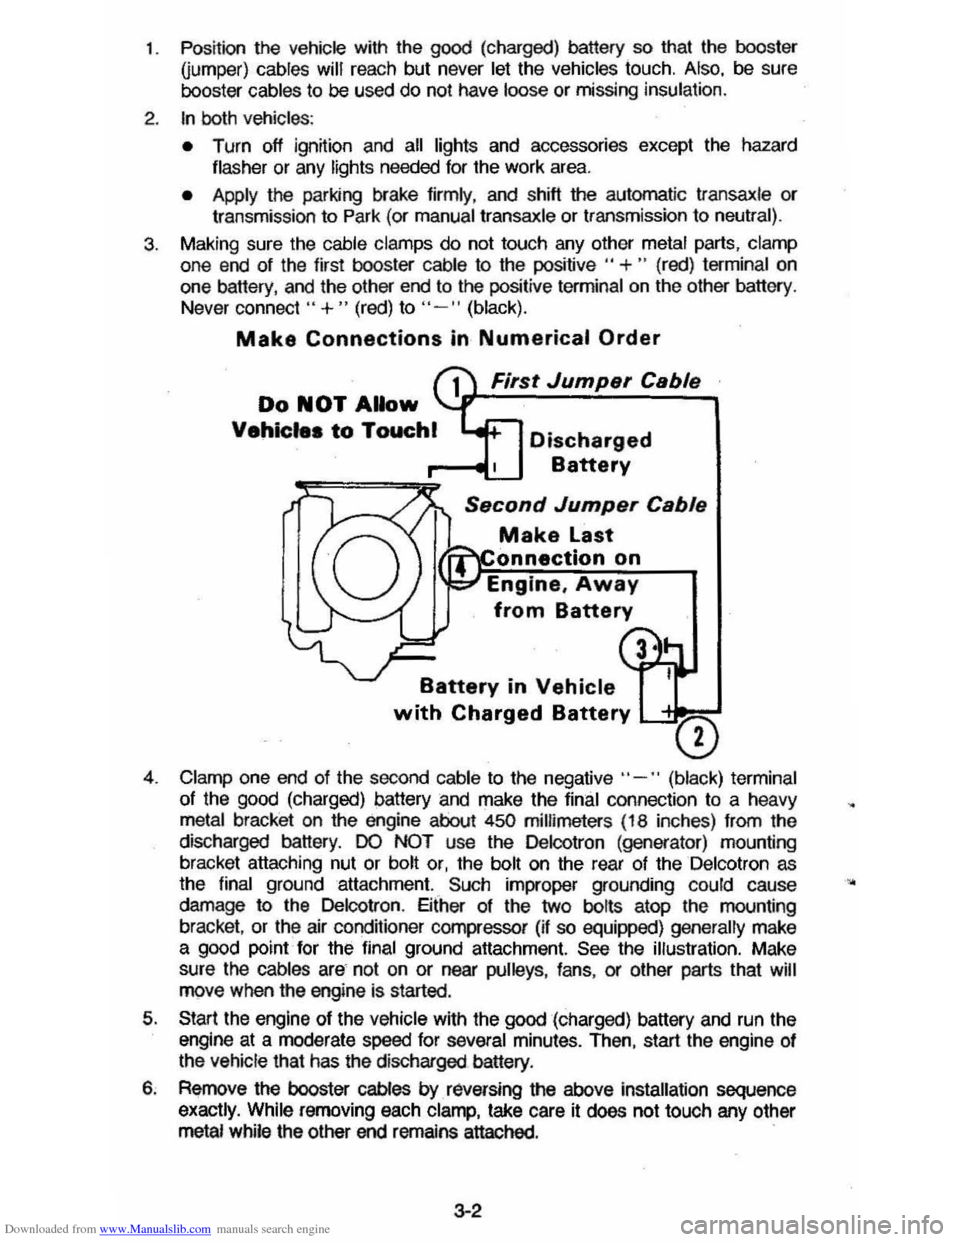
Downloaded from www.Manualslib.com manuals search engine 1. Position the vehicle with the good (charged) battery so that the booster Qumper) cables will reach but never let the vehicles touch. Also, be sure
booster cables to be used do not have loose or missing insulation.
2. tn both vehicles :
• Turn off ignition and all lights and accessories except the hazard
flasher or any lights needed for lhe work area.
• Apply the parking brake firmly, and shift the automatic transaxle or transmission to Park (or manual transaxle or transmission to neutral).
3. Making sure the cable clamps do not touch any other metal parts, clamp
one end of the first booster cable to the positive " +" (red) terminal on
one battery, and the other end to the positive terminal on the other battery .
Never connect"
+ " (red) to "- " (black).
Make Connections in Numerical Order
First Jump.r C.bl.
Do NOT Allow
Vehicle. to Touchl Discharged
Battery
S.cond Jump.r C.bl.
Make Last
onnectlon on
Engine,
Away
from Battery
Battery in Vehicle
with Charged Battery L-'= ___
o
4. Clamp one end of the second cable to the negative" -" (black) terminal
of the
good (charged) battery and make the final connection to a heavy metal bracket on the engine about 450 millimeters (18 inches) from the
discharged battery.
DO NOT use the Delcotron (generator) mounting
bracket attaching nut or bolt or, the bolt on the rear of the Delcotron as
the final ground attachment. Such improper grounding could cause
damage to the Delcotron . Either of the two bolts atop the mounting
bracket ,
or the air conditioner compressor (if so equipped) generally make a good point for the final ground attachment. See the illustration. Make
sure
the cables are not on or near pulleys , fans , or other parts that will move when the engine is started.
5. Start the engine of the vehicle with the good (charged) battery and run the
engine at a moderate speed for several minutes. Then, start the engine of
the vehicle that has the discharged battery.
6. Remove the booster cables by. raversing the above installation sequence
exactly. While removing each clamp, take care it does not touch any other metal while the other end remains attached. .
3-2
•
Page 63 of 105

Downloaded from www.Manualslib.com manuals search engine JACKING INSTRUCTIONS
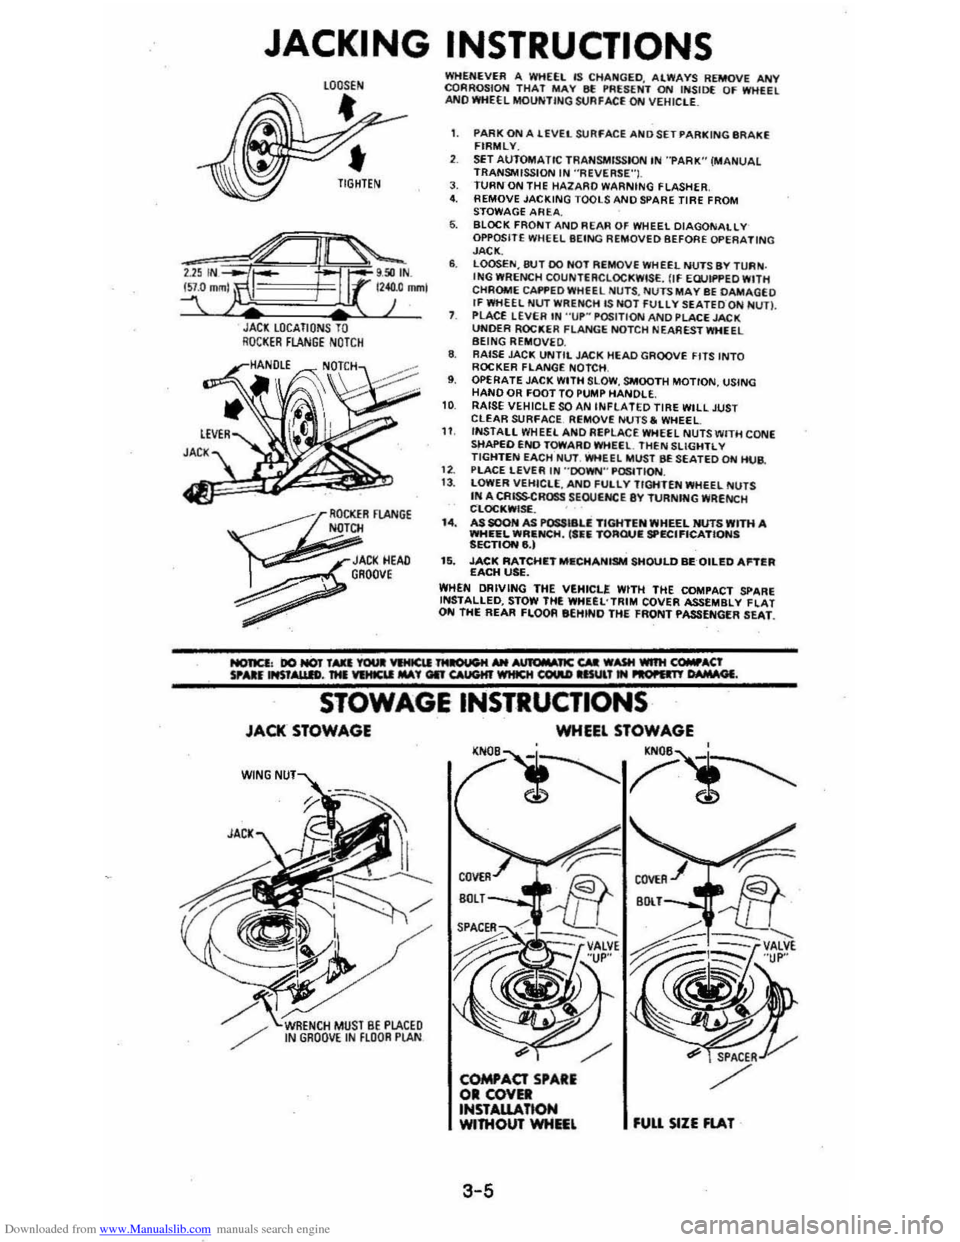
JACl LOCATIONS TO RQCI(ER FLANGE NOTCH
~
OCKER FlANGE N
JACI(HEAD , GROOve
~
WHENEVER A WHEEL IS CHA~GED. ALWAYS REMOVE ANY CQRROSIOH THAT MAY 8f !'RUENT ON INSID( OF WHEEL ANO WHEEL MOUNTING StJAFACE ON VEHIClE_
1. PARK ON A lEVEL SURFACE AND SET PARKING IIR AKE FIRMLY.
SET AUTOMATIC TRANSMISSION IN "PARK" (MANUAL TRANSMISSION IN ·'ReVERSE"I. J. TURN ON THE HAlARO WARNING FLASHER 4. REMOVE JACKING TOOLS AND SPARE TIRE FROM
STOWAGE AREA. 6. BLOCK FRONT AND REAR OF WHEEL DIAGONALLY OPPOSITE WHEEL BEING REMOVED BEFORE OPERATING JACK. 6. LOOSEN,8tH DO HOT REMOVE WHEEL NUTS BY TURN . ING WRENCH COUNTERCLOCKWISE. flf EWIf'PED WITH
CHROME CAI'f'EDWHfEL NU TS , NUTS MAY BE DAMAGEO If WHEEL NUT WRENCH lS NOT FUllY SEATEDQN NUn. PLACE LEVER IN "UP~ POSITION AND PLACE JACK UNOER ROCKER FLANGE NOTCH NEA REST WHEEL BEING REMOVE D. 8. RAISE JAC!!; UNTIL JACK HEAD GROOVE FITS INTO ROCKER FLANGE NOTCH , 9. OPERATE JACK WITH SLOW , SMOOTH MOTION, USING HAND OR FOOT TO PUMP HANDLE. 10 RAISE VEHICLE SOAN INfLATED TIRE WILL JUST CLEAR SURfACE. Ri;MOVE NUTS. WHEEL 11 INSTALL WHEEL ANO Ai;PLACE WHEEL NUTS WITH CONE sttAPEO END TOWARO WHEEl. THEN SLiGHTL V TIGHTEN EACH Nl.IT. WHEEL MUST BE SEATED ON HUB.
1 2. PlACE LEVER IN "'DOWN'" P~TION. 13 . lOWER VEHICLE, ANO fULlY TIGHTEN WHEEL NUTS IN A CRISSCROSS SEOUtNCE 8Y TURNfNG WRENCH CLOC!!;WISf. . I.. AS SOON AS POSSI8U TIGHTEN WHEEL NUTS WITH A WHEEL WRIlNCH, ('fiIi TORQUIE SPECIFICATIONS SECTIONe,) 15. JACK RATCHIETMIlCHANISM SHOULD BEQILED Antill EACH USE. WHEN DRIVING THE VEHICLE WITH THE COMPACT SPARE INSTALLED, STOW THE WHUL'TRIM COVER ASSEMBLY flAT ON THE REAR FLOOR eEHINO THE FRONT PASSENGER SEAT.
STOWAGE INSTRUCTIONS
JACK STOWAGE
W(NG
WHEEL STOWAGE
'N
3-5
fUU SIZE FlAT
Page 73 of 105

Downloaded from www.Manualslib.com manuals search engine '"
.,.
PART NUMBER
1051516
1050017
1052277
1050172
1050173
1050174 "1050214 "1050244 1052627
1050427
1050429
1052349 1050729
1052870
1051055 "1051398 1051515 1050201 1051855 1052367 1052753
1052271 1052535
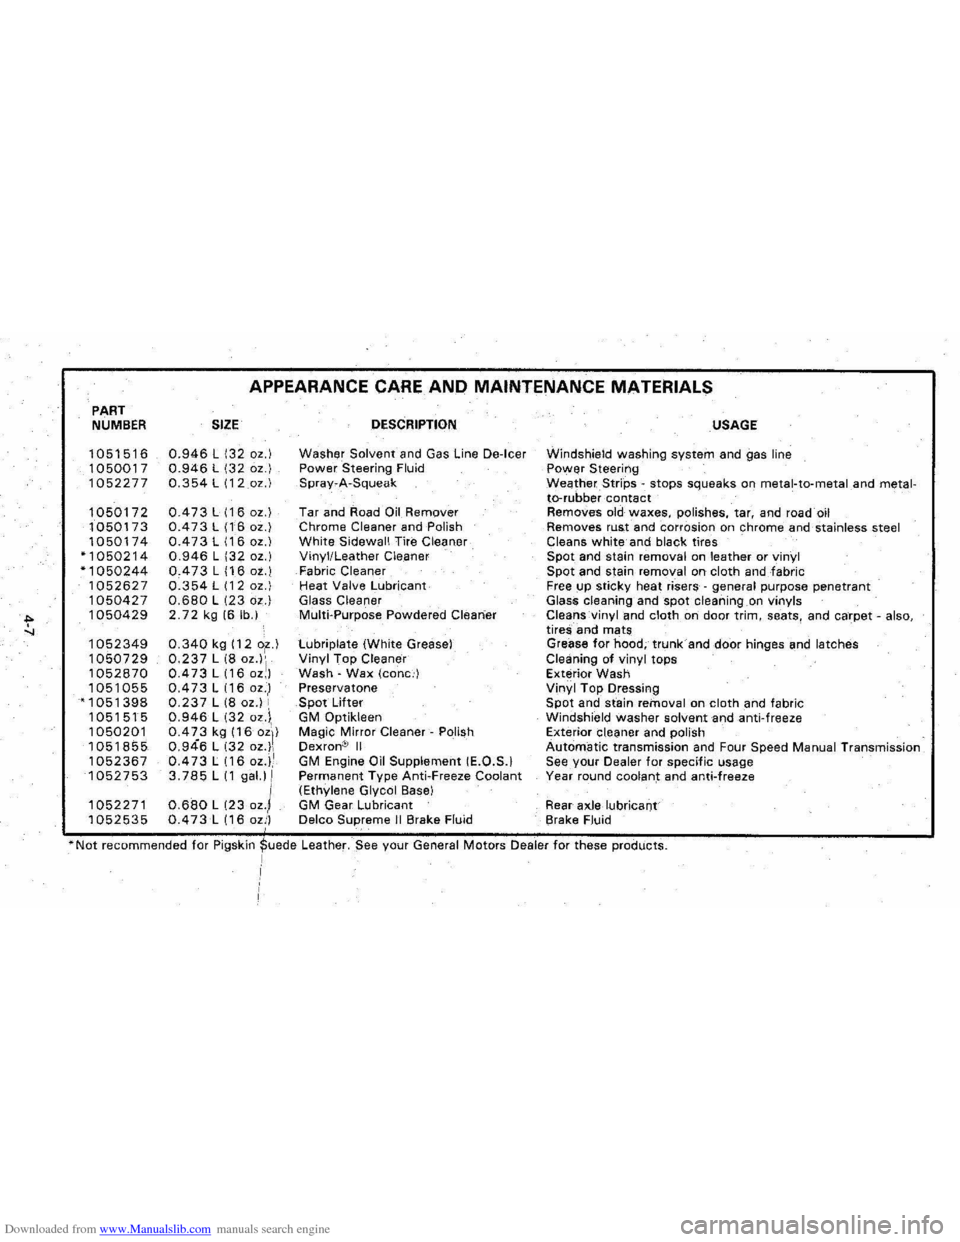
APPEARANCE CARE AND MAINTENANCE MATERIALS
SIZE
0.946 L 132 oz.) 0.946 L 132 oz.) 0.354 L (12oz.)
0.473 L 116 oz.) 0.473 L (16 oz.) 0.473 L 116 oz.) 0.946 L 132 oz.) 0.473 L 116 ot.) 0.354 L 112 oz.) 0.680 L 123 oz.) 2.72 kg 16 lb.)
0.340 kg 112 o~.) 0.237 L 18 oZ')'1 0.473 L 116 oz,) 0.473 L 116 oz.,1 0.237 L 18 oz.) , 0.946 L 132 oz.i, 0.4Z3 kg 116 oZI) 0.946 L 132 oz.), 0.473 L (16 OZ.),.I 3.785 L 11 gal.) 1
0.680 L (23 oz.l 0.473 L 116 ozi)
DESCRIPTION
Washer Solvent and Gas Line De-Icer Power Steering Fluid Spray~A-Squeak
Tar and Road on Remover Chrome Cleaner and Polish White Sidewall Tire Cleaner Vinyl/Leather Cleaner Fabric Cleaner Heat Valve Lubricant Glass Cleaner Multi-Purpose Powdered Cleaner
tubriplate (White Grease) Vinyl Top Cleaner Wash -Wax (cone.') Preservatone Spot Lifter GM Optikleen Magic Mirror Cleaner-Polish Dexron® II GM Engine Oil Supplement IE.O.S.1 Permanent Type Anti.Freeze Coolant (Ethylene Glycol Base) GM Gear Lubricant Delco Supreme II Brake Fluid
USAGE
Windshield washing system and gas line Power Steering WeatherStrips -stops squeaks on metal-to-metaland metalto-rubber contact Removes old waxes, polishes, tar, and road oil Removes rust and corrosion on chrome and stainless steel Cleans white and black tires Spot and stain removal on leather or vinyl Spot and stain removal on cloth andfabric Free up sticky heat risers -general purpose penetrant
Glass cleaning and spot cleaning on vinyls Cleans vinyl and cloth on door trim, seats, and carpet -also, tireS; and mats
Grease for hood; trunk and door hinges and latches
Cleaning of vinyl tops
Exterior Wash
Vinyl Top Dressing
Spot and stain removal on cloth and fabric
Windshield washer solvent and anti-freeze Exterior Cleaner and polish Automatic transmission and Four Speed Manual Transmission See your Dealer for specific usage
Year round coolant and anti-freeze
Rear
axle lubricant
Brake Fluid
*Not recommended for Pigskj~ede Leather. $ee your General Motors Dealer for these products. I
Page 79 of 105

Downloaded from www.Manualslib.com manuals search engine AUTOMATIC TRANSAXLE FLUID RECOMMENDATIONS
Use the Proper Fluid
Use only automatic transmission fluid labeled DEXRON'" II. You can buy this
fluid from your dealer or other service outlets.
Check the Fluid Level with Care
Check the automatic transaxle fluid level at each engine oil change. Driving
with too much or too
little fluid can damage the transaxle.
To check the fluid
level, first set the parking brake, then start the engine in
"P"(Park), and let idle for two minutes . You must check the fluid level with the
engine running at slow
idle and the vehicle level.
You cannot read the correct fluid level if you have just driven the vehicle for a
long time at high speed, in city traffic in hot weather, or if the vehicle has been
pulling a trailer. Wait
until the fluid has cooled down (about 30 minutes).
Remove the dipstick located
On the driver's side forward of the cowl. Carefully
touch the wet end of the dipstick to find out if the fluid is cool, warm or hot. Wipe it clean and push it back in until the cap seats. Pull out the dipstick and
read the fluid level.
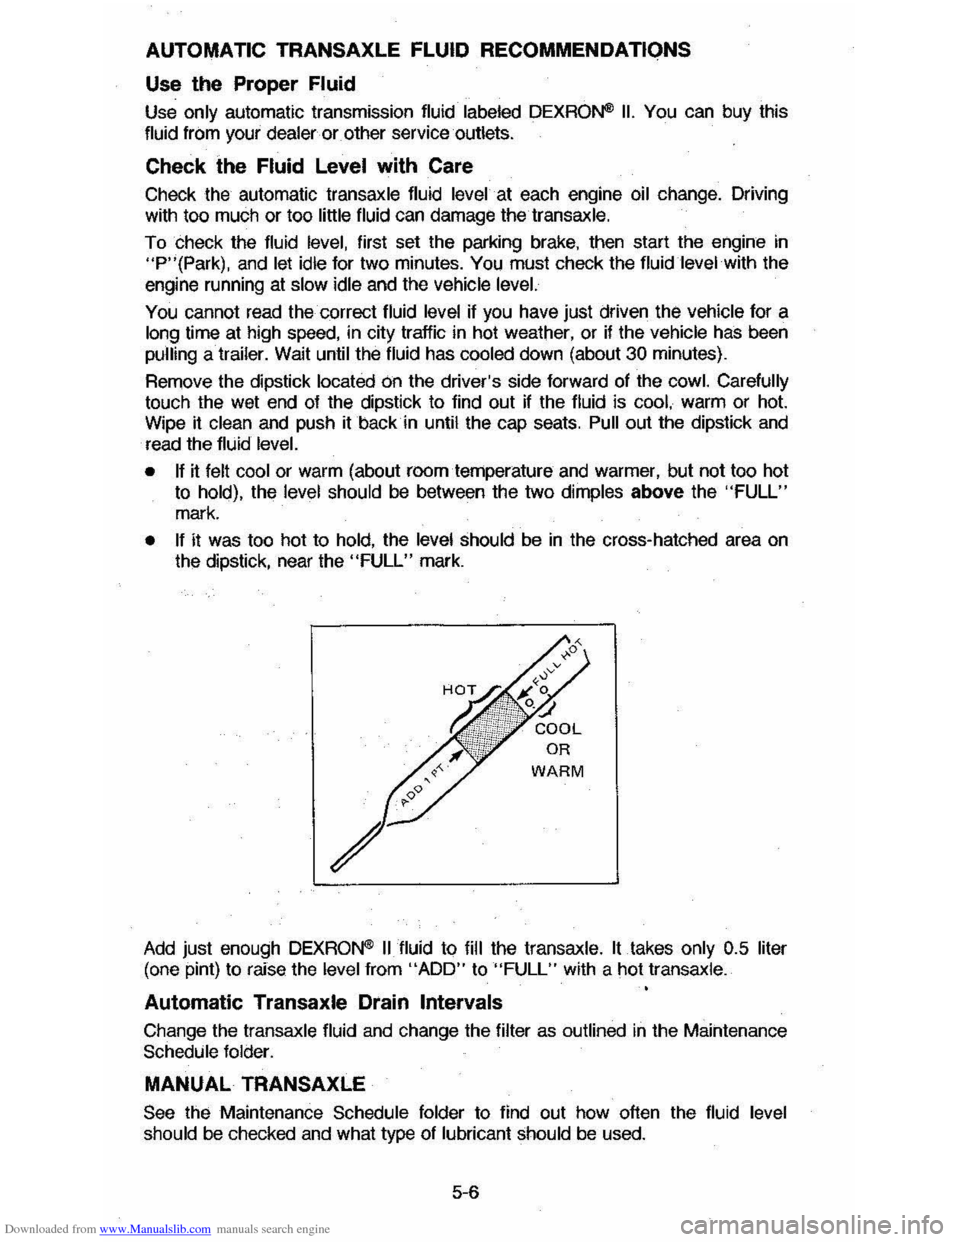
• If it felt cool or warm (about roomternperature and warmer, but not too hot
to hold), the level should be between the two dimples above the "FULL"
mark.
• If it was too hot to hold, the level should be in the cross-hatched area on the dipstick, near the "FULL" mark.
Add just enough DEXRON'" II fluid to fill the transaxle. It takes only 0.5 liter
(one pint) to raise the level from "ADD" to "FULL" with a hot transaxle.
Automatic Transaxle Drain Intervals
Change the transaxle fluid and change the filter as outlined in the Maintenance Schedule folder.
MANUAL TRANSAXLE
See the Maintenance Schedule folder to find out how often the fluid level should be checked and what type of lubricant should be used.
5-6