clock CHEVROLET CAVALIER 1994 1.G Owners Manual
[x] Cancel search | Manufacturer: CHEVROLET, Model Year: 1994, Model line: CAVALIER, Model: CHEVROLET CAVALIER 1994 1.GPages: 243, PDF Size: 15.06 MB
Page 46 of 243
Downloaded from www.Manualslib.com manuals search engine Features & Controls
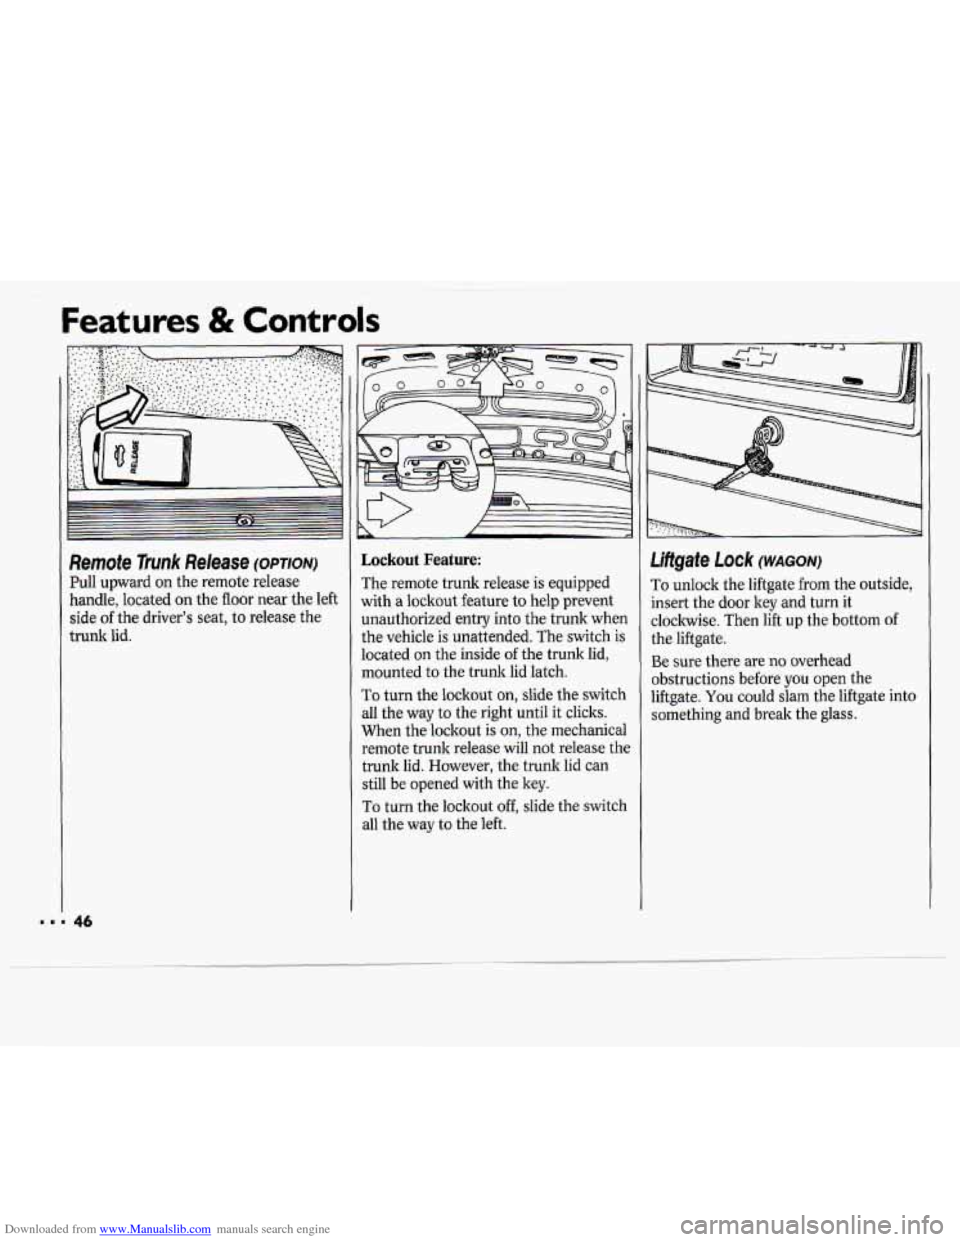
Remote Trunk Release (OPTION)
Pull upward on the remote release
handle, located on the floor near the left
side
of the driver’s seat, to release the
trunk lid.
Lockout Feature:
The remote trunk release is equipped
with
a lockout feature to help prevent
unauthorized entry into the trunk when
the vehicle is unattended. The switch
is
located on the inside of the trunk lid,
mounted to the trunk lid latch.
To turn the lockout on, slide the switch
all the way to the right until it clicks.
When the lockout is on, the mechanical
remote trunk release will not release the
trunk lid. However, the trunk lid can
still be opened with the key.
To turn the lockout off, slide the switch
all the way to the left.
Liftgate Lock (WAGON)
To unlock the liftgate from the outside,
insert the door
ley and turn it
clockwise. Then lift up the bottom of
the liftgate.
Be sure there are no overhead
obstructions before
you open the
liftgate.
You could slam the liftgate into
something and break the glass.
Page 92 of 243
Downloaded from www.Manualslib.com manuals search engine In this part you'll find out how to
operate the comfort control systems and audio systems
offered with your Chevrolet. Be
sure to read about the particular
system supplied with your vehicle.
Part 3
Comfort Controls & Audio Systems
Climate Control System ........................................................................\
.................... 92
Air Conditioning System ........................................................................\
.................. 93
Rear Window Defogger ........................................................................\
..................... 95
Setting the Clock ........................................................................\
............................... 97
AM/FM Stereo Radio ........................................................................\
........................ 97
AM/FM Stereo Radio with Cassette Tape Player .................................................... 99
AM/FM Stereo Radio with Compact Disc Player.. ................................................ 101
Understanding Radio Reception. ........................................................................\
.... 104
Care of Your Cassette Tape Player ........................................................................\
. 104
Care of Your Compact Discs ........................................................................\
.......... 105
Fixed Mast Antenna ........................................................................\
........................ 105
Page 98 of 243
Downloaded from www.Manualslib.com manuals search engine If- 71
c
VSEEKA 1234sET
I ILSCANA
I' I
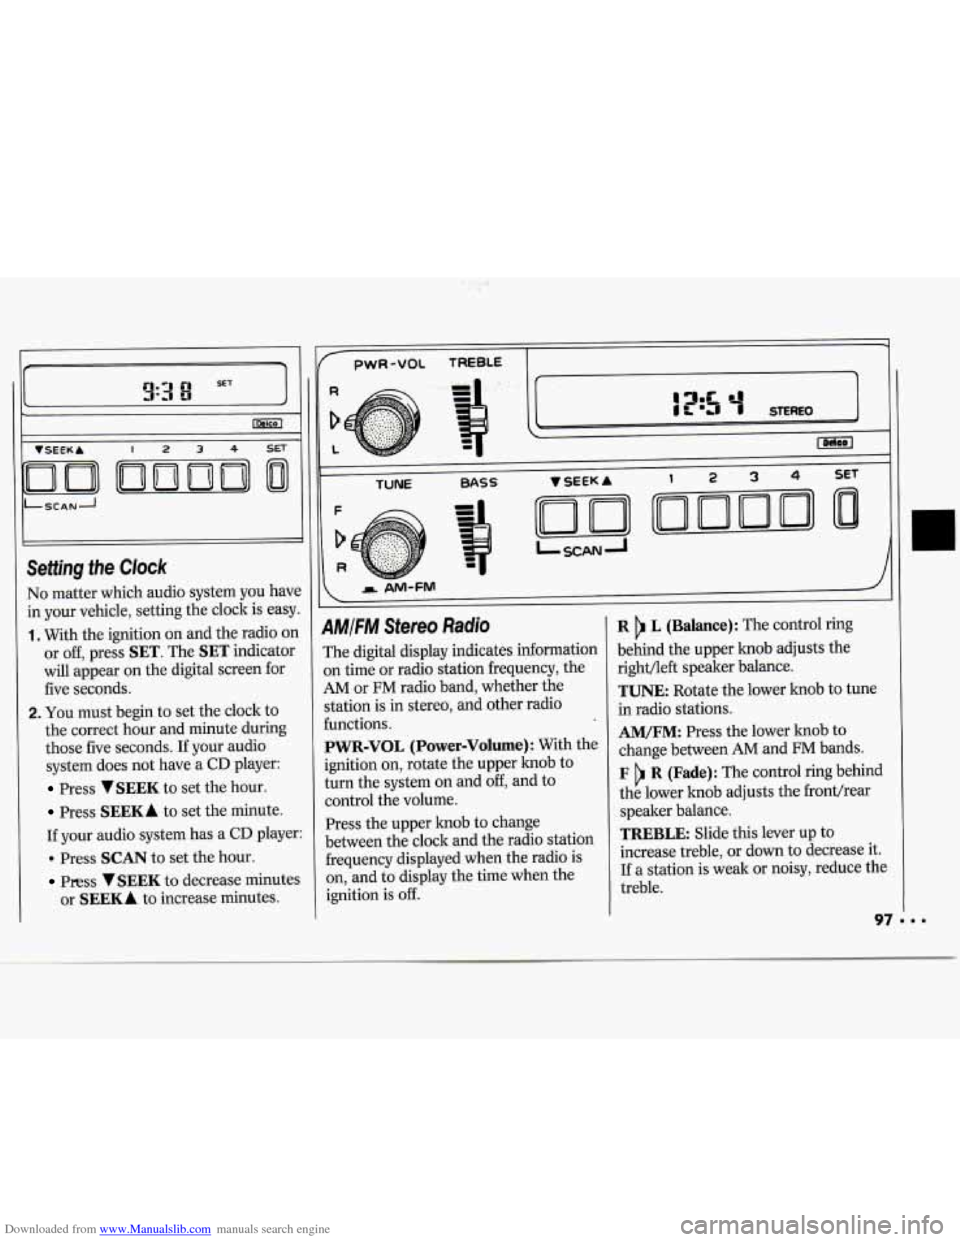
No matter which audio system you have
in your vehicle, setting the clock is easy.
1. With the ignition on and the radio on
or off, press
SET. The SET indicator
will appear on the digital screen for
five seconds.
2. You must begin to set the clock to
the correct hour and minute during
those five seconds. If your audio
system does not have a
CD player:
Press VSEEK to set the hour.
Press SEEKA to set the minute.
If your audio system has a
CD player:
. Press SCAN to set the hour.
Press VSEEK to decrease minutes
or
SEEKA to increase minutes.
1
pwR-VOL TREBLE -
TUNE BASS
AMIFM Stereo Radio
The digital display indicates information
on time
or radio station frequency, the
AM or FM radio band, whether the
station is in stereo, and other radio
functions.
PWR-VOL (Power-Volume): With the
ignition
on, rotate the upper knob to
turn the system
on and off, and to
control the volume.
Press the upper knob to change
between the clock and the radio station
frequency displayed when the radio is
on, and to display the time when the
ignition is
off.
R L (Balance): The control ring
behind the upper knob adjusts the
right/left speaker balance.
TUNE: Rotate the lower knob to tune
in radio stations.
AM/FM: Press the lower knob to
change between
AM and FM bands.
F R (Fade): The control ring behind
the lower knob adjusts the fronthear
speaker balance.
TREBLE: Slide this lever up to
increase treble, or
down to decrease it.
If a station is weak or noisy, reduce the
treble.
Page 100 of 243
Downloaded from www.Manualslib.com manuals search engine -
PWR-VOL TREBLE
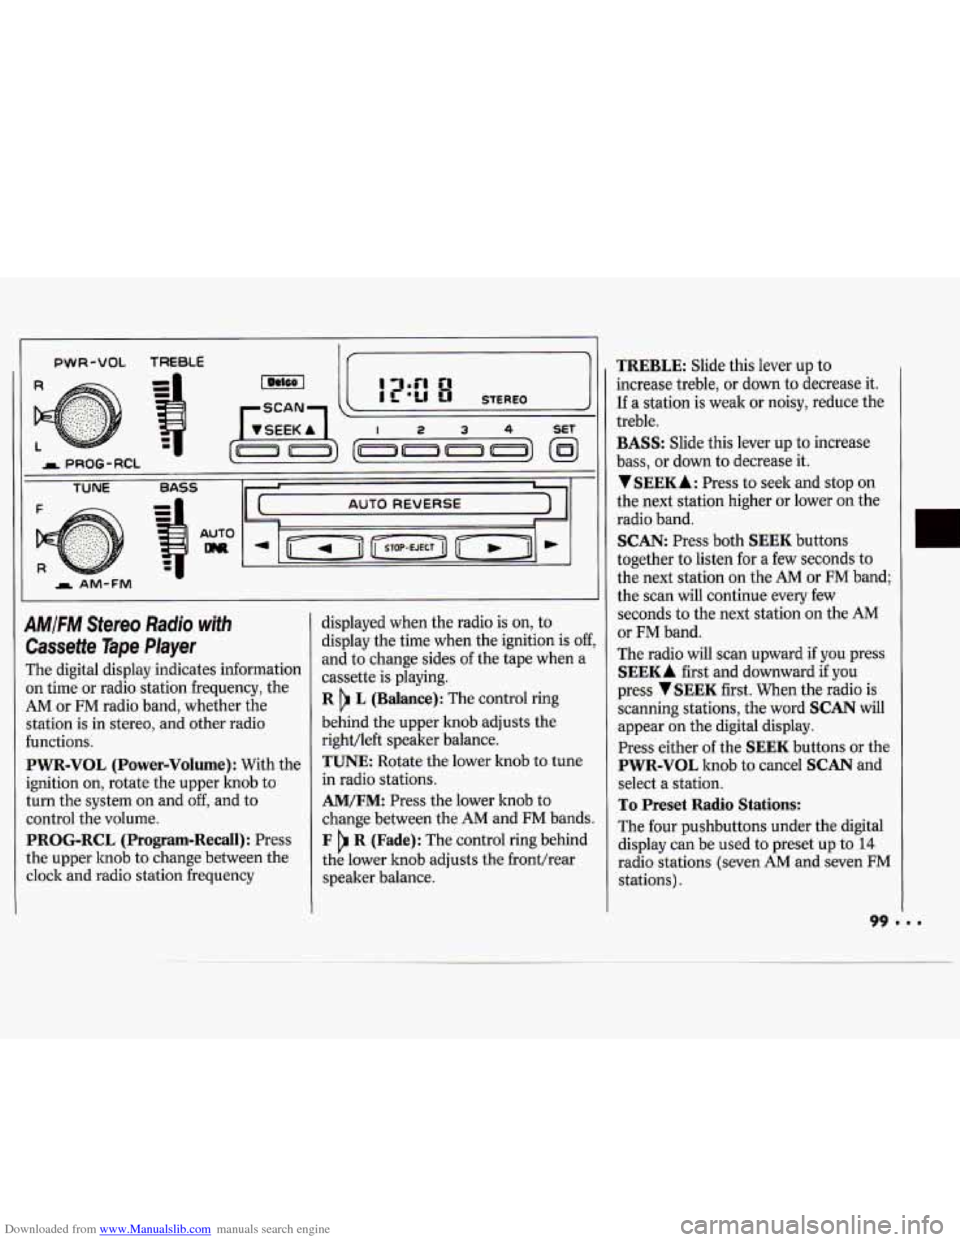
AM/FM Stereo Radio with
Cassette Tape Player
The digital display indicates information
on time or radio station frequency, the
AM or FM radio band, whether the
station is in stereo, and other radio
functions.
PWR-VOL (Power-Volume) : With the
ignition on, rotate the upper lmob to
turn the system on and
off, and to
control the volume.
PROG-RCL (Program-Recall): Press
the upper knob to change between the
clock and radio station frequency displayed
when the radio is
on, to
display the time when the ignition is
off,
and to change sides of the tape when a
cassette is playing.
R L (Balance): The control ring
behind the upper knob adjusts the
right/left speaker balance.
TUNE Rotate the lower knob to tune
in radio stations.
AM/FM: Press the lower knob to
change between the
AM and FM bands.
F R (Fade): The control ring behind
the lower knob adjusts the fronthear
speaker balance.
TREBLE: Slide this lever up to
increase treble, or down to decrease it.
If a station is weak or noisy, reduce the
treble.
BASS: Slide this lever up to increase
bass, or down
to decrease it.
VSEEKA: Press to seek and stop on
the next station higher or lower on the
radio band.
SCAN: Press both SEEK buttons
together to listen for a few seconds to
the next station on the
AM or FM band;
the scan will continue every few
seconds to the next station on the AM
or FM band.
The radio will scan upward if you press
SEEKA first and downward if you
press
VSEEK first. When the radio is
scanning stations, the word
SCAN will
appear on the digital display.
Press either
of the SEEK buttons or the
PWR-VOL knob to cancel SCAN and
select a station.
To Preset Radio Stations:
The four pushbuttons under the digital
display can be used to preset up to
14
radio stations (seven AM and seven FM
stations).
Page 103 of 243
Downloaded from www.Manualslib.com manuals search engine Comfort Concr 5 & Audio Systems
102
4. Repeat steps 1-3 for each of five AM
Compact Disc Player
Many of the controls for the radio also
have functions for the compact disc
player,
as explained here.
Don’t use mini-discs that are called
singles. They won’t eject. Use only full-
size compact discs.
1. Turn the PWR-VOL knob to turn on
the power.
2. Insert a disc part-way into the slot,
with the label side up. The player will
pull
it in. Within a few seconds, the
disc should play.
If the disc comes back out and/or
Err
appears on the display:
The disc may be upside down.
The disc may be dirty, scratched or
wet.
There may be too much moisture in
the air (wait about one hour and try
again).
The player may be too hot, or the road
may be too rough for the disc to play.
As soon as things get back to normal,
the disc should play.
and
five
FM stations.
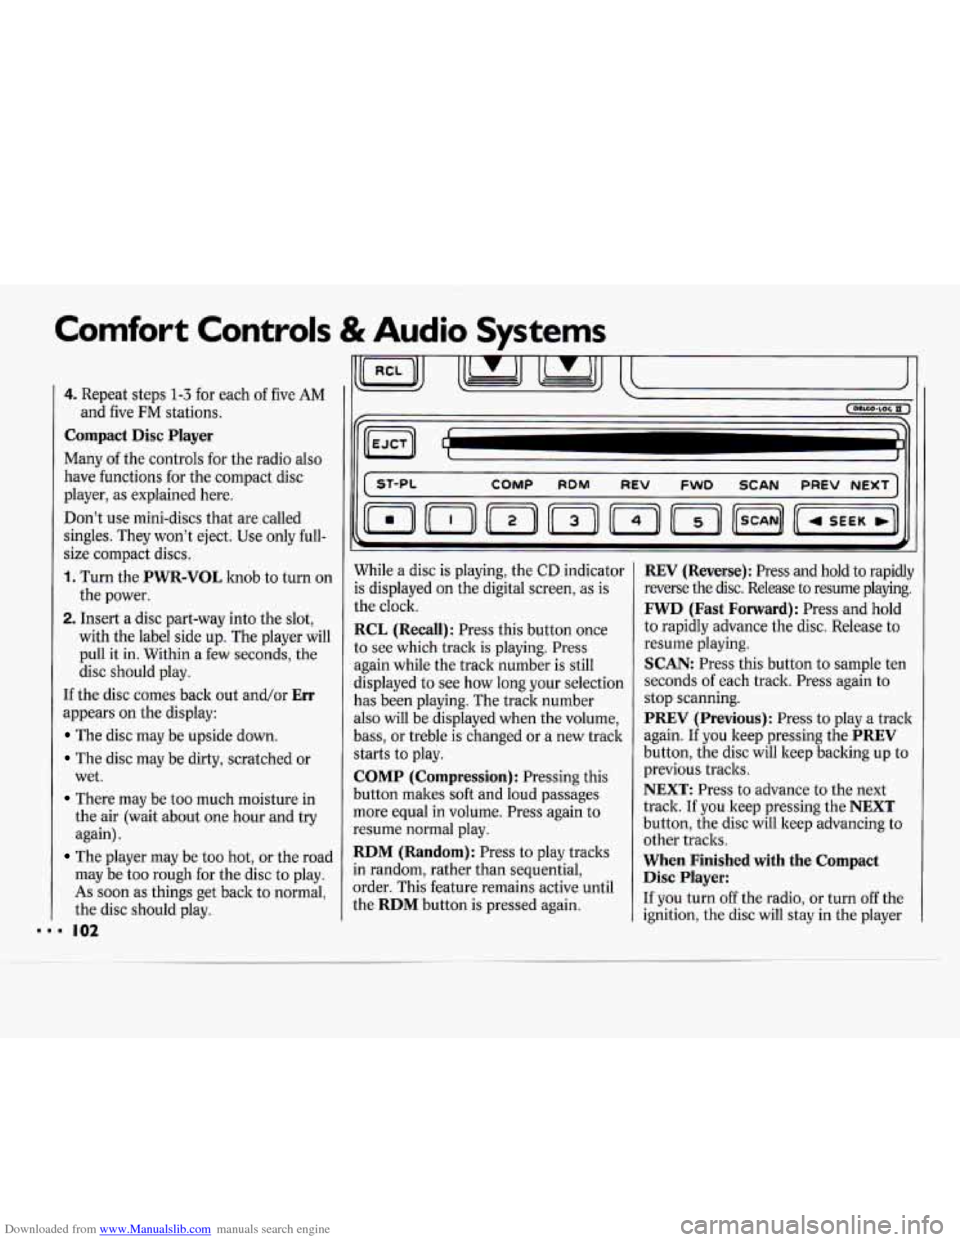
While a disc is playing, the
CD indicator
is displayed on the digital screen, as is
the clock.
RCL (Recall): Press this button once
to see which track is playing. Press
again while the track number is still
displayed to see how long your selection
has been playing. The track number
also will be displayed when the volume,
bass, or treble is changed or a new track
starts to play.
COMP (Compression): Pressing this
button makes soft and loud passages
more equal in volume. Press again to
resume normal play.
RDM (Random): Press to play tracks
in random, rather than sequential,
order. This feature remains active until
the
RDM button is pressed again.
REV (Reverse): Press and hold to rapidly
reverse the disc. Release to resume playing.
FWD (Fast Forward): Press and hold
to rapidly advance the disc. Release to
resume playing.
SCAN: Press this button to sample ten
seconds of each track. Press again to
stop scanning.
PREV (Previous): Press to play a track
again.
If you keep pressing the PREV
button, the disc will keep backing up to
previous tracks.
NEXT: Press to advance to the next
track. If you keep pressing the
NEXT
button, the disc will keep advancing to
other tracks.
When Finished with the Compact
Disc Player:
If you turn off the radio, or turn off the
ignition, the disc will stay in the player
Page 115 of 243
Downloaded from www.Manualslib.com manuals search engine Your Driving and the Road
P
..
Steering in Emergencies
There are times when steering can De
more effective than braking. For
example, you come over a hill and find
a truck stopped in your lane, or a car
suddenly pulls out from nowhere, or a
child darts out from between parked
cars and stops right in front
of you. You
can avoid these problems by braking -
if you can stop in time. But sometimes
you can't; there isn't room. That's the
time for evasive action
- steering
around the problem.
Your Chevrolet
can perform very well in
emergencies like these. First apply your
brakes. It
is better to remove as much
speed as you can from a possible collision.
Then steer around the
problem, to the left or right depending
on the space available.
An emergency like this requires close
attention and a quick decision.
If you
are holding the steering wheel
at the
recommended
9 and 3 o'clock positions,
you can turn it a full
180 degrees very
quickly without removing either hand.
But you have to act fast, steer quickly,
and just as quickly straighten the wheel
once you have avoided the object.
The fact that such emergency situations
are always possible is a good reason to
practice defensive driving at all times
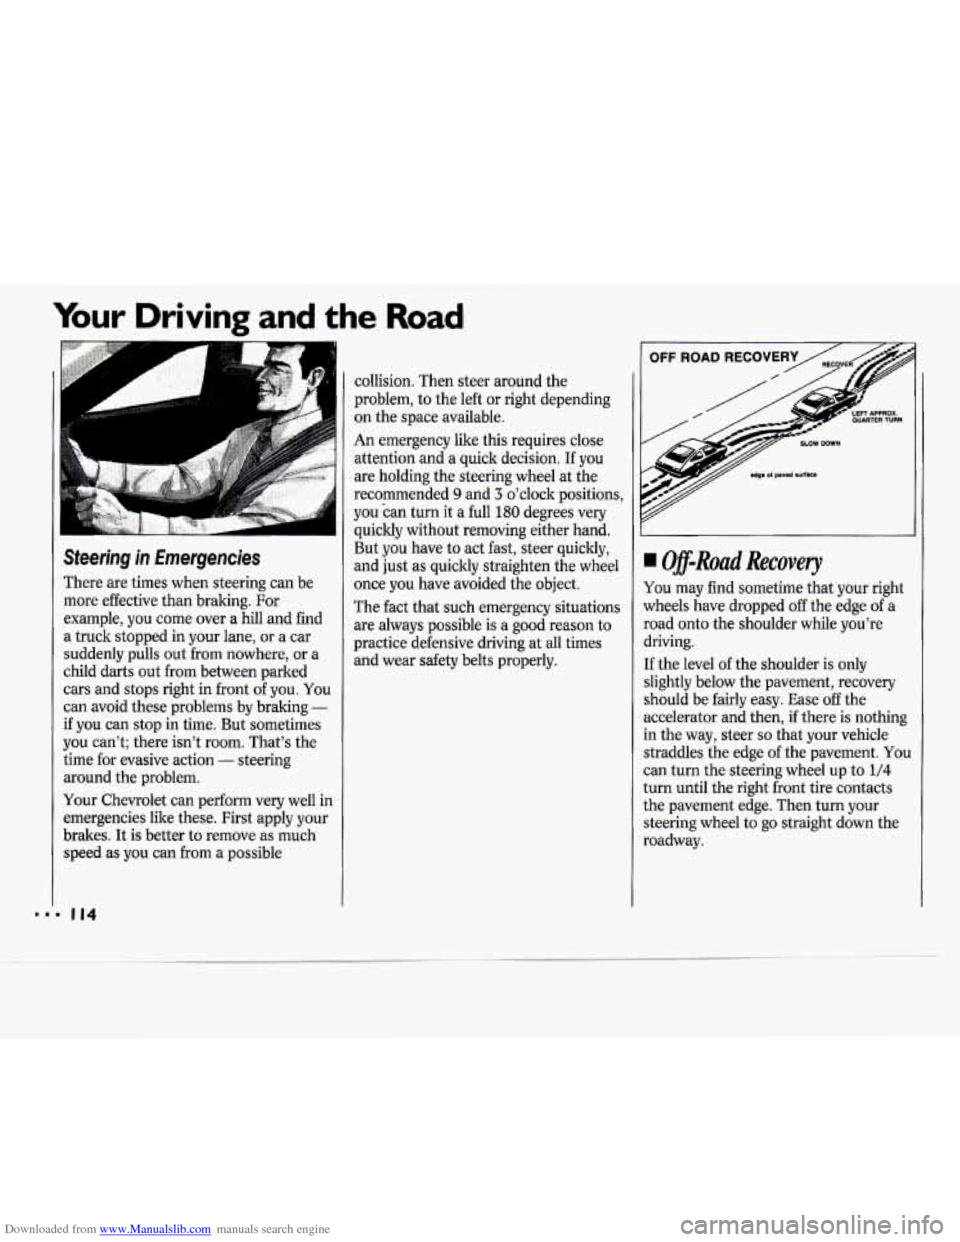
and wear safety belts properly. I Off-Ruad Recovery
You may find sometime that your right
lvheels have dropped
off the edge of a
soad onto the shoulder while you're
hiving.
:f the level of the shoulder is only
;lightly below the pavement, recovery
;hould be fairly easy. Ease off the
iccelerator and then, if there is nothing
n the way, steer
so that your vehicle
itraddles the edge of the pavement. You
:an turn the steering wheel up to
1/4
urn until the right front tire contacts
he pavement edge. Then turn your
;teering wheel
to go straight down the
toadway.
Page 148 of 243
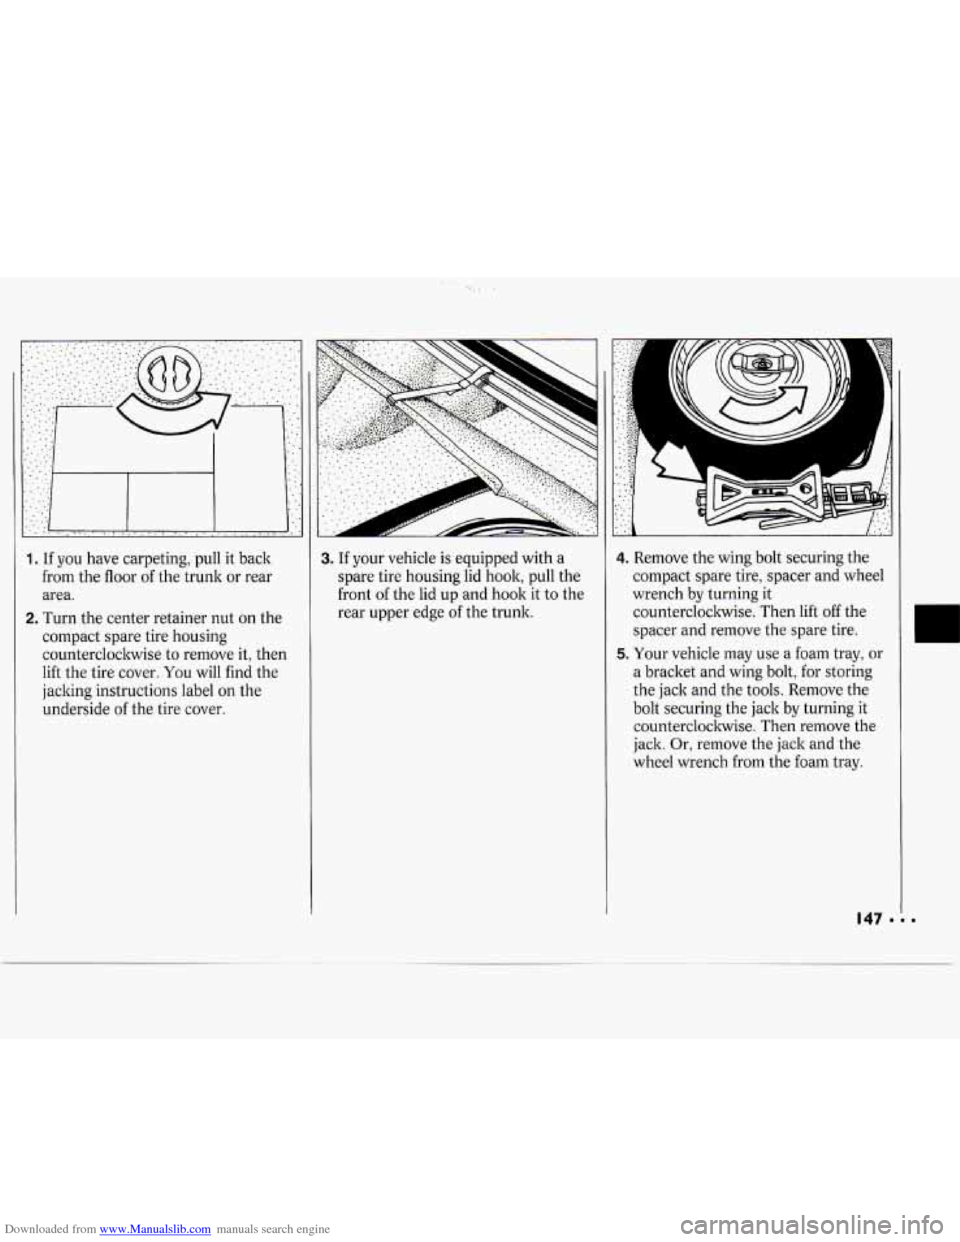
Downloaded from www.Manualslib.com manuals search engine 1. If you have carpeting, pull it back
from the floor of the trunk or rear
area.
2. Turn the center retainer nut on the
compact spare tire housing counterclockwise to remove it, then
lift the tire cover.
You will find the
jacking instructions label
on the
underside
of the tire cover.
..
3. If your vehicle is equipped with a
spare tire housing lid hook, pull the
front
of the lid up and hook it to the
rear upper edge
of the trunk.
4. Remove the wing bolt securing the
compact spare tire, spacer and wheel
wrench by turning it
counterclockwise. Then lift off the
spacer and remove the spare tire.
5. Your vehicle may use a foam tray, or
a bracket and wing bolt, for storing
the jack and the tools. Remove the
bolt securing the jack by turning it
counterclockwise. Then remove the
jack. Or, remove the jack and the
wheel wrench from the foam tray.
I
Page 151 of 243
Downloaded from www.Manualslib.com manuals search engine Problems on the Road
J
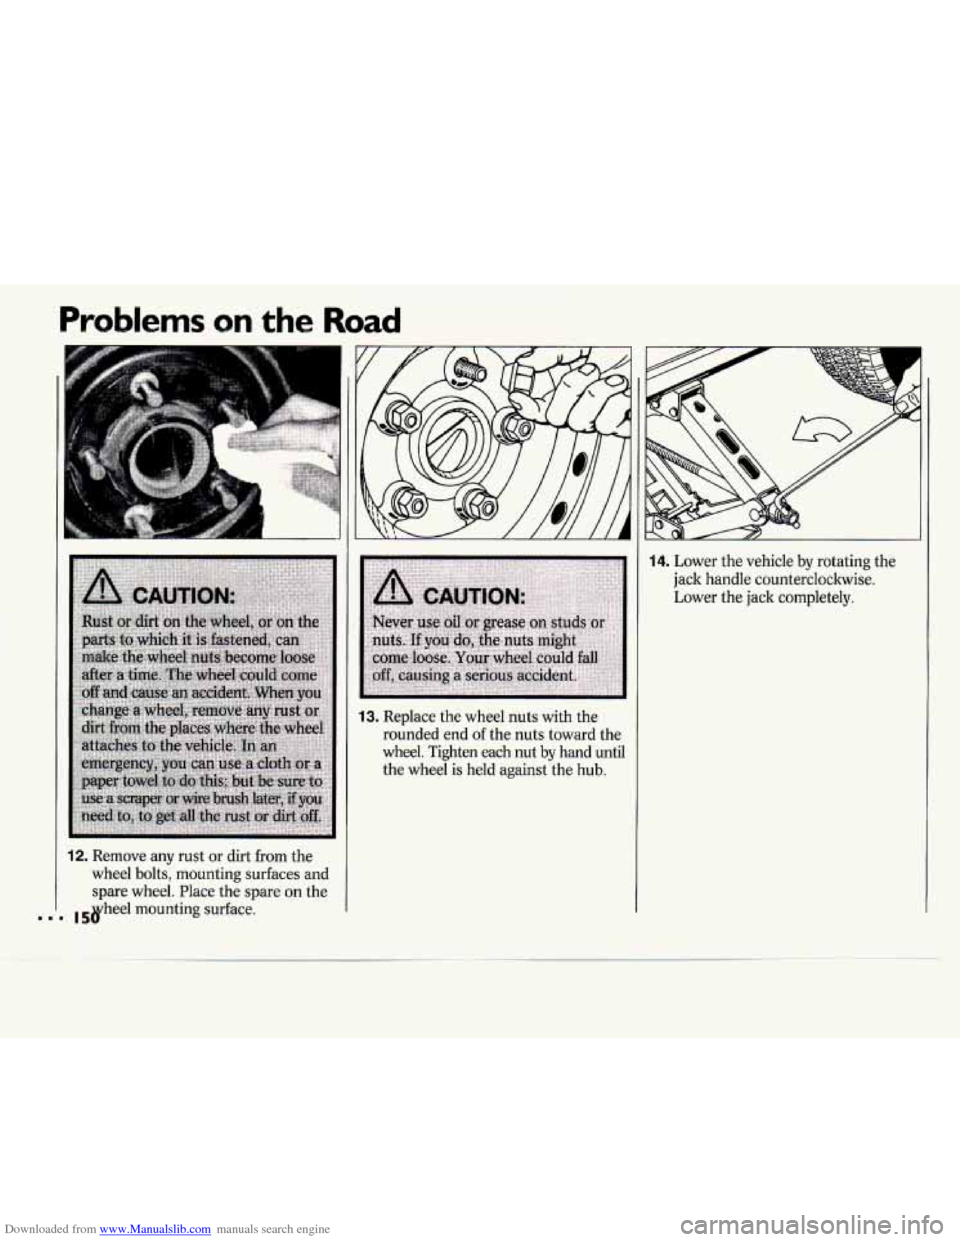
12. Remove any rust or dirt from the
wheel bolts, mounting surfaces and
spare wheel. Place the spare
on the
mounting surface.
F
13. Replace the wheel nuts with the
rounded end of the nuts toward the
wheel. Tighten each nut by hand until
the wheel
is held against the hub.
14. Lower the vehicle by rotating the
jack handle counterclockwise.
Lower the jack completely.
Page 157 of 243
Downloaded from www.Manualslib.com manuals search engine ..
Service & Appearance Care
Fuels in Foreign Countries
If you plan on driving in another
country outside the
U.S. or Canada,
unleaded fuel may be hard to find. Do
not use leaded gasoline.
If you use even
one tankful, your emission controls
won’t work well or at all. With
continuous use, spark plugs can get
fouled, the exhaust system can corrode,
and your engine oil can deteriorate
quickly. Your vehicle’s oxygen sensor
will be damaged. All
of that means
costly repairs that wouldn’t be covered
by your warranty.
To check on fuel availability, ask an
auto club, or contact a major oil
company that does business in the
country where you’ll be driving.
You can also write us at the following
address for advice. Just tell us where
you’re going and give your Vehicle Identification Number
(VIN).
General Motors Overseas Distribution
North American Export Sales (NAES)
1908 Colonel Sam Drive
Oshawa, Ontario
L1H 8P7
Corporation Filling Your Tank
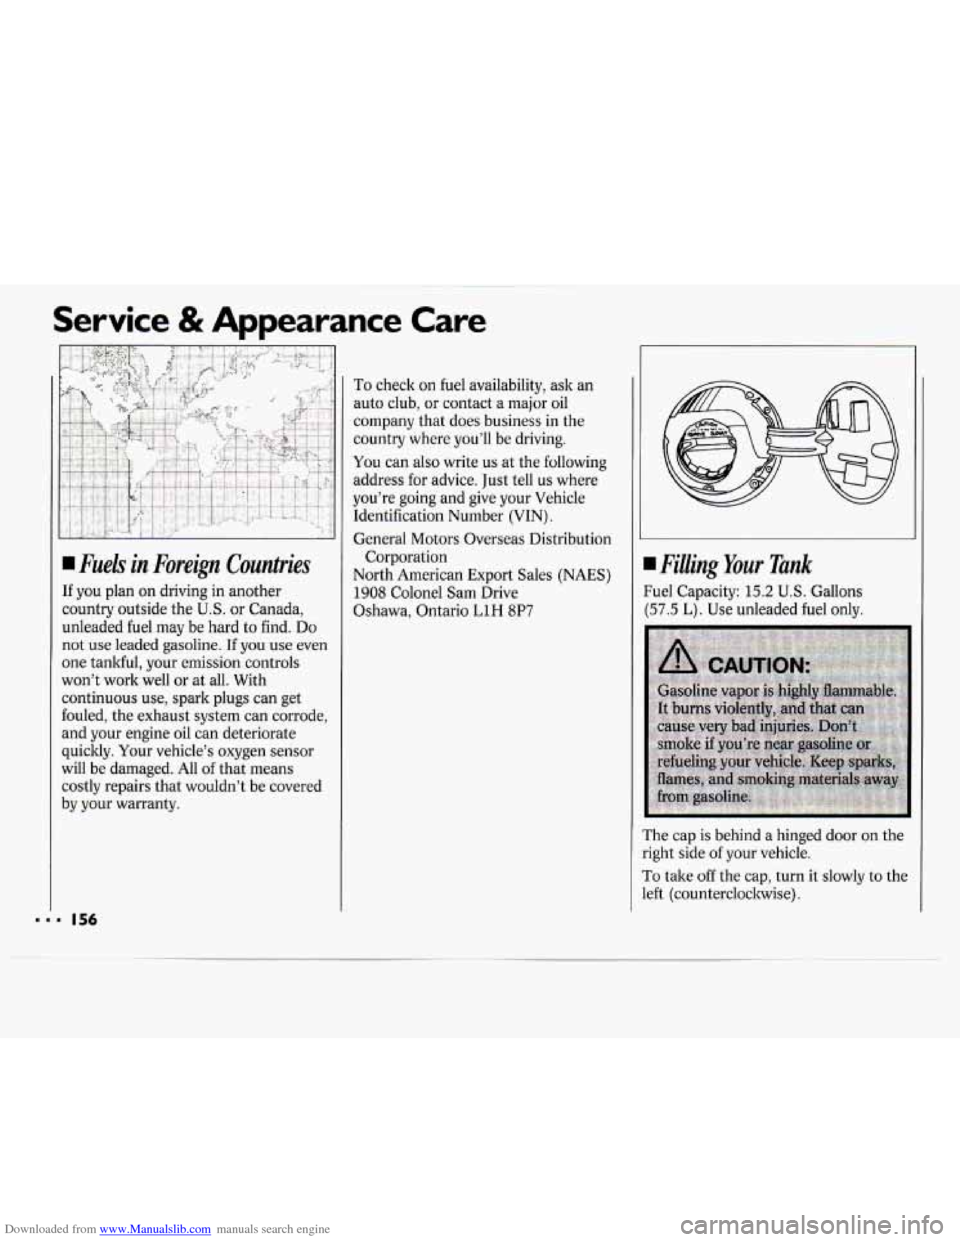
“el Capacity: 15.2 U.S. Gallons
77.5 L). Use unleaded fuel only.
The cap
is behind a hinged door on the
sight side
of your vehicle.
To take off the cap, turn it slowly to the
eft (counterclockwise).
Page 178 of 243
Downloaded from www.Manualslib.com manuals search engine Headlight Bulb Replacement
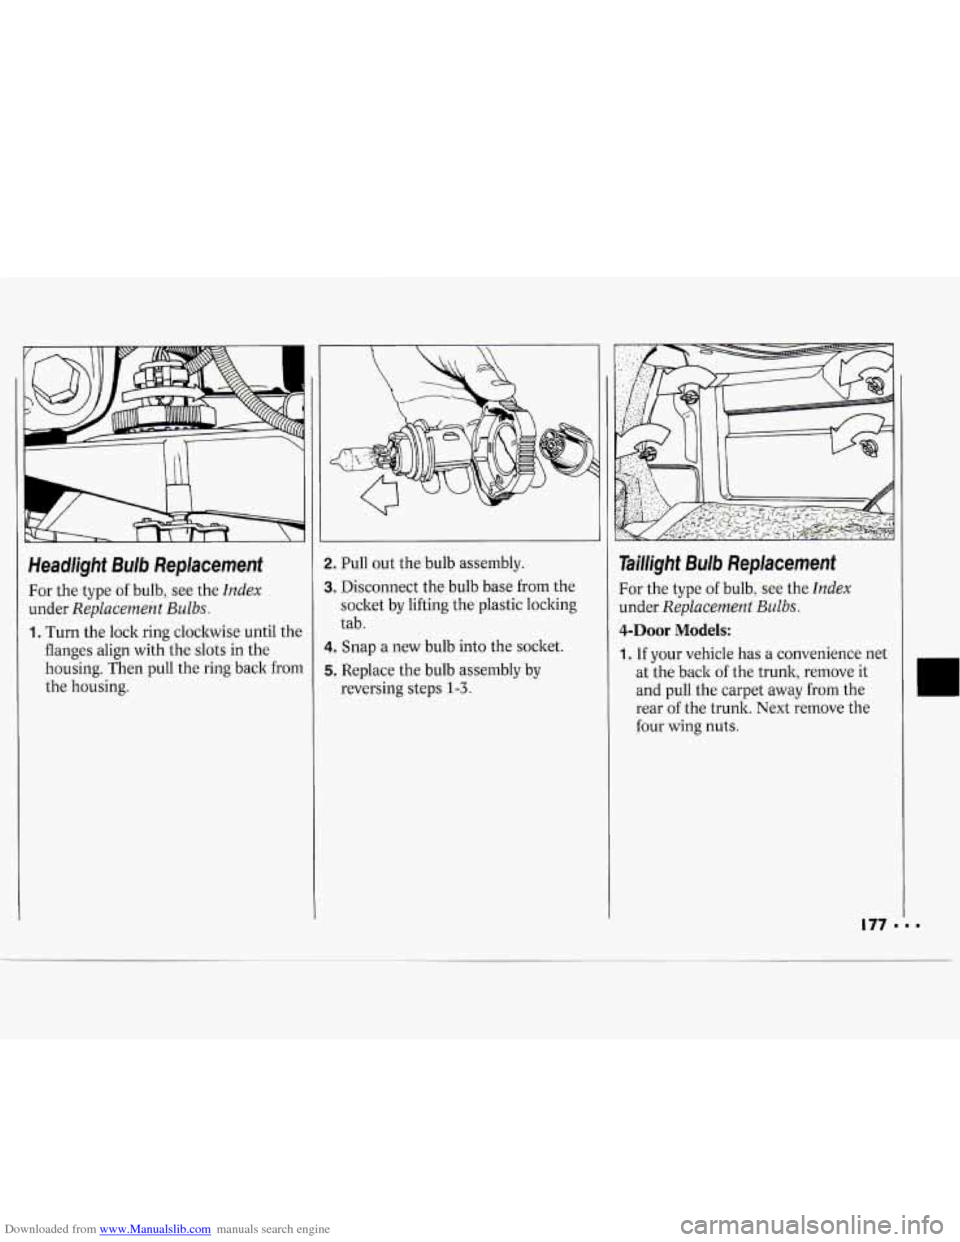
For the type of bulb, see the Index
under Replacement Bulbs.
1. Turn the lock ring clockwise until the
flanges align with the slots in the
housing. Then pull the ring back from
the housing.
2. Pull out the bulb assembly.
3. Disconnect the bulb base from the
socket by lifting the plastic locking
tab.
4. Snap a new bulb into the socltet.
5. Replace the bulb assembly by
reversing steps
1-3.
Taillight Bulb Replacement
For the type of bulb, see the Index
under Replacement Bulbs.
4-Door Models:
1, If your vehicle has a convenience net
at the back of the trunk, remove it
and pull the carpet away from the
rear of the trunk. Next remove the
four wing nuts.
177 1