oil dipstick CHEVROLET CAVALIER 1994 1.G Owners Manual
[x] Cancel search | Manufacturer: CHEVROLET, Model Year: 1994, Model line: CAVALIER, Model: CHEVROLET CAVALIER 1994 1.GPages: 243, PDF Size: 15.06 MB
Page 161 of 243
Downloaded from www.Manualslib.com manuals search engine Service & Appearance Care
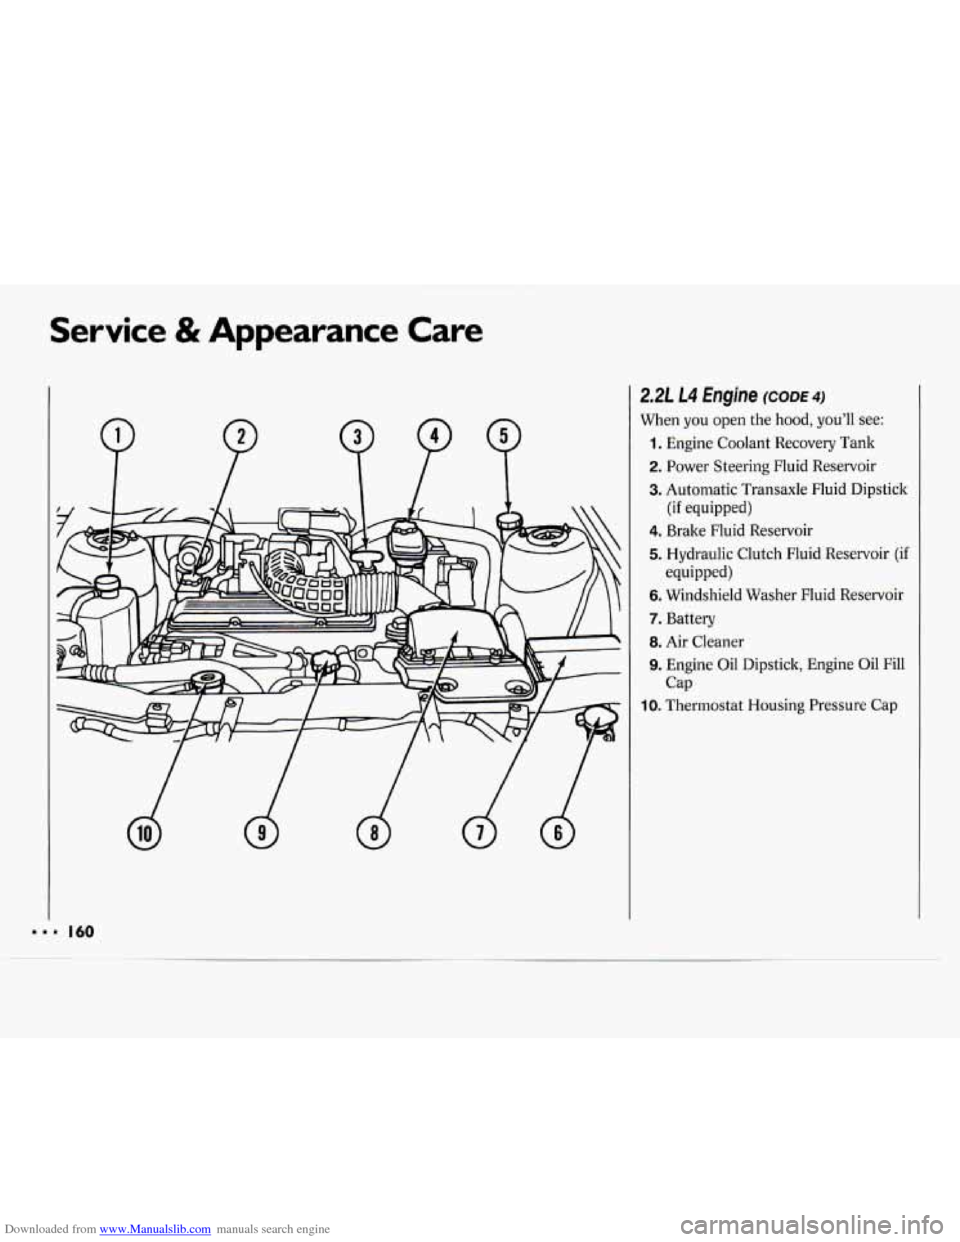
2.21 L4 Engine CODE^)
When you open the hood, you’ll see:
1. Engine Coolant Recovery Tank
2. Power Steering Fluid Reservoir
3. Automatic Transaxle Fluid Dipstick
4. Brake Fluid Reservoir
5. Hydraulic Clutch Fluid Reservoir (if
6. Windshield Washer Fluid Reservoir
7. Battery
8. Air Cleaner
9. Engine Oil Dipstick, Engine Oil Fill
(if equipped)
equipped)
Cap
IO. Thermostat Housing Pressure Cap
Page 162 of 243
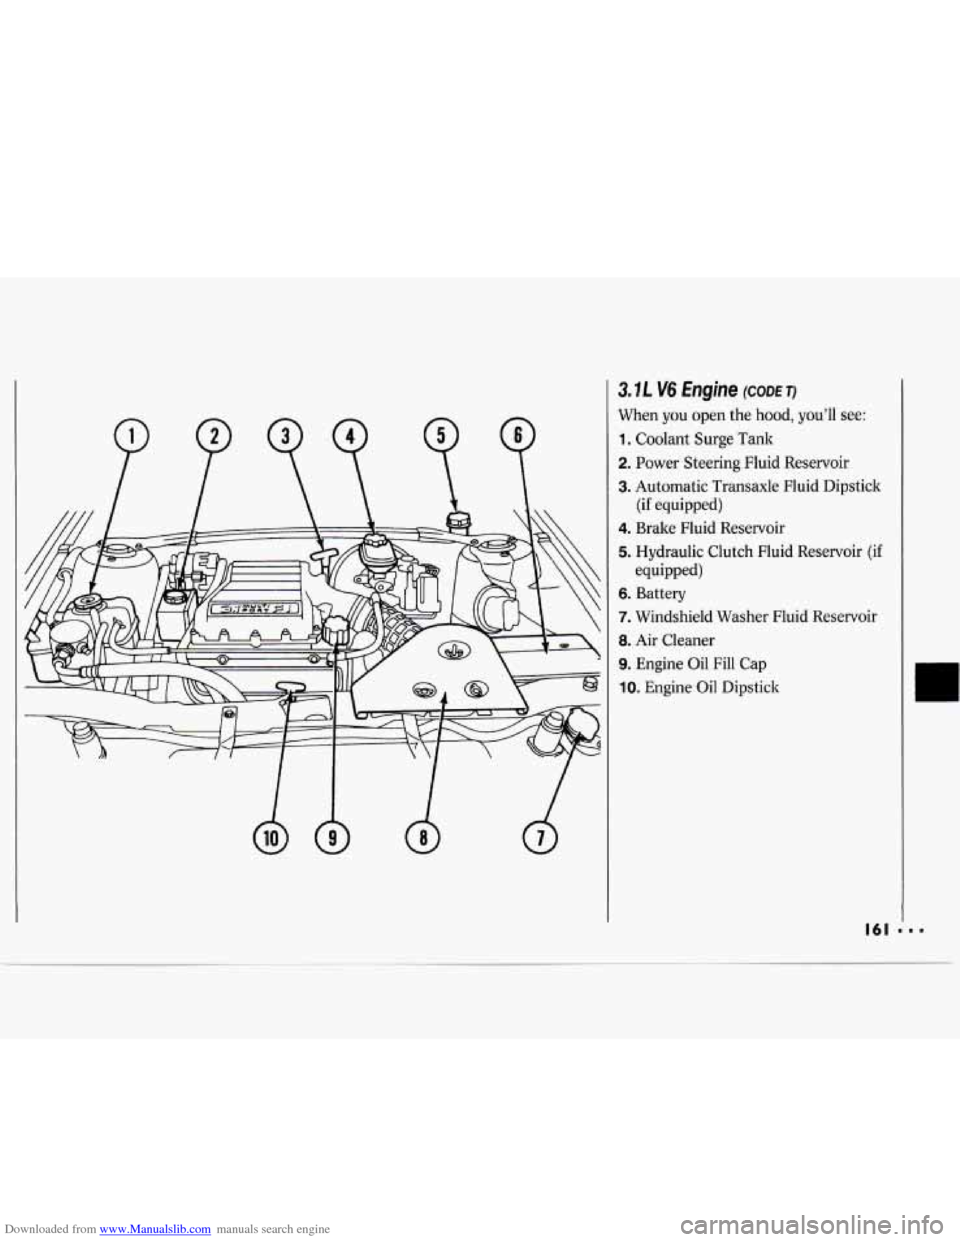
Downloaded from www.Manualslib.com manuals search engine 3.7L V6 Engine (CODE TI
When you open the hood, you’ll see:
1. Coolant Surge Tank
2. Power Steering Fluid Reservoir
3. Automatic Transaxle Fluid Dipstick
4. Brake Fluid Reservoir
5. Hydraulic Clutch Fluid Reservoir (if
6. Battery
7. Windshield Washer Fluid Reservoir
8. Air Cleaner
9. Engine Oil Fill Cap
IO. Engine Oil Dipstick
(if equipped)
equipped)
Page 163 of 243
Downloaded from www.Manualslib.com manuals search engine Service & Appearance Care
Engine Oil
If the oil warning light on the
instrument panel comes on, it means
you need to check your engine oil level
right away. For more information, see
Engine Oil Warning Light in the Index.
You should check your engine oil level
regularly; this is an added reminder.
It’s a good idea to check your engine oil
every time you get fuel. In order to get
an accurate reading, the oil must be
warm and the vehicle must be on level
ground.
Turn
off the engine and give the oil a
few minutes to drain back into the oil
pan. If you don’t, the oil dipstick might
not show the actual level.
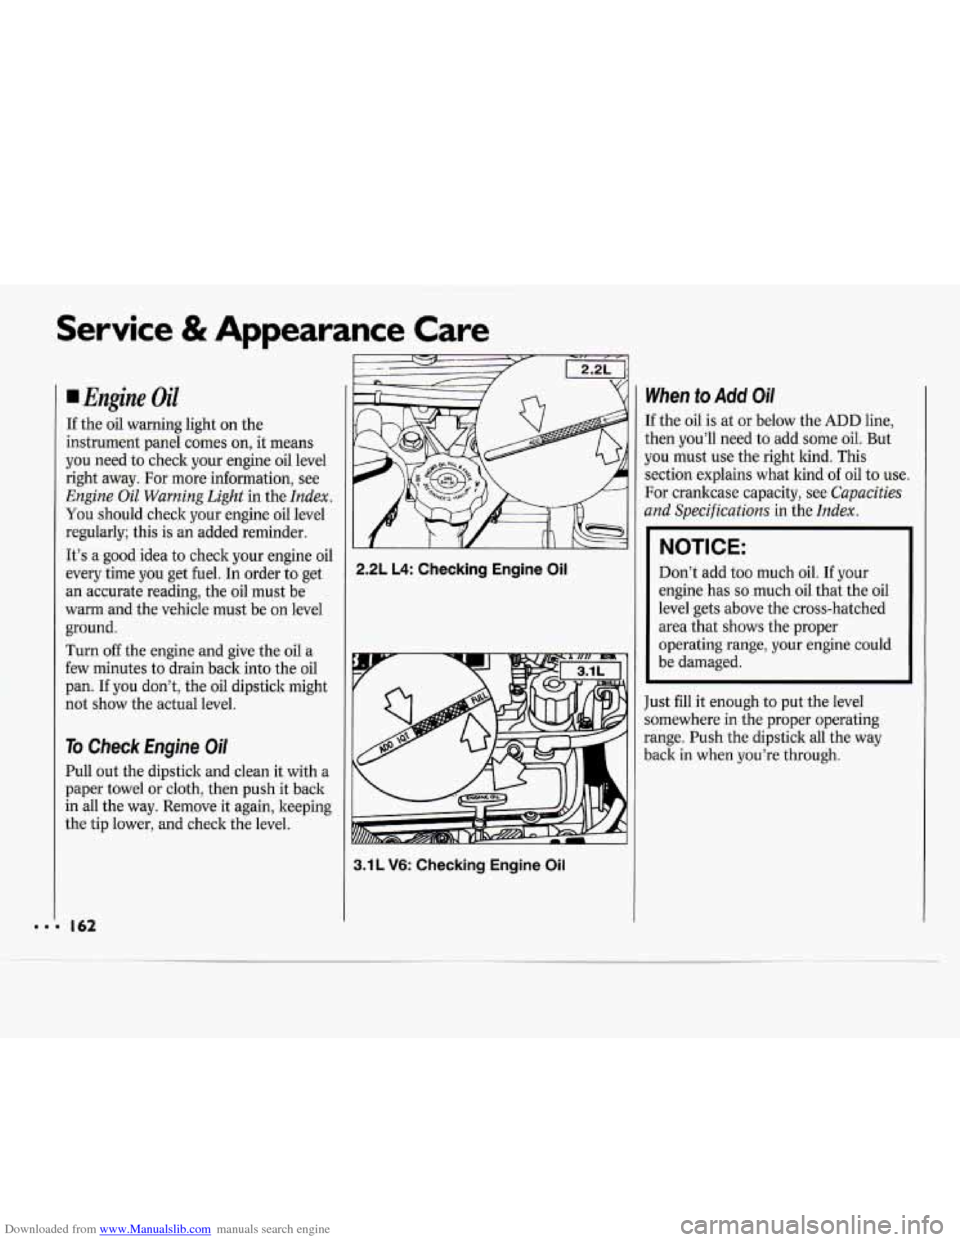
To Check Engine Oil
Pull out the dipstick and clean it with a
paper towel or cloth, then push it back
in all the way. Remove it again, keeping
the tip lower, and check the level.
2.2L L4: Checking Engine Oil
3.1 L V6: Checking Engine Oil
When to Add Oi/
If the oil is at or below the ADD line,
then you’ll need to add some oil. But
you must use the right kind. This
section explains what kind of oil to use.
For crankcase capacity, see
Capacities
and Specifications
in the Index.
NOTICE:
Don’t add too much oil. If your
engine has
so much oil that the oil
level gets above the cross-hatched
area that shows the proper
operating range, your engine could
be damaged.
Just
fill it enough to put the level
somewhere in the proper operating
range. Push the dipstick all the way
back in when you’re through.
Page 168 of 243
Downloaded from www.Manualslib.com manuals search engine I Automatic Transaxle Fluid
1 When to Check and Change
A good time to check your automatic
transaxle fluid level is when the engine
oil is changed. Refer to the Maintenance
Schedule to determine when to change
your fluid. See
Scheduled Maintenance
Services
in the Index.
How to Check
Because this operation can be a little
difficult, you may choose to have this
done at your Chevrolet dealership
Service Department.
If you do it yourself, be sure to follow
all the instructions here, or
you could
get a false reading on the dipstick.
NOTICE:
~. , ,'
Too much or too little fluid can
damage your transaxle.
Too much can
mean that some of the fluid could
come out and fall on hot engine parts
or exhaust system, starting a fire.
Be sure to get an accurate reading
if
you check your transaxle fluid.
Wait at least
30 minutes before
checking the transaxle fluid level
if you
have been driving:
When outside temperatures are above
At high speed for quite a while.
In heavy traffic - especially in hot
To get the right reading, the fluid
should be at normal operating
temperature, which is 180°F to 200°F
(82°C to 93°C).
Get the vehicle warmed up by driving
about 15 miles (24 lun) when outside
temperatures are above
50°F (10.C). If
it's colder than 50°F (lOOC), you may
have to drive longer.
90°F
(32°C).
weather.
To check the fluid level
Park your vehicle on a level place.
With the parking brake applied, place
With your foot on the brake pedal,
the
shift lever in
P (Park).
move the shift lever through each gear
range, pausing for about three
seconds in each range. Then, position
the shift lever in
P (Park).
Let the engine run at idle for three to
five minutes.
Then, without shutting off the engine,
follow these steps:
1. Pull out the dipstick and wipe it with
2. Push it back in all the way, wait three
a clean rag or
paper towel.
seconds and then pull it back out
again.
3. Check both sides of the dipstick, and
read the lower level. The fluid level
must be in the cross-hatched area.
4. If the fluid level is in the acceptable
range, push the dipstick back in all
the way.
Page 170 of 243
Downloaded from www.Manualslib.com manuals search engine Manual Transaxle Fluid
When to Check
A good time to have it checked is when
the engine oil is changed. However, the
fluid in your manual transaxle doesn't
require changing.
How to Check
Because this operation can be a little
difficult, you may choose to have this
done at a Chevrolet dealership Service
Department.
If you do it yourself, be sure to follow
all the instructions here, or you could
get a false reading on the dipstick.
NOTICE:
Too much or too little fluid can
damage your transaxle.
Too much
can mean that some of the fluid
could come out and fall on hot'
engine parts or exhaust system,
starting a fire. Be sure to get an
accurate reading if you check your
transaxle fluid. Check
the fluid level only when your
engine is off, the vehicle is parked on a
level place and the transaxle is cool
enough for you to rest your fingers on
the transaxle case.
Then, follow these steps:
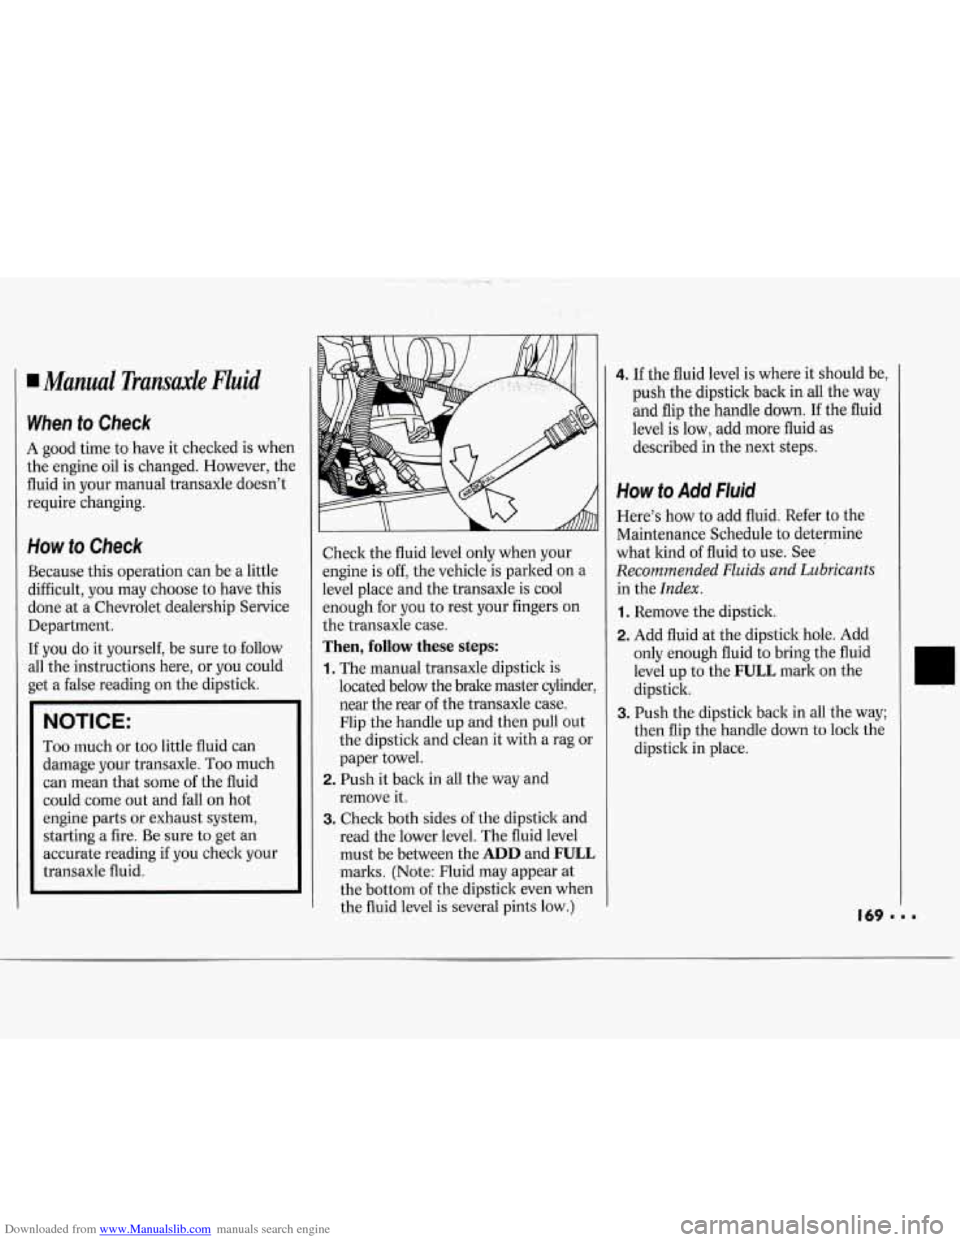
1. The manual transaxle dipstick is
located below the brake master cylinder
near the rear of the transaxle case.
Flip the handle up and then pull out
the dipstick and clean it with a rag or
paper towel.
2. Push it back in all the way and
remove it.
3. Check both sides of the dipstick and
read the lower level. The fluid level
must be between the
ADD and FULL
marks. (Note: Fluid may appear at
the bottom of the dipstick even when
the fluid level is several pints low.)
4. If the fluid level is where it should be,
push the dipstick back in all the way
and flip the handle down.
If the fluid
level is low, add more fluid as
described in the next steps.
How to Add Fluid
Here's how to add fluid. Refer to the
Maintenance Schedule to determine
what kind of fluid to use. See
Recommended Fluids and Lubricants
in the Index.
1. Remove the dipstick.
2. Add fluid at the dipstick hole. Add
only enough fluid to bring the fluid
level up to the
FULL mark on the
dipstick.
3. Push the dipstick back in all the way;
then flip the handle down
to lock the
dipstick in place.