lights CHEVROLET CAVALIER 1996 3.G Owners Manual
[x] Cancel search | Manufacturer: CHEVROLET, Model Year: 1996, Model line: CAVALIER, Model: CHEVROLET CAVALIER 1996 3.GPages: 372, PDF Size: 19.73 MB
Page 10 of 372
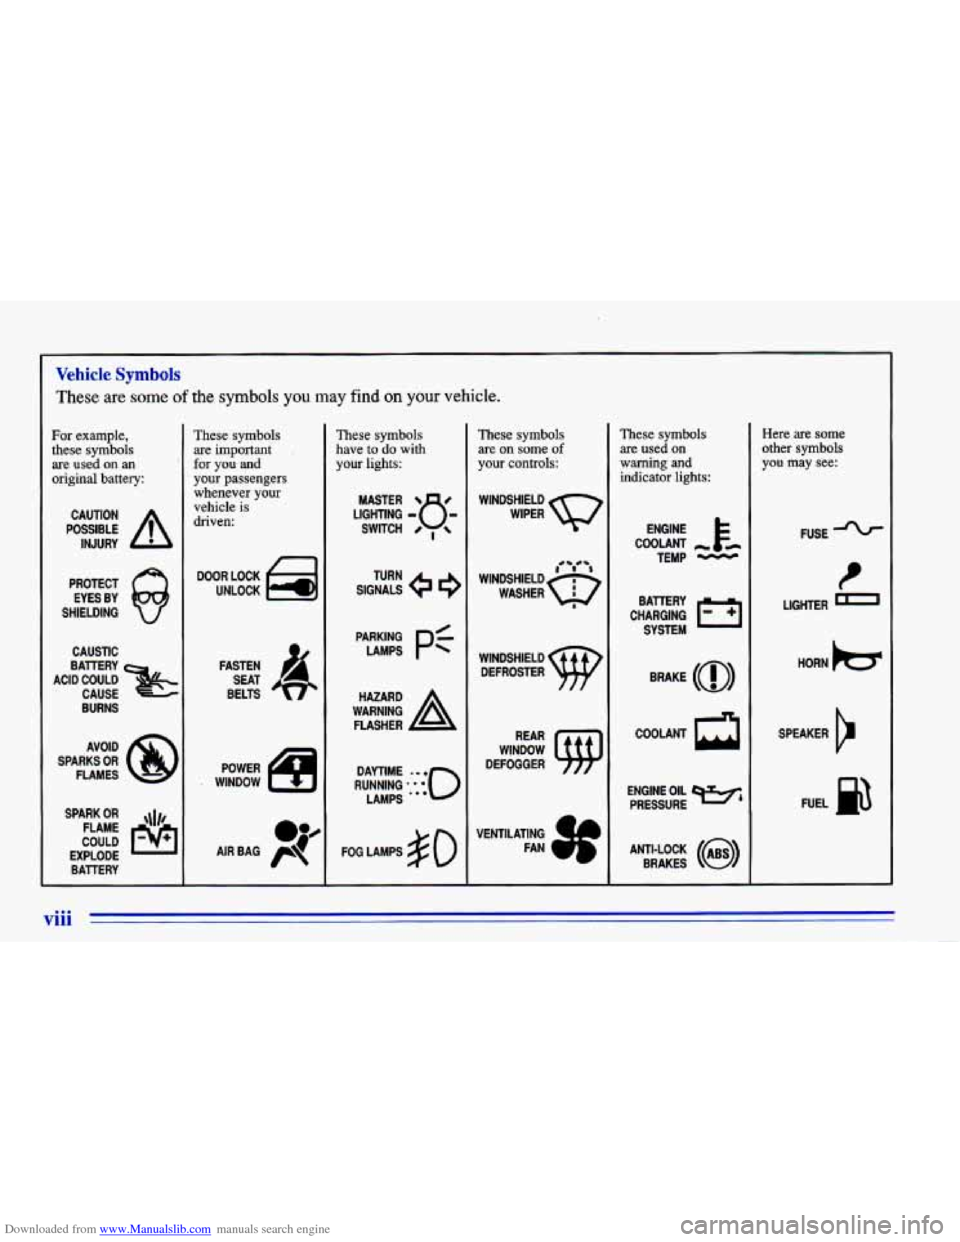
Downloaded from www.Manualslib.com manuals search engine Vehicle Symbols
These are some of the symbols you may find on your vehicle.
For example,
these symbols
are used
on an
original battery:
POSSIBLE A
CAUTION
INJURY
PROTECT EYES BY
SHIELDING
CAUSTIC
BURNS
SPARK
OR ,\I/,
COULD FLAME
EXPLODE BATTERY
These symbols
are important
for you
and
your passengers whenever your
vehicle
is
driven:
FASTEN
SEAT
BELTS
These symbols
have
to do with
your lights:
SIGNALS @
TURN
FOG LAMPS
$0
These symbols are on some
of
your controls:
WINDSHIELD
DEFROSTER
These symbols are used on
warning
and
indicator lights:
COOLANT -
TEMP -
CHARGING I-1
BAllERY
SYSTEM
BRAKE
(a)
COOLANT a
ENGINE OIL e,
PRESSURE
ANTI-LOCK
(@)
BRAKES
Here are some
other symbols
you may see:
FUSE
LIGHTER
m
HORN )a(
SPEAKER
b
FUEL B
viii
Page 68 of 372
Downloaded from www.Manualslib.com manuals search engine Ignition Switch
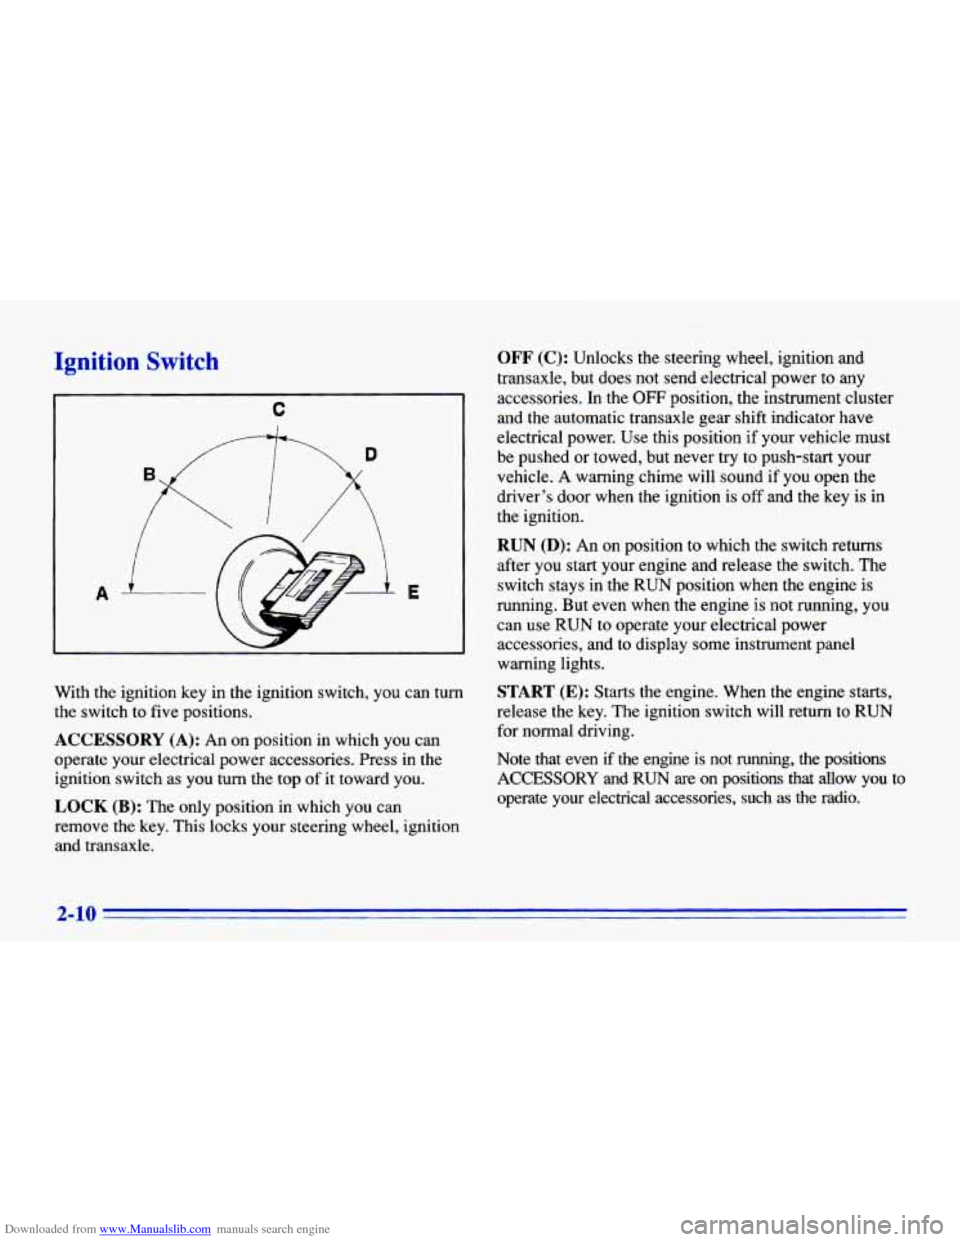
A E
With the ignition key in the ignition switch, you can turn
the switch to five positions.
ACCESSORY (A): An on position in which you can
operate your electrical power accessories. Press in the
ignition switch as you turn the top of it toward you.
LOCK (B): The only position in which you can
remove the key. This locks your steering wheel, ignition
and transaxle.
OFF (C): Unlocks the steering wheel, ignition and
transaxle, but does not send electrical power to any
accessories.
In the OFF position, the instrument cluster
and the automatic transaxle gear shift indicator have
electrical power. Use this position if your vehicle must
be pushed or towed, but never try to push-start your
vehicle.
A warning chime will sound if you open the
driver’s door when the ignition is
off and the key is in
the ignition.
RUN (D): An on position to which the switch returns
after you start your engine and release the switch. The
switch stays in the RUN position when the engine is
running. But even when the engine is not running, you can use RUN to operate your electrical power
accessories, and to display some instrument panel
warning lights.
START (E): Starts the engine. When the engine starts,
release the key. The ignition switch will return to RUN
for normal driving.
Note that even if the engine is not running, the positions
ACCESSORY and RUN are on positions that allow you to
operate your electrical accessories, such
as the radio.
2-10
Page 97 of 372
Downloaded from www.Manualslib.com manuals search engine Lamps
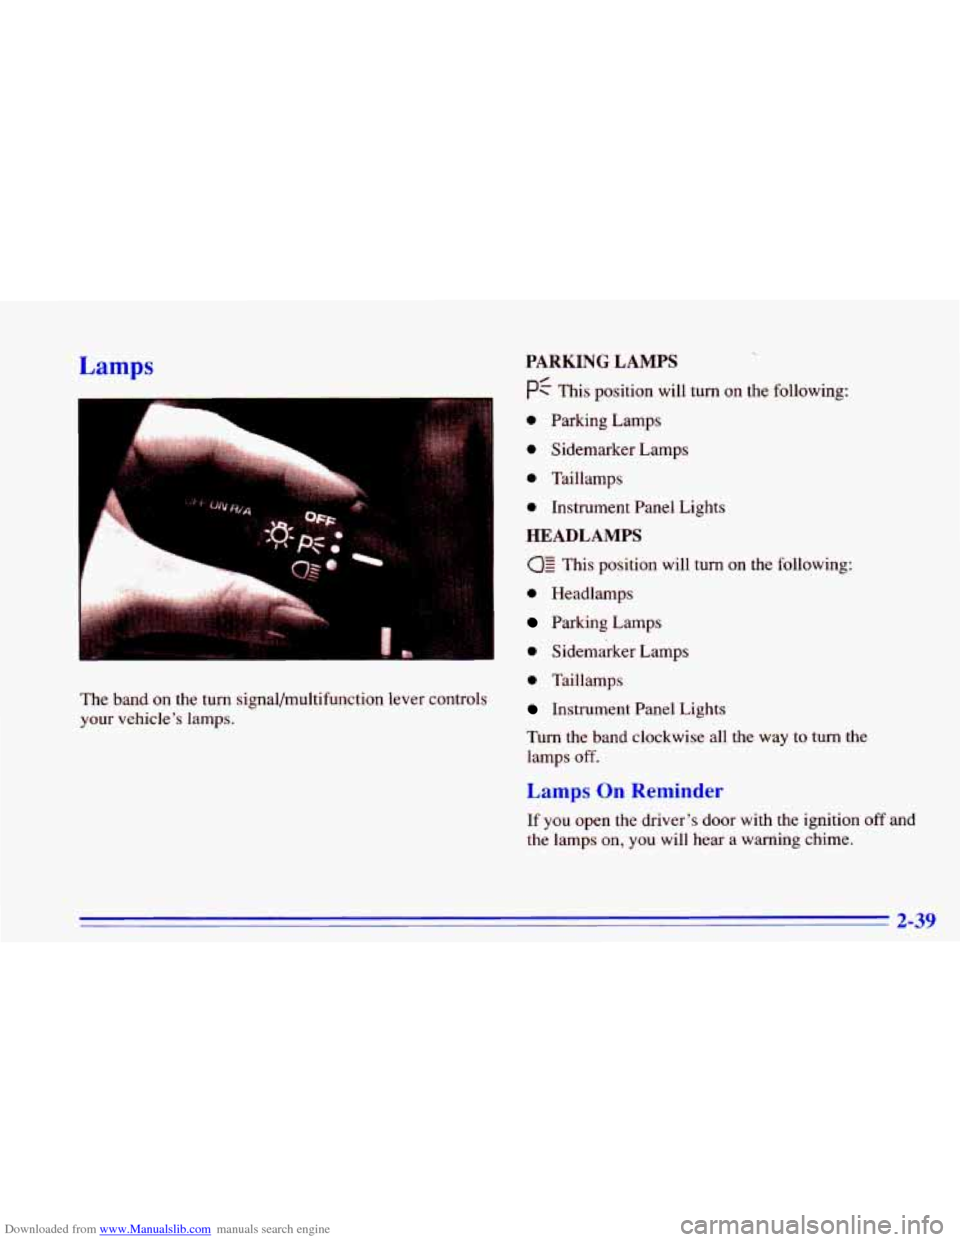
The band on the turn signal/multifunction lever controls
your vehicle’s lamps.
PARKING LAMPS
pf This position will turn on the following:
0 Parking Lamps
0 Sidemarker Lamps
0 Taillamps
0 Instrument Panel Lights
HEADLAMPS
This position will turn on the following:
0 Headlamps
Parking Lamps
0 Sidemarker Lamps
0 Taillamps
Instrument Panel Lights
Turn the band clockwise all the way
to turn the
lamps
off.
Lamps On Reminder
If you open the driver’s door with the ignition off and
the lamps on, you will hear a warning chime.
2-39
Page 99 of 372
Downloaded from www.Manualslib.com manuals search engine Fog Lamps (224 Model) Fog lamps will go off whenever the high-beam
headlamps come on. When the high beams
go off, the
fog lamps will come
on again.
Interior Lamps
Instrument Panel Intensity Control
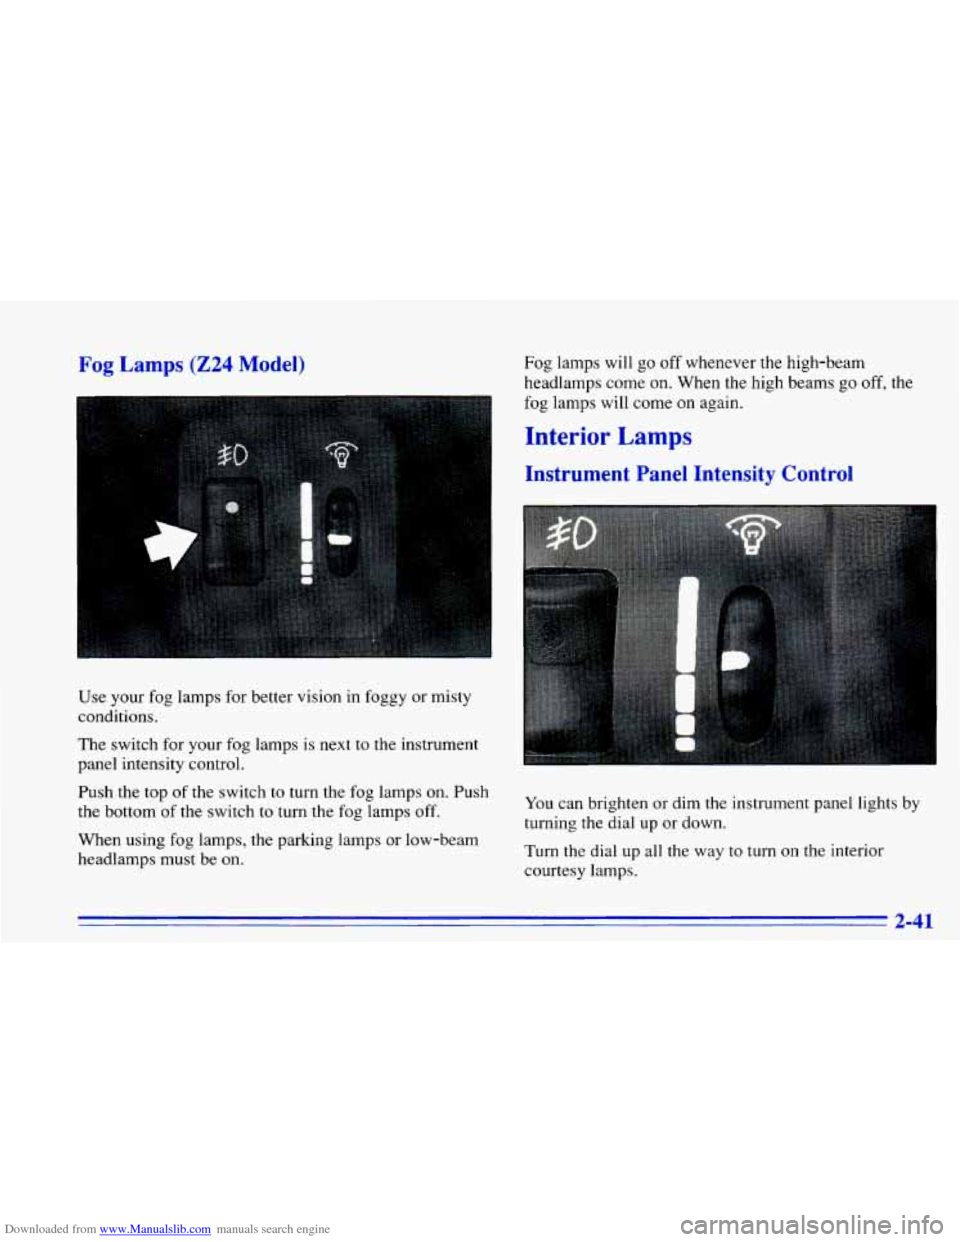
Use your fog lamps for better vision in foggy or misty
conditions.
The switch for your fog lamps is next to the instrument
panel intensity control.
Push the top of the switch to turn the fog lamps on. Push
the bottom
of the switch to turn the fog lamps off.
When using fog lamps, the parking lamps or low-beam
headlamps must be on. You
can brighten or dim the instrument panel lights by
turning
the dial up or down.
Turn the dial
up all the way to turn on the interior
courtesy lamps.
2-41
Page 120 of 372
Downloaded from www.Manualslib.com manuals search engine Instrument Panel Clusters
UNLEADED FUEL ONLY
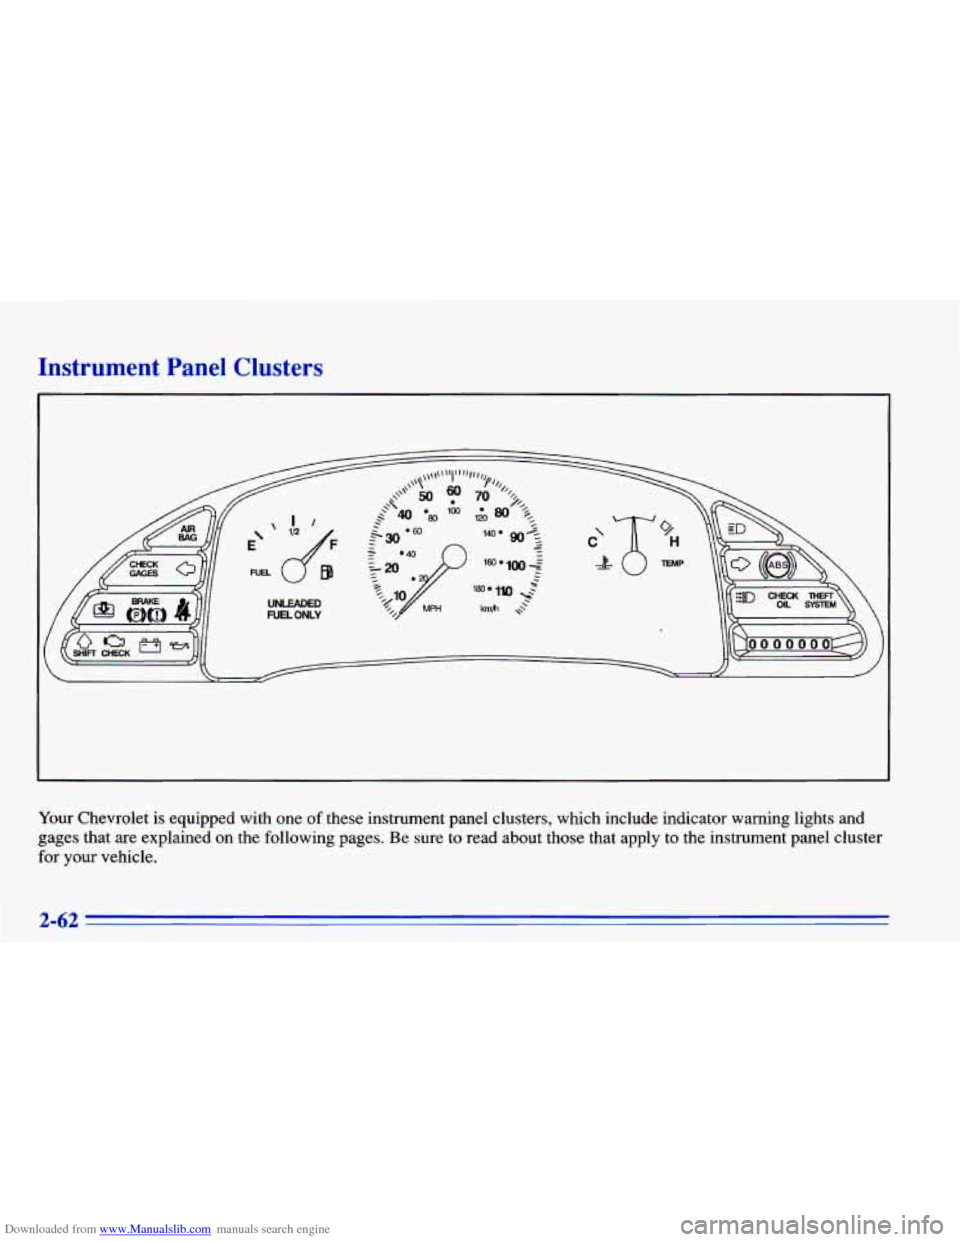
Your Chevrolet is equipped with one of these instrument panel clusters, which include indicator warning lights and
gages that
are explained on the following pages. Be sure to read about those that apply to the instrument panel cluster
for
your vehicle.
2-62
Page 123 of 372
Downloaded from www.Manualslib.com manuals search engine Warning Lights, Gages and
Indicatl
IS
This part describes the warning lights and gages that
may be on your vehicle. The pictures will help you
locate them.
Warning lights and gages can signal that something
is
wrong before it becomes serious enough to cause an
expensive repair or replacement. Paying attention to
your warning lights and gages could also save you or
others from injury.
Warning lights come on when there may be or is a
problem with one of your vehicle’s functions.
As you
will see in the details on the next few pages, some
warning lights come on briefly when you start the
engine just to let you know they’re working.
If you are
familiar with this section, you should not be alarmed
when this happens.
Gages can indicate when there may be or is a problem with one of your vehicle’s functions. Often gages and
warning lights work together to
let you know when
there’s a problem with your vehicle. When
one of the warning lights
comes on and stays on
when you are driving, or when one of the gages shows
there may be a problem, check the section that tells you
what to do about it. Please fallow this manual’s advice.
Waiting to do repairs can be costly
-- and even
dangerous.
So please get to know your warning lights
and gages. They’re a big help.
Safety Belt Reminder Light
When the key is turned to RUN or START, a chime will
come on for about eight seconds to remind people to
fasten their safety belts, unless the driver’s safety belt i\
s
already buckled.
The safety belt light will
also come on and stay on
for about
20 seconds, then
it will flash for about
55 seconds. If the driver’s
belt is already buckled,
neither the chime nor the
light will come on.
2-65
Page 178 of 372
Downloaded from www.Manualslib.com manuals search engine Night Vision
No one can see as well at night as in the daytime. But as
we get older these differences increase.
A 50-year-old
driver may require at least twice as much light to see the
same thing
at night as a 20-year-old.
What you
do in the daytime can also affect your night
vision. For example, if you spend the day in bright
sunshine you are wise to wear sunglasses. Your eyes will
have less trouble adjusting to night. But if you’re
driving, don’t wear sunglasses at night. They may cut
down on glare from headlamps, but they also make a lot
of things invisible.
You can be temporarily blinded by approaching
headlamps.
It can take a second or two, or even several
seconds, for your eyes to readjust to the dark. When you
are faced with severe glare (as from a driver who
doesn’t lower the high beams, or
a vehicle with
misaimed headlamps), slow down a little. Avoid staring
directly into the approaching headlamps. K&@
Y6ur windshield and all the glass on your vehicle
clean
-- inside and out. Glare at night is made much
worse by dirt
on the glass. Even the inside of the glass
can build up
a film caused by dust. Dirty glass makes
lights dazzle and flash more than clean glass would,
making the pupils of your eyes contract repeatedly.
Remember that your headlamps light up far less of
a
roadway when you are in a turn or curve. Keep your
eyes moving; that way, it’s easier to pick out dimly
lighted objects. Just as your headlamps should be
checked regularly for proper aim,
so should your eyes
be examined regularly. Some drivers suffer from night
blindness
-- the inability to see in dim light -- and
aren’t even aware
of it.
4-16
Page 260 of 372
Downloaded from www.Manualslib.com manuals search engine When to Check and What to Use
Refer to the Maintenance Schedule to determine how
often you should check the fluid level in your clutch
master cylinder reservoir and for the proper fluid. See
“Owner Checks and Services” and “Recommended
Fluids and Lubricants” in the Index.
How to Check
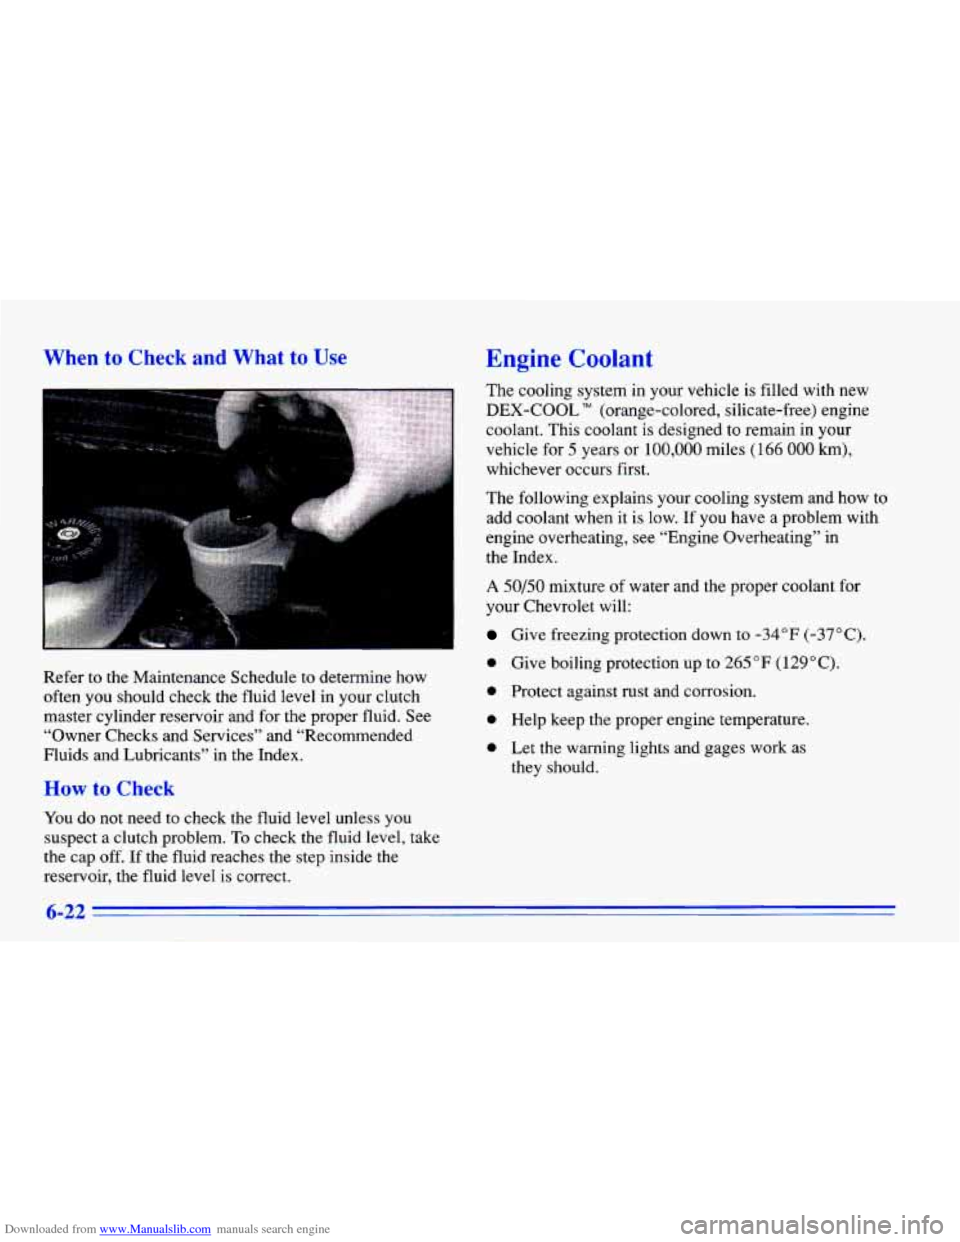
You do not need to check the fluid level unless you
suspect a clutch problem. To check the fluid level, take
the cap off.
If the fluid reaches the step inside the
reservoir, the fluid level
is correct.
Engine Coolant
The cooling system in your vehicle is filled with new
DEX-COOL TM (orange-colored, silicate-free) engine
coolant. This coolant is designed to remain in your
vehicle for
5 years or 100,000 miles ( 166 000 km),
whichever occurs first.
The following explains your cooling system and how to
add coolant when it is low. If you have a problem with
engine overheating, see “Engine Overheating” in
the Index.
A 50/50 mixture of water and the proper coolant for
your Chevrolet will:
Give freezing protection down to -34°F (-37OC).
e Give boiling protection up to 265 “F (129°C).
0 Protect against rust and corrosion.
e Help keep the proper engine temperature.
e Let the warning lights and gages work as
they should.
6-22
Page 293 of 372
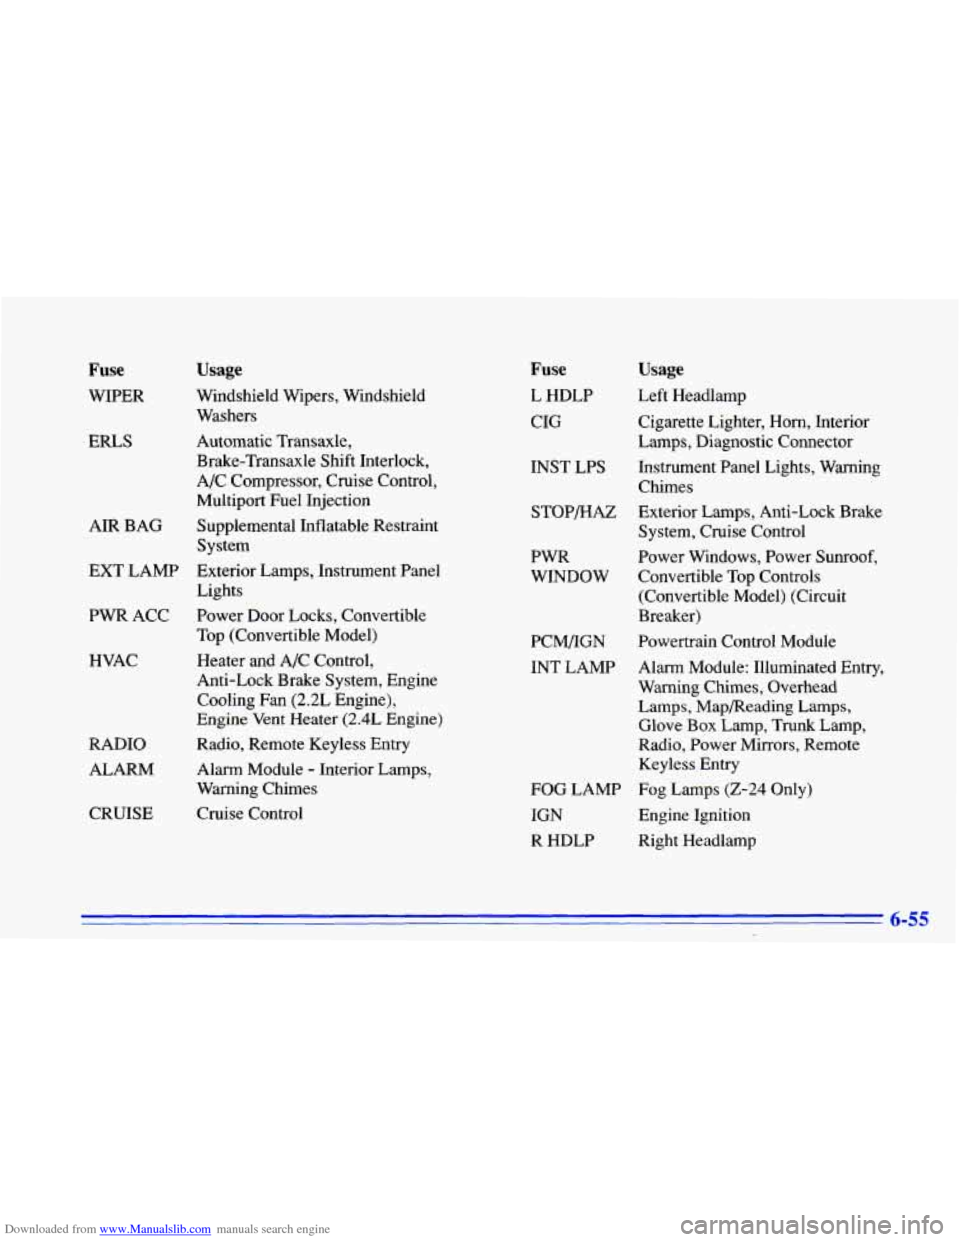
Downloaded from www.Manualslib.com manuals search engine Fuse Usage
WIPER Windshield Wipers, Windshield Washers
ERLS Automatic Transaxle,
Brake-Transaxle Shift Interlock,
A/C Compressor, Cruise Control, Multiport Fuel Injection
AIR BAG Supplemental Inflatable Restraint
EXT LAMP Exterior Lamps, Instrument Panel
PWR ACC Power Door Locks, Convertible System
Lights
Top (Convertible Model)
HVAC
RADIO ALARM
CRUISE Heater and
A/C Control,
Anti-Lock Brake System, Engine Cooling Fan (2.2L Engine),
Engine Vent Heater
(2.4L Engine)
Radio, Remote Keyless Entry
Alarm Module
- Interior Lamps,
Warning Chimes
Cruise Control
Fuse
L HDLP
CIG
INST LPS
STOP/HAZ
PWR
WINDOW
PCM/IGN
INT LAMP
FOG LAMP
IGN
R HDLP
Usage
Left Headlamp
Cigarette Lighter,
Horn, Interior
Lamps, Diagnostic Connector
Instrument Panel Lights, Warning Chimes
Exterior Lamps, Anti-Lock Brake
System, Cruise Control
Power Windows, Power
Sunroof,
Convertible Top Controls (Convertible Model) (Circuit
Breaker)
Powertrain Control Module
Alarm Module: Illuminated Entry,
Warning Chimes, Overhead
Lamps, Mapmeading Lamps,
Glove Box Lamp,
Trunk Lamp,
Radio, Power Mirrors, Remote
Keyless Entry
Fog Lamps (2-24 Only)
Engine Ignition
Right Headlamp
6-55
Page 364 of 372
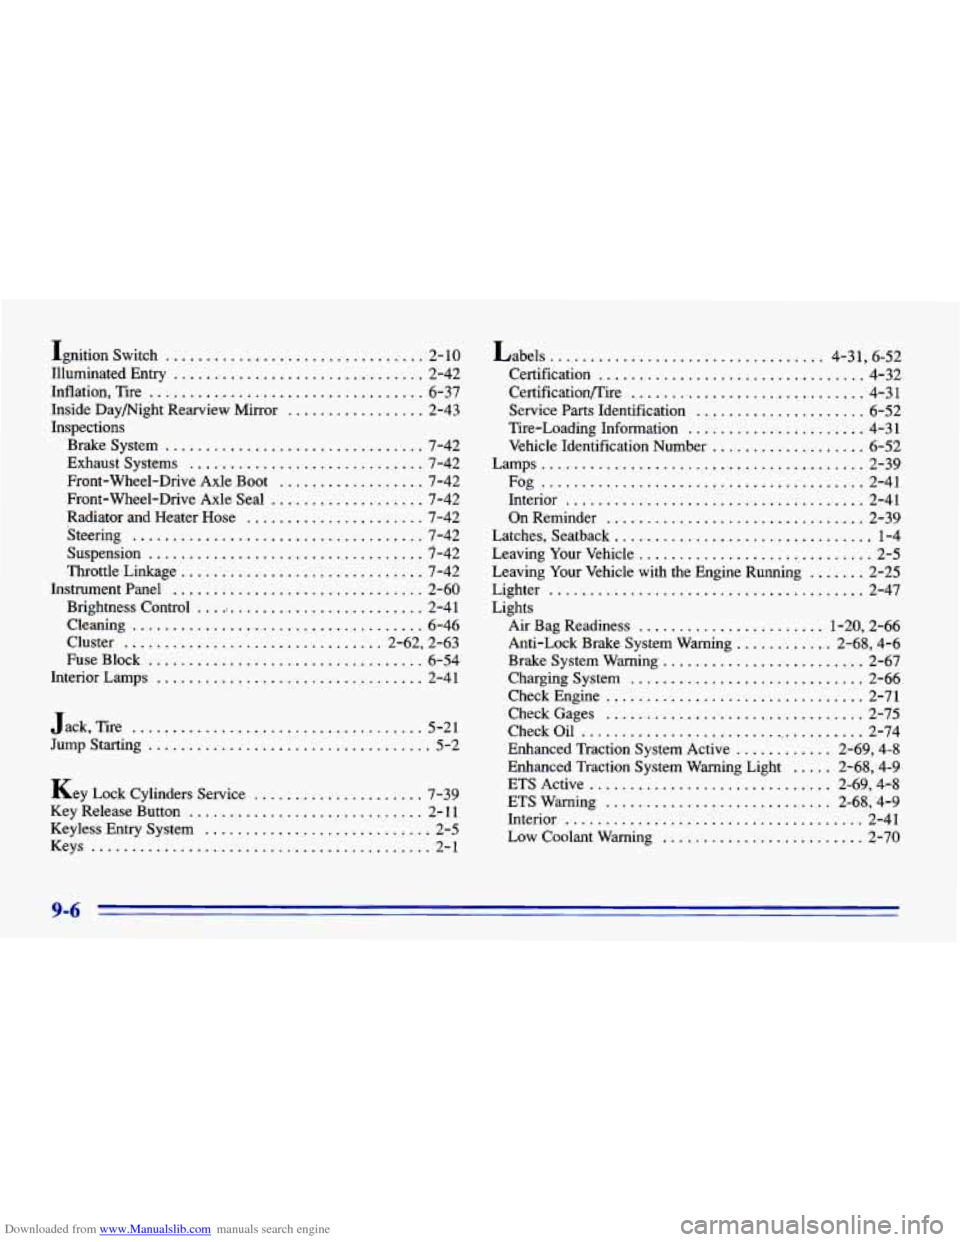
Downloaded from www.Manualslib.com manuals search engine Ignition Switch ................................ 2-10
Illuminated Entry
............................... 2-42
Inflation. Tire
.................................. 6-37
Inside Daymight Rearview Mirror
................. 2-43
Inspections
Brakesystem
................................ 7-42
Exhaust Systems
............................. 7-42
Front-Wheel-Drive Axle Boot
.................. 7-42
Front-Wheel-Drive Axle Seal
................... 7-42
Radiator and Heater Hose
...................... 7-42
Steering
.................................... 7-42
Suspension
.................................. 7-42
Throttle Linkage
.............................. 7-42
Instrument Panel
............................... 2-60
Brightness Control
............................. 2-4 1
Cleaning
.................................... 6-46
Cluster
................................ 2-62. 2-63
FuseBlock
.................................. 6-54
Interior Lamps
................................. 2-41
Jack. Tire
.................................... 5-21
Jump Starting
................................... 5-2
Key Lock Cylinders Service
..................... 7-39
Key Release Button
............................. 2- 11
Keyless Entry System ............................ 2-5
Keys .......................................... 2-1 Labels
.................................. 4.31. 6.52
Certification
................................. 4-32
CertificationEire
............................. 4-31
Service Parts Identification
..................... 6-52
Tire-Loading Information
...................... 4-31
Vehicle Identification Number
................... 6-52
Lamps
........................................ 2-39
Fog
........................................ 2-41
Interior
..................................... 2-41
On Reminder ................................ 2-39
Latches. Seatback
................................ 1-4
Leaving Your Vehicle
............................. 2-5
Leaving Your Vehicle with the Engine Running ....... 2-25
Lighter
....................................... 2-47
Lights Air Bag Readiness
....................... 1-20. 2-66
Anti-Lock Brake System Warning
............ 2-68. 4-6
Brake System Warning
......................... 2-67
Charging System
............................. 2-66
CheckEngine
................................ 2-71
CheckGages
................................ 2-75
CheckOil
.................................... 2-74
Enhanced Traction System Active
............ 2-69. 4-8
Enhanced Traction System Warning Light
..... 2-68. 4-9
ETS Active
.............................. 2-69. 4-8
ETS Warning
............................. 2-68. 4-9
Interior
..................................... 2-41
Low Coolant Warning
......................... 2-70
9-6