headlamp CHEVROLET CAVALIER 2001 3.G User Guide
[x] Cancel search | Manufacturer: CHEVROLET, Model Year: 2001, Model line: CAVALIER, Model: CHEVROLET CAVALIER 2001 3.GPages: 357, PDF Size: 2.57 MB
Page 273 of 357
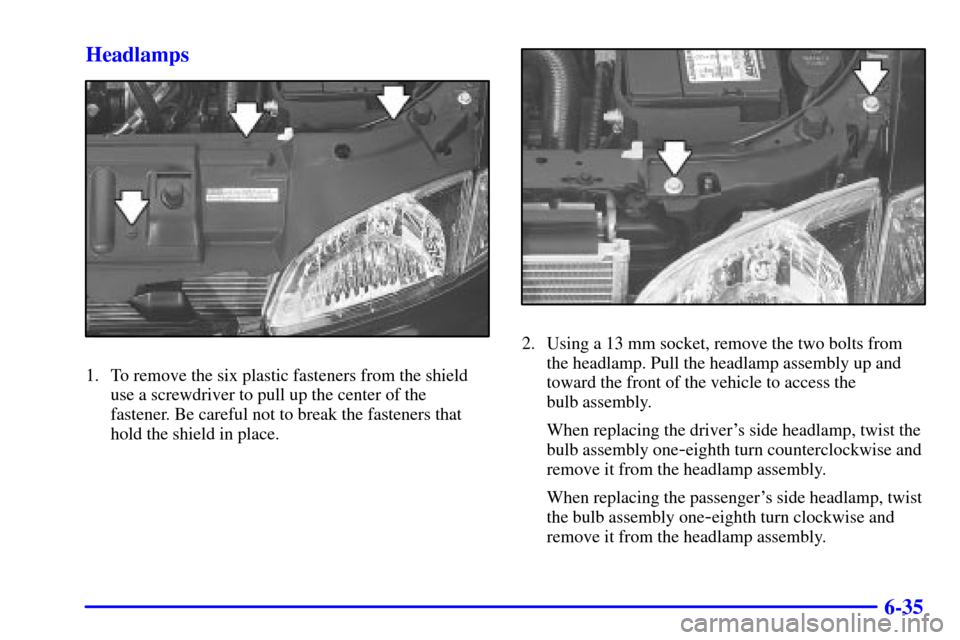
6-35 Headlamps
1. To remove the six plastic fasteners from the shield
use a screwdriver to pull up the center of the
fastener. Be careful not to break the fasteners that
hold the shield in place.
2. Using a 13 mm socket, remove the two bolts from
the headlamp. Pull the headlamp assembly up and
toward the front of the vehicle to access the
bulb assembly.
When replacing the driver's side headlamp, twist the
bulb assembly one
-eighth turn counterclockwise and
remove it from the headlamp assembly.
When replacing the passenger's side headlamp, twist
the bulb assembly one
-eighth turn clockwise and
remove it from the headlamp assembly.
Page 274 of 357
6-36
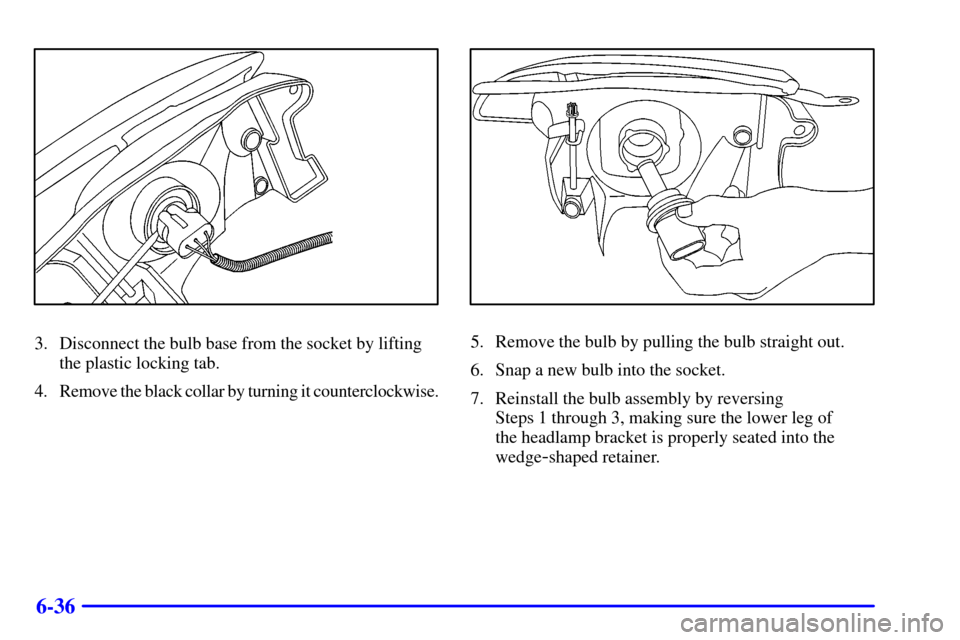
3. Disconnect the bulb base from the socket by lifting
the plastic locking tab.
4. Remove the black collar by turning it counterclockwise.5. Remove the bulb by pulling the bulb straight out.
6. Snap a new bulb into the socket.
7. Reinstall the bulb assembly by reversing
Steps 1 through 3, making sure the lower leg of
the headlamp bracket is properly seated into the
wedge
-shaped retainer.
Page 275 of 357
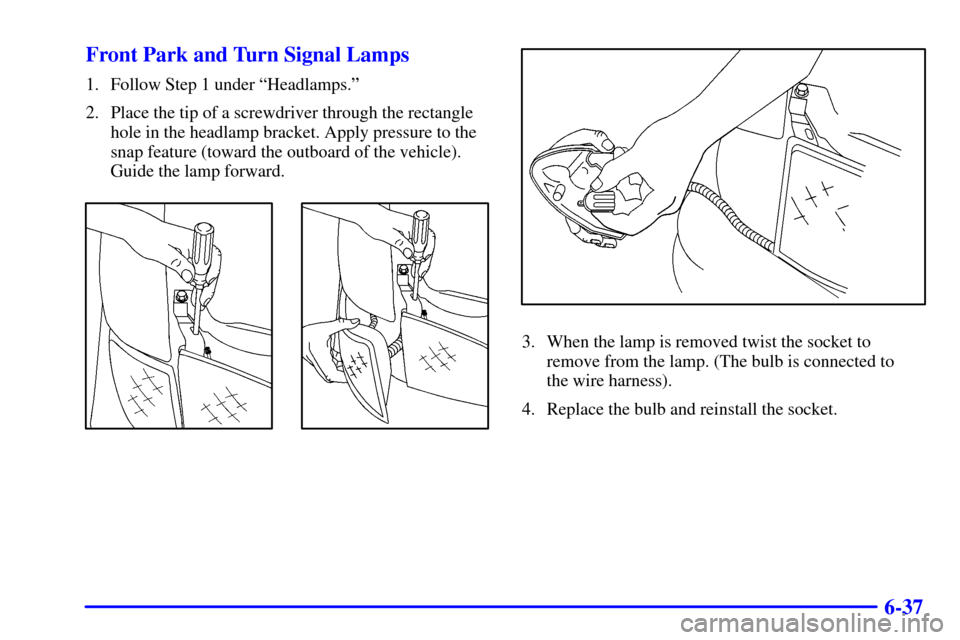
6-37 Front Park and Turn Signal Lamps
1. Follow Step 1 under ªHeadlamps.º
2. Place the tip of a screwdriver through the rectangle
hole in the headlamp bracket. Apply pressure to the
snap feature (toward the outboard of the vehicle).
Guide the lamp forward.
3. When the lamp is removed twist the socket to
remove from the lamp. (The bulb is connected to
the wire harness).
4. Replace the bulb and reinstall the socket.
Page 276 of 357
6-38
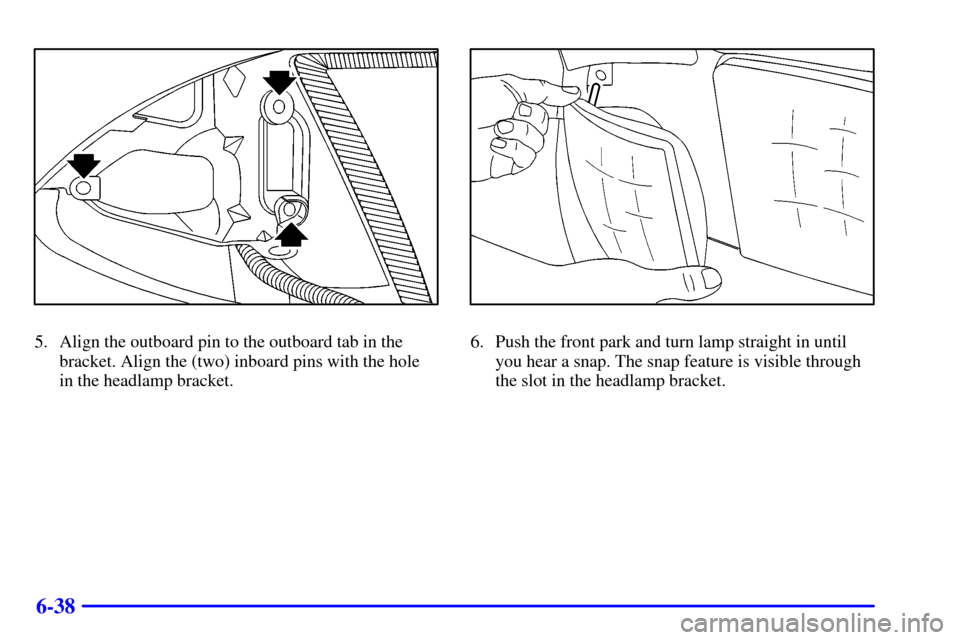
5. Align the outboard pin to the outboard tab in the
bracket. Align the (two) inboard pins with the hole
in the headlamp bracket.6. Push the front park and turn lamp straight in until
you hear a snap. The snap feature is visible through
the slot in the headlamp bracket.
Page 287 of 357
6-49
Each new wheel should have the same load-carrying
capacity, diameter, width, offset and be mounted the
same way as the one it replaces.
If you need to replace any of your wheels, wheel bolts
or wheel nuts, replace them only with new GM original
equipment parts. This way, you will be sure to have the
right wheel, wheel bolts and wheel nuts for your vehicle.
CAUTION:
Using the wrong replacement wheels, wheel bolts
or wheel nuts on your vehicle can be dangerous.
It could affect the braking and handling of your
vehicle, make your tires lose air and make you
lose control. You could have a collision in which
you or others could be injured. Always use
the correct wheel, wheel bolts and wheel nuts
for replacement.
NOTICE:
The wrong wheel can also cause problems with
bearing life, brake cooling, speedometer or
odometer calibration, headlamp aim, bumper
height, vehicle ground clearance and tire or
tire chain clearance to the body and chassis.
See ªChanging a Flat Tireº in the Index for
more information.
Used Replacement Wheels
CAUTION:
Putting a used wheel on your vehicle is
dangerous. You can't know how it's been used or
how far it's been driven. It could fail suddenly
and cause an accident. If you have to replace a
wheel, use a new GM original equipment wheel.
Page 298 of 357
6-60
Electrical System
Add-On Electrical Equipment
NOTICE:
Don't add anything electrical to your vehicle
unless you check with your dealer first. Some
electrical equipment can damage your vehicle
and the damage wouldn't be covered by your
warranty. Some add
-on electrical equipment
can keep other components from working as
they should.
Your vehicle has an air bag system. Before attempting to
add anything electrical to your vehicle, see ªServicing
Your Air Bag
-Equipped Vehicleº in the Index.
Headlamp Wiring
The headlamp wiring is protected by fuses. Should your
headlamps fail to function, have your headlamp system
checked right away.
Windshield Wiper Fuse
The windshield wiper motor is protected by a circuit
breaker and a fuse. If the motor overheats due to heavy
snow or ice, the wiper will stop until the motor cools.
If the overload is caused by some electrical problem,
have it fixed.
Power Windows and Other Power Options
Circuit breakers in the fuse panel protect the power
windows and other power accessories. When the current
load is too heavy, the circuit breaker opens and closes,
protecting the circuit until the problem is fixed.
Page 300 of 357
6-62
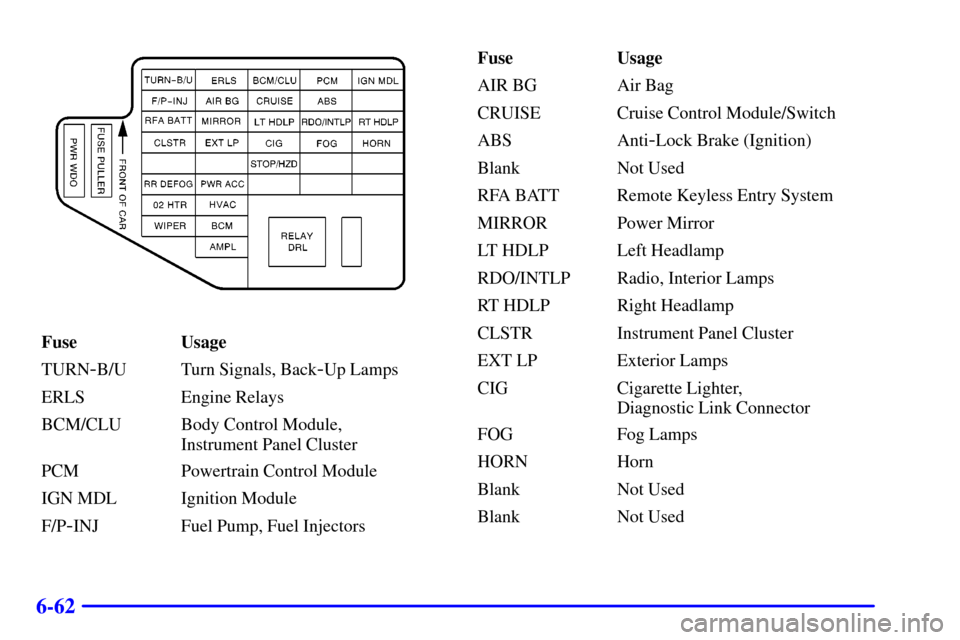
Fuse Usage
TURN
-B/U Turn Signals, Back-Up Lamps
ERLS Engine Relays
BCM/CLU Body Control Module,
Instrument Panel Cluster
PCM Powertrain Control Module
IGN MDL Ignition Module
F/P
-INJ Fuel Pump, Fuel InjectorsFuse Usage
AIR BG Air Bag
CRUISE Cruise Control Module/Switch
ABS Anti
-Lock Brake (Ignition)
Blank Not Used
RFA BATT Remote Keyless Entry System
MIRROR Power Mirror
LT HDLP Left Headlamp
RDO/INTLP Radio, Interior Lamps
RT HDLP Right Headlamp
CLSTR Instrument Panel Cluster
EXT LP Exterior Lamps
CIG Cigarette Lighter,
Diagnostic Link Connector
FOG Fog Lamps
HORN Horn
Blank Not Used
Blank Not Used
Page 302 of 357
6-64
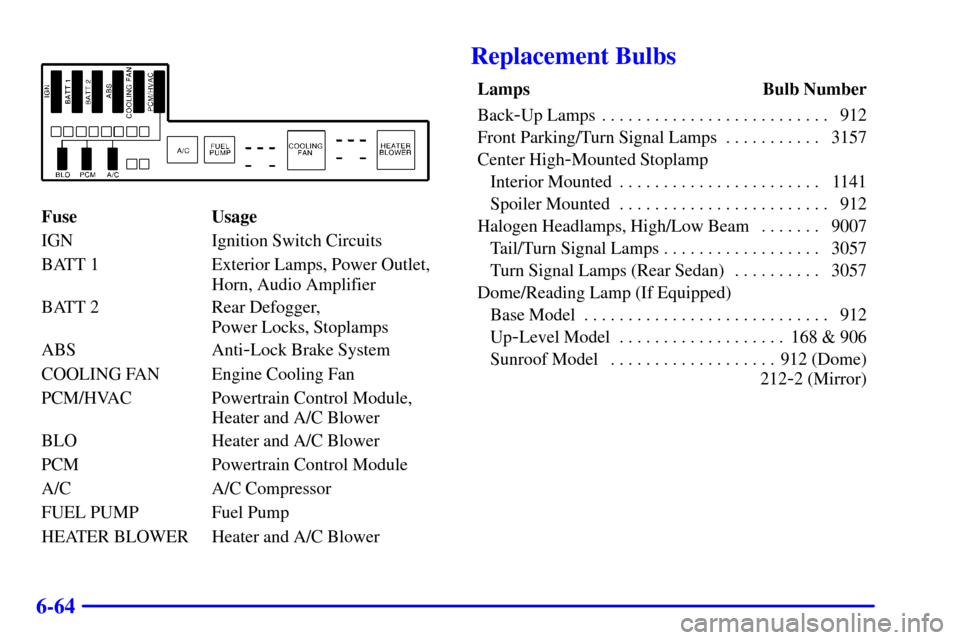
Fuse Usage
IGN Ignition Switch Circuits
BATT 1 Exterior Lamps, Power Outlet,
Horn, Audio Amplifier
BATT 2 Rear Defogger,
Power Locks, Stoplamps
ABS Anti
-Lock Brake System
COOLING FAN Engine Cooling Fan
PCM/HVAC Powertrain Control Module,
Heater and A/C Blower
BLO Heater and A/C Blower
PCM Powertrain Control Module
A/C A/C Compressor
FUEL PUMP Fuel Pump
HEATER BLOWER Heater and A/C Blower
Replacement Bulbs
Lamps Bulb Number
Back
-Up Lamps 912. . . . . . . . . . . . . . . . . . . . . . . . . .
Front Parking/Turn Signal Lamps 3157. . . . . . . . . . .
Center High
-Mounted Stoplamp
Interior Mounted 1141. . . . . . . . . . . . . . . . . . . . . . .
Spoiler Mounted 912. . . . . . . . . . . . . . . . . . . . . . . .
Halogen Headlamps, High/Low Beam 9007. . . . . . .
Tail/Turn Signal Lamps 3057. . . . . . . . . . . . . . . . . .
Turn Signal Lamps (Rear Sedan) 3057. . . . . . . . . .
Dome/Reading Lamp (If Equipped)
Base Model 912. . . . . . . . . . . . . . . . . . . . . . . . . . . .
Up
-Level Model 168 & 906. . . . . . . . . . . . . . . . . . .
Sunroof Model 912 (Dome). . . . . . . . . . . . . . . . . . .
212
-2 (Mirror)