reset CHEVROLET CAVALIER 2003 3.G Owners Manual
[x] Cancel search | Manufacturer: CHEVROLET, Model Year: 2003, Model line: CAVALIER, Model: CHEVROLET CAVALIER 2003 3.GPages: 364, PDF Size: 2.44 MB
Page 71 of 364
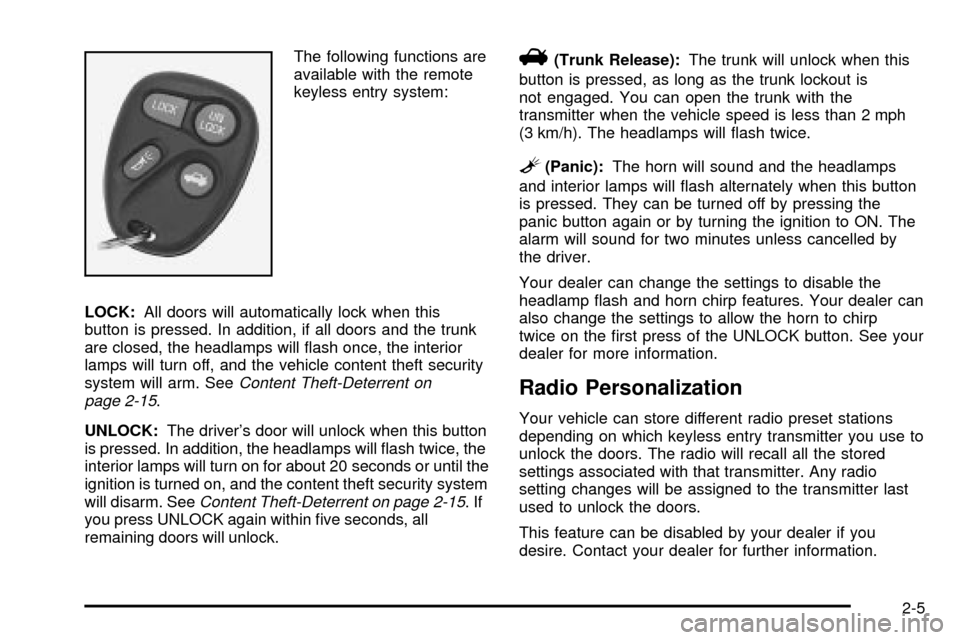
The following functions are
available with the remote
keyless entry system:
LOCK:All doors will automatically lock when this
button is pressed. In addition, if all doors and the trunk
are closed, the headlamps will ¯ash once, the interior
lamps will turn off, and the vehicle content theft security
system will arm. See
Content Theft-Deterrent on
page 2-15.
UNLOCK:The driver's door will unlock when this button
is pressed. In addition, the headlamps will ¯ash twice, the
interior lamps will turn on for about 20 seconds or until the
ignition is turned on, and the content theft security system
will disarm. See
Content Theft-Deterrent on page 2-15.If
you press UNLOCK again within ®ve seconds, all
remaining doors will unlock.
V(Trunk Release):The trunk will unlock when this
button is pressed, as long as the trunk lockout is
not engaged. You can open the trunk with the
transmitter when the vehicle speed is less than 2 mph
(3 km/h). The headlamps will ¯ash twice.
L(Panic):The horn will sound and the headlamps
and interior lamps will ¯ash alternately when this button
is pressed. They can be turned off by pressing the
panic button again or by turning the ignition to ON. The
alarm will sound for two minutes unless cancelled by
the driver.
Your dealer can change the settings to disable the
headlamp ¯ash and horn chirp features. Your dealer can
also change the settings to allow the horn to chirp
twice on the ®rst press of the UNLOCK button. See your
dealer for more information.
Radio Personalization
Your vehicle can store different radio preset stations
depending on which keyless entry transmitter you use to
unlock the doors. The radio will recall all the stored
settings associated with that transmitter. Any radio
setting changes will be assigned to the transmitter last
used to unlock the doors.
This feature can be disabled by your dealer if you
desire. Contact your dealer for further information.
2-5
Page 99 of 364
Outside Convex Mirror
Your passenger's side mirror is convex. A convex
mirror's surface is curved so you can see more from the
driver's seat.
{CAUTION:
A convex mirror can make things (like other
vehicles) look farther away than they really are.
If you cut too sharply into the right lane, you
could hit a vehicle on your right. Check your
inside mirror or glance over your shoulder
before changing lanes.
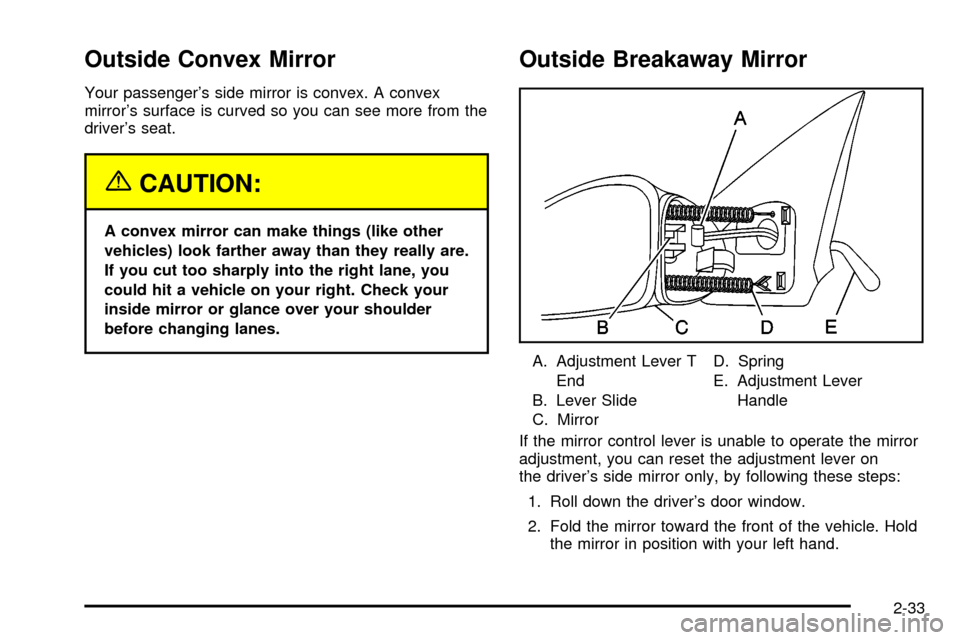
Outside Breakaway Mirror
A. Adjustment Lever T
End
B. Lever Slide
C. MirrorD. Spring
E. Adjustment Lever
Handle
If the mirror control lever is unable to operate the mirror
adjustment, you can reset the adjustment lever on
the driver's side mirror only, by following these steps:
1. Roll down the driver's door window.
2. Fold the mirror toward the front of the vehicle. Hold
the mirror in position with your left hand.
2-33
Page 112 of 364

Resuming a Set Speed
Suppose you set your cruise control at a desired speed
and then you apply the brake or clutch pedal. This,
of course, shuts off the cruise control. But you don't
need to reset it. Once you're going about 25 mph
(40 km/h) or more, you can brie¯y move the cruise
control switch from ON to R/A.
You'll go right back up to your chosen speed and stay
there.
If you hold the switch at R/A longer, the vehicle will
keep going faster until you release the switch or apply
the brake or clutch pedal. So unless you want to go
faster, don't hold the switch at R/A.
Increasing Speed While Using Cruise
Control
There are two ways to go to a higher speed:
·Use the accelerator pedal to get to a higher speed.
Push the SET button at the end of the lever, then
release the button and the accelerator pedal.
You'll now cruise at the higher speed.
·Move the cruise control switch from ON to R/A.
Hold it there until you get up to the speed you
want, and then release the switch. To increase your
speed in very small amounts, brie¯y move the
switch to R/A then release it. Each time you do this,
your vehicle will go about 1 mph (1.6 km/h) faster.
3-10
Page 125 of 364

Speedometer and Odometer
Your speedometer lets you see your speed in both
miles per hour (mph) and kilometers per hour (km/h).
Your odometer shows how far your vehicle has
been driven, in either miles (used in the United States)
or kilometers (used in Canada).
Your odometer can be seen when the vehicle is
running. To view it when the ignition is off, press the trip
odometer button located near the display. The mileage
will display for about ®ve seconds.
Trip Odometer
The trip odometer can tell you how far your vehicle has
been driven since you last reset the trip odometer to
zero.
Your trip odometer can be seen when the vehicle is
running. To view it when the ignition is off, press the trip
odometer button located near the display. You will
®rst see the total miles your vehicle has traveled. Press
it again to see the mileage since the trip odometer
was last reset. The display will show the mileage for
about ®ve seconds.
The trip odometer reset button is located next to the
odometer. By pressing the reset button, you can
alternate between the season odometer and the trip
odometer. To reset the trip odometer, press and hold the
reset button for one or two seconds.The odometer and trip odometer can be displayed with
the ignition off by pressing the trip odometer reset
button. The display will remain on for ®ve seconds after
the last time the reset button is pressed.
Tachometer
If your vehicle has this
feature, the tachometer
displays the engine
speed in revolutions per
minute (rpm).
Notice:Do not operate the engine with the
tachometer in the red area, or engine damage
may occur.
3-23
Page 129 of 364
{CAUTION:
Your brake system may not be working
properly if the brake system warning light is
on. Driving with the brake system warning light
on can lead to an accident. If the light is still
on after you've pulled off the road and stopped
carefully, have the vehicle towed for service.
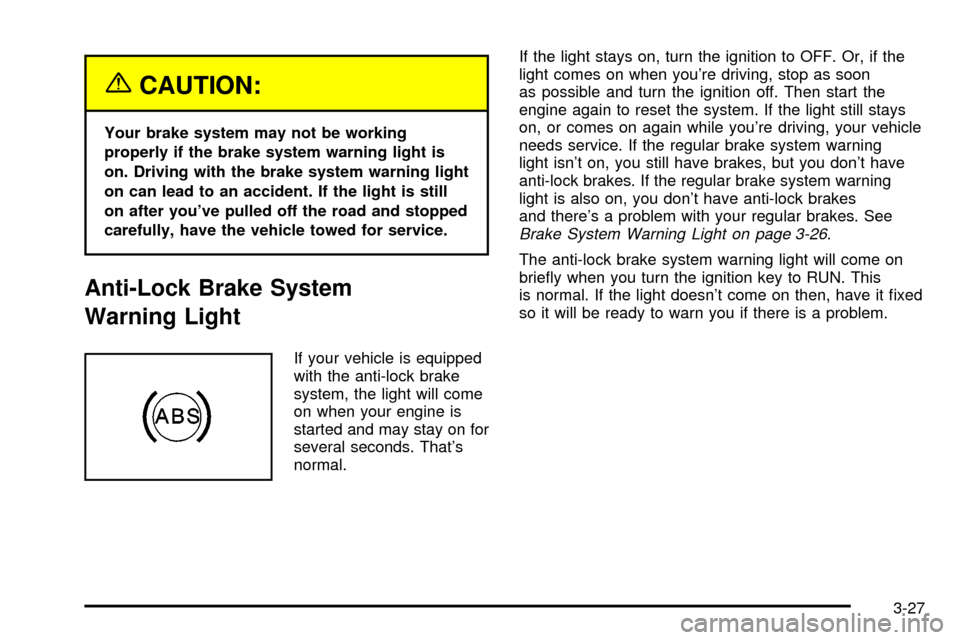
Anti-Lock Brake System
Warning Light
If your vehicle is equipped
with the anti-lock brake
system, the light will come
on when your engine is
started and may stay on for
several seconds. That's
normal.If the light stays on, turn the ignition to OFF. Or, if the
light comes on when you're driving, stop as soon
as possible and turn the ignition off. Then start the
engine again to reset the system. If the light still stays
on, or comes on again while you're driving, your vehicle
needs service. If the regular brake system warning
light isn't on, you still have brakes, but you don't have
anti-lock brakes. If the regular brake system warning
light is also on, you don't have anti-lock brakes
and there's a problem with your regular brakes. See
Brake System Warning Light on page 3-26.
The anti-lock brake system warning light will come on
brie¯y when you turn the ignition key to RUN. This
is normal. If the light doesn't come on then, have it ®xed
so it will be ready to warn you if there is a problem.
3-27
Page 139 of 364
AM-FM Radio
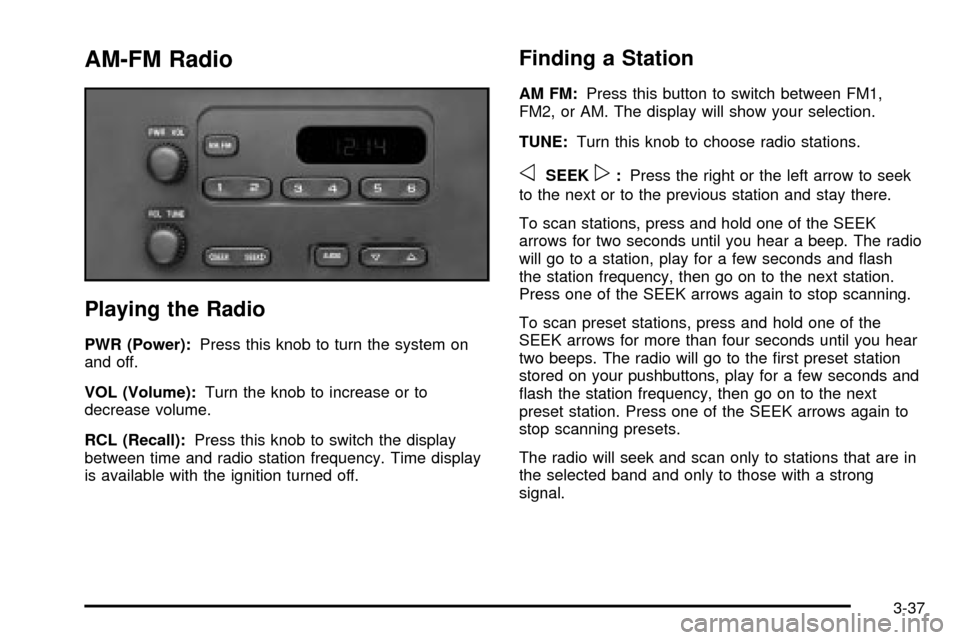
Playing the Radio
PWR (Power):Press this knob to turn the system on
and off.
VOL (Volume):Turn the knob to increase or to
decrease volume.
RCL (Recall):Press this knob to switch the display
between time and radio station frequency. Time display
is available with the ignition turned off.
Finding a Station
AM FM:Press this button to switch between FM1,
FM2, or AM. The display will show your selection.
TUNE:Turn this knob to choose radio stations.
oSEEKp:Press the right or the left arrow to seek
to the next or to the previous station and stay there.
To scan stations, press and hold one of the SEEK
arrows for two seconds until you hear a beep. The radio
will go to a station, play for a few seconds and ¯ash
the station frequency, then go on to the next station.
Press one of the SEEK arrows again to stop scanning.
To scan preset stations, press and hold one of the
SEEK arrows for more than four seconds until you hear
two beeps. The radio will go to the ®rst preset station
stored on your pushbuttons, play for a few seconds and
¯ash the station frequency, then go on to the next
preset station. Press one of the SEEK arrows again to
stop scanning presets.
The radio will seek and scan only to stations that are in
the selected band and only to those with a strong
signal.
3-37
Page 140 of 364

Setting Preset Stations
The six numbered pushbuttons let you return to your
favorite stations. You can set up to 18 stations (six FM1,
six FM2, and six AM) by performing the following
steps:
1. Turn the radio on.
2. Press AM FM to select FM1, FM2, or AM.
3. Tune in the desired station.
4. Press and hold one of the six numbered
pushbuttons until you hear a beep. Whenever you
press that numbered pushbutton, the station
you set will return.
5. Repeat the steps for each pushbutton.
Setting the Tone (Bass/Treble)
AUDIO:To adjust the bass and the treble, press and
release the AUDIO button repeatedly until BAS or
TRE appears on the display. Then press and hold the
up or the down arrow to increase or to decrease. If
a station is weak or noisy, you may want to decrease
the treble.To adjust bass or treble to the middle position, select
BAS or TRE. Then press and hold the AUDIO button for
more than two seconds until you hear a beep. B and
a zero or T and a zero will appear on the display.
To adjust both tone controls and both speaker controls
to the middle position, ®rst end out of audio mode
either by pressing another button, causing the radio to
perform that function, or by waiting ®ve seconds for
the display to return to time of day. Then press and hold
the AUDIO button for more than two seconds until
you hear a beep. CEN will appear on the display.
Adjusting the Speakers (Balance/Fade)
AUDIO:To adjust the balance between the right
and the left speakers, press and release the AUDIO
button until BAL appears on the display. Then press and
hold the up or the down arrow to move the sound
toward the right or the left speakers.
To adjust the fade between the front and the rear
speakers, press and release the AUDIO button until
FAD appears on the display. Then press and hold the up
or the down arrow to move the sound toward the front
or the rear speakers.
3-38
Page 143 of 364

For XMŸ (USA only, if equipped), press this button
while in XM mode to retrieve various pieces of
information related to the current song or channel. By
pressing and releasing this button, you may retrieve four
different categories of information: Artist, Song Title,
Category or PTY, Channel Number/Channel Name.
To change the default on the display, press this button
until you see the display you want, then hold this
button for two seconds. The radio will produce one beep
and the selected display will now be the default.
Finding a Station
BAND:Press this button to switch between AM, FM1,
FM2, or XM1, XM2 (USA only, if equipped). The
display will show your selection.
TUNE:Turn this knob to choose radio stations.
qSEEKr:Press the right or the left arrow to seek
to the next or to the previous station and stay there.
The radio will seek only to stations that are in the
selected band and only to those with a strong signal.
qPSCAN (Preset Scan)r:Press and hold one of
the arrows for more than two seconds and the radio
will produce one beep. The radio will scan to the
®rst preset station stored on the pushbuttons, play for a
few seconds and ¯ash the station frequency, then goon to the next preset station. SCAN will be displayed.
Press one of the arrows again or one of the pushbuttons
to stop scanning presets.
The radio will scan only to the preset stations that are in
the selected band and only to those with a strong
signal.
Setting Preset Stations
The six numbered pushbuttons let you return to your
favorite stations. You can set up to 30 stations (six AM,
six FM1 and six FM2, six XM1 and six XM2 (USA
only, if equipped), by performing the following steps:
1. Turn the radio on.
2. Press BAND to select AM, FM1, FM2, or XM1,
or XM2.
3. Tune in the desired station.
4. Press AUTO TONE to choose the bass and treble
equalization that best suits the type of station you
are listening to.
5. Press and hold one of the six numbered
pushbuttons. The radio will produce one beep.
Whenever you press that numbered pushbutton, the
station you set will return and the bass and treble
equalization that you selected will also be
automatically selected for that pushbutton.
6. Repeat the steps for each pushbutton.
3-41
Page 147 of 364
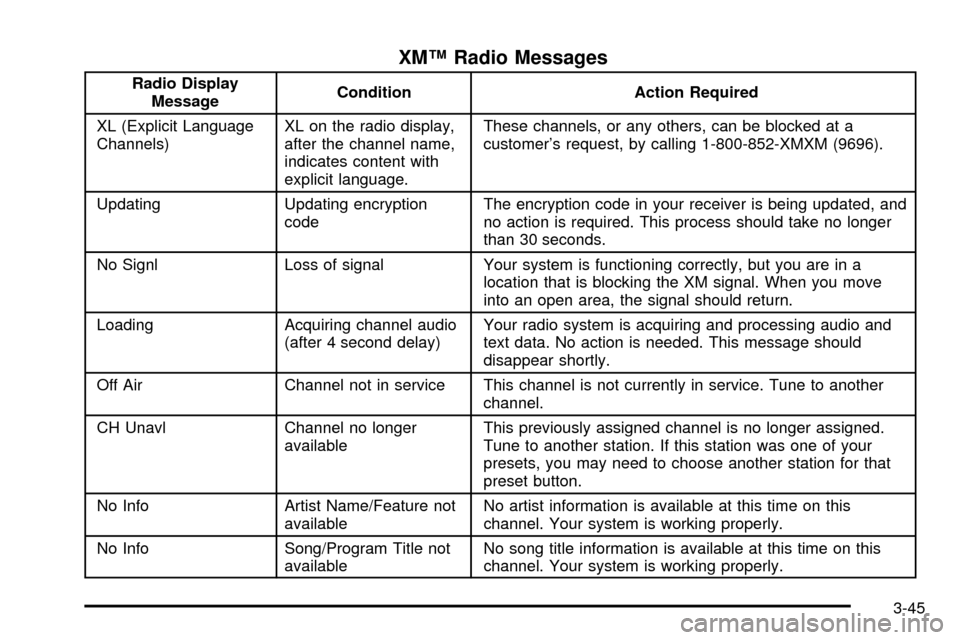
XMŸ Radio Messages
Radio Display
MessageCondition Action Required
XL (Explicit Language
Channels)XL on the radio display,
after the channel name,
indicates content with
explicit language.These channels, or any others, can be blocked at a
customer's request, by calling 1-800-852-XMXM (9696).
Updating Updating encryption
codeThe encryption code in your receiver is being updated, and
no action is required. This process should take no longer
than 30 seconds.
No Signl Loss of signal Your system is functioning correctly, but you are in a
location that is blocking the XM signal. When you move
into an open area, the signal should return.
Loading Acquiring channel audio
(after 4 second delay)Your radio system is acquiring and processing audio and
text data. No action is needed. This message should
disappear shortly.
Off Air Channel not in service This channel is not currently in service. Tune to another
channel.
CH Unavl Channel no longer
availableThis previously assigned channel is no longer assigned.
Tune to another station. If this station was one of your
presets, you may need to choose another station for that
preset button.
No Info Artist Name/Feature not
availableNo artist information is available at this time on this
channel. Your system is working properly.
No Info Song/Program Title not
availableNo song title information is available at this time on this
channel. Your system is working properly.
3-45
Page 153 of 364

Finding a Station
BAND:Press this button to switch between FM1, FM2,
AM or XM1, XM2 (USA only, if equipped). The display
will show your selection.
TUNE:Turn this knob to choose radio stations.
qSEEKr:Press the right or the left arrow to seek
to the next or to the previous station and stay there.
The radio will seek only to stations that are in the
selected band and only to those with a strong signal.
qPSCAN (Preset Scan)r:Press and hold one of
the arrows for more than two seconds and the radio
will produce one beep. The radio will scan to the
®rst preset station stored on the pushbuttons, play for a
few seconds and ¯ash the station frequency, then go
on to the next preset station. SCAN will be displayed.
Press one of the arrows again or one of the pushbuttons
to stop scanning presets.
The radio will scan only to the preset stations that are in
the selected band and only to those with a strong
signal.
Setting Preset Stations
The six numbered pushbuttons let you return to your
favorite stations. You can set up to 30 stations (six FM1,
six FM2, and six AM, six XM1 and six XM2 (USA
only, if equipped), by performing the following steps:
1. Turn the radio on.
2. Press BAND to select FM1, FM2, AM or XM1,
or XM2.
3. Tune in the desired station.
4. Press AUTO TONE to choose the bass and treble
equalization that best suits the type of station you
are listening to.
5. Press and hold one of the six numbered
pushbuttons. The radio will produce one beep.
Whenever you press that numbered pushbutton, the
station you set will return and the bass and treble
equalization that you selected will also be
automatically selected for that pushbutton.
6. Repeat the steps for each pushbutton.
3-51