oil change CHEVROLET CITATION 1980 1.G Owners Manual
[x] Cancel search | Manufacturer: CHEVROLET, Model Year: 1980, Model line: CITATION, Model: CHEVROLET CITATION 1980 1.GPages: 95, PDF Size: 21.48 MB
Page 18 of 95
Downloaded from www.Manualslib.com manuals search engine SECTION 2
STARTING AND OPERATING
ENGINE EXHAUST GAS CAUTION
(CARBON MONOXIDE)
Do not breathe exhaust gas becau~ it contains carbon monoxide, which by itself
- has no color or odor. Carbon monoxide is a dangerous gas . .It can cause
un consc iousness and can
be lethal.
If at any time you think that exhaust fumes are entering the vehicle. have the cause determined and corrected as soon· as possible. If you must drive under these
conditi<:ms, drive only with ALL windows fully OPEN.
Prptect
against carbon monoxide entry ihtp the vehicle body. The best way is to
keep the engine -exhaust system, vehicle
body. and body ventilation system
properly maintained. We recommend that the exhau st system and body be "inspected by a competent mechanic: '
• each time the vehicle is raised for an oil change;
• whenever a change is noticed in the',sound ofthe~exhaust system;
• wh enever the exhaust sys.tem. underbody . or rear of the vehicle is damaged.
See your Maintenan ce Schedule fo.~4er for parts requiring inspection .
To allow proper operation of the vehicle's ventilation system, keep the air inlet
grill e
in front of the win(fshield clear of snow, leaves or other obstru ctions at all
times.
SITTING IN A PARKED VEI:iICLE WITH THE ENGINE RUNNING FOR A LONG TIME IS NOT RECOMMENDED.
Do n ot fun , the engine in co nfined areas (such as garages or next to a building)
any more than needed to move the vehicle. When the, vehicle is stopped in an
UNCONFINED area with the engine running for any, more than a sho rt time, tak e the following steps:
A. Adju st the heating or cooling system to force outside air into the vehicle as
follows:
1. On cars not equipped with air co nditioning . se t the fan to medium or
high speed.
2. On cars equipped with air conditioning, serthe fan to medium or high
spe ed
a!1;d right hand control lever' to any position except "orr' or ·'Max."
-B. Keep the exhau st tailpipe -area clear of snow and other material to help"reduce
the buildup of exhaust gases' under the vehicle .
The ,trunk lid or hatchba ck should be closed while driving to help prevent drawing
exhaust gas into
the car. If the trunk lid or hatchback mu st' remain open for some
rea son while moving , or
if electrical wiring or other cable conn_ection s to a trai ler
_mu st pass through the sea l between the trunk lid or hatchba ck and -the body . follow
thes e precautions:
• Close all wind ows.
2-1
Page 36 of 95
Downloaded from www.Manualslib.com manuals search engine Engine Temperature Gage
This gage indicat~cCX?lant temperature which will vary with air temperature and
operating condition~, The ignition must be on for accurate readings. Hard driving
or prolonged idling In very hot weather will cause the pointer to move beyond the center of the band; Should pointer move to the Red Zone, see "Engine Cooling
System" on page 3-3.
Oil Pressure Gage
The oil pressure gage indicates the pn;ssure at which oil is being delivered 10 the various parts of the engine requiring lubrication. Pressures registered by the gage
I11.!lY vary according to outside air temperatures or weight of oil being used. Oil
pressure of a cold engine ~ing operated at a given speed will be somewhat higher
than when the engine is at normal operating temperature at the same speed .
. Prolonged high speed operation on a hot day at the given speed will result in somewhat lower oil pressure readings. Readings of 30 to 40 psi (205 to 275 kPa)
mny
be considered normal during moderate road speeds of 35 to 40 mph (55 to
60 km/h) \\lith the engine at proper operating temperature. Gage readings which
are
consistently high or Im\l under these conditions may indicate lubrication system
When the engine is operating, the voltmeter indicates the electrical system voltage.
During minimum electrical load, the pointer will read to the right of the center.
As the electrical load is increased,
or in stop-and-go driving, the pointer will rotate
to the left. A meter reading continuously in
the left or right red zone indicates
an electrical system
failure .. Cause of the failure should be determined and corrected~
Light Switch
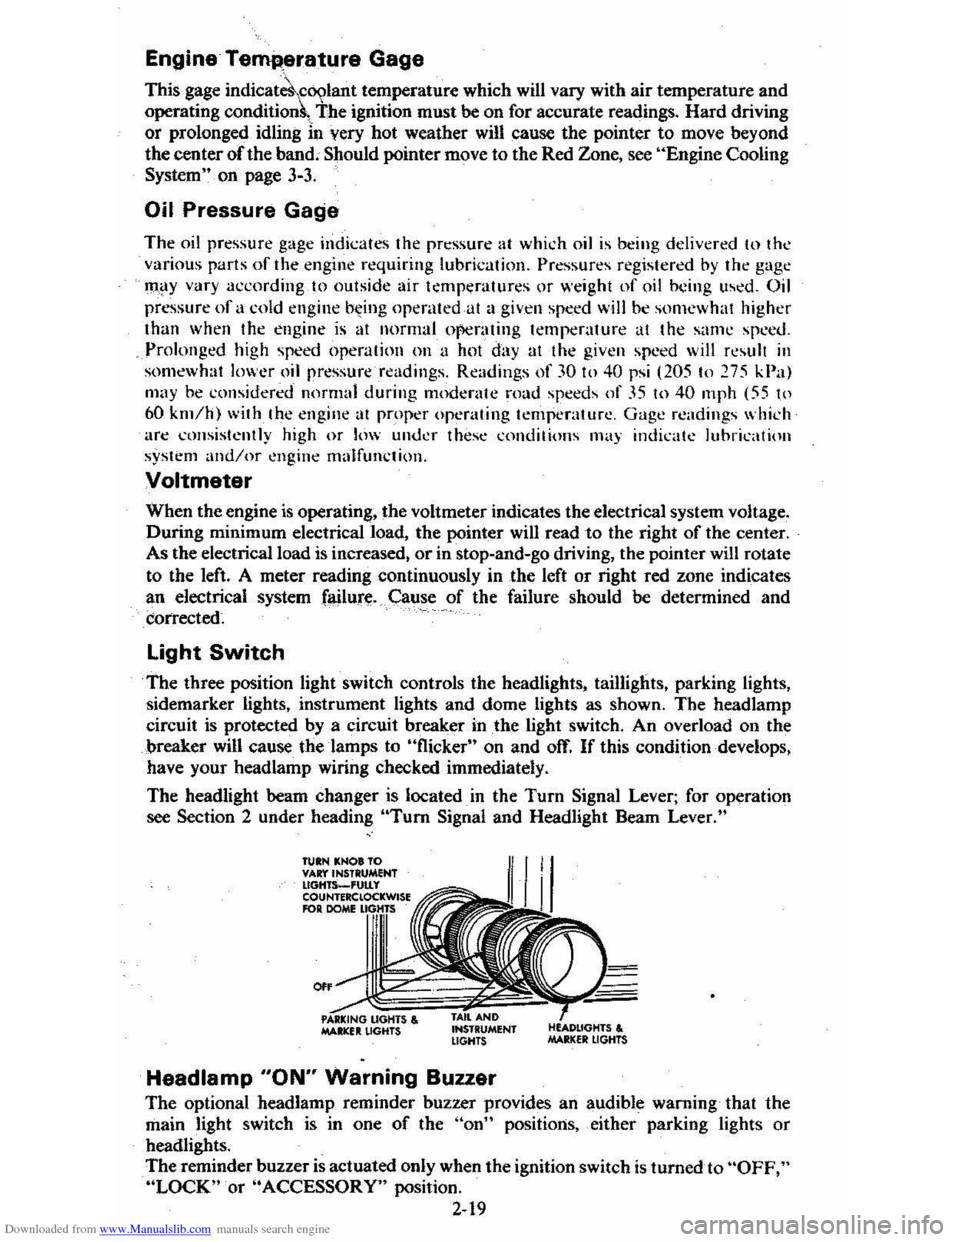
The three position light switch controls the headlights, taillights, parking lights,
sidemarker lights, instrument lights and dome lights as shown. The headlamp
circuit is protected by a circuit breaker in
the light switch. An overload on the
breaker will cause the lamps to "flicker" on and off. If this condition develops,
have your headlamp wiring checked immediately.
The headlight beam changer is located. in the
Turn Signal Lever; for operation
see Section 2 under heading "Tum Signal and Headlight Beam Lever."
TUIN KNOt TO VAr:t'INSTRUMENT lIGHTS_'UtLy COUNTERClOCKWISE RlR DOME
0"
MAltlCfIt LIGHTS , INSTRUMENT LIGHTS
Headlamp "ON" Warning Buzzer
The optional headlamp reminder buzzer provides an audible warning that the
main light switch is in one
of the "on" positions, either parking lights or
headlights.
The reminder buzzer
is actuated only when the ignition switch is turned to "OFF," "LOCK" or "ACCESSORY" position.
2-19
Page 55 of 95
Downloaded from www.Manualslib.com manuals search engine SECTION 4
APPEARANCE CARE
CAUTION: Some cl .. n .... may be poi8Of10ua or flammable, and their improper UH may cau .. per.,nal Injury or damage the inside of the vehicle. Therefore, when cleaning the inside of the vehicle. 00 NOT USE volatile cleaning solvents such as:
acetone. lacquer thinnere. enamel reducers. nail polish removers; or such cl •• ning
materials •• 'aundry soaps. bleach .. or reducing agents except as noted In the fabric cteenlng advice on stein removal that ~Iowa. . NEVER UH carbon tetrachloride, paolin., benzene or naphtha for any cleaning purpose.
Overexposure to the .. vapors may .... ult!n II health problem. This is even more likely to occur In small. unventilated .~. It is recommended that all vehicle doors
be opened for ventilation when any cleaning agents or other chemicals are uNCI in the interior. Approved respiratory protection equipment may be nMded. Follow the manufacturer's advice whenever cleaning agents or other chemicals are used,
Inside or outside the vehicle.
NOTICE: To avoid pouible permanent discoloration of white or light colored nata. DO NOT let materlala with unstabl. dyes come In contact with seat trim materials until the trim meterlals are totally dry. (This would Include certain types of casual
clothing. such a8 colored denims. corduroys. leathers and suedes: also decorative paper, etc.)
CARE AND CLEANING OF INTERIOR TRIM
With the use of modern trim materials, it is VERY IMPORTANT that proper
cleaning techniques
and cleaners be used. Failure to do this on the first cleaning
may result
in water spots, spot rings, or setting of stains or soilage, all of which
make it more difficult to remove in a second cleaning.
The portions of the following cleaning instructions that are in BOLD TYPE are especia11y important and MUST be performed.
Dust and loose dirt that accumulate on interior fabrics should be removed often
with a vacuum cleaner or soft brush. Vinyl or leather trim should be wiped
regularly with a clea:1 damp cloth. Normal trim soilage, spots, or stains can be cleaned with these GM cleaners:
Description
G.M. Spot Lifter 8 oz. (.237L) Solvent Type
G.M. Multi-Purpose Powdered Cleaner
G.M. Part No.
1051398
6
lb. (2.72 Kg) Foam Type 1050429 The above products are excellent cleaners when used property.
They are available through your Authorized dealer.
Remember these basic staps before claaning :
1. Remove stains as quickly as possible before they become "set."
2. Use a clean cloth or sponge, and change to a clean area often. (A SOFT brush
may
be used if stains persist.)
3.
Use solvent type cleaners only in a well ventilated area; also, do not saturate
the stained area.
4-1
Page 64 of 95
Downloaded from www.Manualslib.com manuals search engine On all C-4 cars, a "CHECK ENGINE" light on the instrument panel is
designed to come on during engine starting , to let you know the bulb is working. (The light will stay on a short time after the engine starts.) If the light comes on while driving, service to the emission control system
may be required. See your Chevrolet dealer' as soon as possible for an inspection of the system. Continued driving without having the C-4 System serviced _ could eventually
cause damage
to the emission control system . It could also affect fuel
e conomy and drivabili -ty.
ENGINE OIL AND FILTER RECOMMENDATIONS • Engine oils' are labeled on 'the containers with various API (American
Petroleum Institute) designations 6f quality. Use engine oils that are labeled
5E or SE/CC. Do not use oils labeled only SA, 5B, 5C, SD, CA, CB, CC or CD; _or oils with the combination label SE and CD (SE/CD). Higher
quality oils labeled SF will be introduced soon (late 1979, or 1980). These SF oils are preferred and should be used when available.
• The oil and filter change intervals for your engine are based on the use of SE-quality or SF-quality oils and ,high- quality filters such as AC oil filters. Using oils other than SE-quality or SF-quality oils, or oil change intervals
longer than recommended. could reduce -engine life and might affect your
warranty.
• Your engine was filled with a high·quality engine oil when it was built. You do ,not have to change this oil before the suggested change period.
•
If your normal driving does nQt include one or more of the four "severe service" conditions listed below. change the oil every 7,500 miles (12 000 ' kilometers) or 12 months, whichever comes first. Change the oillilter at the
first oil change. then every second oil change, if mileage (7,500 miles or 12
000. kilom~ters) determines .w ,hen you change the oil. If _time (12 months)
determines when you change the oil, change the filter with every oil change.
• Change the oil and oil filter every 3,000 miles (4 800 kilometers) , or three
months if you often drive under one or more of these 'severe service·,~.
conditions: • Driving in dusty areas
• Towing ,3 trailer
• Frequent idling or idling for long periods
• Driving 4 miles (6 kilometers) br'less in freezing weather,o~other short trips in cold weather, where the engine does not thoTough ,ly warm up.
• Change the oil and oil filter as soon as -possible after driving in a dust
storm.
Oil Viscosity
Engine oil viscosity (thickness) has an effect on fuel economy. Lowec viscosity
engine oils can provide increased , fuel " economy; however, higher temperature
weather conditions require higher viscosity engine oils for satisf~ctory lubrication.
To. get the best fuel economy with your-1980 Chevrolet, -iou should use -,, ' .
fuel. 'saviiJ.&:_engine oil ohhe_ proper viscosity. These oils call_ be found. in serviCe
stations and other retail stores. They are-identified by words such as: "Energy Saving," "Conserves Gasoline," "Gas Saving," "Gasoline Saving," '''Friction
Reducing," "Improved Gasoline Mileage" or "Fuel Saving."
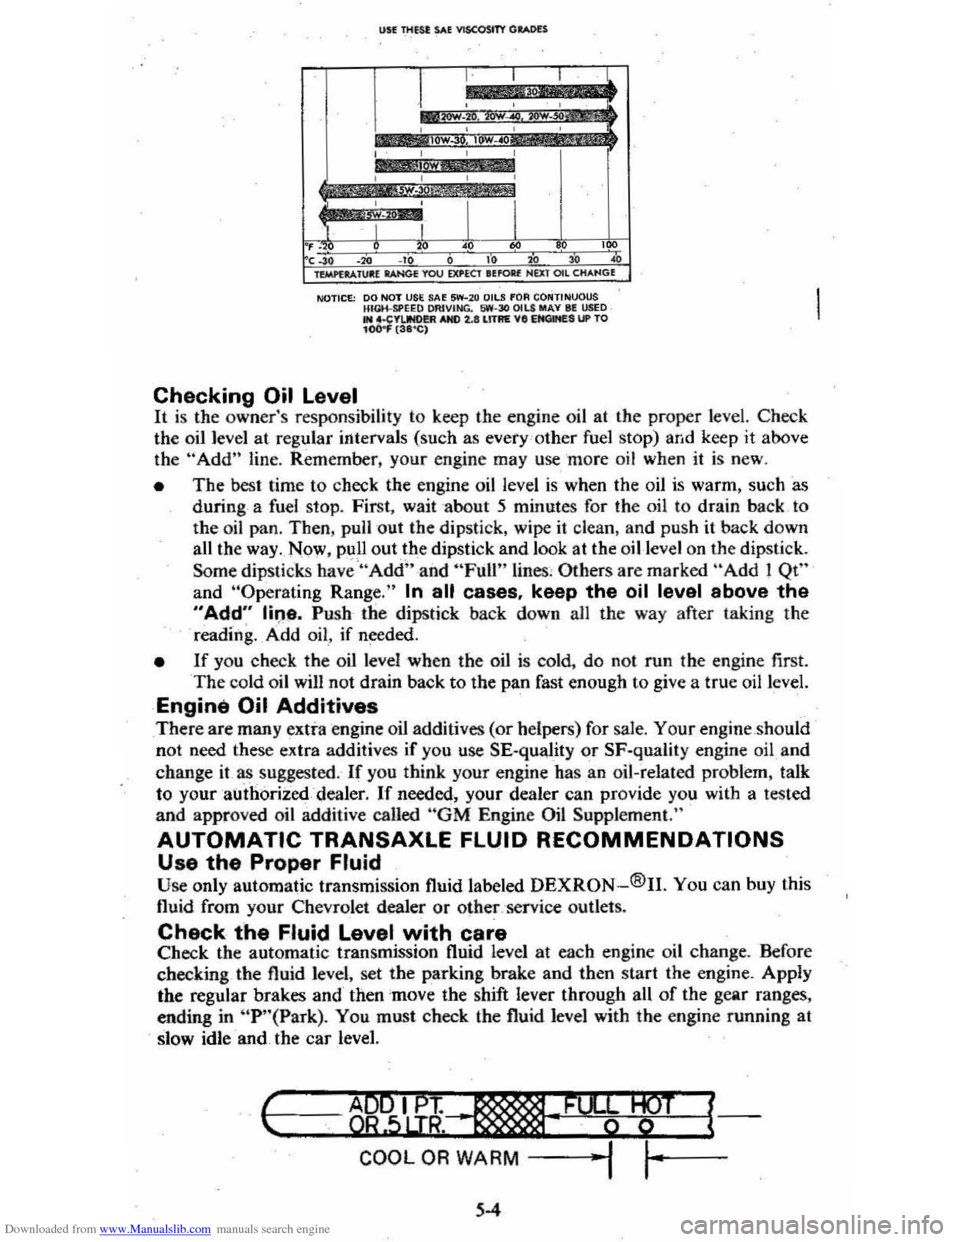
The following chart lists the engine ' oil viscosities recommended for the
temperature range you expect before the next oil change. For lemperalures above ,_18°C (O"F),SAE lOW-30 is -the preferred viscosity grade. Ircold-weather starting
problems
are encountered at temperatures below -lSoC (
5-3
Page 65 of 95
Downloaded from www.Manualslib.com manuals search engine USE Tlltst: SAE VISCOSITY GItotoDH
I , , , cl.
*
::0';'~ ,.,..~,: , , , ,
I
lOW , , , ,
,
I I I I , . , " • '" ,~, ." ., , " " " ~ lVitPl .... 1Ul:( lAN<* YOU ElU'EClltfOll( NUT OIl CHANG(
NOTICE: 00 NOT USE SA~ 5W-2 0 OilS fOA CONTINUOUS HIGH-SPEEQ OAIVING. 1,iW-30 OILS MAY III USED .. 4.CYIJNO!!R AND 2.lIll1AE VII EItClMES UP TO 104)
the oil level at regular intervals (such as every 'o ther fuel stop) and keep it above
th e "Add" line. Rem ember, your engine may use more oil when it is new .
• The best time to check the engine oil level is when the oil is warm, such as
during a fuel stop. First, wait about 5 minutes for the oil to drain back to
the oil pan, Then, pull out the dipstick, wipe
it clean, and push it back down
all the way . Now , pull out.th e dipstick and look at the oil-level on the dipstick.
Some
dipSlicks have "Add" and "Full" lines , Others are marked "Add! Qt"
and "Operaling Range." In all cases, keep the oil level above the
"Add" line. Push· the dipstick back down all the way after taking the
reading. _ A ·dd oil , if needed.
• If you check the oil level when the oil is cold, do no t run the engine first. The cold oil wilJ not drain back to the pan fast enough to give a true oil level.
Engine Oil Additives
There are many extra engine oil additives (or helpers) for sale. Your engine should
not need these extra additives if you use SE-quality or SF·quality engine oil and
change
it as suggested. If you think your engine has .an oil-related problem, talk
to your authorized dealer.
If needed, your dealer can provide you with a tested
and approved oil additive called "GM Engine Oil Supplement."
AUTOMATIC TRANSAXLE FLUID RECOMMENDATIONS
Use the Proper Fluid Use only automatic transmission fluid labe led DEXRON-®II. You can buy this
fluid from your Chevrolet dealer or
othe~,'service outlets.
Check the Fluid Level with care Check the automatic transmission fluid level at each engine oil change. Before
checking the fluid level, set the parking brake and then start the engine. AppJy
the regular brakes and then
'mov e the shift lever through all of the gear ranges,
ending in
"P '·(Park). You must check the fluid level with the engine funning at
slow idle and the car level.
I-c ..... --=---=..,~ ..... B9"""5IL.u;~~"-·, __ .........,; ..... _·F_%¥-W+--T -l{
COOL OR WARM -j ""I ,~-
5-4
Page 66 of 95
Downloaded from www.Manualslib.com manuals search engine NOTICE: You cannot read the correct fluid level if you have just driven the car for a long time at high speed, in city traffic in hot weather, or if the car has been pulling a trailer. Wait. until the fluid has cooled down (about 30 minutes).
Remove the dipstick located on the driver's side forward of the cowl. Carefully
touch the wet end of the dipstick to find out if the fluid is cool, warm or hot. Wipe
it clean and push it back in until the cap seats. Pull
out the dipstick and read the
fluid level.
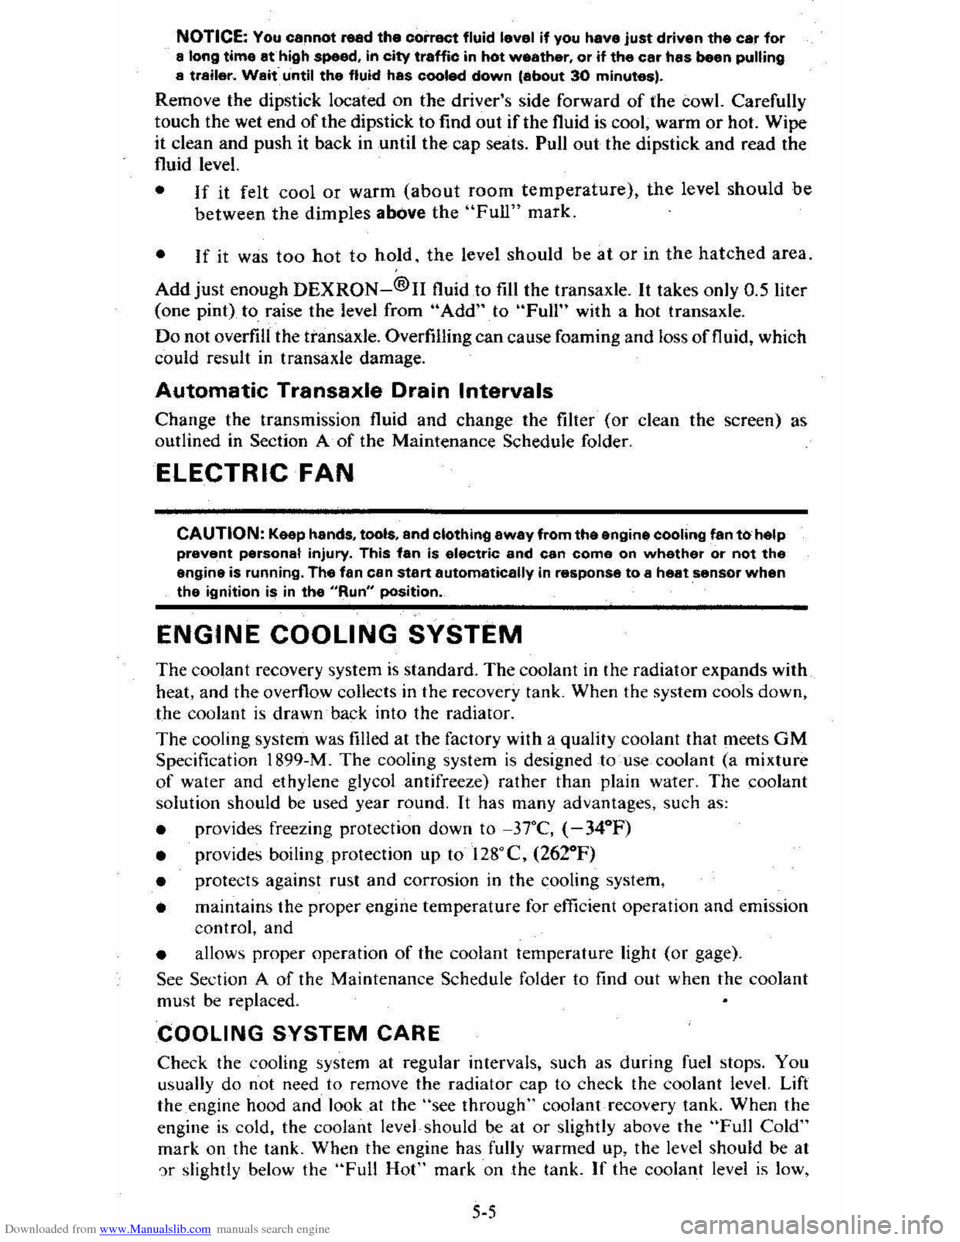
• If it felt cool or warm (about room temperature), the level should be
between the dimples above the "Full" mark.
• If it was too hot to hold. the level should be at or in the hatched area.
Add just enough DEXRON-®n fluid to fill the transaxle. It takes only 0.5 liter
(one pint)to raise the level from "Add" to "Full" with a hot transaxle.
Do not overfill the transaxle. Overfilling can cause foaming and loss of fluid, which
could result in transaxle damage.
Automatic Transaxle Drain Intervals
Change the transmission fluid and change the filter (or clean the screen) as
outlined in Section
A of the Maintenance Schedule folder.
ELECTRIC FAN
CAUTION: Keep hands, tools, and clothing away from the angine cooling fan to help prevent personal injury. This fan is electric and can come on whether or not the engine is running. The fan can start automatically in response to a heat sensor when the ignition is in the "Run" position.
ENGINE COOLING SYSTEM
The coolant recovery system is standard. The coolant in the radiator expands with
heat, and the overflow collects in the recovery tank. When the system cools down,
the coolant
is drawn back into the radiator.
The cooling system was filled at the factory with a quality coolant that meets
GM Specification 1899-M. The cooling system is designed to use coolant (a mixture
of water and ethylene glycol antifreeze) rather than plain water. The coolant
solution should be used year round. It has many advantages, such as:
• provides freezing protection down to _37°C, (-34°P)
•
provides boiling protection up to 128QC, (262°P)
•
protects against rust and corrosion in the cooling system,
• maintains the proper engine temperature for efficient operation and emission
control, and
• allows proper operation of the coolant temperature light (or gage).
See Section A of the Maintenance Schedule folder to find out when the coolant
must
be replaced.
COOLING SYSTEM CARE
Check the cooling system at regular intervals, such as during fuel stops. You
usually do not need to remove the radiator cap to check the coolant level. Lift
the engine hood and look at the "see through" coolant recovery tank. When the
engine
is cold, the coolant level -should be at or slightly above the "Full Cold"
mark on the tank. When the engine has fully warmed up, the level should be at ')r slightly below the "Full Hot" mark on the tank. If the coolant level is low,
5-5
Page 67 of 95
Downloaded from www.Manualslib.com manuals search engine remOve tlie cap on the coolant ~ecove~y tank : Add to the tank enough of a 50 150 . mixture of w ater and a g ood quality eth)dene glycol antifreez e to bring the level
up to the .
proper mark. Put the cap bac k on the tank .
Certain
conditi ons; "Such as air trapped in the syste m, may affe ct the coolant level
in
the radiator. You sho uld ch ec k the co olant ·Ievel ·in the radiator while you
change the engine oil and the e ng ine is col d. Follow steps I , 8, 9 and 10 und er
"Coola nt Rep lacement" for the correct way to rt!move the radiator cap .an d add
. coolant.
If you have to add coola nt more than f our tim es a yea r (ei ther to th e recov ery
tank
or to the radiat or). see your dealer. for a. c oo lin g system chec k.
NOTICE: If the proper quality antifreeze is used, there is no .nee~ to add extra inhibltOf"s or additives which claim to improve the svstem .. They may be harmful to the proper operation. I)f the system.
Cooling System Service
The cooling syste m should be serviced at the intervals specifi ed inSection A of
the Maintenan ce Sch edule fold er as follows:
I. W ash the radiatqr cap .and filler neck with clean water. See step J of "Coolant
Replacement" to remove rapiator cap. .
2. C hec k the coolant level in the radiator and have it tes ted for freeze proteCtion . Add·· ethylene gly col antifreeze, if needed, to· m aintain freeze protecti on at -37'C(-34'F),
3~ Have ·the coOlin-g sys tem and radiat or cap tested fo r a press ure capacity of
105 kPa (15 psi) . If a repl acement cap is needed"Hse an AC ca'p,or an
equivalent · cap, designed fOl: coolant recovery system ·s and spe cified for your model;
4. Tighten all radiator hose clamps and heater hose clamps and inspect an hose s.
R
eplace the hose s if they are swollen, "checked" or otherwise worn .
NOTICE: Take care when tightenjng·the hose clemps at tMI radiator. Overtightening COUld. bend or collapse .the radiator fittings.
5. Clean the front. of the radiator core and air condit ioning condenser to re m ove
dirt and oth er·objects. Al so clean the auxiliary engine oil andlor transmission -fluid ' cooler if the vehicle has them.
Coolant, Replacement
At the interval s specified in Section A of the Maintenance Schedule folder, flu sh
a
nd refill the cool ing system as follows :
1. Remove the·radiat or·cap when the engin e is ·cool :
•
Turn . t he cap s lowly to the len until ·it reaches a " stop. " Do not press down while turning the cap.
• 'Wait until any rem aining press ure (indicated by a hissing sound) is
reliev ed. then press down on the cap an d continue turning it t(j the left.
CAUTION:· To help ~lVoid the danger of being ,burned, do not remove the radiator cap while the angine and radiator are still hot s.c.lding flutd and steam can be bk)wn out under pressure if the·cap is taken off.too soon.
2. Whe n the cap is re m oved, run the eng ine until the upper radiator hose is hot.
(This shows that the thermostat is open and the coola nt is flow ing through
the . system.)
5·6
•
Page 70 of 95
Downloaded from www.Manualslib.com manuals search engine CAUTION: If the air cleaner is removed during repair or maintenance, be sure to . put It back on correctly. If the air cleaner is not correctly installed, there could be II fire In the engine compartment (if there should happen to be a backfire), or other engine malfunction.
Power Steering System
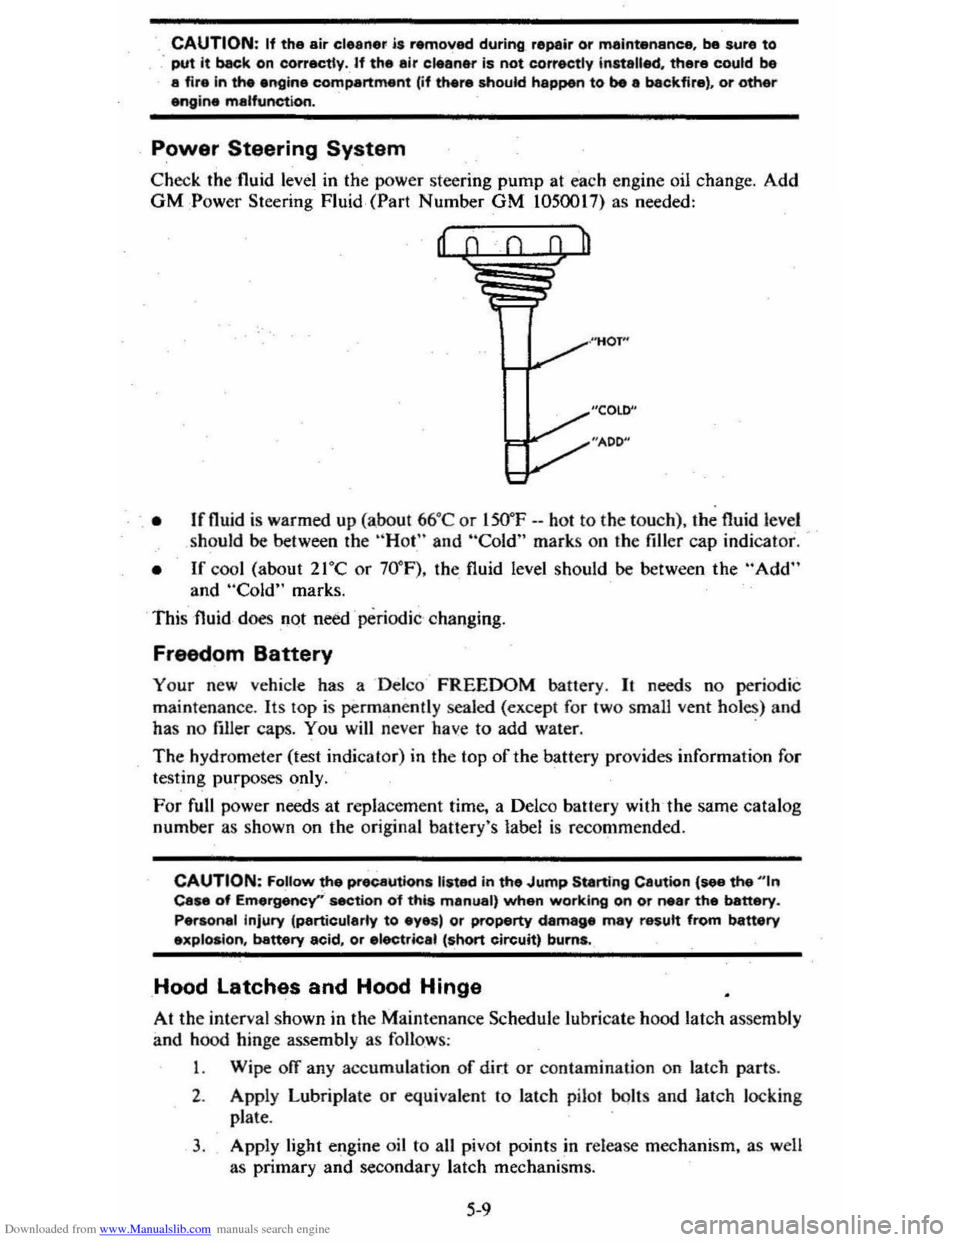
Check the 'fluid level in the power steering pump at each engine oil change. Add GM :Power Steering Fluid, (Part Number GM 1050017) as needed:
, • Ifnuid is warmed up (abo ut 66°C or lSO"F --hot to the to uch), the fluid level
should be between the "Hot" and "Cold" marks on the filler cap indicat or.
• If cool (about 21°C or 70° F), the fluid level should be between the "Add" and "Cold" marks.
This fluid
does not need ' periodic changing.
Freedom Battery
Your new vehicle has a Delco FREEDOM battery. It needs no periodic
maint enance . Its
lOp is permanently sealed (except for two small vent holes) and
has no filler caps. You will never have to add water. .
The hydrometer (test indicat or) in the top of the battery provides information for
testing purposes only.
For full power needs at repla cement time, a Delco battery with ,the same catalog
number as shown on the original banery's label
is recommended.
CAUTION: FoUow the precautions listed in the Jump Starting Cautton {see the "'n Case of Emergency''' section o"f this manual, when working on or near the battery.
Personal injury (particularly to eyes) or property damage may result from battery explosion, battery acid, or electric.1 (short circuit) burns.
Hood latches and Hood Hinge
At the interval shown in the Maintenance Schedule lubricate hood latch assembly
and hood hinge assembly as follows :
1 . Wipe off any accumulation
of dir.t or contamination on latch parts.
2. Apply Lubriplate or equivalent to latch pilaf bolts and latch loc king
plate .
3. Apply light engine oil to all pivot points in release mechanism, as well
as primary
and secondary latch mechanisms.
5-9
Page 83 of 95
Downloaded from www.Manualslib.com manuals search engine . SECTION 7
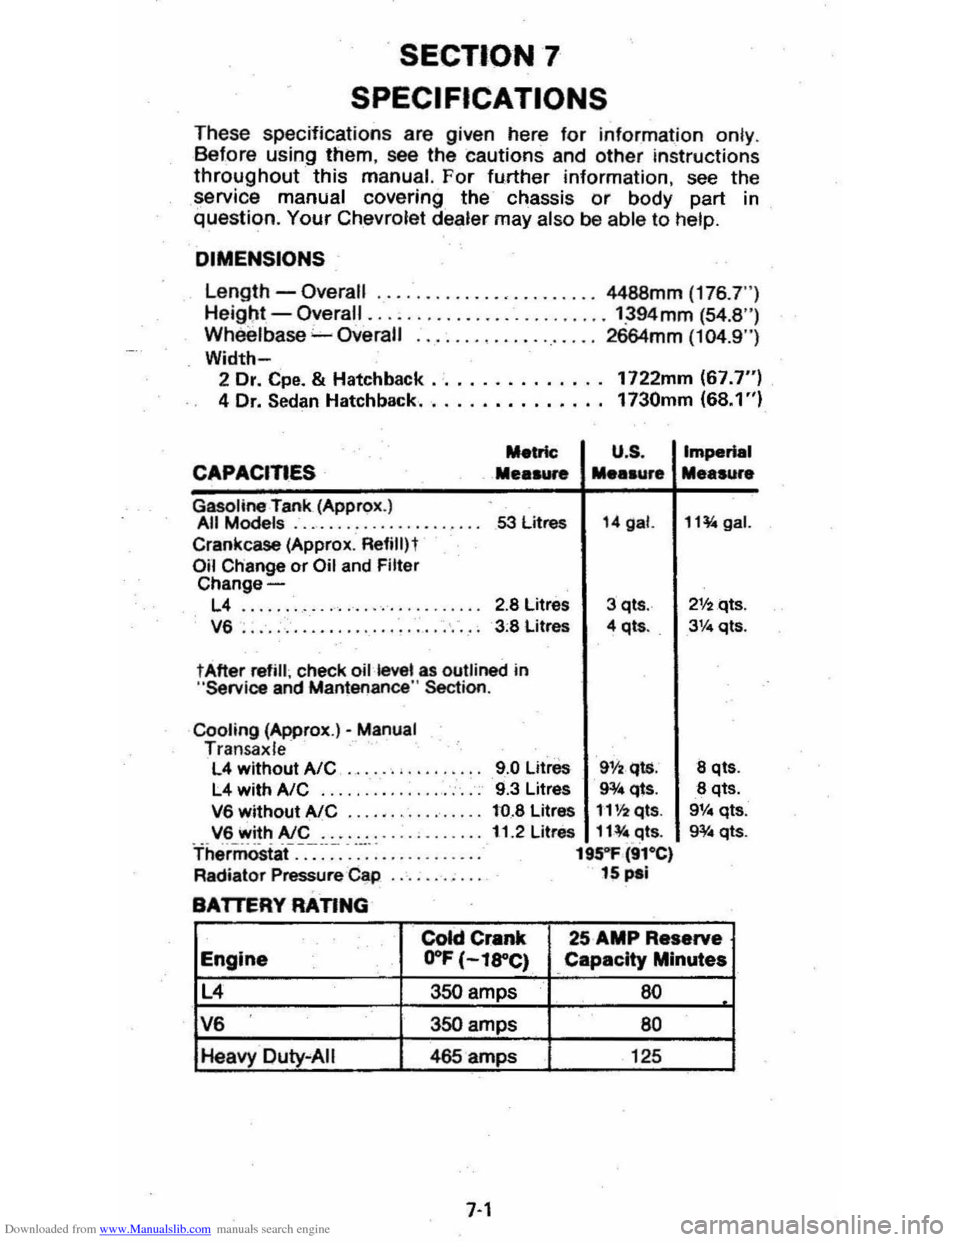
SPECIFICATIONS
T hese specifications are given here for information on ly . B efore using them, see the cautions and other instructions
throughout this manual. For fu.rther information , see the
service manual covering the chassis or body part in question. Your Chevrol et dealer may also be abl e to help.
DIMENSIONS
Length -Overall ......... , •.... , •...... 4488mm (176 .7")
He igl;lt -Overall ......................... ':394mm (54.8 ") Wh eelbase "-Overall ................... 2664mm (104.9")
Width-2 Dr. Cpe. & Hatchback .· ............. 1722mm (67.7") 4 Dr. Sedan Hatchback.. . . . . . . . . . . . .. 1730mm (68.1 ")
Metric U .S .
CAPACITIES Mea .... .... .ur.
Gasoline rank (Approx.) All Models .................... 53 litres 14 gal.
Crankcase (Approx . Refililt Oil Change or Oil and Filter Change-
L4 ........ ........... '. ' .. ... 2.8 Litres 3 qts .
V6 . . . . . , . . . . . . . . . . . . . . . . . . . . . . 3 :8 Litres 4 qt • . .
t After refill ; check oil kwel as outlined in "Service and Mantenance " Section .
Cooling (Approx.)· Manual Tran sa x le L4 without AlC ..... . , .. .
L4 withA/C .... ... ........... .
V6 without AlC ...... ...•...... V6 with AlC ....... . Thermostaf.-.-:~-~-. -....... : ....... .
Radiator Pressure Cap
BATTERY RATING
9.0 Litre. 911 •. qls. 9.3 Litres 9¥4 qts.
to.8 Litres 1'1'12 qts.
11.2 Litres 11¥ " .c:Jts. 195"1' (91·e) 15 pal
Imperial
Me.sure
11~gal.
21f2qts .
3Ve qts.
8 qt •.
8 qts. 9V .. qts.
g¥ .. qts.
colci Crank 25 AMP Reserve
Engine .. O"F (-l8"C) Capacity Minutes
L4 350 amps 60
V6 350 amps 80
Heavy Duty "AIi 465 amps 125
7-1
Page 89 of 95
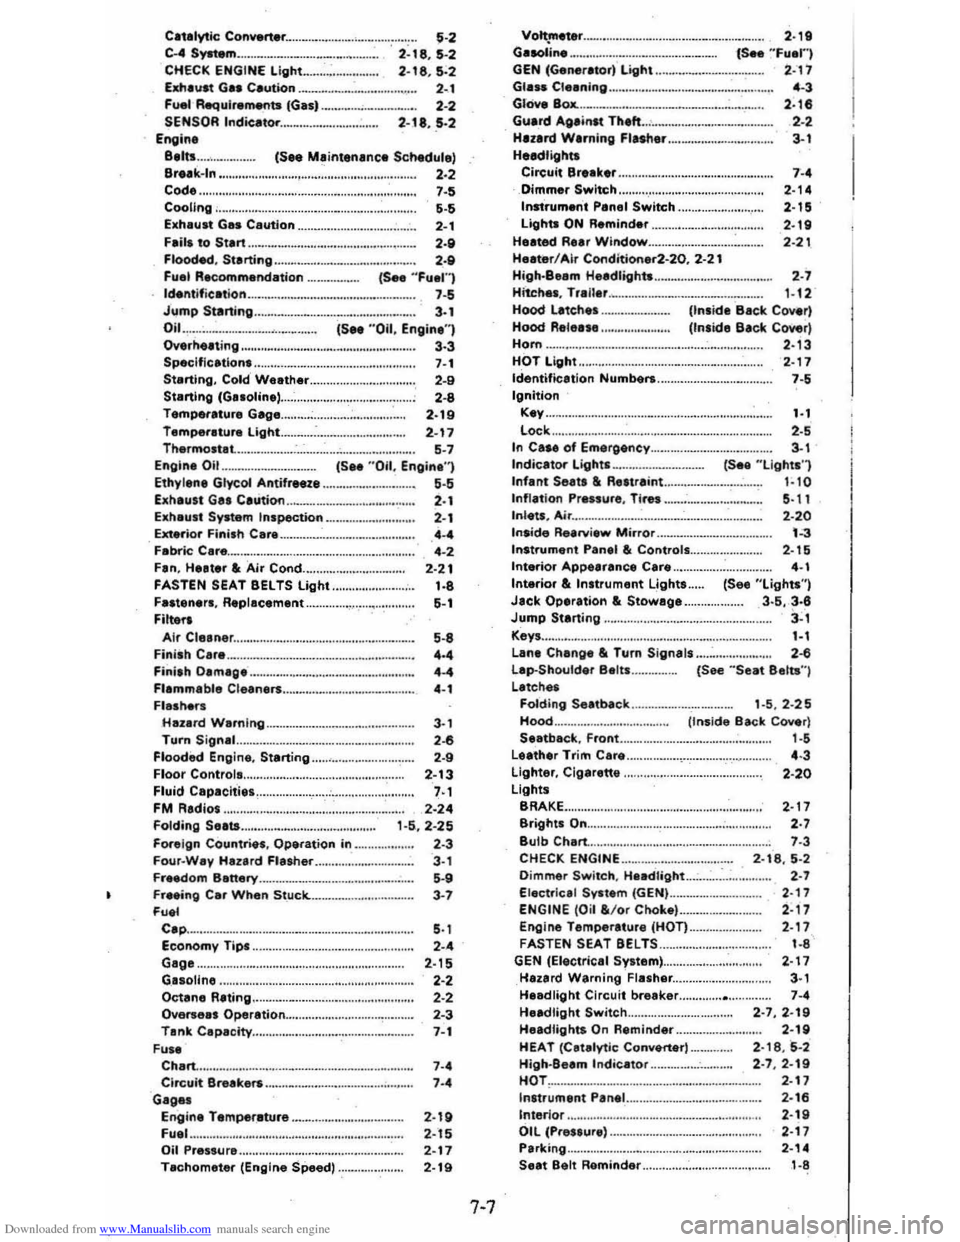
Downloaded from www.Manualslib.com manuals search engine Catalytic Converter ..................................... . 5·2 C.4S~m . CHECK ENGINE Light.. .... : ..... . 2·18,5-2 2-18,5·2 Eldla~t Gas Csution ._ .... _ ...... . Fuel Requirements IGu, ._ .... ..
SENSOR Indie.tOt' .............. . Engin.
2· 2·2 2.18 •. 5.2
e.lts .... , ........ . (See M.int.n.nce SChedule) Br •• k·ln .... . ................................. 2-2 Cod ........... . Cooling .............................. .................... . Exh.ust Ges C.ution .................... .. Flil. to St.rt ........
,.,
5·5 2· 2·0 Flooct.d ,St.rting........... 2·g Fu.1 Recommend.tion (See "Fu.1'1 I~ntification ...... _........................................ 7-5 Jump St.rting ........................... 3·1 OiL.......... ....................... (5 .. "Oil, Engine'" Overh •• ting.. ....................... . 3.3 Speclflc.tions.. ............................................ 7·1 St.rtlng. Cold Weather ........................... ".. 2·9 St.rtlng (GI,oline). 2-8 T.mp.r.ture G.g..................... ................ 2-19 T.mp.ratur. Light ..................................... 2 ·17 Th.rmostlt. ............ ..................................... 5·7 Enolne Olt.. (S .. "Oil. Enginlt '')
Ethylane Gly<:ot AntifrNZe ......... 5·6 exhauSt Gn C.U1iOfI.._ .... Exhlu.t Sy.tem Inspection .. Exterior Fini.h C.ra .............. ............... .. F.bric Care ............................................ .. F.n, Halter" Air Cond ............................ .. FASTEN SEAT BELTS Light .......... ............. . FI.tener., Repllcemant Filte~ Air CI •• n.r ... .. Fini.h C.r ... . Finilh Olm.g • .. flammable Cle.ners ................................. . FI •• ,,-,.
HI,Zlrd Wlmi"il .. Turn Signll .............................. .......... .. Flood.d Engine, St.rting .. Floor Control ....
Fluid C.p.cili ................................. ............. .. FM Radio'
2· 2· 4·4 ' ·2 2·21 \·8 5·
5 ·8 4·4
4" 4·
3 · 2-0 2·. 2·13 ,. 2·24 Folding Se.ts ........ For.lgn Countries , Operation in .. 1·5 , 2·25 2·3 Four ·W.y Hazard FI.sher ..... .. FrHdom Bett.ry ......... .......... .. FrHing C.r Wh.n Stuck. ..................... . Fue' C.p... .. ............................ ............ .. Economy Tips .. Glge .................................... .. G, •• oUne Oct.ne R.ting ................................. ........ . Ov.~e •• Oper.tion ... Tlnk C.pecity .. Fu •• Ch.ft. ......
3· 5 ·. 3·'
, . 2·' 2 ·15 2·2 2 ·2 2·3 7·
7·4 Circuit Bre ... ers ....... _................. 7-" G.ga. Engin. Temper.ture 2 ·18 Fuel ..... ...... ............ ......... 2·15 Oil Pr •• sur ... T.chometer (Engin. Sp.ed) 2·17 2·19
7·7
Volt!"etftr .............. ................................. ....... 2·19 G.soIina ......... . .......... ....... _._... (Sa. "Fu.I") GEN (G.nerator) Livht 2:17 GI ... CI •• ning ................... _ .... .... _............. '·3
Glove 8011. ............................ _....................... 2 .1 6 Gu.rd Ao-irtSt T".ft ... ~...... 2-2 Hu.rd W.rning FI.sher.. 3·1 H.adlights Circuit are.ker.. 7_. Dimm.r Switch.. 2 ·1' Instrument P.n.1 Switch.. 2 ·15 lights ON Reminder 2 -19 He.ted R .. r Window......... ................ ........ 2·2,. H.ater/Alr CondltiOfler2·20, 2·21
High·e •• m H •• dlivhts........................ 2·7
Hitches , Tr.iI.r ............................. _......... 1.12 Hood L.tcha. Iln.ide B.ck Co~r) Hood R.l"H... (Inside B.ck Cowr) Horn ............................ ......... 2.13 HOT light ........ 2 ·17
Identificltion Numbers ........................... ....... 7·5
Ignition
K.V· .... · .. · ................ . Lock In Case of Emar;ency ... Indicator L~ht •.. Infenl Se'1I " Renr.in\.. Infl.tion Pres.ure. Tires Inl.ts, Air .............................. _ .... .. Inside R •• rviaw Mirror .. Instrum.nt P.n.1 &. Controls ...
\.
2·' 3 · (SH " lightS'') 1·10 5 ·11 2·20 '·3 2·15 Int.rior ApP41.r'nce C.re . ..................... ...... ,., Interior" Instrum.nt lights.. (See "lights'" J.ck Operation&. Stowlge.. 3·5. 3.8 Jump Stlrting .......... 3~" Keys ..... 1-1 Lan. Change 8t Turn Signals 2-6 L.p-Shoulde, Baits.. {See "Seat Belts ",
Latches
Folding S •• t~c"" .. 1·5 .2 ·25 Hood ....................... .. S •• tb.c", Front.. Leather Trim Cer ...
(Ins ide Back Cover) \·5
light.r, Clgar.ne ... lights BRAKE ......... .. Brights On ..... . Bulb Ch.rt.. CHECK ENGINE ... Dimmer SwitCh , Hndlight...
Electricel Svst.m (GEN) ENGINE ( O il & /or CI\o"e) Engin. TemP41f.ture (HOT) .. FASTEN SEAT BELTS .. GEN (EI.ctric.I System) ... Hazard W.rning FI.sher ... H •• dlight Circuit br.aker H •• dlight SwitCh ... H •• dlights On Reminder HEAT (Cat.lytic Convert.r) .. High·Beam Indicator HOT: .......................................... .. Instrum.nt P.n.1 Interior .......... . OIL (Pr.ssur.) .. Parking .... Se.t B.lt Remind.r ...
4 ·3
2 -20
2·17 2· 7 '·3 2 ·18. 5·2 2·' 2 ·17 2 ·11 2 ·17 \·8
2 ·17
3 · , .. 2 ·7,2·19 2-1Q 2·18, '5-2 2·7 . 2·19 2 ·17
2 -1E1 2·19 2·17 2·" ,1 ·8