four CHEVROLET CITY EXPRESS 2017 Owners Manual
[x] Cancel search | Manufacturer: CHEVROLET, Model Year: 2017, Model line: CITY EXPRESS, Model: CHEVROLET CITY EXPRESS 2017Pages: 348, PDF Size: 4.84 MB
Page 9 of 348
Chevrolet Express Owner Manual (GMNA-Localizing-U.S./Canada/Mexico-
9967827) - 2017 - crc - 9/26/16
8 In Brief
Initial Drive
Information
This section provides a brief
overview about some of the
important features that may or may
not be on your specific vehicle.
For more detailed information, refer
to each of the features which can be
found later in this owner’s manual.
Remote Keyless Entry
(RKE) System
If equipped, the Remote Keyless
Entry (RKE) transmitter is used to
remotely lock and unlock the doors
from up to 60 m (197 ft) away from
the vehicle.
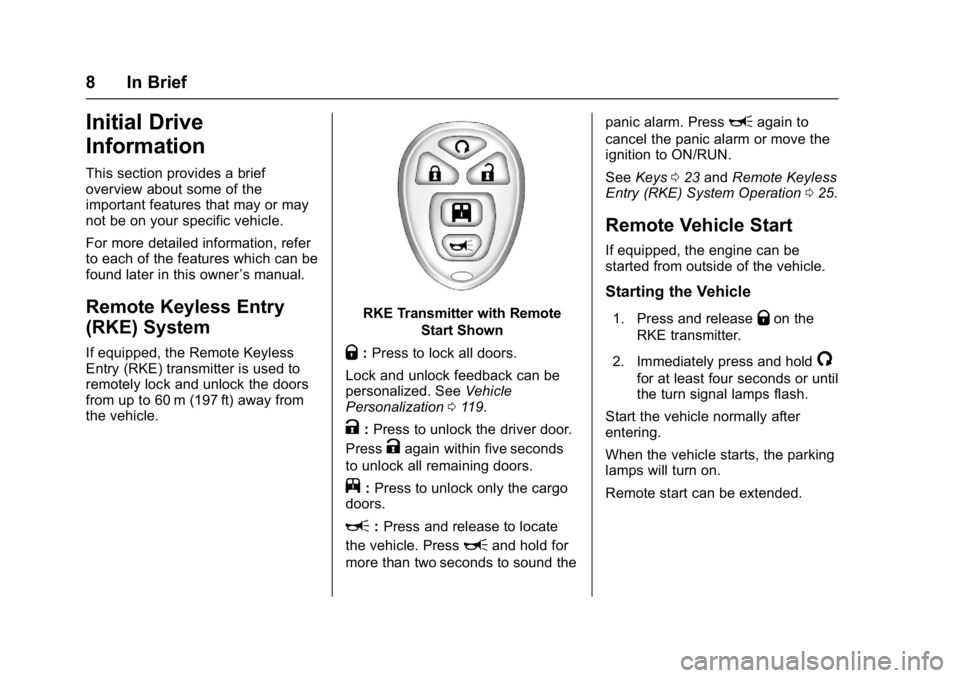
RKE Transmitter with Remote
Start Shown
Q:Press to lock all doors.
Lock and unlock feedback can be
personalized. See Vehicle
Personalization 0119.
K:Press to unlock the driver door.
Press
Kagain within five seconds
to unlock all remaining doors.
j: Press to unlock only the cargo
doors.
L: Press and release to locate
the vehicle. Press
Land hold for
more than two seconds to sound the panic alarm. Press
Lagain to
cancel the panic alarm or move the
ignition to ON/RUN.
See Keys 023 and Remote Keyless
Entry (RKE) System Operation 025.
Remote Vehicle Start
If equipped, the engine can be
started from outside of the vehicle.
Starting the Vehicle
1. Press and releaseQon the
RKE transmitter.
2. Immediately press and hold
/
for at least four seconds or until
the turn signal lamps flash.
Start the vehicle normally after
entering.
When the vehicle starts, the parking
lamps will turn on.
Remote start can be extended.
Page 15 of 348
Chevrolet Express Owner Manual (GMNA-Localizing-U.S./Canada/Mexico-
9967827) - 2017 - crc - 9/26/16
14 In Brief
Exterior Lighting
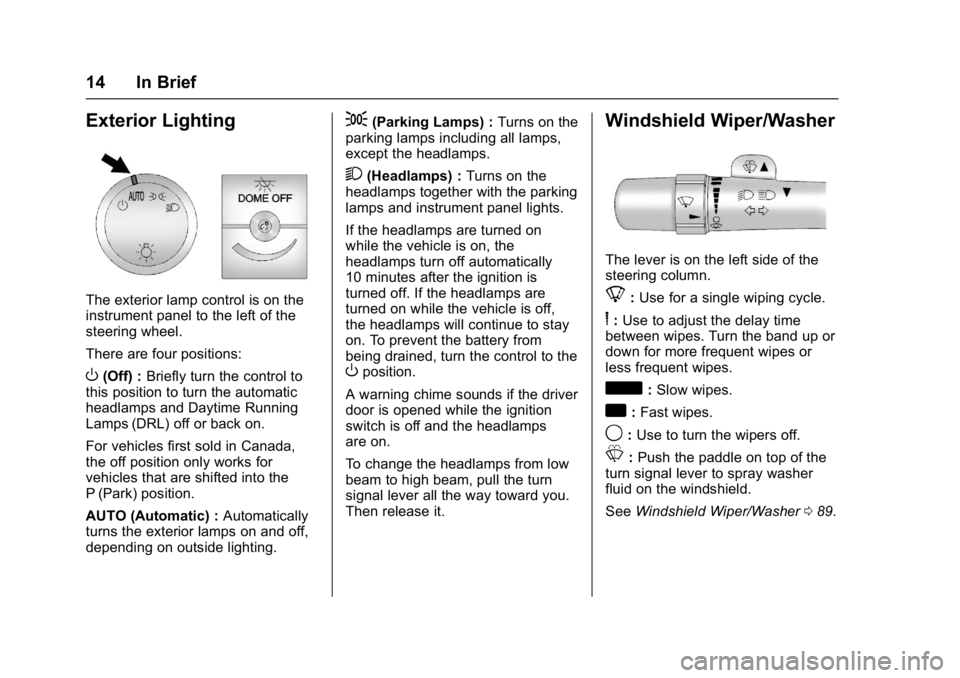
The exterior lamp control is on the
instrument panel to the left of the
steering wheel.
There are four positions:
O(Off) :Briefly turn the control to
this position to turn the automatic
headlamps and Daytime Running
Lamps (DRL) off or back on.
For vehicles first sold in Canada,
the off position only works for
vehicles that are shifted into the
P (Park) position.
AUTO (Automatic) : Automatically
turns the exterior lamps on and off,
depending on outside lighting.
;(Parking Lamps) : Turns on the
parking lamps including all lamps,
except the headlamps.
2(Headlamps) : Turns on the
headlamps together with the parking
lamps and instrument panel lights.
If the headlamps are turned on
while the vehicle is on, the
headlamps turn off automatically
10 minutes after the ignition is
turned off. If the headlamps are
turned on while the vehicle is off,
the headlamps will continue to stay
on. To prevent the battery from
being drained, turn the control to the
Oposition.
A warning chime sounds if the driver
door is opened while the ignition
switch is off and the headlamps
are on.
To change the headlamps from low
beam to high beam, pull the turn
signal lever all the way toward you.
Then release it.
Windshield Wiper/Washer
The lever is on the left side of the
steering column.
8: Use for a single wiping cycle.
6: Use to adjust the delay time
between wipes. Turn the band up or
down for more frequent wipes or
less frequent wipes.
d: Slow wipes.
a:Fast wipes.
9: Use to turn the wipers off.
L:Push the paddle on top of the
turn signal lever to spray washer
fluid on the windshield.
See Windshield Wiper/Washer 089.
Page 27 of 348
Chevrolet Express Owner Manual (GMNA-Localizing-U.S./Canada/Mexico-
9967827) - 2017 - crc - 9/26/16
26 Keys, Doors, and Windows
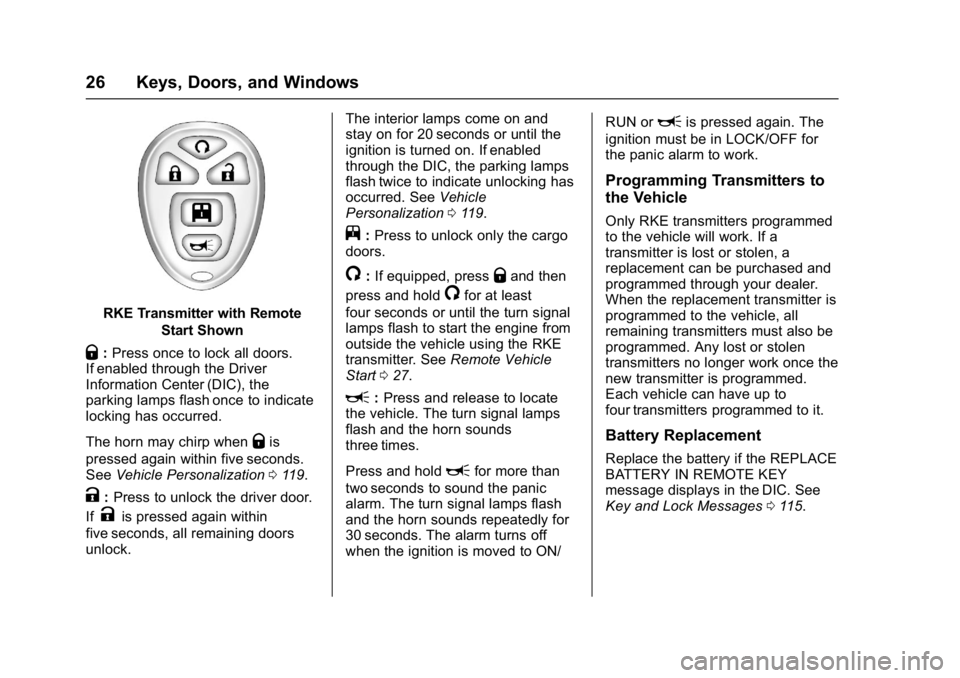
RKE Transmitter with RemoteStart Shown
Q:Press once to lock all doors.
If enabled through the Driver
Information Center (DIC), the
parking lamps flash once to indicate
locking has occurred.
The horn may chirp when
Qis
pressed again within five seconds.
See Vehicle Personalization 0119.
K:Press to unlock the driver door.
If
Kis pressed again within
five seconds, all remaining doors
unlock. The interior lamps come on and
stay on for 20 seconds or until the
ignition is turned on. If enabled
through the DIC, the parking lamps
flash twice to indicate unlocking has
occurred. See
Vehicle
Personalization 0119.
j:Press to unlock only the cargo
doors.
/: If equipped, pressQand then
press and hold
/for at least
four seconds or until the turn signal
lamps flash to start the engine from
outside the vehicle using the RKE
transmitter. See Remote Vehicle
Start 027.
L:Press and release to locate
the vehicle. The turn signal lamps
flash and the horn sounds
three times.
Press and hold
Lfor more than
two seconds to sound the panic
alarm. The turn signal lamps flash
and the horn sounds repeatedly for
30 seconds. The alarm turns off
when the ignition is moved to ON/ RUN or
Lis pressed again. The
ignition must be in LOCK/OFF for
the panic alarm to work.
Programming Transmitters to
the Vehicle
Only RKE transmitters programmed
to the vehicle will work. If a
transmitter is lost or stolen, a
replacement can be purchased and
programmed through your dealer.
When the replacement transmitter is
programmed to the vehicle, all
remaining transmitters must also be
programmed. Any lost or stolen
transmitters no longer work once the
new transmitter is programmed.
Each vehicle can have up to
four transmitters programmed to it.
Battery Replacement
Replace the battery if the REPLACE
BATTERY IN REMOTE KEY
message displays in the DIC. See
Key and Lock Messages 0115.
Page 28 of 348
Chevrolet Express Owner Manual (GMNA-Localizing-U.S./Canada/Mexico-
9967827) - 2017 - crc - 9/26/16
Keys, Doors, and Windows 27
Caution
When replacing the battery, do
not touch any of the circuitry on
the transmitter. Static from your
body could damage the
transmitter.
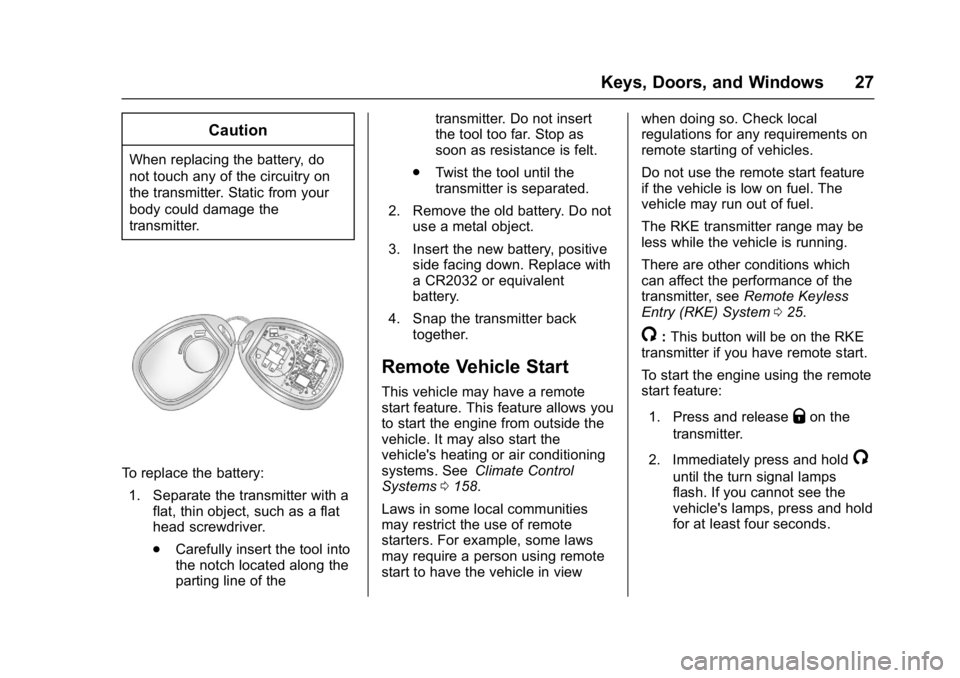
To replace the battery:1. Separate the transmitter with a flat, thin object, such as a flat
head screwdriver.
.Carefully insert the tool into
the notch located along the
parting line of the transmitter. Do not insert
the tool too far. Stop as
soon as resistance is felt.
. Twist the tool until the
transmitter is separated.
2. Remove the old battery. Do not use a metal object.
3. Insert the new battery, positive side facing down. Replace with
a CR2032 or equivalent
battery.
4. Snap the transmitter back together.
Remote Vehicle Start
This vehicle may have a remote
start feature. This feature allows you
to start the engine from outside the
vehicle. It may also start the
vehicle's heating or air conditioning
systems. See Climate Control
Systems 0158.
Laws in some local communities
may restrict the use of remote
starters. For example, some laws
may require a person using remote
start to have the vehicle in view when doing so. Check local
regulations for any requirements on
remote starting of vehicles.
Do not use the remote start feature
if the vehicle is low on fuel. The
vehicle may run out of fuel.
The RKE transmitter range may be
less while the vehicle is running.
There are other conditions which
can affect the performance of the
transmitter, see
Remote Keyless
Entry (RKE) System 025.
/:This button will be on the RKE
transmitter if you have remote start.
To start the engine using the remote
start feature:
1. Press and release
Qon the
transmitter.
2. Immediately press and hold
/
until the turn signal lamps
flash. If you cannot see the
vehicle's lamps, press and hold
for at least four seconds.
Page 45 of 348
Chevrolet Express Owner Manual (GMNA-Localizing-U.S./Canada/Mexico-
9967827) - 2017 - crc - 9/26/16
44 Seats and Restraints
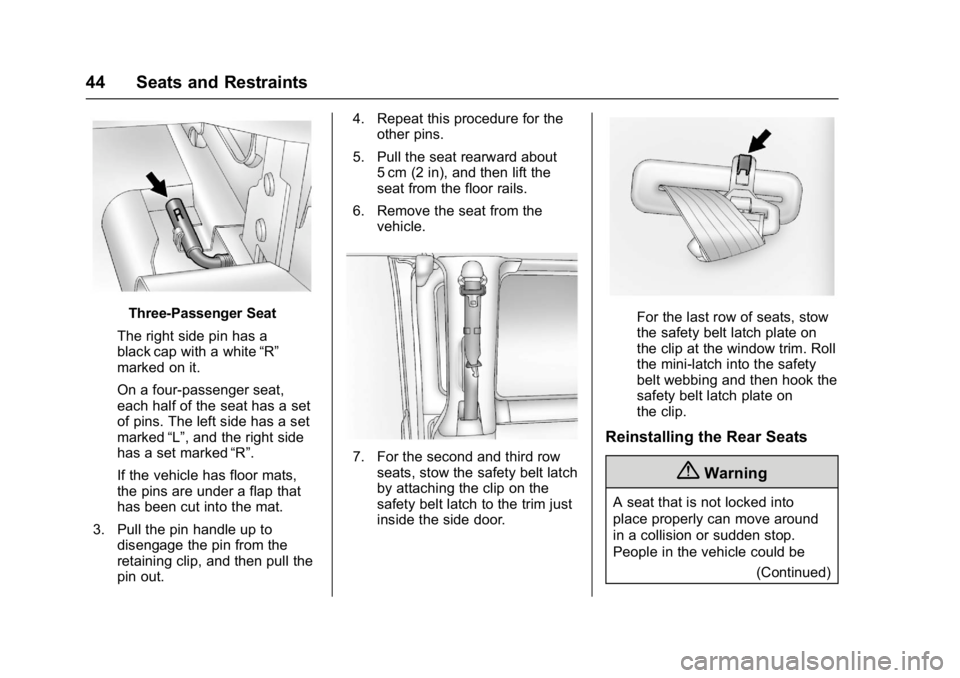
Three-Passenger Seat
The right side pin has a
black cap with a white “R”
marked on it.
On a four-passenger seat,
each half of the seat has a set
of pins. The left side has a set
marked “L”, and the right side
has a set marked “R”.
If the vehicle has floor mats,
the pins are under a flap that
has been cut into the mat.
3. Pull the pin handle up to disengage the pin from the
retaining clip, and then pull the
pin out. 4. Repeat this procedure for the
other pins.
5. Pull the seat rearward about 5 cm (2 in), and then lift the
seat from the floor rails.
6. Remove the seat from the vehicle.
7. For the second and third rowseats, stow the safety belt latch
by attaching the clip on the
safety belt latch to the trim just
inside the side door.
For the last row of seats, stow
the safety belt latch plate on
the clip at the window trim. Roll
the mini-latch into the safety
belt webbing and then hook the
safety belt latch plate on
the clip.
Reinstalling the Rear Seats
{Warning
A seat that is not locked into
place properly can move around
in a collision or sudden stop.
People in the vehicle could be
(Continued)
Page 46 of 348
Chevrolet Express Owner Manual (GMNA-Localizing-U.S./Canada/Mexico-
9967827) - 2017 - crc - 9/26/16
Seats and Restraints 45
Warning (Continued)
injured. Be sure to lock the seat
into place properly when
installing it.
{Warning
A safety belt that is improperly
routed, not properly attached,
or twisted will not provide the
protection needed in a crash. The
person wearing the belt could be
seriously injured. After raising the
rear seatback, always check to be
sure that the safety belts are
properly routed and attached, and
are not twisted.
1. Position the seat into the open slots in both rails. Push the
seat forward in the rail, hooking
both seat bases onto the pins
inside of the rails.
2. Locate the hole in the rail to install the locking pins at the
rear of the seat base. If the vehicle has floor mats, pull the
flap that has been cut into
the mat.
3. Insert the locking pins into the seat base and push the seat to
line up the pins with the base.
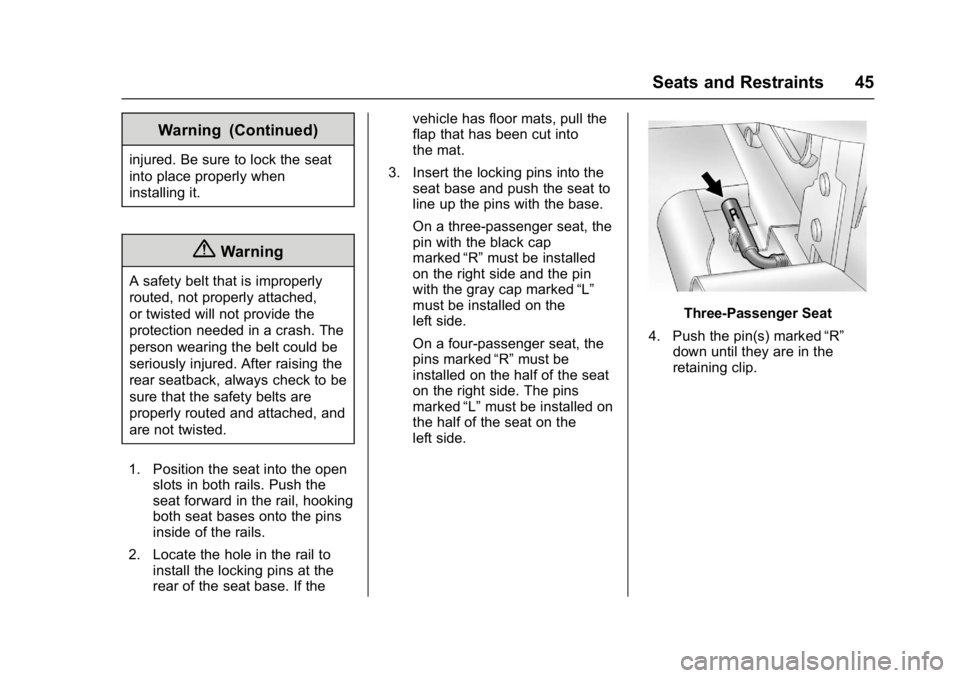
On a three-passenger seat, the
pin with the black cap
marked “R”must be installed
on the right side and the pin
with the gray cap marked “L”
must be installed on the
left side.
On a four-passenger seat, the
pins marked “R”must be
installed on the half of the seat
on the right side. The pins
marked “L”must be installed on
the half of the seat on the
left side.
Three-Passenger Seat
4. Push the pin(s) marked “R”
down until they are in the
retaining clip.
Page 52 of 348
Chevrolet Express Owner Manual (GMNA-Localizing-U.S./Canada/Mexico-
9967827) - 2017 - crc - 9/26/16
Seats and Restraints 51
Rear Safety Belt Comfort
Guides
This vehicle may have rear safety
belt comfort guides. The guides may
provide added safety belt comfort
for older children who have
outgrown booster seats and for
some adults. When installed and
properly adjusted, the comfort guide
positions the shoulder belt away
from the neck and head.
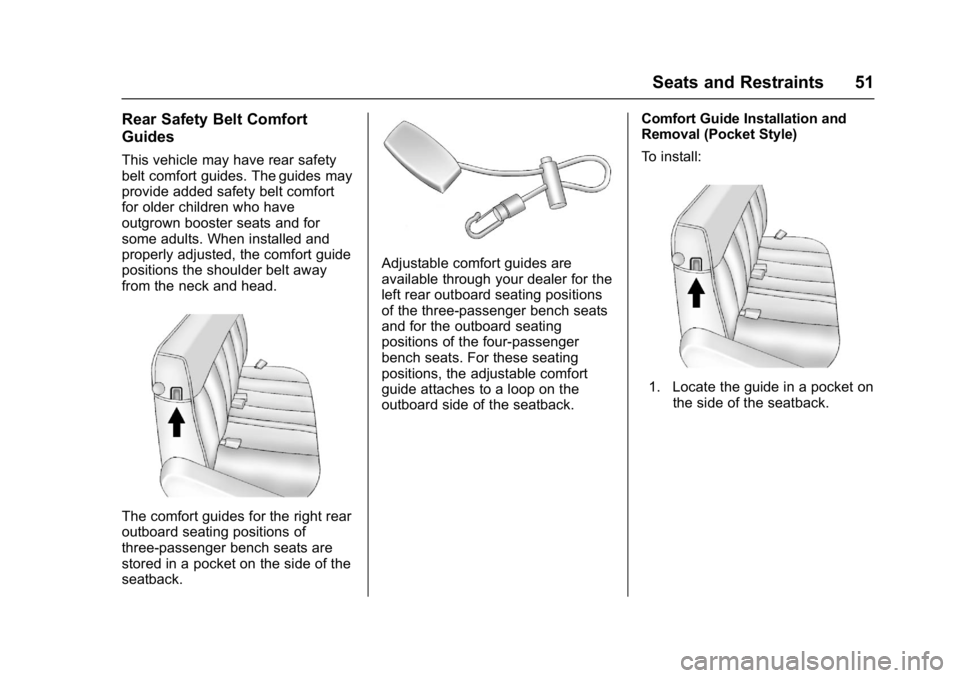
The comfort guides for the right rear
outboard seating positions of
three-passenger bench seats are
stored in a pocket on the side of the
seatback.
Adjustable comfort guides are
available through your dealer for the
left rear outboard seating positions
of the three-passenger bench seats
and for the outboard seating
positions of the four-passenger
bench seats. For these seating
positions, the adjustable comfort
guide attaches to a loop on the
outboard side of the seatback.Comfort Guide Installation and
Removal (Pocket Style)
To install:
1. Locate the guide in a pocket on
the side of the seatback.
Page 54 of 348
Chevrolet Express Owner Manual (GMNA-Localizing-U.S./Canada/Mexico-
9967827) - 2017 - crc - 9/26/16
Seats and Restraints 53
Comfort Guide Installation and
Removal (Adjustable Style)
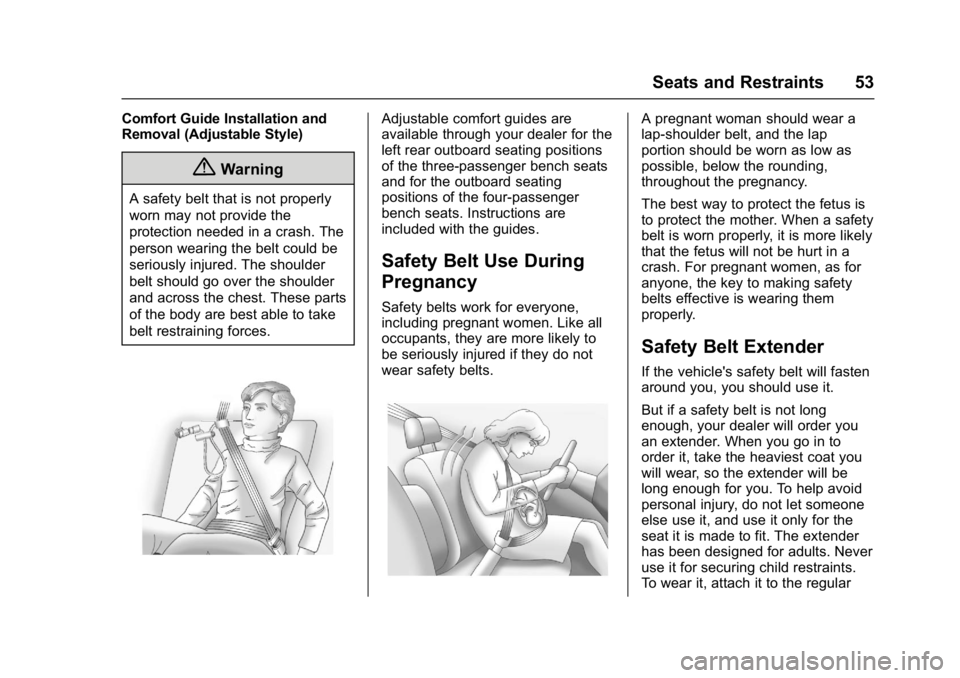
{Warning
A safety belt that is not properly
worn may not provide the
protection needed in a crash. The
person wearing the belt could be
seriously injured. The shoulder
belt should go over the shoulder
and across the chest. These parts
of the body are best able to take
belt restraining forces.
Adjustable comfort guides are
available through your dealer for the
left rear outboard seating positions
of the three-passenger bench seats
and for the outboard seating
positions of the four-passenger
bench seats. Instructions are
included with the guides.
Safety Belt Use During
Pregnancy
Safety belts work for everyone,
including pregnant women. Like all
occupants, they are more likely to
be seriously injured if they do not
wear safety belts.
A pregnant woman should wear a
lap-shoulder belt, and the lap
portion should be worn as low as
possible, below the rounding,
throughout the pregnancy.
The best way to protect the fetus is
to protect the mother. When a safety
belt is worn properly, it is more likely
that the fetus will not be hurt in a
crash. For pregnant women, as for
anyone, the key to making safety
belts effective is wearing them
properly.
Safety Belt Extender
If the vehicle's safety belt will fasten
around you, you should use it.
But if a safety belt is not long
enough, your dealer will order you
an extender. When you go in to
order it, take the heaviest coat you
will wear, so the extender will be
long enough for you. To help avoid
personal injury, do not let someone
else use it, and use it only for the
seat it is made to fit. The extender
has been designed for adults. Never
use it for securing child restraints.
To wear it, attach it to the regular
Page 76 of 348
Chevrolet Express Owner Manual (GMNA-Localizing-U.S./Canada/Mexico-
9967827) - 2017 - crc - 9/26/16
Seats and Restraints 75
Some child restraints that have a
top tether are designed for use with
or without the top tether being
attached. Others require the top
tether always to be attached.
In Canada, the law requires that
forward-facing child restraints have
a top tether, and that the tether be
attached. Be sure to read and follow
the instructions for your child
restraint.
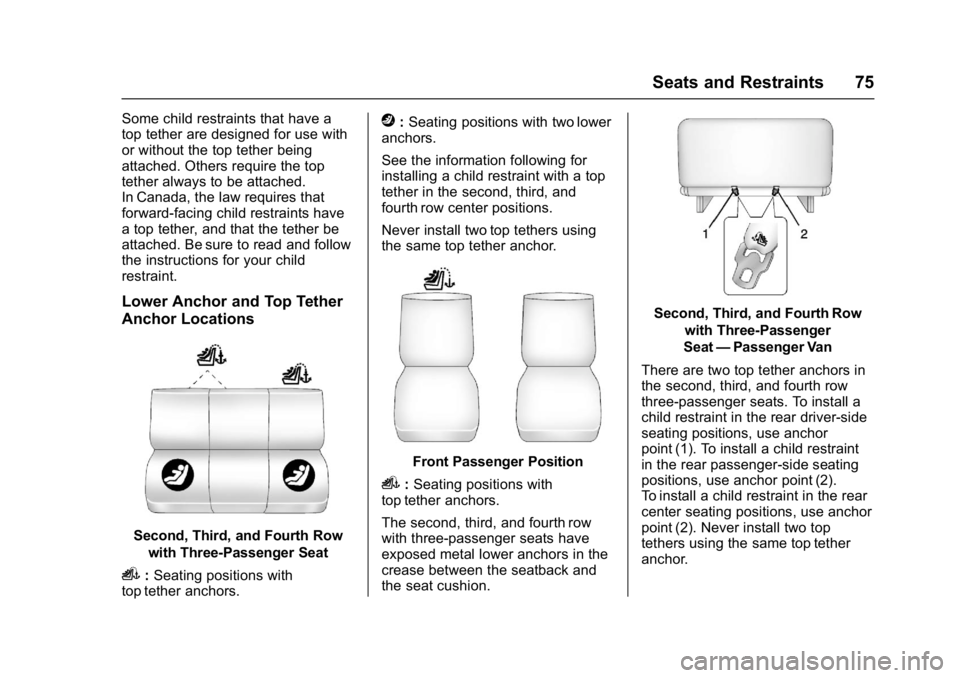
Lower Anchor and Top Tether
Anchor Locations
Second, Third, and Fourth Rowwith Three-Passenger Seat
i:Seating positions with
top tether anchors.
j: Seating positions with two lower
anchors.
See the information following for
installing a child restraint with a top
tether in the second, third, and
fourth row center positions.
Never install two top tethers using
the same top tether anchor.
Front Passenger Position
i: Seating positions with
top tether anchors.
The second, third, and fourth row
with three-passenger seats have
exposed metal lower anchors in the
crease between the seatback and
the seat cushion.
Second, Third, and Fourth Row
with Three-Passenger
Seat —Passenger Van
There are two top tether anchors in
the second, third, and fourth row
three-passenger seats. To install a
child restraint in the rear driver-side
seating positions, use anchor
point (1). To install a child restraint
in the rear passenger-side seating
positions, use anchor point (2).
To install a child restraint in the rear
center seating positions, use anchor
point (2). Never install two top
tethers using the same top tether
anchor.
Page 77 of 348
Chevrolet Express Owner Manual (GMNA-Localizing-U.S./Canada/Mexico-
9967827) - 2017 - crc - 9/26/16
76 Seats and Restraints
If the vehicle is equipped with a four
passenger fourth or fifth row seat, it
does not have upper or lower
anchors. If a child restraint is placed
in the four- passenger fourth or fifth
row seat, it must be secured using
the vehicle safety belts.
SeeSecuring Child Restraints (With
the Safety Belt in the Rear Seat)
0 80 orSecuring Child Restraints
(With the Safety Belt in the Front
Seat) 082.
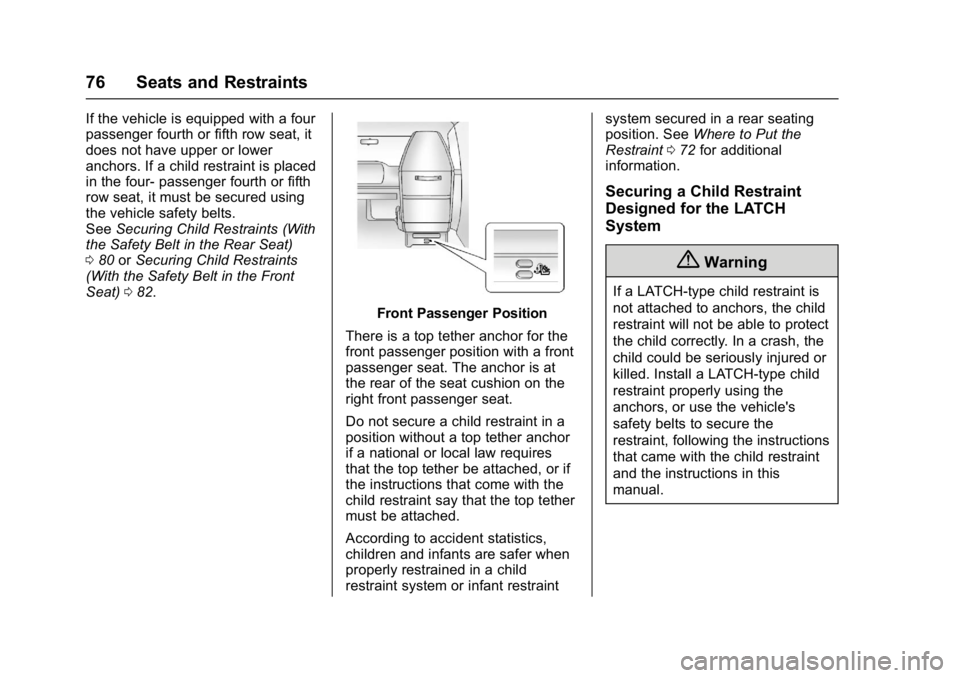
Front Passenger Position
There is a top tether anchor for the
front passenger position with a front
passenger seat. The anchor is at
the rear of the seat cushion on the
right front passenger seat.
Do not secure a child restraint in a
position without a top tether anchor
if a national or local law requires
that the top tether be attached, or if
the instructions that come with the
child restraint say that the top tether
must be attached.
According to accident statistics,
children and infants are safer when
properly restrained in a child
restraint system or infant restraint system secured in a rear seating
position. See
Where to Put the
Restraint 072 for additional
information.
Securing a Child Restraint
Designed for the LATCH
System
{Warning
If a LATCH-type child restraint is
not attached to anchors, the child
restraint will not be able to protect
the child correctly. In a crash, the
child could be seriously injured or
killed. Install a LATCH-type child
restraint properly using the
anchors, or use the vehicle's
safety belts to secure the
restraint, following the instructions
that came with the child restraint
and the instructions in this
manual.