spare wheel CHEVROLET CLASSIC 2004 Owners Manual
[x] Cancel search | Manufacturer: CHEVROLET, Model Year: 2004, Model line: CLASSIC, Model: CHEVROLET CLASSIC 2004Pages: 348, PDF Size: 5.32 MB
Page 203 of 348
Service............................................................5-3
Doing Your Own Service Work.........................5-3
Adding Equipment to the Outside of Your
Vehicle......................................................5-4
Fuel................................................................5-4
Gasoline Octane............................................5-4
Gasoline Specifications....................................5-5
California Fuel...............................................5-5
Additives.......................................................5-6
Fuels in Foreign Countries...............................5-6
Filling Your Tank............................................5-7
Filling a Portable Fuel Container.......................5-9
Checking Things Under the Hood....................5-10
Hood Release..............................................5-10
Engine Compartment Overview.......................5-12
Engine Oil...................................................5-13
Engine Air Cleaner/Filter................................5-17
Automatic Transaxle Fluid..............................5-19
Engine Coolant.............................................5-19
Coolant Surge Tank Pressure Cap..................5-22
Engine Overheating.......................................5-22
Cooling System............................................5-25
Power Steering Fluid.....................................5-31
Windshield Washer Fluid................................5-32Brakes........................................................5-34
Battery........................................................5-38
Jump Starting...............................................5-39
Bulb Replacement..........................................5-45
Halogen Bulbs..............................................5-45
Headlamps..................................................5-45
Front Turn Signal Lamps...............................5-47
Center High-Mounted Stoplamp (CHMSL).........5-47
Taillamps, Turn Signal, Stoplamps and
Back-up Lamps.........................................5-48
Replacement Bulbs.......................................5-50
Windshield Wiper Blade Replacement..............5-51
Tires..............................................................5-52
Inflation - Tire Pressure.................................5-59
Tire Inspection and Rotation...........................5-60
When It Is Time for New Tires.......................5-62
Buying New Tires.........................................5-62
Uniform Tire Quality Grading..........................5-63
Wheel Alignment and Tire Balance..................5-65
Wheel Replacement......................................5-65
Tire Chains..................................................5-66
If a Tire Goes Flat........................................5-67
Changing a Flat Tire.....................................5-68
Compact Spare Tire......................................5-79
Section 5 Service and Appearance Care
5-1
Page 262 of 348
When to Check
Check your tires once a month or more.
Don’t forget your compact spare tire. It should be at
60 psi (420 kPa).
How to Check
Use a good quality pocket-type gage to check tire
pressure. You can’t tell if your tires are properly inflated
simply by looking at them. Radial tires may look
properly inflated even when they’re underinflated. Check
the tire’s inflation pressure when the tires are cold.
Cold means your vehicle has been sitting for at least
three hours or driven no more than 1 mile (1.6 km).
Remove the valve cap from the tire valve stem. Press
the tire gage firmly onto the valve to get a pressure
measurement. If the cold tire inflation pressure matches
the recommended pressure on the Tire and Loading
Information label, no further adjustment is necessary. If
the inflation pressure is low, add air until you reach
the recommended amount.
If you overfill the tire, release air by pushing on the
metal stem in the center of the tire valve. Recheck the
tire pressure with the tire gage.
Be sure to put the valve caps back on the valve stems.
They help prevent leaks by keeping out dirt and
moisture.
Tire Inspection and Rotation
Tires should be rotated every 5,000 to 8,000 miles
(8 000 to 13 000 km).
Any time you notice unusual wear, rotate your tires as
soon as possible and check wheel alignment. Also
check for damaged tires or wheels. SeeWhen It Is Time
for New Tires on page 5-62andWheel Replacement
on page 5-65for more information.
The purpose of regular rotation is to achieve more
uniform wear for all tires on the vehicle. The first rotation
is the most important. SeePart A: Scheduled
Maintenance Services on page 6-4, for scheduled
rotation intervals.
5-60
Page 263 of 348
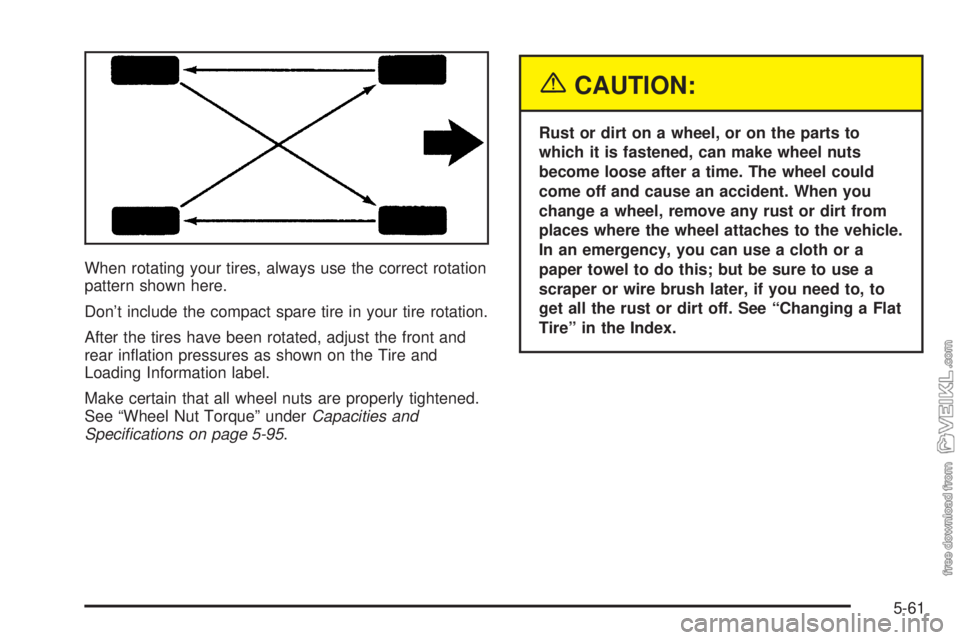
When rotating your tires, always use the correct rotation
pattern shown here.
Don’t include the compact spare tire in your tire rotation.
After the tires have been rotated, adjust the front and
rear inflation pressures as shown on the Tire and
Loading Information label.
Make certain that all wheel nuts are properly tightened.
See “Wheel Nut Torque” underCapacities and
Speci�cations on page 5-95.
{CAUTION:
Rust or dirt on a wheel, or on the parts to
which it is fastened, can make wheel nuts
become loose after a time. The wheel could
come off and cause an accident. When you
change a wheel, remove any rust or dirt from
places where the wheel attaches to the vehicle.
In an emergency, you can use a cloth or a
paper towel to do this; but be sure to use a
scraper or wire brush later, if you need to, to
get all the rust or dirt off. See “Changing a Flat
Tire” in the Index.
5-61
Page 265 of 348
{CAUTION:
Mixing tires could cause you to lose control
while driving. If you mix tires of different sizes
or types (radial and bias-belted tires), the
vehicle may not handle properly, and you
could have a crash. Using tires of different
sizes may also cause damage to your vehicle.
Be sure to use the same size and type tires on
all wheels. It’s all right to drive with your
compact spare temporarily, it was developed
for use on your vehicle. See “Compact Spare
Tire” in the index.
{CAUTION:
If you use bias-ply tires on your vehicle, the
wheel rim �anges could develop cracks after
many miles of driving. A tire and/or wheel
could fail suddenly, causing a crash. Use only
radial-ply tires with the wheels on your vehicle.
Uniform Tire Quality Grading
Quality grades can be found where applicable on the
tire sidewall between tread shoulder and maximum
section width. For example:
Treadwear 200 Traction AA Temperature A
The following information relates to the system
developed by the United States National Highway
Traffic Safety Administration, which grades tires by
treadwear, traction and temperature performance. (This
applies only to vehicles sold in the United States.)
The grades are molded on the sidewalls of most
passenger car tires. The Uniform Tire Quality Grading
system does not apply to deep tread, winter-type
snow tires, space-saver or temporary use spare tires,
tires with nominal rim diameters of 10 to 12 inches
(25 to 30 cm), or to some limited-production tires.
While the tires available on General Motors passenger
cars and light trucks may vary with respect to these
grades, they must also conform to federal safety
requirements and additional General Motors Tire
Performance Criteria (TPC) standards.
5-63
Page 272 of 348
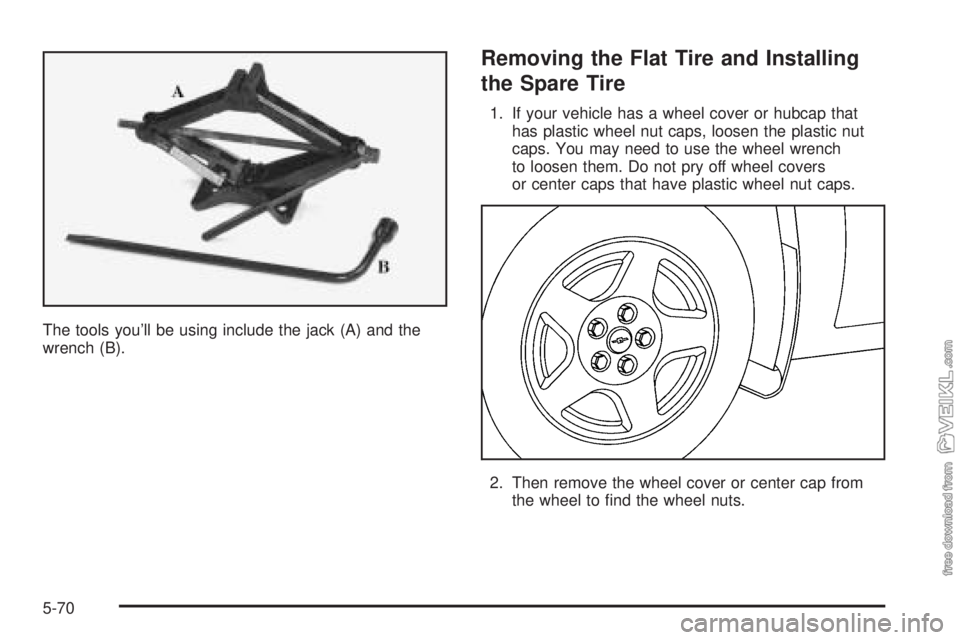
The tools you’ll be using include the jack (A) and the
wrench (B).
Removing the Flat Tire and Installing
the Spare Tire
1. If your vehicle has a wheel cover or hubcap that
has plastic wheel nut caps, loosen the plastic nut
caps. You may need to use the wheel wrench
to loosen them. Do not pry off wheel covers
or center caps that have plastic wheel nut caps.
2. Then remove the wheel cover or center cap from
the wheel to find the wheel nuts.
5-70
Page 275 of 348
{CAUTION:
Raising your vehicle with the jack improperly
positioned can damage the vehicle and even
make the vehicle fall. To help avoid personal
injury and vehicle damage, be sure to �t the
jack lift head into the proper location before
raising the vehicle.
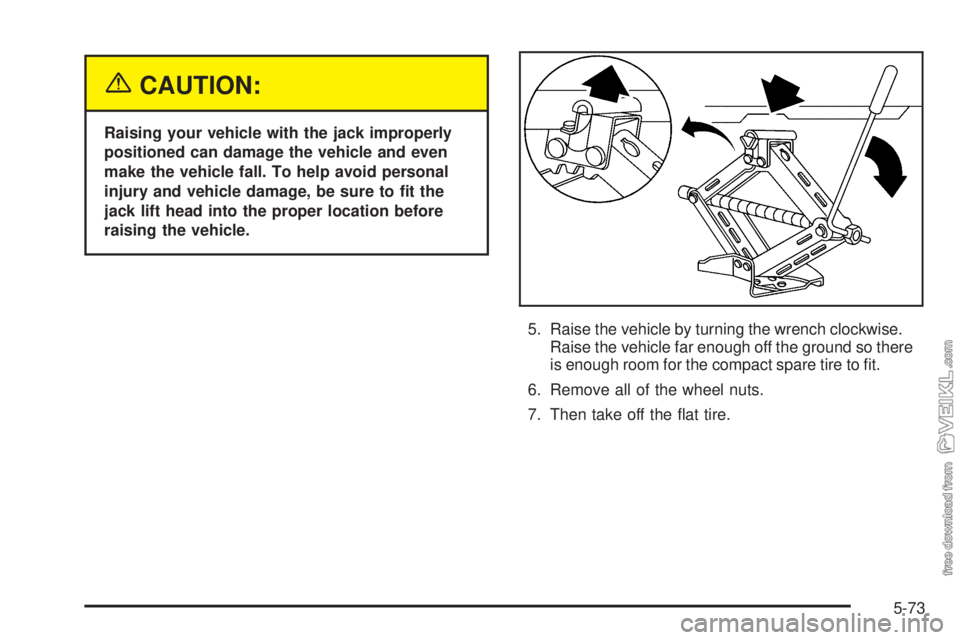
5. Raise the vehicle by turning the wrench clockwise.
Raise the vehicle far enough off the ground so there
is enough room for the compact spare tire to fit.
6. Remove all of the wheel nuts.
7. Then take off the flat tire.
5-73
Page 276 of 348
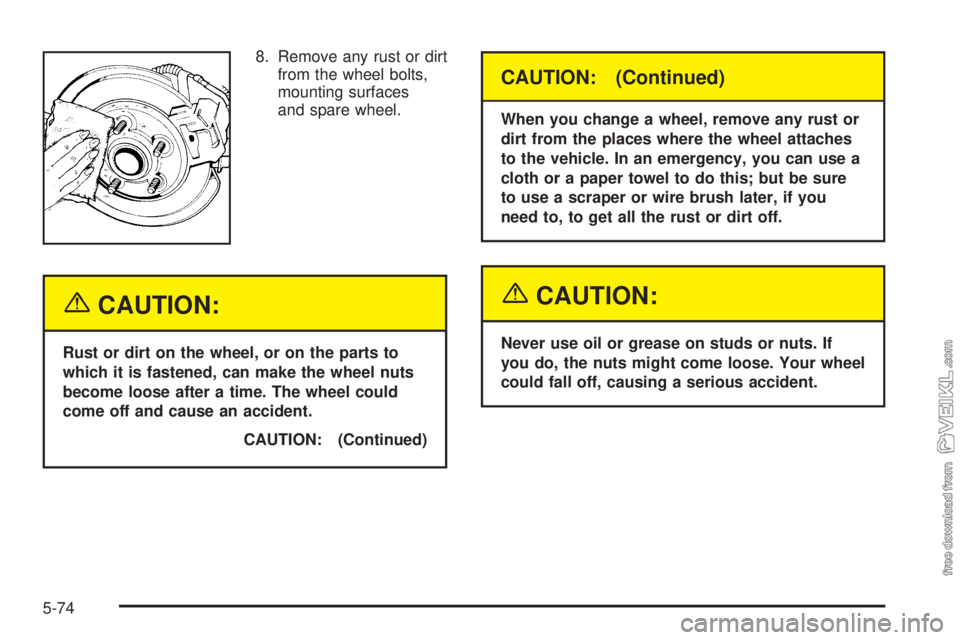
8. Remove any rust or dirt
from the wheel bolts,
mounting surfaces
and spare wheel.
{CAUTION:
Rust or dirt on the wheel, or on the parts to
which it is fastened, can make the wheel nuts
become loose after a time. The wheel could
come off and cause an accident.
CAUTION: (Continued)
CAUTION: (Continued)
When you change a wheel, remove any rust or
dirt from the places where the wheel attaches
to the vehicle. In an emergency, you can use a
cloth or a paper towel to do this; but be sure
to use a scraper or wire brush later, if you
need to, to get all the rust or dirt off.
{CAUTION:
Never use oil or grease on studs or nuts. If
you do, the nuts might come loose. Your wheel
could fall off, causing a serious accident.
5-74
Page 277 of 348
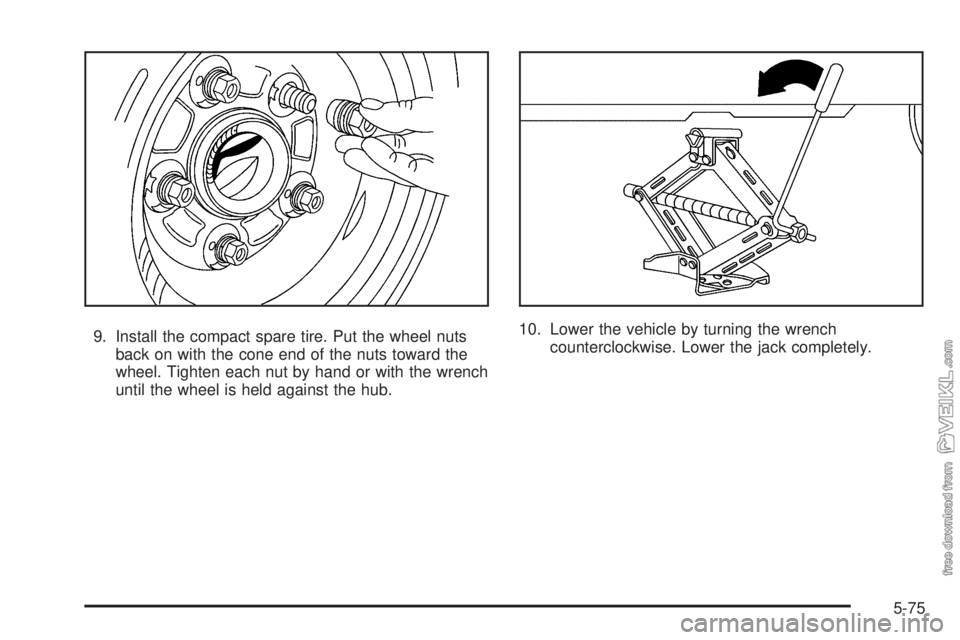
9. Install the compact spare tire. Put the wheel nuts
back on with the cone end of the nuts toward the
wheel. Tighten each nut by hand or with the wrench
until the wheel is held against the hub.10. Lower the vehicle by turning the wrench
counterclockwise. Lower the jack completely.
5-75
Page 278 of 348
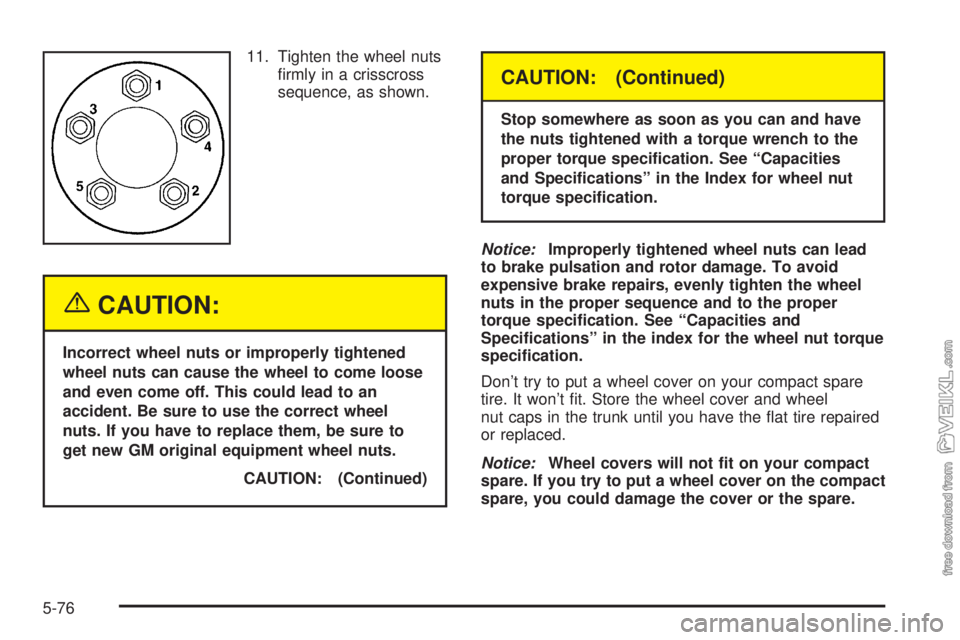
11. Tighten the wheel nuts
firmly in a crisscross
sequence, as shown.
{CAUTION:
Incorrect wheel nuts or improperly tightened
wheel nuts can cause the wheel to come loose
and even come off. This could lead to an
accident. Be sure to use the correct wheel
nuts. If you have to replace them, be sure to
get new GM original equipment wheel nuts.
CAUTION: (Continued)
CAUTION: (Continued)
Stop somewhere as soon as you can and have
the nuts tightened with a torque wrench to the
proper torque speci�cation. See “Capacities
and Speci�cations” in the Index for wheel nut
torque speci�cation.
Notice:Improperly tightened wheel nuts can lead
to brake pulsation and rotor damage. To avoid
expensive brake repairs, evenly tighten the wheel
nuts in the proper sequence and to the proper
torque speci�cation. See “Capacities and
Speci�cations” in the index for the wheel nut torque
speci�cation.
Don’t try to put a wheel cover on your compact spare
tire. It won’t fit. Store the wheel cover and wheel
nut caps in the trunk until you have the flat tire repaired
or replaced.
Notice:Wheel covers will not �t on your compact
spare. If you try to put a wheel cover on the compact
spare, you could damage the cover or the spare.
5-76
Page 281 of 348
Compact Spare Tire
Although the compact spare tire was fully inflated when
your vehicle was new, it can lose air after a time.
Check the inflation pressure regularly. It should be
60 psi (420 kPa).
After installing the compact spare on your vehicle, you
should stop as soon as possible and make sure
your spare tire is correctly inflated. The compact spare
is made to perform well at speeds up to 65 mph
(105 km/h) for distances up to 3,000 miles (5 000 km),
so you can finish your trip and have your full-size
tire repaired or replaced where you want. Of course, it’s
best to replace your spare with a full-size tire as
soon as you can. Your spare will last longer and be in
good shape in case you need it again.Notice:When the compact spare is installed, don’t
take your vehicle through an automatic car wash
with guide rails. The compact spare can get caught
on the rails. That can damage the tire and wheel,
and maybe other parts of your vehicle.
Don’t use your compact spare on other vehicles.
And don’t mix your compact spare tire or wheel with
other wheels or tires. They won’t fit. Keep your spare tire
and its wheel together.
Notice:Tire chains won’t �t your compact spare.
Using them can damage your vehicle and can
damage the chains too. Don’t use tire chains on
your compact spare.
5-79