CHEVROLET COLORADO 2004 1.G Owners Manual
Manufacturer: CHEVROLET, Model Year: 2004, Model line: COLORADO, Model: CHEVROLET COLORADO 2004 1.GPages: 414, PDF Size: 2.71 MB
Page 161 of 414
AC (Air Conditioning) OFF
This message will be displayed when the engine coolant
temperature is too high and the air conditioning in
your vehicle needs to be turned off. See andEngine
Overheating on page 5-28andClimate Control System
on page 3-12for more information. It will be displayed
along with the ENG HOT message.
ABS (Anti-Lock Brake System)
This message will be displayed on the DIC if there is a
problem with your antilock brake system. Check
your antilock brake system as soon as possible and
have your vehicle serviced by your GM dealer.
SeeBrakes on page 5-39andAnti-Lock Brake System
Warning Light on page 3-23for more information.
Pressing the reset stem to acknowledge this message
and clear it from the DIC display.
BATTERY
This message will be displayed when there is a problem
with your vehicle’s battery. SeeBattery on page 5-42
andBattery Warning Light on page 3-21for
more information.
BRAKES
This message will be displayed on the DIC if there is a
problem with your brakes. Check your brakes as
soon as possible and have your vehicle serviced by
your GM dealer. SeeBrakes on page 5-39andBrake
System Warning Light on page 3-22for more
information. Press and release the reset stem to
acknowledge the message and clear it from the
DIC display.
CHANGE OIL
This message will be displayed on your DIC when the
oil needs to be changed. Check the oil in your vehicle as
soon as possible and have your vehicle serviced by
your GM dealer. SeeEngine Oil on page 5-13and
Scheduled Maintenance on page 6-4for more
information. Press the reset stem to acknowledge the
message and clear it from the display.
DOORS
This message will be displayed on your DIC when one
of your doors is ajar. You should check all the doors
on your vehicle to make sure they are closed. The
message will clear from the display after all of the doors
are closed.
3-33
Page 162 of 414
ENG (Engine) HOT
This message will be displayed on your DIC when your
engine coolant temperature is hot. Check your engine
coolant temperature gage. SeeEngine Coolant
Temperature Gage on page 3-24for more information.
You should have your vehicle serviced by your
GM dealer as soon as possible if you suspect your
engine is overheating. SeeEngine Overheating
on page 5-28for more information.
FLUID
This message will be displayed on the DIC if your brake
�uid is low. Check the brake �uid as soon as possible
and have your vehicle serviced by your GM dealer. See
Brakes on page 5-39for more information. Press the
reset stem to acknowledge the message and clear
it from the DIC display.
FUEL CAP
This message will be displayed if your vehicle’s fuel cap
is either off or loose. You should pull over and check
to see if your vehicle’s fuel cap is secure as soon
as possible. You may also see the check engine light
on the instrument panel cluster. SeeMalfunction
Indicator Lamp on page 3-24for more information. Press
the reset stem to acknowledge the message and
clear it from the display.
LOW FUEL
This message will be displayed on your DIC if the level
of fuel in your vehicle is low. You should also check
your fuel gage. SeeFuel Gage on page 3-29for more
information. You should �ll your vehicle’s tank as
soon as possible.
LOW TRAC (Traction)
If you have the Traction Control System (TCS), you will
see this message when the TCS is active. See
Traction Control System (TCS) on page 4-8for more
information. Press and release the reset stem to
acknowledge the message and clear it from the
DIC display.
OIL
This message will be displayed when your oil pressure
is low. SeeOil Pressure Light on page 3-27, and
Engine Oil on page 5-13for more information.
OIL LIFE
This message will be displayed when your GM Oil Life
System needs to be checked. Press the reset stem
to acknowledge the message. For more information, see
“GM Oil Life System” underDIC Controls and Displays
on page 3-30.
3-34
Page 163 of 414
PARK BRK (Brake)
This message will be displayed when your vehicle’s
parking brake is active. SeeParking Brake on page 2-31
andBrake System Warning Light on page 3-22for
more information. The message will clear from
the display after the parking brake is released.
REDUCED POWER
This message will be displayed on your DIC when your
vehicle’s engine power is reduced. Press the reset
stem to acknowledge the message and clear it from
the display.
SERV (Service) 4WD
(Four-Wheel Drive)
This message will be displayed on your DIC when there
is a problem with your transfer case control system.
Check the transfer case on your vehicle and have
it serviced by your GM dealer. SeeFour-Wheel Drive on
page 2-27for more information about your transfer
case. Press the reset stem to acknowledge the message
and clear it from the display.
TRACTION FAULT
If you have the Traction Control System (TCS), you may
see this message if there is a problem with your Traction
Control System (TCS). Check your TCS as soon as
possible and have your vehicle serviced by your
GM dealer. SeeTraction Control System (TCS) on
page 4-8for more information. Press the reset stem to
acknowledge the message and clear it from the display.
SERV VEH (Service Vehicle)
This message will be displayed on your DIC if your
vehicle needs service. You should have your vehicle
serviced by your GM dealer as soon as possible.
TURN SIGNAL
This message will be displayed on your DIC when your
turn signal is on for approximately 0.75 miles (1.2 km)
of travel. Press the reset stem to acknowledge the
message and clear it from the display.
3-35
Page 164 of 414
Audio System(s)
Notice:Before adding any sound equipment to
your vehicle, like a tape player, CB radio, mobile
telephone, or two-way radio, make sure that it can
be added by checking with your dealer. Also,
check federal rules covering mobile radio and
telephone units. If sound equipment can be added,
it is very important to do it properly. Added
sound equipment may interfere with the operation
of your vehicle’s engine, radio, or other systems,
and even damage them. Your vehicle’s systems may
interfere with the operation of sound equipment
that has been added improperly.
Figure out which audio system is in your vehicle, �nd
out what your audio system can do, and how to operate
all of its controls.
Setting the Time for Radios without
Radio Data Systems (RDS)
Press and hold HR until the correct hour appears on the
display. Press and hold MIN until the correct minute
appears on the display. There is an initial two-second
delay before the clock goes into time-set mode.
Display the time with the ignition off, by pressing RCL,
HR, or MIN.
Setting the Time for Radios with
Radio Data Systems (RDS)
The radio may have a button marked with an H or HR to
represent hours and an M or MN to represent minutes.
Press and hold the hour button until the correct hour
appears on the display. Press and hold the minute
button until the correct minute appears on the display.
The time can be set with the ignition on or off.
To synchronize the time with an FM station broadcasting
Radio Data System (RDS) information, press and hold
the hour and minute buttons at the same time until RDS
TIME appears on the display. To accept this time, press
and hold the hour and minute buttons, at the same time,
for another two seconds. If the time is not available from
the station, NO UPDAT will appear on the display.
RDS time is broadcast once a minute. After tuning to an
RDS broadcast station, it may take a few minutes for
the time to update.
3-36
Page 165 of 414
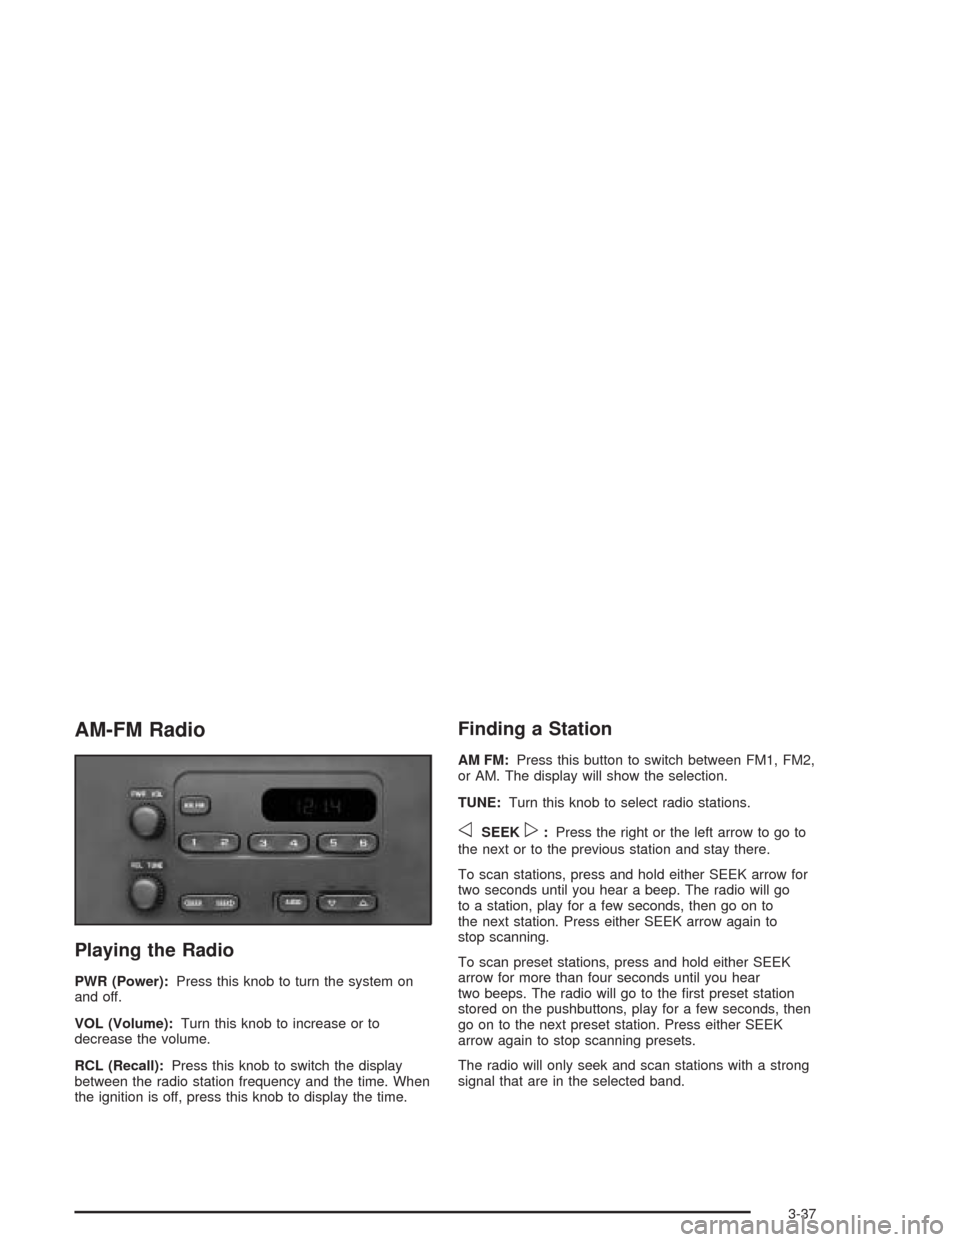
AM-FM Radio
Playing the Radio
PWR (Power):Press this knob to turn the system on
and off.
VOL (Volume):Turn this knob to increase or to
decrease the volume.
RCL (Recall):Press this knob to switch the display
between the radio station frequency and the time. When
the ignition is off, press this knob to display the time.
Finding a Station
AM FM:Press this button to switch between FM1, FM2,
or AM. The display will show the selection.
TUNE:Turn this knob to select radio stations.
oSEEKp:Press the right or the left arrow to go to
the next or to the previous station and stay there.
To scan stations, press and hold either SEEK arrow for
two seconds until you hear a beep. The radio will go
to a station, play for a few seconds, then go on to
the next station. Press either SEEK arrow again to
stop scanning.
To scan preset stations, press and hold either SEEK
arrow for more than four seconds until you hear
two beeps. The radio will go to the �rst preset station
stored on the pushbuttons, play for a few seconds, then
go on to the next preset station. Press either SEEK
arrow again to stop scanning presets.
The radio will only seek and scan stations with a strong
signal that are in the selected band.
3-37
Page 166 of 414
Setting Preset Stations
Up to 18 stations (six FM1, six FM2, and six AM) can be
programmed on the six numbered pushbuttons, by
performing the following steps:
1. Turn the radio on.
2. Press AM FM to select FM1, FM2, or AM.
3. Tune in the desired station.
4. Press and hold one of the six numbered
pushbuttons until you hear a beep. Whenever that
numbered pushbutton is pressed, the station
that was set will return.
5. Repeat the steps for each pushbutton.
Setting the Tone (Bass/Treble)
AUDIO:To adjust bass and treble, press and release
AUDIO until BAS or TRE appears on the display.
Then press and hold the up or the down arrow to
increase or to decrease. If a station is weak or noisy,
decrease the treble.
To adjust bass or treble to the middle position, select
BAS or TRE. Then press and hold AUDIO for more than
two seconds until you hear a beep. B and a zero or T
and a zero will appear on the display.To adjust both tone controls and both speaker controls
to the middle position, �rst end out of audio mode
by pressing another button, causing the radio to perform
that function or by waiting �ve seconds for the display
to return to time of day. Then press and hold AUDIO for
more than two seconds until you hear a beep. CEN
will appear on the display.
Adjusting the Speakers (Balance/Fade)
AUDIO:To adjust the balance between the right
and the left speakers, press and release AUDIO until
BAL appears on the display. Then press and hold the up
or the down arrow to move the sound toward the right
or the left speakers.
To adjust the fade between the front and the rear
speakers, press and release AUDIO until FAD appears
on the display. Then press and hold the up or the
down arrow to move the sound toward the front or the
rear speakers.
To adjust balance or fade to the middle position, select
BAL or FAD. Then press and hold AUDIO for more
than two seconds until you hear a beep. L and a zero
or F and a zero will appear on the display.
3-38
Page 167 of 414
To adjust both tone controls and both speaker controls
to the middle position, �rst end out of audio mode
by pressing another button, causing the radio to perform
that function or by waiting �ve seconds for the display
to return to time of day. Then press and hold AUDIO for
more than two seconds until you hear a beep. CEN
will appear on the display.
Fade may not be available if the vehicle is a regular
cab model.
Radio Messages
CAL (Calibrated):The audio system has been
calibrated for your vehicle from the factory. If CAL
appears on the display it means that the radio has not
been con�gured properly for your vehicle and must
be returned to the dealer for service.
LOC (Locked):This message is displayed when the
THEFTLOCK
®system has locked up. Take the vehicle
to the dealer for service.
If any error occurs repeatedly or if an error cannot be
corrected, contact your dealer.
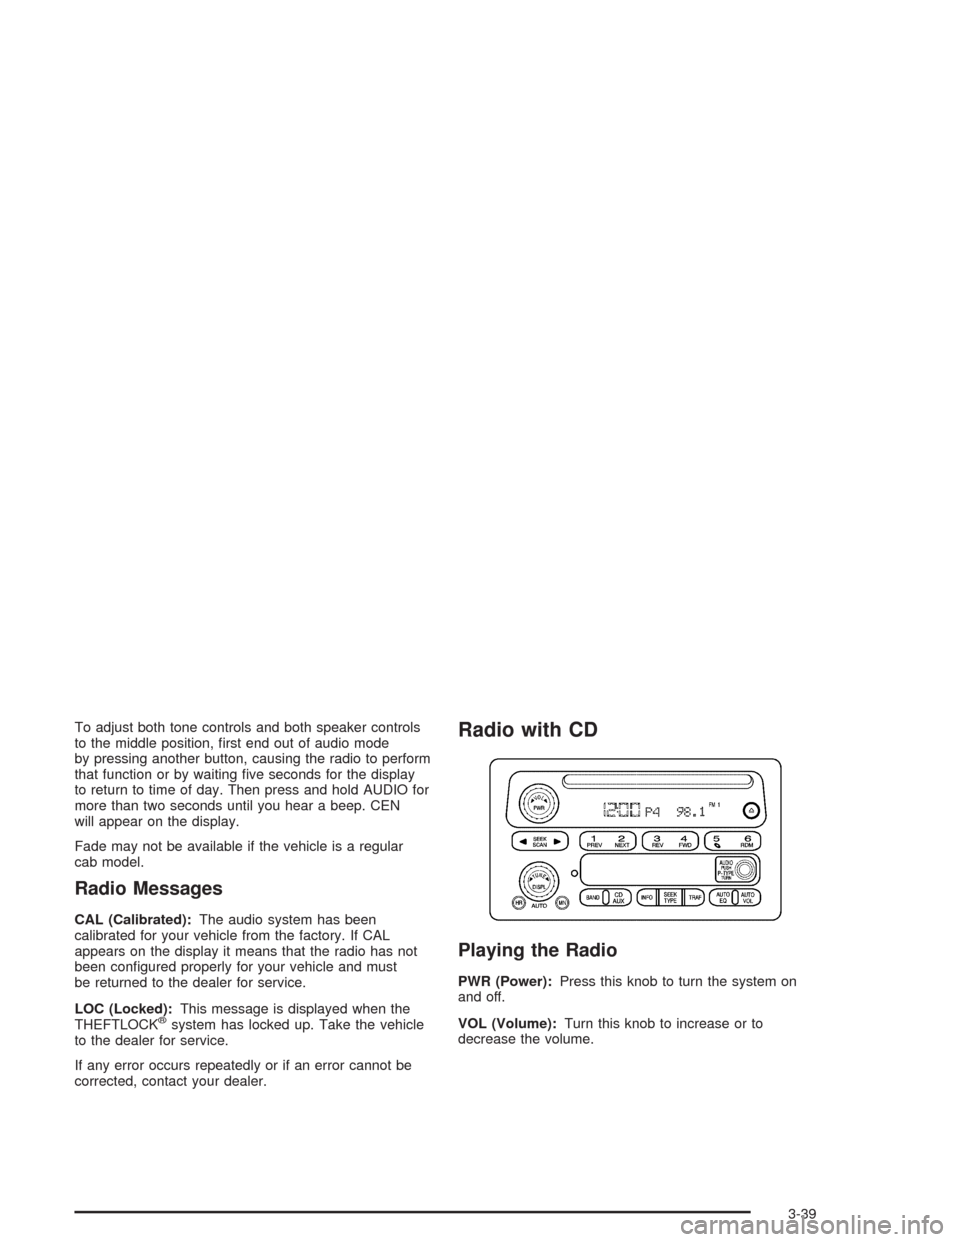
Radio with CD
Playing the Radio
PWR (Power):Press this knob to turn the system on
and off.
VOL (Volume):Turn this knob to increase or to
decrease the volume.
3-39
Page 168 of 414
AUTO VOL (Automatic Volume):With automatic
volume, the audio system will adjust automatically to
make up for road and wind noise as you drive by
increasing the volume as vehicle speed increases.
Set the volume at the desired level. Press this button to
select LOW, MEDIUM, or HIGH. AVOL will appear
on the display. Each higher setting will provide more
volume compensation at faster vehicle speeds. To turn
automatic volume off, press this button until AVOL
OFF appears on the display.
DISPL (Display):Press this knob to switch the display
between the radio station frequency and the time.
When the ignition is off, press this knob to display
the time.
For RDS, press the DISPL knob to change what
appears on the display while using RDS. The display
options are station name, RDS station frequency, PTY,
and the name of the program (if available).
To change the default on the display, press the DISPL
knob until you see the display you want, then hold
the knob for two seconds. The radio will produce one
beep and the selected display will now be the default.Finding a Station
BAND:Press this button to switch between FM1, FM2,
or AM. The display will show the selection.
TUNE:Turn this knob to select radio stations.
qSEEKr:Press the right or the left arrow to go to
the next or to the previous station and stay there.
The radio will only seek stations with a strong signal
that are in the selected band.
qSCANr:Press and hold either arrow for more
than two seconds. SCAN will appear on the display and
you will hear a beep. The radio will go to a station,
play for a few seconds, then go on to the next station.
Press either arrow again to stop scanning.
To scan preset stations, press and hold either arrow for
more than four seconds. PSCN will appear on the
display and you will hear two beeps. The radio will go to
the �rst preset station, play for a few seconds, then
go on to the next preset station. Press either arrow again
or one of the pushbuttons to stop scanning.
The radio will only scan stations with a strong signal
that are in the selected band.
3-40
Page 169 of 414
Setting Preset Stations
Up to 30 stations (six FM1, six FM2, and six AM), can
be programmed on the six numbered pushbuttons,
by performing the following steps:
1. Turn the radio on.
2. Press BAND to select FM1, FM2, or AM.
3. Tune in the desired station.
4. Press AUTO EQ to select the equalization.
5. Press and hold one of the six numbered
pushbuttons until you hear a beep. Whenever that
numbered pushbutton is pressed, the station
that was set will return and the equalization that
was selected will be stored for that pushbutton.
6. Repeat the steps for each pushbutton.
Setting the Tone (Bass/Treble)
AUDIO:Push and release the AUDIO knob until BASS
or TREB appears on the display. Turn the knob to
increase or to decrease. The display will show the bass
or treble level. If a station is weak or noisy, decrease
the treble.
To adjust the bass and treble to the middle position, push
and hold the AUDIO knob. The radio will produce one
beep and adjust the display level to the middle position.To adjust all tone and speaker controls to the middle
position, push and hold the AUDIO knob when no tone or
speaker control is displayed. ALL will appear on the
display, you will hear a beep, and the display level will be
adjusted to the middle position.
AUTO EQ (Automatic Equalization):Press this button
to select customized equalization settings designed
for country/western, jazz, talk, pop, rock, and classical.
Selecting CUSTOM or changing bass or treble,
returns the EQ to the manual bass and treble settings.
The radio will save separate AUTO EQ settings for
each preset and source.
Adjusting the Speakers (Balance/Fade)
AUDIO:To adjust the balance to the right and the
left speakers, push and release the AUDIO knob until
BAL appears on the display. Turn the knob to move the
sound toward the right or the left speakers.
To adjust the fade to the front and the rear speakers,
push and release the AUDIO knob until FADE appears
on the display. Turn the knob to move the sound
toward the front or the rear speakers.
3-41
Page 170 of 414
To adjust the balance and fade to the middle position,
push the AUDIO knob, then push it again and hold
it until the radio produces one beep. The balance and
fade will be adjusted to the middle position and the
display will show the speaker balance.
To adjust all tone and speaker controls to the middle
position, push and hold the AUDIO knob when no tone
or speaker control is displayed. ALL will appear on
the display, you will hear a beep, and the display level
will be adjusted to the middle position.
Radio Data System (RDS)
The audio system has a Radio Data System (RDS).
RDS features are available for use only on FM stations
that broadcast RDS information.
With RDS, the radio can do the following:
Seek to stations broadcasting the selected type
of programming
Receive announcements concerning local and
national emergencies
Display messages from radio stations
Seek to stations with traffic announcementsThis system relies upon receiving speci�c information
from these stations and will only work when the
information is available. In rare cases, a radio station
may broadcast incorrect information that will cause
the radio features to work improperly. If this happens,
contact the radio station.
While the radio is tuned to an RDS station, the station
name or call letters will appear on the display instead of
the frequency. RDS stations may also provide the time of
day, a program type (PTY) for current programming, and
the name of the program being broadcast.
Finding a Program Type (PTY) Station
To select and �nd a desired PTY perform the following:
1. Turn the P-TYPE knob to activate program type
select mode. TYPE and a PTY will appear on
the display.
2. Turn the P-TYPE knob to select a PTY.
3. Once the desired PTY is displayed, press the
SEEK TYPE button or one of the SEEK arrows
to take you to the PTY’s �rst station.
4. To go to another station within that PTY and the
PTY is displayed, press the SEEK TYPE button
once. If the PTY is not displayed, press the SEEK
TYPE button twice to display the PTY and then
to go to another station.
3-42