fuse CHEVROLET COLORADO 2005 1.G Owners Manual
[x] Cancel search | Manufacturer: CHEVROLET, Model Year: 2005, Model line: COLORADO, Model: CHEVROLET COLORADO 2005 1.GPages: 414, PDF Size: 2.57 MB
Page 9 of 414
Front Seats
Manual Seats
{CAUTION:
You can lose control of the vehicle if you try to
adjust a manual driver’s seat while the vehicle
is moving. The sudden movement could startle
and confuse you, or make you push a pedal
when you do not want to. Adjust the driver’s
seat only when the vehicle is not moving.
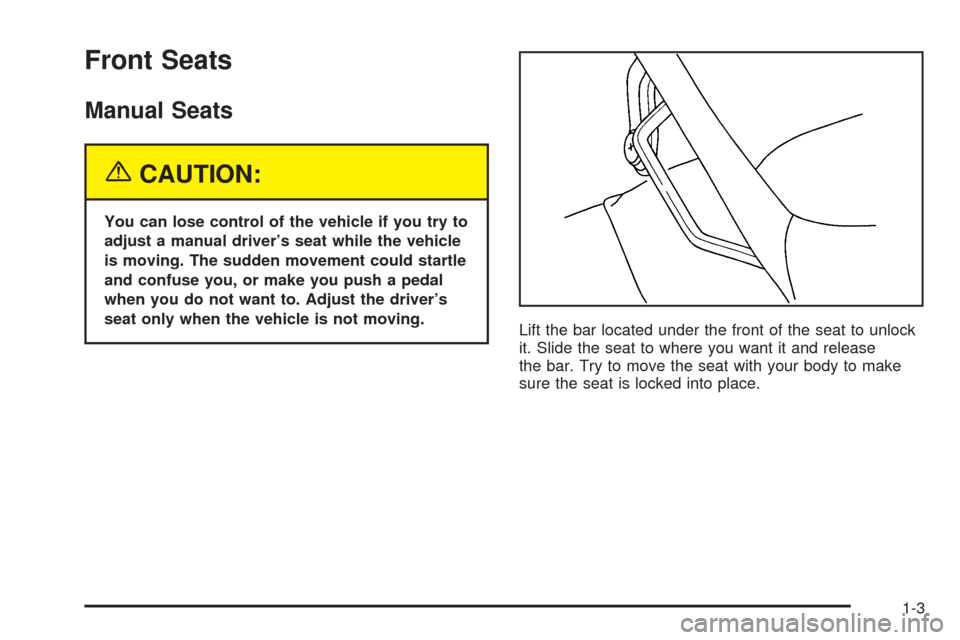
Lift the bar located under the front of the seat to unlock
it. Slide the seat to where you want it and release
the bar. Try to move the seat with your body to make
sure the seat is locked into place.
1-3
Page 95 of 414
Power Windows
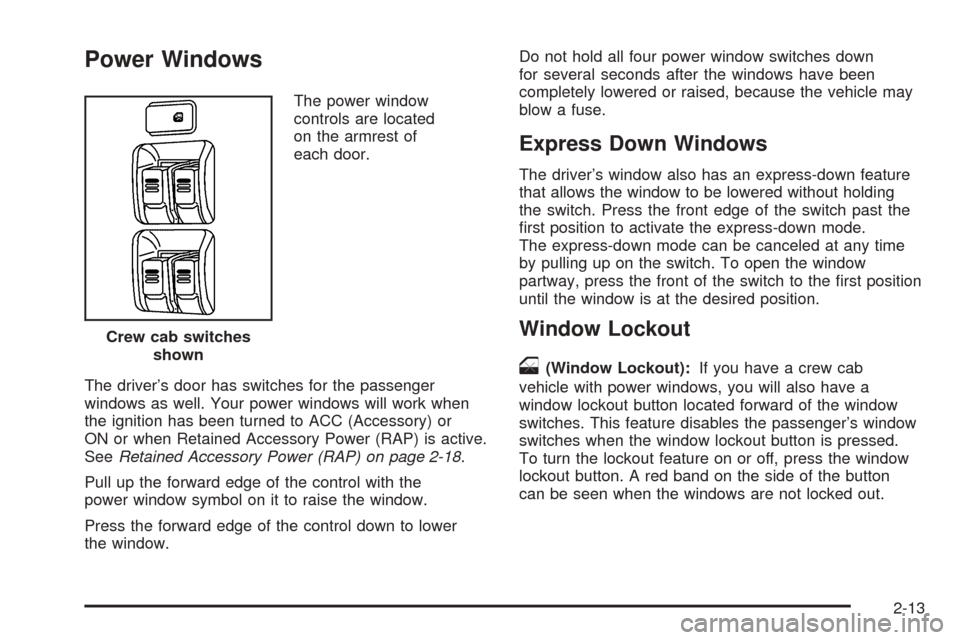
The power window
controls are located
on the armrest of
each door.
The driver’s door has switches for the passenger
windows as well. Your power windows will work when
the ignition has been turned to ACC (Accessory) or
ON or when Retained Accessory Power (RAP) is active.
SeeRetained Accessory Power (RAP) on page 2-18.
Pull up the forward edge of the control with the
power window symbol on it to raise the window.
Press the forward edge of the control down to lower
the window.Do not hold all four power window switches down
for several seconds after the windows have been
completely lowered or raised, because the vehicle may
blow a fuse.
Express Down Windows
The driver’s window also has an express-down feature
that allows the window to be lowered without holding
the switch. Press the front edge of the switch past the
�rst position to activate the express-down mode.
The express-down mode can be canceled at any time
by pulling up on the switch. To open the window
partway, press the front of the switch to the �rst position
until the window is at the desired position.
Window Lockout
o
(Window Lockout):If you have a crew cab
vehicle with power windows, you will also have a
window lockout button located forward of the window
switches. This feature disables the passenger’s window
switches when the window lockout button is pressed.
To turn the lockout feature on or off, press the window
lockout button. A red band on the side of the button
can be seen when the windows are not locked out. Crew cab switches
shown
2-13
Page 97 of 414
If the lock button on the remote keyless entry transmitter
is pressed, but a door is open, the horn will chirp
six times. Close the open door and the system will be
activated.
If a locked door is not opened using the remote keyless
entry transmitter, or by OnStar
®, the alarm will go off.
The front turn signal lamps will �ash for two minutes,
and the horn will sound for two minutes, then will turn off
to save the battery power.
Remember, the theft-deterrent system will not activate if
you lock the doors with a key, the manual door lock,
or power door lock switch. The system can only
be activated using the remote keyless entry transmitter,
or by OnStar
®. SeeOnStar®System on page 2-39
for additional information. You should also remember
that you can start your vehicle with the correct ignition
key if the alarm has been set off.
Here is how to avoid setting off the alarm by accident:
If you do not want to activate the theft-deterrent
system, the vehicle should be locked with the
door key after the doors are closed.
Always unlock a door with the remote keyless entry
transmitter. Unlocking a door any other way will set
off the alarm.If you set off the alarm by accident, you can turn off the
alarm by pressing unlock on the remote keyless
entry transmitter. The alarm will not stop if you try to
unlock a door any other way.
Testing the Alarm
The alarm can be tested by following these steps:
1. From inside the vehicle, activate the system by
locking the doors with the remote keyless entry
transmitter.
2. Unlock the door with the manual door lock and
open the door. This should set off the alarm.
3. To turn the alarm off, press the unlock button on
the remote keyless entry transmitter or start the
engine.
If the alarm does not sound when it should but the
lights �ash, check to see if the horn works. The horn
fuse may be blown. To replace the fuse, seeFuses
and Circuit Breakers on page 5-99.
If the alarm does not sound or the headlamps do not
�ash, see your dealer for service.
2-15
Page 102 of 414
Engine Coolant Heater
Your vehicle may be equipped with this feature.
In very cold weather, 0°F (–18°C) or colder, the engine
coolant heater can help. You will get easier starting
and better fuel economy during engine warm-up.
Usually, the coolant heater should be plugged in a
minimum of four hours prior to starting your vehicle.
At temperatures above 32°F (0°C), use of the coolant
heater is not required.
To Use the Engine Coolant Heater
1. Turn off the engine.
2. Open the hood and unwrap the electrical cord.
The cord is located in the engine compartment
behind the underhood fuse block on the driver’s
side of the vehicle.
3. Plug it into a normal, grounded 110-volt AC outlet.
{CAUTION:
Plugging the cord into an ungrounded outlet
could cause an electrical shock. Also, the
wrong kind of extension cord could overheat
and cause a �re. You could be seriously
injured. Plug the cord into a properly grounded
three-prong 110-volt AC outlet. If the cord will
not reach, use a heavy-duty three-prong
extension cord rated for at least 15 amps.
4. Before starting the engine, be sure to unplug and
store the cord as it was before to keep it away
from moving engine parts. If you do not, it could be
damaged.
How long should you keep the coolant heater plugged
in? The answer depends on the outside temperature, the
kind of oil you have, and some other things. Instead
of trying to list everything here, we ask that you contact
your dealer in the area where you will be parking
your vehicle. The dealer can give you the best advice
for that particular area.
2-20
Page 134 of 414
Turn and Lane-Change Signals
The turn signal has two upward (for right) and two
downward (for left) positions. These positions allow you
to signal a turn or a lane change.
To signal a turn, move the lever all the way up or down.
When the turn is �nished, the lever will automatically
return to the off position.
To signal a lane change, raise or lower the lever until
the arrow starts to �ash. Hold it there until the change is
completed. The lever will return by itself when released.
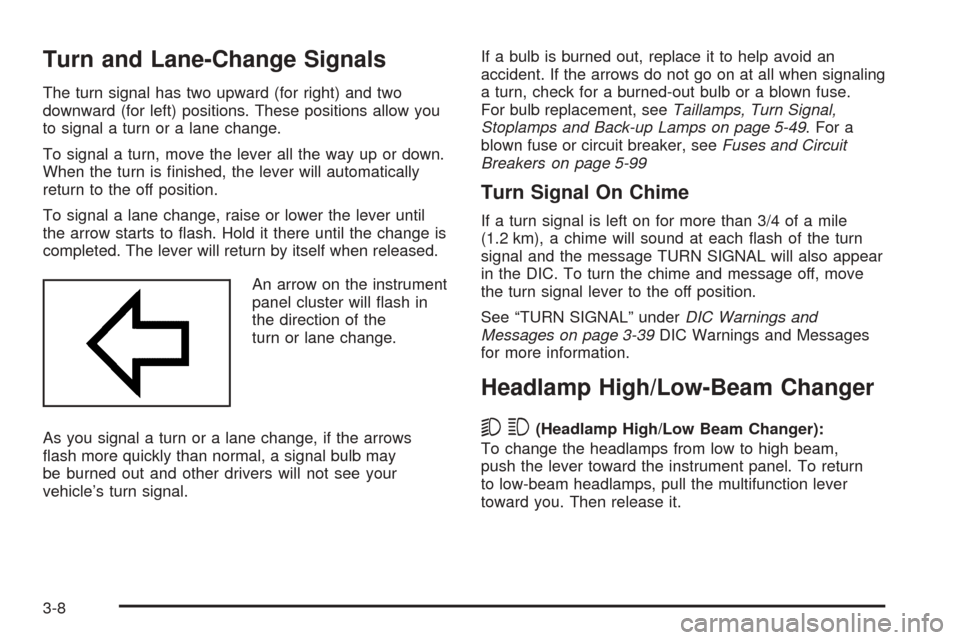
An arrow on the instrument
panel cluster will �ash in
the direction of the
turn or lane change.
As you signal a turn or a lane change, if the arrows
�ash more quickly than normal, a signal bulb may
be burned out and other drivers will not see your
vehicle’s turn signal.If a bulb is burned out, replace it to help avoid an
accident. If the arrows do not go on at all when signaling
a turn, check for a burned-out bulb or a blown fuse.
For bulb replacement, seeTaillamps, Turn Signal,
Stoplamps and Back-up Lamps on page 5-49. For a
blown fuse or circuit breaker, seeFuses and Circuit
Breakers on page 5-99
Turn Signal On Chime
If a turn signal is left on for more than 3/4 of a mile
(1.2 km), a chime will sound at each �ash of the turn
signal and the message TURN SIGNAL will also appear
in the DIC. To turn the chime and message off, move
the turn signal lever to the off position.
See “TURN SIGNAL” underDIC Warnings and
Messages on page 3-39DIC Warnings and Messages
for more information.
Headlamp High/Low-Beam Changer
53(Headlamp High/Low Beam Changer):
To change the headlamps from low to high beam,
push the lever toward the instrument panel. To return
to low-beam headlamps, pull the multifunction lever
toward you. Then release it.
3-8
Page 144 of 414
Certain electrical accessories may not be compatible
with the accessory power outlet and could result
in blown vehicle or adapter fuses. If you experience a
problem, see your dealer for additional information
on accessory power outlets.
Notice:Adding any electrical equipment to your
vehicle may damage it or keep other components
from working as they should. The repairs would not
be covered by your warranty. Do not use equipment
exceeding maximum amperage rating. Check
with your dealer before adding electrical equipment.
When adding electrical equipment, be sure to follow
the proper installation instructions included with
the equipment.
Notice:Improper use of the power outlet can cause
damage not covered by your warranty. Do not
hang any type of accessory or accessory bracket
from the plug because the power outlets are
designed for accessory power plugs only.Ashtrays and Cigarette Lighter
Your vehicle may have an ashtray and cigarette lighter.
Your ashtray is located in your center console area.
The ashtray can be removed for cleaning. When
the ashtray is removed, this area can also be used as
a cupholder.
Notice:If you put papers, pins, or other �ammable
items in the ashtray, hot cigarettes or other
smoking materials could ignite them and possibly
damage your vehicle. Never put �ammable items in
the ashtray.
To use the lighter, press it in all the way, and let go.
When it’s ready, it will pop back out by itself.
Notice:Holding a cigarette lighter in while it is
heating will not allow the lighter to back away from
the heating element when it is hot. Damage from
overheating may occur to the lighter or heating
element, or a fuse could be blown. Do not hold a
cigarette lighter in while it is heating.
3-18
Page 214 of 414
Environmental Concerns
Off-road driving can provide wholesome and satisfying
recreation. However, it also raises environmental
concerns. We recognize these concerns and urge every
off-roader to follow these basic rules for protecting
the environment:
Always use established trails, roads and areas that
have been specially set aside for public off-road
recreational driving; obey all posted regulations.
Avoid any driving practice that could damage
the environment — shrubs, �owers, trees,
grasses — or disturb wildlife (this includes
wheel-spinning, breaking down trees or
unnecessary driving through streams or over
soft ground).
Always carry a litter bag — make sure all refuse
is removed from any campsite before leaving.
Take extreme care with open �res (where
permitted), camp stoves and lanterns.
Never park your vehicle over dry grass or other
combustible materials that could catch �re from
the heat of the vehicle’s exhaust system.
Traveling to Remote Areas
It makes sense to plan your trip, especially when going
to a remote area. Know the terrain and plan your
route. You are much less likely to get bad surprises.
Get accurate maps of trails and terrain. Try to learn of
any blocked or closed roads.
It is also a good idea to travel with at least one other
vehicle. If something happens to one of them, the other
can help quickly.
Does your vehicle have a winch? If so, be sure to read
the winch instructions. In a remote area, a winch
can be handy if you get stuck. But you will want to know
how to use it properly.
Getting Familiar with Off-Road Driving
It is a good idea to practice in an area that is safe
and close to home before you go into the wilderness.
Off-road driving does require some new and different
skills. Here is what we mean.
Tune your senses to different kinds of signals. Your
eyes, for example, need to constantly sweep the terrain
for unexpected obstacles. Your ears need to listen
for unusual tire or engine sounds. With your arms,
hands, feet and body, you will need to respond to
vibrations and vehicle bounce.
4-16
Page 268 of 414
Buying New Tires.........................................5-62
Uniform Tire Quality Grading..........................5-63
Wheel Alignment and Tire Balance..................5-64
Wheel Replacement......................................5-64
Tire Chains..................................................5-66
If a Tire Goes Flat........................................5-67
Changing a Flat Tire.....................................5-68
Removing the Spare Tire and Tools................5-69
Removing the Flat Tire and Installing
the Spare Tire..........................................5-73
Secondary Latch System...............................5-80
Storing a Flat or Spare Tire and Tools............5-83
Spare Tire...................................................5-86
Appearance Care............................................5-88
Cleaning the Inside of Your Vehicle.................5-88
Fabric/Carpet...............................................5-90
Leather.......................................................5-90
Instrument Panel, Vinyl, and Other Plastic
Surfaces..................................................5-91
Care of Safety Belts......................................5-91
Weatherstrips...............................................5-91
Washing Your Vehicle...................................5-92Cleaning Exterior Lamps/Lenses.....................5-92
Finish Care..................................................5-92
Windshield and Wiper Blades.........................5-93
Aluminum Wheels.........................................5-93
Tires...........................................................5-94
Sheet Metal Damage.....................................5-94
Finish Damage.............................................5-95
Underbody Maintenance................................5-95
Chemical Paint Spotting.................................5-95
Vehicle Care/Appearance Materials..................5-96
Vehicle Identi�cation......................................5-97
Vehicle Identi�cation Number (VIN).................5-97
Service Parts Identi�cation Label.....................5-97
Electrical System............................................5-98
Add-On Electrical Equipment..........................5-98
Windshield Wiper Fuses................................5-98
Power Windows and Other Power Options.......5-98
Fuses and Circuit Breakers............................5-99
Engine Compartment Fuse Block....................5-99
Capacities and Speci�cations........................5-103
Section 5 Service and Appearance Care
5-2
Page 270 of 414
Doing Your Own Service Work
If you want to do some of your own service work,
you will want to use the proper service manual. It tells
you much more about how to service your vehicle
than this manual can. To order the proper service
manual, seeService Publications Ordering Information
on page 7-11.
Your vehicle has an airbag system. Before attempting
to do your own service work, seeServicing Your
Airbag-Equipped Vehicle on page 1-74.
You should keep a record with all parts receipts and
list the mileage and the date of any service work
you perform. SeeMaintenance Record on page 6-15.{CAUTION:
You can be injured and your vehicle could be
damaged if you try to do service work on a
vehicle without knowing enough about it.
Be sure you have sufficient knowledge,
experience, the proper replacement parts,
and tools before you attempt any vehicle
maintenance task.
Be sure to use the proper nuts, bolts,
and other fasteners. English and metric
fasteners can be easily confused. If you
use the wrong fasteners, parts can later
break or fall off. You could be hurt.
5-4
Page 279 of 414
A. Windshield Washer Fluid. See “Adding Washer
Fluid” underWindshield Washer Fluid on page 5-35.
B. Coolant Recovery Tank. SeeEngine Coolant on
page 5-25.
C. Power Steering Fluid Reservoir (low in engine
compartment). SeePower Steering Fluid on
page 5-34.
D. Transmission Fluid Dipstick. SeeAutomatic
Transmission Fluid on page 5-19.
E. Engine Oil Dipstick. See “Checking Engine Oil”
underEngine Oil on page 5-13.
F. Brake Fluid Reservoir. See “Brake Fluid” under
Brakes on page 5-36.
G. Battery. SeeBattery on page 5-39.
H. Hydraulic Clutch Fluid Reservoir (If Equipped).
SeeHydraulic Clutch on page 5-24.
I. Engine Air Cleaner/Filter. SeeEngine Air
Cleaner/Filter on page 5-18.
J. Engine Oil Fill Cap. See “When to Add Engine Oil”
underEngine Oil on page 5-13.
K. Radiator Pressure Cap. SeeCooling System
on page 5-29.L. Remote Negative (−) Terminal. SeeJump Starting
on page 5-40.
M. Remote Positive (+) Terminal. SeeJump Starting
on page 5-40.
N. Engine Compartment Fuse Block. SeeEngine
Compartment Fuse Block on page 5-99.
Engine Oil
Checking Engine Oil
It is a good idea to check your engine oil every time you
get fuel. In order to get an accurate reading, the oil
must be warm and the vehicle must be on level ground.
The engine oil dipstick handle is a yellow loop. See
Engine Compartment Overview on page 5-12for
the location of the engine oil dipstick.
1. Turn off the engine and give the oil several minutes
to drain back into the oil pan. If you do not do this,
the oil dipstick might not show the actual level.
2. Pull out the dipstick and clean it with a paper towel
or cloth, then push it back in all the way. Remove it
again, keeping the tip down, and check the level.
5-13