seats CHEVROLET COLORADO 2006 1.G Owner's Manual
[x] Cancel search | Manufacturer: CHEVROLET, Model Year: 2006, Model line: COLORADO, Model: CHEVROLET COLORADO 2006 1.GPages: 434, PDF Size: 2.57 MB
Page 56 of 434
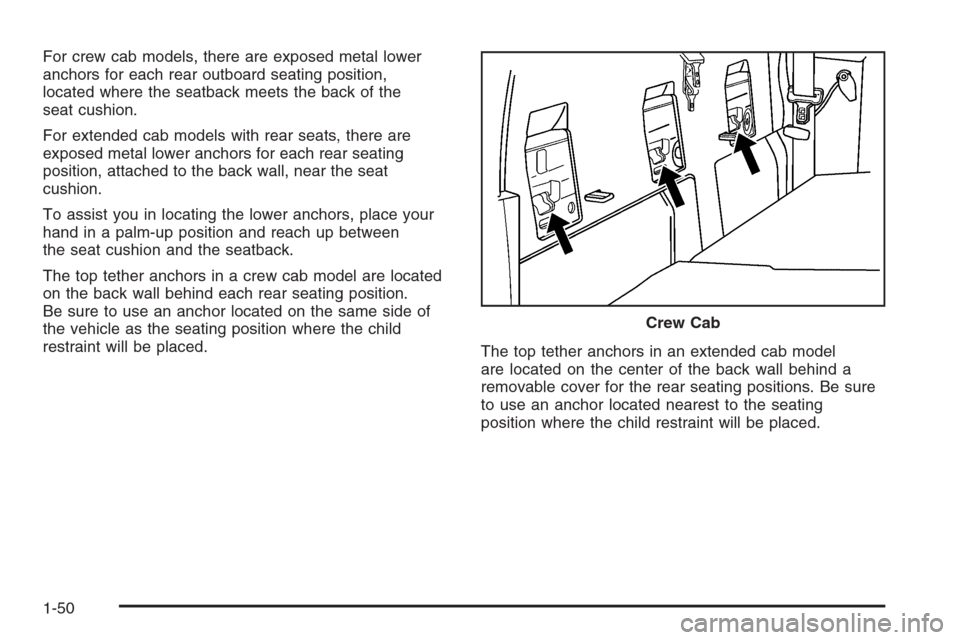
For crew cab models, there are exposed metal lower
anchors for each rear outboard seating position,
located where the seatback meets the back of the
seat cushion.
For extended cab models with rear seats, there are
exposed metal lower anchors for each rear seating
position, attached to the back wall, near the seat
cushion.
To assist you in locating the lower anchors, place your
hand in a palm-up position and reach up between
the seat cushion and the seatback.
The top tether anchors in a crew cab model are located
on the back wall behind each rear seating position.
Be sure to use an anchor located on the same side of
the vehicle as the seating position where the child
restraint will be placed.
The top tether anchors in an extended cab model
are located on the center of the back wall behind a
removable cover for the rear seating positions. Be sure
to use an anchor located nearest to the seating
position where the child restraint will be placed.Crew Cab
1-50
Page 57 of 434
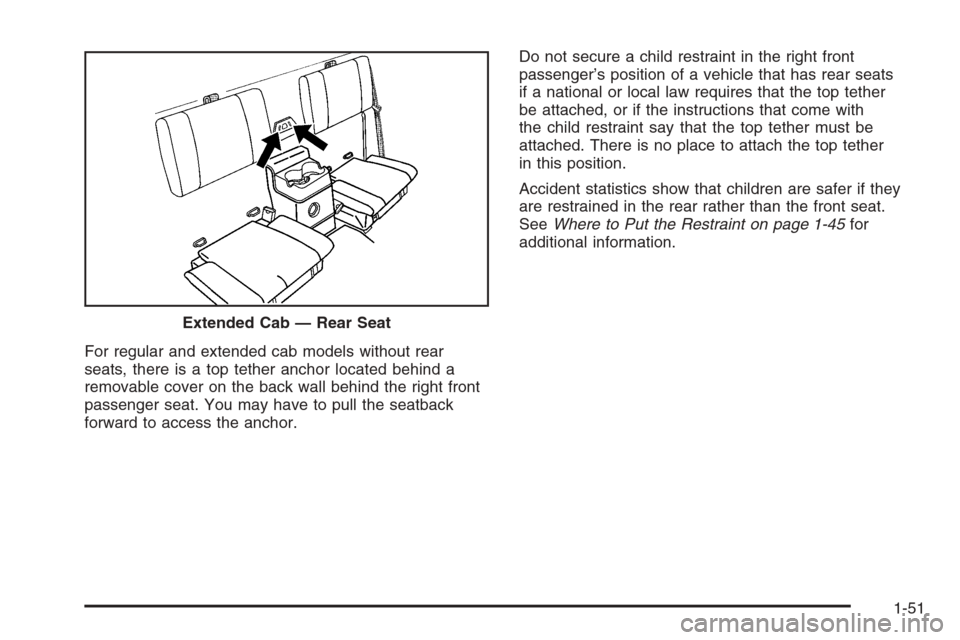
For regular and extended cab models without rear
seats, there is a top tether anchor located behind a
removable cover on the back wall behind the right front
passenger seat. You may have to pull the seatback
forward to access the anchor.Do not secure a child restraint in the right front
passenger’s position of a vehicle that has rear seats
if a national or local law requires that the top tether
be attached, or if the instructions that come with
the child restraint say that the top tether must be
attached. There is no place to attach the top tether
in this position.
Accident statistics show that children are safer if they
are restrained in the rear rather than the front seat.
SeeWhere to Put the Restraint on page 1-45for
additional information.
Extended Cab — Rear Seat
1-51
Page 63 of 434
3. Tighten the lower anchor attachments and the
top tether. The child restraint instructions will
show you how.
4. Push and pull the child restraint in different
directions to be sure it is secure.
Front Seat — Regular/Extended Cab
without Rear Seats
Your vehicle has a right front passenger’s airbag and
a passenger sensing system. The passenger sensing
system is designed to turn off the right front passenger’s
frontal airbag when an infant in a rear-facing infant
seat or a small child in a forward-facing child restraint
or booster seat is detected. SeeSecuring a Child
Restraint in the Right Front Seat Position on page 1-61
andPassenger Sensing System on page 1-74for
important safety information and additional information
on installing a child restraint in the right front seat
position.
1. SeeSecuring a Child Restraint in the Right Front
Seat Position on page 1-61for instructions on
installing the child restraint using the safety belts.2. If the child restraint manufacturer’s instructions
recommends that the top tether be attached,
attach and tighten the top tether to the top tether
anchor. Refer to the child restraint instructions and
the following steps:
2.1. Pull the seatback forward to access the
top tether anchor. SeeSeatback Latches
on page 1-9.
2.2. Pull on the nger access tab to remove the
cover to access the top tether anchor.
2.3. Route the top tether according to your child
restraint instructions and the following
instructions:
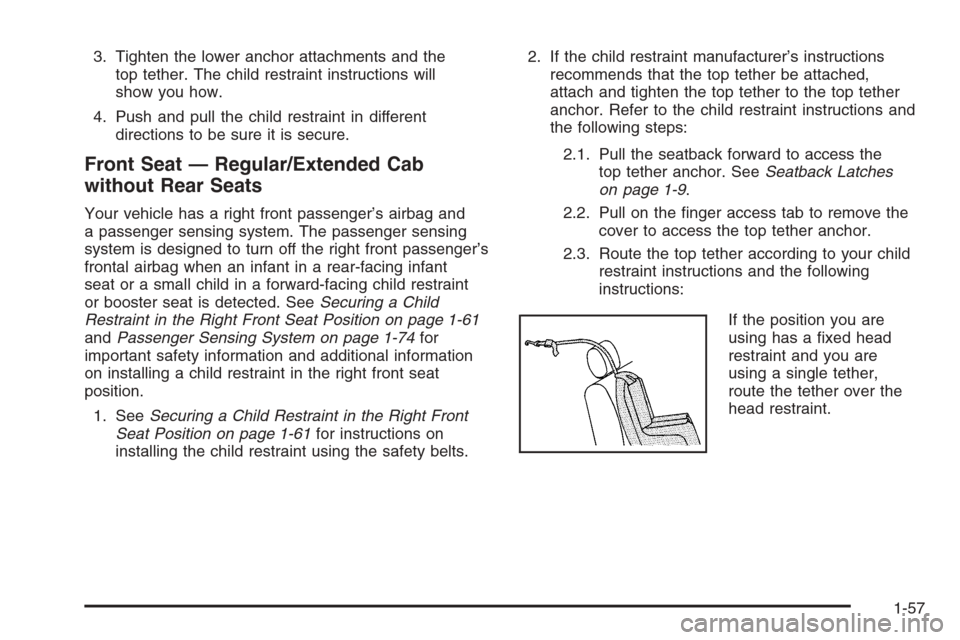
If the position you are
using has a xed head
restraint and you are
using a single tether,
route the tether over the
head restraint.
1-57
Page 69 of 434
CAUTION: (Continued)
can guarantee that an airbag will not deploy
under some unusual circumstance, even
though it is turned off. We recommend that
rear-facing child restraints be transported
in vehicles with a rear seat that will
accommodate a rear-facing child restraint,
whenever possible.
If you need to secure a forward-facing child restraint
in the right front seat position, move the seat as far
back as it will go before securing the forward-facing
child restraint. SeePower Seats on page 1-3or
Manual Seats on page 1-2.
If your child restraint is equipped with the LATCH
system, seeLower Anchors and Tethers for Children
(LATCH) on page 1-47.
If your vehicle has rear seats, there is no top tether
anchor at the right front seating position. Do not secure
a child seat in this position if a national or local law
requires that the top tether be anchored or if the
instructions that come with the child restraint say that
the top tether must be anchored. SeeLower Anchors
and Tethers for Children (LATCH) on page 1-47if
the child restraint has a top tether.You will be using the lap-shoulder belt to secure the
child restraint in this position. Be sure to follow the
instructions that came with the child restraint. Secure
the child in the child restraint when and as the
instructions say.
1. Your vehicle has a right front passenger’s frontal
airbag. SeePassenger Sensing System on
page 1-74. We recommend that rear-facing
child restraints be secured in a rear seat, even
if the airbag is off. If your child restraint is
forward-facing, move the seat as far back as it
will go before securing the child restraint in this
seat. SeePower Seats on page 1-3orManual
Seats on page 1-2.
When the passenger sensing system has turned
off the right front passenger’s frontal airbag, the off
indicator in the passenger airbag status indicator
should light and stay lit when you turn the ignition
to ON or START. SeePassenger Airbag Status
Indicator on page 3-27.
2. Put the child restraint on the seat.
3. Pick up the latch plate, and run the lap and shoulder
portions of the vehicle’s safety belt through or
around the restraint. The child restraint instructions
will show you how.
1-63
Page 71 of 434
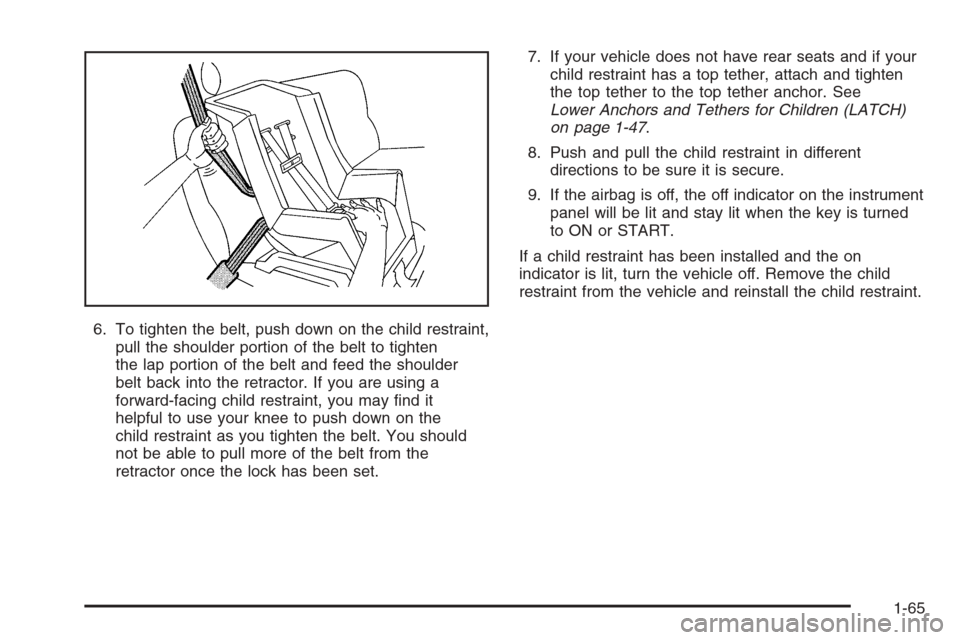
6. To tighten the belt, push down on the child restraint,
pull the shoulder portion of the belt to tighten
the lap portion of the belt and feed the shoulder
belt back into the retractor. If you are using a
forward-facing child restraint, you may nd it
helpful to use your knee to push down on the
child restraint as you tighten the belt. You should
not be able to pull more of the belt from the
retractor once the lock has been set.7. If your vehicle does not have rear seats and if your
child restraint has a top tether, attach and tighten
the top tether to the top tether anchor. See
Lower Anchors and Tethers for Children (LATCH)
on page 1-47.
8. Push and pull the child restraint in different
directions to be sure it is secure.
9. If the airbag is off, the off indicator on the instrument
panel will be lit and stay lit when the key is turned
to ON or START.
If a child restraint has been installed and the on
indicator is lit, turn the vehicle off. Remove the child
restraint from the vehicle and reinstall the child restraint.
1-65
Page 86 of 434
Adding Equipment to Your
Airbag-Equipped Vehicle
Q:Is there anything I might add to the front or
sides of the vehicle that could keep the
airbags from working properly?
A:Yes. If you add things that change your vehicle’s
frame, bumper system, height, front end or side
sheet metal, they may keep the airbag system from
working properly. Also, the airbag system may
not work properly if you relocate any of the airbag
sensors. If you have any questions about this,
you should contact Customer Assistance before you
modify your vehicle. The phone numbers and
addresses for Customer Assistance are in Step Two
of the Customer Satisfaction Procedure in this
manual. SeeCustomer Satisfaction Procedure
on page 7-2.
Q:Because I have a disability, I have to get my
vehicle modied. How can I nd out whether
this will affect my airbag system?
A:Changing or moving any parts of the front seats,
safety belts, the airbag sensing and diagnostic
module, steering wheel, instrument panel,
ceiling headliner, ceiling and pillar garnish trim,
roof-mounted airbag modules, or airbag wiring
can affect the operation of the airbag system.
If you have questions, call Customer Assistance.
The phone numbers and addresses for Customer
Assistance are in Step Two of the Customer
Satisfaction Procedure in this manual. See
Customer Satisfaction Procedure on page 7-2.
1-80
Page 130 of 434
OnStar®Hands-Free Calling
OnStar®Hands-Free Calling allows OnStar®subscribers
to make and receive calls using voice commands at
the touch of a button. Hands-Free Calling is fully
integrated into the vehicle, and may be used with
Pre-Paid Packages or linked to a cell phone through
OnStar
®Shared Minutes Plan. To nd out more, refer
to the OnStar®User’s Guide in the vehicle’s glove
box, visit www.onstar.com or www.onstar.ca, or speak
with an OnStar
®advisor by pressing the OnStar®button
or calling 1-888-4-ONSTAR (1-888-466-7827).
OnStar®Virtual Advisor
Your vehicle may have Virtual Advisor. It is a feature
of OnStar®hands-Free Calling that uses your minutes
to access weather, local traffic reports, and stock
quotes. By pressing the phone button and giving a
few simple voice commands, you can browse through
the various topics. Customize your information prole
at www.myonstar.com. See the OnStar
®user’s guide
for more information.
Storage Areas
Glove Box
To open the glove box, pull on the lever.
Cupholder(s)
Your vehicle may have two cupholders located on the
lower part of the front doors as well as two cupholders
located at the front end of the console. Vehicles
with bench seats may have cupholders attached to the
front of the center seat.
If your vehicle is an extended cab or crew cab model,
your vehicle also has two rear cupholders. On crew
cab models, the cupholders are located at the front
end of the rear center seat cushion. On extended cab
models, the rear seat cupholders are located on
top of the rear center console.
If you have an ashtray, it will use one of the cupholders.
2-42
Page 131 of 434
Front Armrest Storage Area
For vehicles with bench seats, you may have a center
armrest storage area. Lift up on the upper tab located
at the front of the armrest to release the latch. Lift the
lid to open the storage area.
For vehicles with bucket seats or uplevel packages,
your vehicle may have a two-tiered center armrest
storage area. Lift up on the upper tab located at the
front of the armrest to release the latch. Lift the lid to
the top storage area. A second tab is located below
the top one and allows you to access the bottom
storage area. Lift up on the lower tab to release the
latch. Then, raise the lid of the lower storage area.
The upper storage area will lift up with the lid of
the lower storage area.
To close the storage area(s), lower the lid(s) until you
feel the latch close.
Assist Handles
Your vehicle may have assist handles to be used when
getting out of your vehicle. If your vehicle has assist
handles, they are located above the front passenger
door if you have a regular cab, or above the front and
rear passenger doors if you have an extended cab
or crew cab.
If your vehicle is equipped with roof-mounted side
impact air bags, there will be assist handles located
above both the driver’s and front passenger’s doors.
2-43
Page 132 of 434
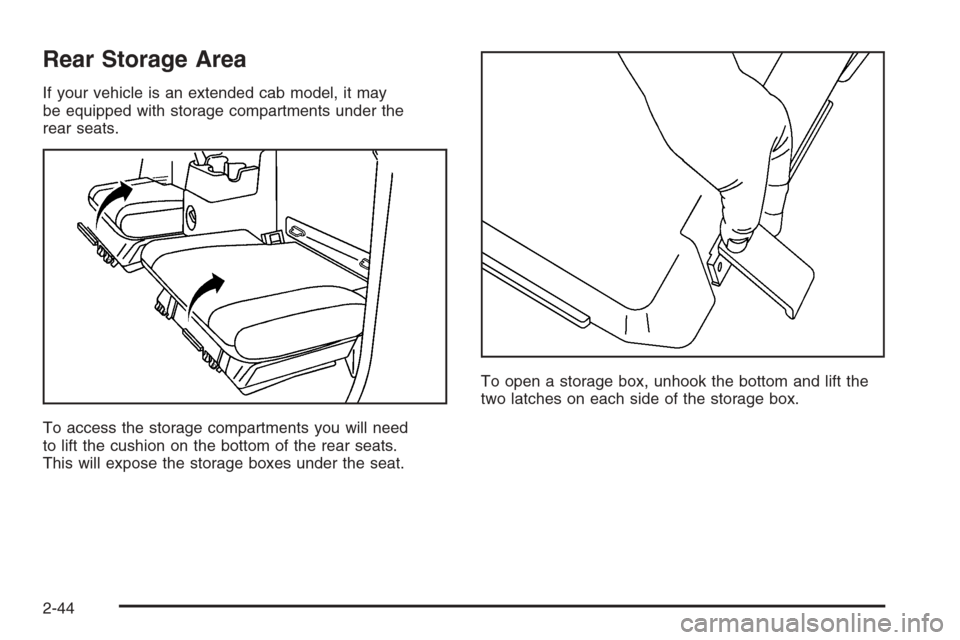
Rear Storage Area
If your vehicle is an extended cab model, it may
be equipped with storage compartments under the
rear seats.
To access the storage compartments you will need
to lift the cushion on the bottom of the rear seats.
This will expose the storage boxes under the seat.To open a storage box, unhook the bottom and lift the
two latches on each side of the storage box.
2-44
Page 155 of 434
You may notice a slight change in engine performance
when the air conditioning compressor shuts off and
turns on again. This is normal. The system is designed
to make adjustments to help with fuel economy while
still maintaining the selected temperature.
The air conditioning system removes moisture from
the air, so you may sometimes notice a small amount
of water dripping underneath your vehicle while idling
or after turning off the engine. This is normal.
Defogging and Defrosting
Fog on the inside of windows is a result of high humidity
(moisture) condensing on the cool window glass. This
can be minimized if the climate control system is used
properly. There are two modes to clear fog or frost from
your windshield and side windows. Use the defog mode
to clear the windows of fog or moisture and warm the
passengers. Use the defrost mode to remove fog or frost
from the windshield more quickly. For best results, clear
all snow and ice from the windshield before defrosting.
Turn the mode knob on the climate control panel
clockwise to select the defog or defrost modes.
/(Floor/Defog):This mode directs the air to the
windshield, the side window outlets, and to the
oor outlets. When you select this mode, the system
runs the air conditioning compressor unless the outside
temperature is near freezing or below. Recirculation
is not available in this mode.
0(Defrost):This mode directs most of the air to
the windshield, and the side window outlets. When you
select this mode, the system runs the air conditioning
compressor unless the outside temperature is near,
or below freezing. Recirculation is not available in
this mode.
Do not drive the vehicle until all the windows are clear.
Outlet Adjustment
Use the thumbwheel on the outlets to change the
direction of the air ow.
Lift up or push down on the thumbwheel located in
the center of the outlet to direct the air up or down,
or slide the thumbwheel to the left or right to direct the
airow from side-to-side.
Operation Tips
Clear away any ice, snow or leaves from the air
inlets at the base of the windshield that may
block the ow of air into your vehicle.
Use of non-GM approved hood deectors may
adversely affect the performance of the system.
Keep the path under the front seats clear of objects
to help circulate the air inside of your vehicle more
effectively.
3-21