length CHEVROLET COLORADO 2015 2.G Owners Manual
[x] Cancel search | Manufacturer: CHEVROLET, Model Year: 2015, Model line: COLORADO, Model: CHEVROLET COLORADO 2015 2.GPages: 431, PDF Size: 5.74 MB
Page 80 of 431
Black plate (31,1)Chevrolet Colorado Owner Manual (GMNA-Localizing-U.S./Canada-
7586788) - 2015 - crc - 2/9/15
Seats and Restraints 3-31
.Can proper safety belt fit be
maintained for the length of the
trip? If yes, continue. If no,
return to the booster seat.
Q: What is the proper way to wear safety belts?
A: An older child should wear a
lap-shoulder belt and get the
additional restraint a shoulder
belt can provide. The shoulder
belt should not cross the face or
neck. The lap belt should fit
snugly below the hips, just
touching the top of the thighs.
This applies belt force to the
child's pelvic bones in a crash.
It should never be worn over the
abdomen, which could cause
severe or even fatal internal
injuries in a crash.
Also see “Rear Safety Belt Comfort
Guides” underLap-Shoulder Belt on
page 3-11.
According to accident statistics,
children are safer when properly
restrained in a rear seating position. In a crash, children who are not
buckled up can strike other people
who are buckled up, or can be
thrown out of the vehicle. Older
children need to use safety belts
properly.
{Warning
Never allow more than one child
to wear the same safety belt. The
safety belt cannot properly spread
the impact forces. In a crash, they
can be crushed together and
seriously injured. A safety belt
must be used by only one person
at a time.
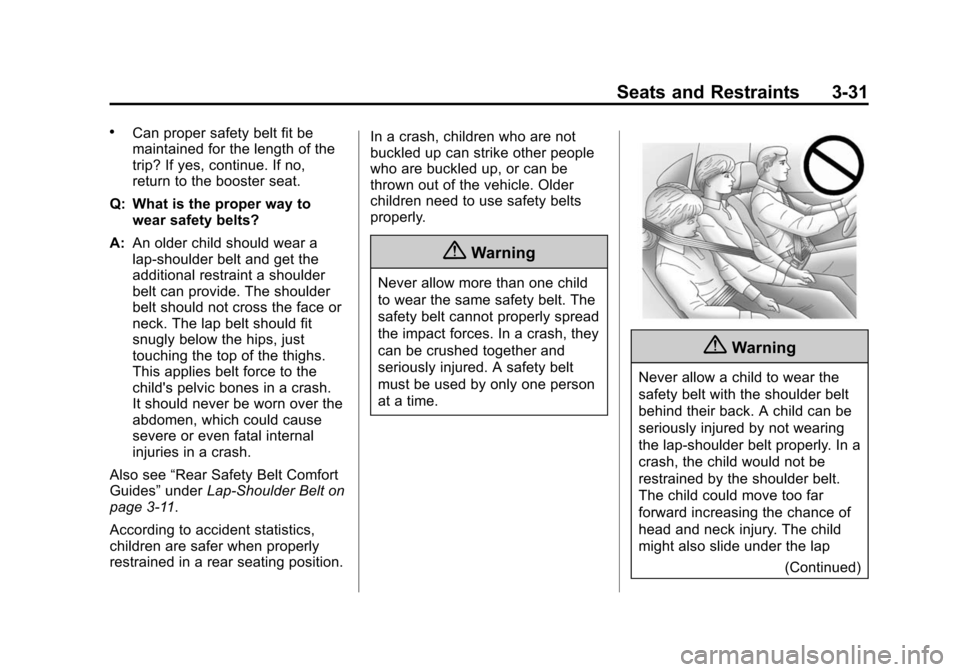
{Warning
Never allow a child to wear the
safety belt with the shoulder belt
behind their back. A child can be
seriously injured by not wearing
the lap-shoulder belt properly. In a
crash, the child would not be
restrained by the shoulder belt.
The child could move too far
forward increasing the chance of
head and neck injury. The child
might also slide under the lap
(Continued)
Page 95 of 431
Black plate (46,1)Chevrolet Colorado Owner Manual (GMNA-Localizing-U.S./Canada-
7586788) - 2015 - crc - 2/9/15
3-46 Seats and Restraints
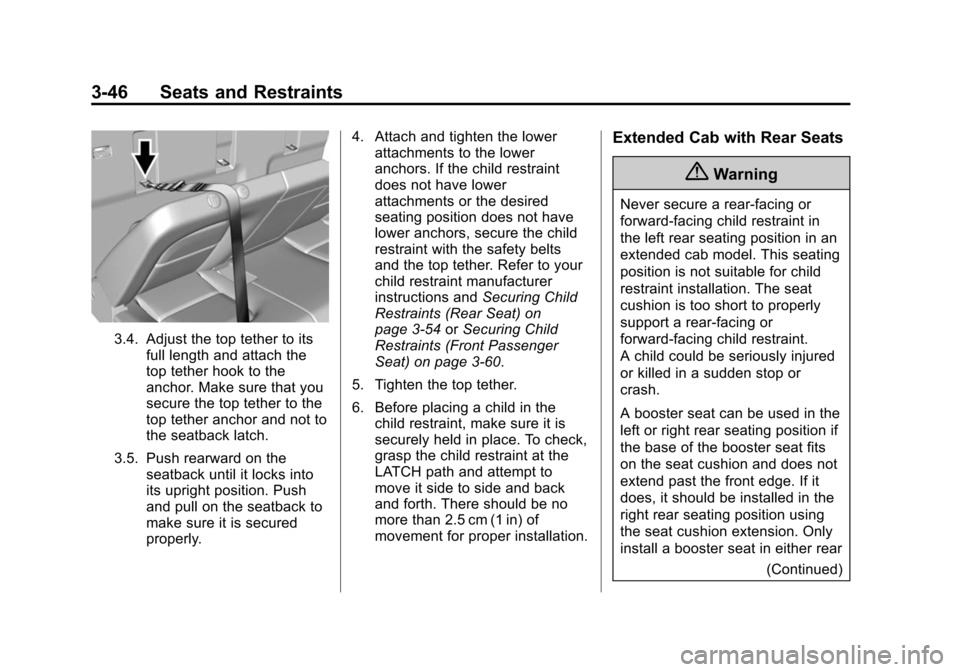
3.4. Adjust the top tether to itsfull length and attach the
top tether hook to the
anchor. Make sure that you
secure the top tether to the
top tether anchor and not to
the seatback latch.
3.5. Push rearward on the seatback until it locks into
its upright position. Push
and pull on the seatback to
make sure it is secured
properly. 4. Attach and tighten the lower
attachments to the lower
anchors. If the child restraint
does not have lower
attachments or the desired
seating position does not have
lower anchors, secure the child
restraint with the safety belts
and the top tether. Refer to your
child restraint manufacturer
instructions and Securing Child
Restraints (Rear Seat) on
page 3-54 orSecuring Child
Restraints (Front Passenger
Seat) on page 3-60.
5. Tighten the top tether.
6. Before placing a child in the child restraint, make sure it is
securely held in place. To check,
grasp the child restraint at the
LATCH path and attempt to
move it side to side and back
and forth. There should be no
more than 2.5 cm (1 in) of
movement for proper installation.
Extended Cab with Rear Seats
{Warning
Never secure a rear-facing or
forward-facing child restraint in
the left rear seating position in an
extended cab model. This seating
position is not suitable for child
restraint installation. The seat
cushion is too short to properly
support a rear-facing or
forward-facing child restraint.
A child could be seriously injured
or killed in a sudden stop or
crash.
A booster seat can be used in the
left or right rear seating position if
the base of the booster seat fits
on the seat cushion and does not
extend past the front edge. If it
does, it should be installed in the
right rear seating position using
the seat cushion extension. Only
install a booster seat in either rear
(Continued)
Page 98 of 431
Black plate (49,1)Chevrolet Colorado Owner Manual (GMNA-Localizing-U.S./Canada-
7586788) - 2015 - crc - 2/9/15
Seats and Restraints 3-49
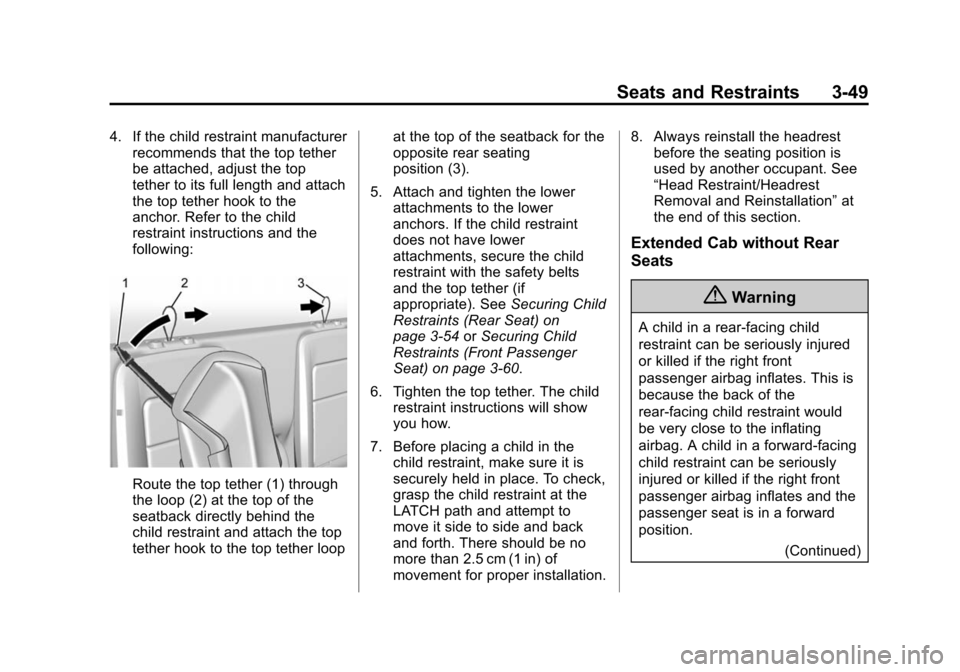
4. If the child restraint manufacturerrecommends that the top tether
be attached, adjust the top
tether to its full length and attach
the top tether hook to the
anchor. Refer to the child
restraint instructions and the
following:
Route the top tether (1) through
the loop (2) at the top of the
seatback directly behind the
child restraint and attach the top
tether hook to the top tether loop at the top of the seatback for the
opposite rear seating
position (3).
5. Attach and tighten the lower attachments to the lower
anchors. If the child restraint
does not have lower
attachments, secure the child
restraint with the safety belts
and the top tether (if
appropriate). See Securing Child
Restraints (Rear Seat) on
page 3-54 orSecuring Child
Restraints (Front Passenger
Seat) on page 3-60.
6. Tighten the top tether. The child restraint instructions will show
you how.
7. Before placing a child in the child restraint, make sure it is
securely held in place. To check,
grasp the child restraint at the
LATCH path and attempt to
move it side to side and back
and forth. There should be no
more than 2.5 cm (1 in) of
movement for proper installation. 8. Always reinstall the headrest
before the seating position is
used by another occupant. See
“Head Restraint/Headrest
Removal and Reinstallation” at
the end of this section.
Extended Cab without Rear
Seats
{Warning
A child in a rear-facing child
restraint can be seriously injured
or killed if the right front
passenger airbag inflates. This is
because the back of the
rear-facing child restraint would
be very close to the inflating
airbag. A child in a forward-facing
child restraint can be seriously
injured or killed if the right front
passenger airbag inflates and the
passenger seat is in a forward
position.
(Continued)
Page 105 of 431
Black plate (56,1)Chevrolet Colorado Owner Manual (GMNA-Localizing-U.S./Canada-
7586788) - 2015 - crc - 2/9/15
3-56 Seats and Restraints
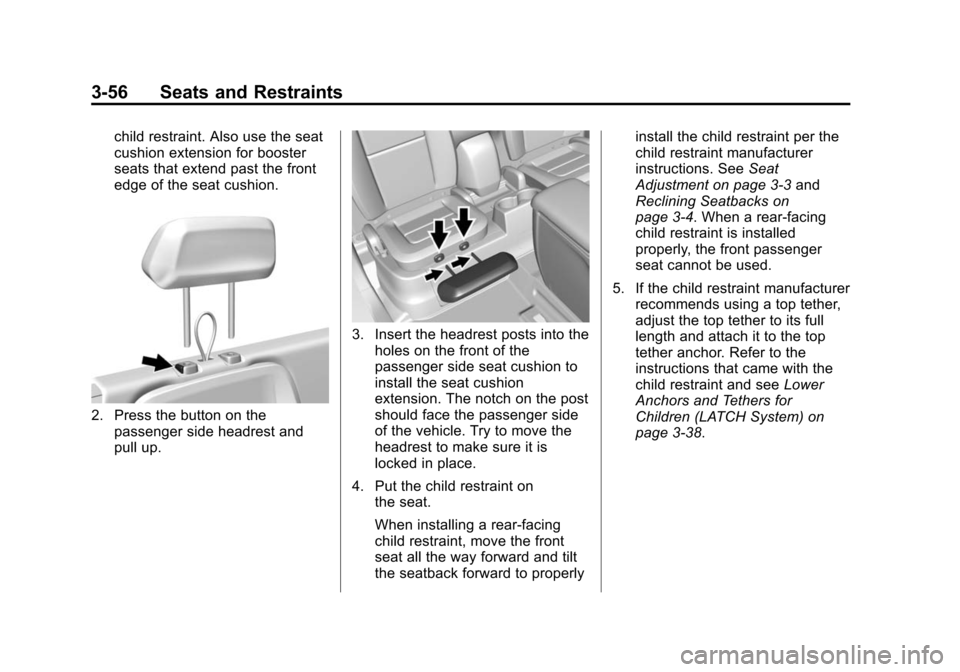
child restraint. Also use the seat
cushion extension for booster
seats that extend past the front
edge of the seat cushion.
2. Press the button on thepassenger side headrest and
pull up.
3. Insert the headrest posts into theholes on the front of the
passenger side seat cushion to
install the seat cushion
extension. The notch on the post
should face the passenger side
of the vehicle. Try to move the
headrest to make sure it is
locked in place.
4. Put the child restraint on the seat.
When installing a rear-facing
child restraint, move the front
seat all the way forward and tilt
the seatback forward to properly install the child restraint per the
child restraint manufacturer
instructions. See
Seat
Adjustment on page 3-3 and
Reclining Seatbacks on
page 3-4. When a rear-facing
child restraint is installed
properly, the front passenger
seat cannot be used.
5. If the child restraint manufacturer recommends using a top tether,
adjust the top tether to its full
length and attach it to the top
tether anchor. Refer to the
instructions that came with the
child restraint and see Lower
Anchors and Tethers for
Children (LATCH System) on
page 3-38.
Page 108 of 431
Black plate (59,1)Chevrolet Colorado Owner Manual (GMNA-Localizing-U.S./Canada-
7586788) - 2015 - crc - 2/9/15
Seats and Restraints 3-59
length and attach it to the top
tether anchor. Refer to the
instructions that came with the
child restraint and seeLower
Anchors and Tethers for
Children (LATCH System) on
page 3-38.
3. Put the child restraint on the seat.
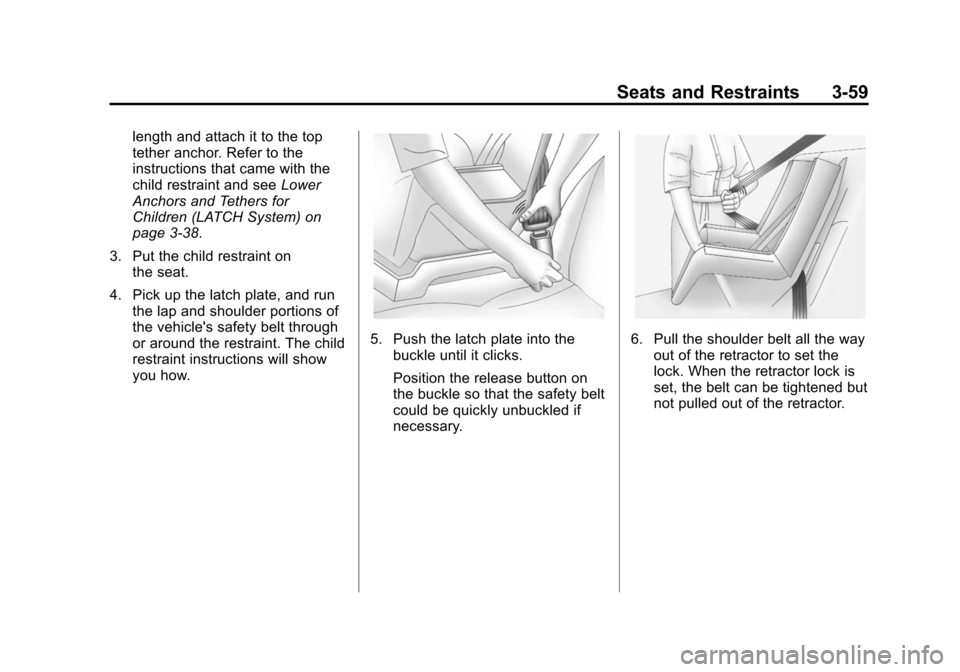
4. Pick up the latch plate, and run the lap and shoulder portions of
the vehicle's safety belt through
or around the restraint. The child
restraint instructions will show
you how.
5. Push the latch plate into thebuckle until it clicks.
Position the release button on
the buckle so that the safety belt
could be quickly unbuckled if
necessary.6. Pull the shoulder belt all the wayout of the retractor to set the
lock. When the retractor lock is
set, the belt can be tightened but
not pulled out of the retractor.
Page 154 of 431

Black plate (39,1)Chevrolet Colorado Owner Manual (GMNA-Localizing-U.S./Canada-
7586788) - 2015 - crc - 2/9/15
Instruments and Controls 5-39
Pair New Device
Select to pair a new device. See
“Pairing”underBluetooth
(Overview) on page 7-25 or
Bluetooth (Infotainment Controls -
Base Radio) on page 7-26 or
Bluetooth (Infotainment Controls -
Base Connected Radio) on
page 7-30 or“Pairing” in
“Infotainment Controls” under
“Bluetooth” in the infotainment
manual.
Device Management
Select to connect to a different
phone source, disconnect a phone,
or delete a phone.
Ringtones
Press to change the ring tone for
the specific phone. The phone does
not need to be connected to change
the ring tones.
Voice Mail Numbers
This feature displays the voice mail
number for all connected phones.
To change the voice mail number, select EDIT or press the EDIT
button. Type a new number, then
select SAVE or press the SAVE
button.
Text Message Alerts
This allows the feature to be turned
on or off.
Select Off or On.
Voice
Select and the following may
display:
.Confidence Threshold
.Prompt Length
.Audio Feedback Speed
Confidence Threshold
This feature allows the adjustment
of the sensitivity of the speech
recognition system.
Select Confirm More or
Confirm Less. Prompt Length
This feature adjusts the voice
prompt length.
Select Short or Long.
Audio Feedback Speed
This feature adjusts the audio
feedback speed.
Select Slow, Medium, or Fast.
Display
Select and the following may
display:
.Mode
.Calibrate Touchscreen
.Turn Display Off
Mode
Select to change the display
screen mode.
Select Auto, Day, or Night.
Calibrate Touchscreen
Select to calibrate the touchscreen,
then follow the prompts.
Page 187 of 431
Black plate (24,1)Chevrolet Colorado Owner Manual (GMNA-Localizing-U.S./Canada-
7586788) - 2015 - crc - 2/9/15
7-24 Infotainment System
The restriction is that the command
“Play Song”must be spoken first;
the system will then ask for the song
name. The reply command would be
to say the name of the song to play.
Similar limits exist for album
content. If there are more than
4,000 albums, but less than 8,000,
the content cannot be accessed
directly with one command like,
“Play
command “Play Album” must first be
spoken; the system will then ask for
the album name. The reply would
be to say the name of the album
to play.
Once the number of songs has
exceeded approximately 8,000,
there is no support for accessing the
songs directly through voice
commands. There will still be
access to the media content by
using commands for playlists,
artists, and genres. The access commands for playlists,
artists, and genres are prohibited
after the number of this type of
media exceeds 4,000.
The system will provide feedback
the first time voice recognition is
initiated if it has become apparent
that any of these limits are reached
during a device initializing process.
Voice Recognition for the
Phone
“Call
Initiate a
call to an entered contact. The
command may include location if
the contact has location numbers
stored.
“Call
“At Work,” “On Mobile,” or“On
Other”: Initiate a call to an entered
contact and location at home, at
work, on mobile device, or on
another phone.
“Call
call to a standard phone number
seven or 10 digits in length, and
also 911, 411, or 611. “Pair Phone”:
Begin the Bluetooth
pairing process. Follow instructions
on the radio display.
“Switch Phone”: Select a different
phone for outgoing calls.
“Voice Keypad”: Begin a dialog to
enter special numbers like
international numbers. The numbers
can be entered in groups of digits
with each group of digits being
repeated back by the system. If the
group of digits is not correct, the
command “Delete”will remove the
last group of digits and allow them
to be re-entered. Once the entire
number has been entered, the
command “Call”will start dialing the
number.
“Voice Mail”: Initiate a call to voice
mail numbers.
Voice Recognition for OnStar
(If Equipped)
“OnStar”: Begin OnStar Voice
Recognition.
Page 239 of 431
Black plate (26,1)Chevrolet Colorado Owner Manual (GMNA-Localizing-U.S./Canada-
7586788) - 2015 - crc - 2/9/15
9-26 Driving and Operating
{Warning
Improper use of the heater cord
or an extension cord can damage
the cord and may result in
overheating and fire.
.Plug the cord into a
three-prong electrical utility
receptacle that is protected
by a ground fault detection
function. An ungrounded
outlet could cause an electric
shock.
.Use a weatherproof,
heavy-duty, 15 amp-rated
extension cord if needed.
Failure to use the
recommended extension cord
in good operating condition,
or using a damaged heater or
extension cord, could make it(Continued)
Warning (Continued)
overheat and cause a fire,
property damage, electric
shock, and injury.
.Do not operate the vehicle
with the heater cord
permanently attached to the
vehicle. Possible heater cord
and thermostat damage could
occur.
.While in use, do not let the
heater cord touch vehicle
parts or sharp edges. Never
close the hood on the
heater cord.
.Before starting the vehicle,
unplug the cord, reattach the
cover to the plug, and
securely fasten the cord.
Keep the cord away from any
moving parts.
4. Before starting the engine, be sure to unplug and store the
cord as it was before to keep it away from moving engine parts.
If you do not, it could be
damaged.
The length of time the heater should
remain plugged in depends on
several factors. Ask a dealer in the
area where you will be parking the
vehicle for the best advice on this.
Shifting Into Park
{Warning
It can be dangerous to get out of
the vehicle if the shift lever is not
fully in P (Park) with the parking
brake firmly set. The vehicle can
roll. If you have left the engine
running, the vehicle can move
suddenly. You or others could be
injured. To be sure the vehicle will
not move, even when you are on
fairly level ground, use the steps
that follow. With four-wheel drive,
if the transfer case is in
N (Neutral), the vehicle will be (Continued)
Page 308 of 431
Black plate (29,1)Chevrolet Colorado Owner Manual (GMNA-Localizing-U.S./Canada-
7586788) - 2015 - crc - 2/9/15
Vehicle Care 10-29
.To check the P (Park)
mechanism's holding ability:
With the engine running, shift to
P (Park). Then release the
parking brake followed by the
regular brake.
Contact your dealer if service is
required.
Wiper Blade Replacement
Windshield wiper blades should be
inspected for wear or cracking.
Replacement blades come in
different types and are removed in
different ways. For proper
windshield wiper blade length and
type, see Maintenance
Replacement Parts on page 11-14.
{Caution
Allowing the wiper arm to touch
the windshield when no wiper
blade is installed could damage
the windshield. Any damage that
(Continued)
Caution (Continued)
occurs would not be covered by
the vehicle warranty. Do not allow
the wiper arm to touch the
windshield.
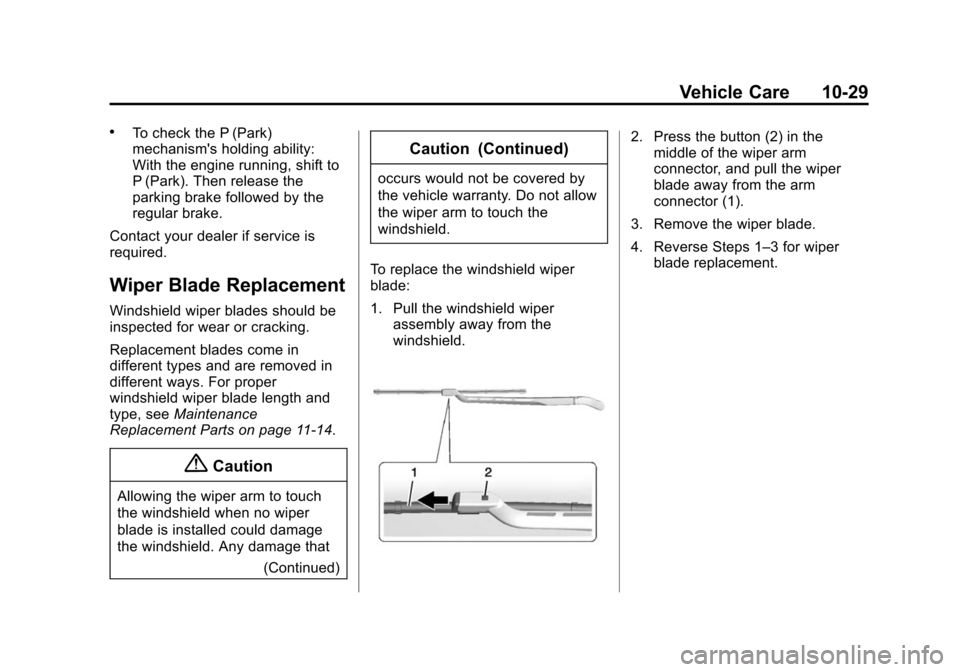
To replace the windshield wiper
blade:
1. Pull the windshield wiper assembly away from the
windshield.
2. Press the button (2) in themiddle of the wiper arm
connector, and pull the wiper
blade away from the arm
connector (1).
3. Remove the wiper blade.
4. Reverse Steps 1–3 for wiper blade replacement.