automatic transmission CHEVROLET COLORADO 2018 Owner's Guide
[x] Cancel search | Manufacturer: CHEVROLET, Model Year: 2018, Model line: COLORADO, Model: CHEVROLET COLORADO 2018Pages: 421, PDF Size: 5.58 MB
Page 262 of 421
Chevrolet Colorado Owner Manual (GMNA-Localizing-U.S./Canada/Mexico-
11349743) - 2018 - crc - 10/12/17
Driving and Operating 261
vehicle may show signs similar to
engine overheating. To avoid this,
let the engine run while parked,
preferably on level ground, with the
transmission in P (Park) for a few
minutes before turning the engine
off. If the overheat warning comes
on, seeEngine Overheating 0291.
Parking on Hills
{Warning
Parking the vehicle on a hill with
the trailer attached can be
dangerous. If something goes
wrong, the rig could start to move.
People can be injured, and both
the vehicle and the trailer can be
damaged. When possible, always
park the rig on a flat surface.
If parking the rig on a hill: 1. Press the brake pedal, but do not shift into P (Park) yet. Turn
the wheels into the curb if
facing downhill or into traffic if
facing uphill. 2. Have someone place chocks
under the trailer wheels.
3. When the wheel chocks are in place, release the regular
brakes until the chocks absorb
the load.
4. Reapply the brake pedal. Then apply the parking brake and
shift into P (Park).
5. Release the brake pedal.Leaving After Parking on a Hill
1. Apply and hold the brake pedal.
2. Start the engine.
3. Shift into a gear.
4. Release the parking brake.
5. Let up on the brake pedal.
6. Drive slowly until the trailer is clear of the chocks.
7. Stop and have someone pick up and store the chocks.
Maintenance when Trailer
Towing
The vehicle needs service more
often when pulling a trailer. See
Maintenance Schedule 0365.
Things that are especially important
in trailer operation are automatic
transmission fluid, engine oil, axle
lubricant, belts, cooling system, and
brake system. It is a good idea to
inspect these before and during
the trip.
Check periodically to see that all
hitch nuts and bolts are tight.
Trailer Towing
Do not tow a trailer during break-in.
See New Vehicle Break-In 0216.
{Warning
The driver can lose control when
pulling a trailer if the correct
equipment is not used or the
vehicle is not driven properly. For
example, if the trailer is too heavy
(Continued)
Page 268 of 421
Chevrolet Colorado Owner Manual (GMNA-Localizing-U.S./Canada/Mexico-
11349743) - 2018 - crc - 10/12/17
Driving and Operating 267
.When pulling a heavy trailer or a
large or heavy load in busy
parking lots where improved low
speed control of the vehicle is
desired.
Operating the vehicle in Tow/Haul
when lightly loaded or with no trailer
at all will not cause damage.
However, there is no benefit to the
selection of Tow/Haul when the
vehicle is unloaded. Such a
selection when unloaded may result
in unpleasant engine and
transmission driving characteristics
and reduced fuel economy. Tow/
Haul is recommended only when
pulling a heavy trailer or a large or
heavy load.
If the vehicle has a diesel engine,
the Tow/Haul button activates the
exhaust brake system
simultaneously. See “Exhaust
Brake” in the Duramax diesel
supplement.Integrated Trailer Brake
Control System
The vehicle may have an Integrated
Trailer Brake Control (ITBC) system
for use with electric trailer brakes or
most electric over hydraulic trailer
brakes.
This symbol is on the Trailer Brake
Control Panel on vehicles with an
ITBC system. The power output to
the trailer brakes is based on the
amount of brake pressure being
applied by the vehicle’s brake
system, and on the type of trailer
brakes detected. This available
power output to the trailer brakes
can be adjusted to a wide range of
trailering situations.
The ITBC system is integrated with
the vehicle’ s brake, antilock brake,
and StabiliTrak systems. In trailering
conditions that cause the vehicle’s antilock brake or StabiliTrak
systems to activate, power sent to
the trailer's brakes will be
automatically adjusted to minimize
trailer wheel lock-up. This does not
imply that the trailer has StabiliTrak.
If the vehicle’s brake, antilock brake,
or StabiliTrak systems are not
functioning properly, the ITBC
system may not be fully functional
or may not function at all. Make sure
all of these systems are fully
operational to ensure full
functionality of the ITBC system.
The ITBC system is powered
through the vehicle's electrical
system. Turning the ignition off will
also turn off the ITBC system. The
ITBC system is fully functional only
when the ignition is in ON/RUN.
{Warning
Connecting a trailer that has an
air brake system may result in
reduced or complete loss of trailer
braking. There may be an
(Continued)
Page 275 of 421
Chevrolet Colorado Owner Manual (GMNA-Localizing-U.S./Canada/Mexico-
11349743) - 2018 - crc - 10/12/17
274 Vehicle Care
Vehicle Care
General Information
General Information . . . . . . . . . . 275
California Proposition65 Warning . . . . . . . . . . . . . . . . . 275
California Perchlorate Materials Requirements . . . . . 276
Accessories and Modifications . . . . . . . . . . . . . . . . 276
Vehicle Checks
Doing Your OwnService Work . . . . . . . . . . . . . . . 276
Hood . . . . . . . . . . . . . . . . . . . . . . . . . 277
Engine Compartment Overview . . . . . . . . . . . . . . . . . . . . 278
Engine Oil . . . . . . . . . . . . . . . . . . . . 281
Engine Oil Life System . . . . . . . 283
Automatic Transmission Fluid . . . . . . . . . . . . . . . . . . . . . . . . 285
Manual Transmission Fluid . . . 285
Hydraulic Clutch . . . . . . . . . . . . . . 285
Engine Air Cleaner/Filter . . . . . . 286
Cooling System . . . . . . . . . . . . . . 287
Engine Overheating . . . . . . . . . . 291
Engine Fan . . . . . . . . . . . . . . . . . . . 292
Washer Fluid . . . . . . . . . . . . . . . . . 293
Brakes . . . . . . . . . . . . . . . . . . . . . . . 293 Brake Fluid . . . . . . . . . . . . . . . . . . . 294
Battery - North America . . . . . . 295
Four-Wheel Drive . . . . . . . . . . . . . 296
Front Axle . . . . . . . . . . . . . . . . . . . . 297
Rear Axle . . . . . . . . . . . . . . . . . . . . 298
Starter Switch Check . . . . . . . . . 298
Automatic Transmission Shift
Lock Control Function
Check . . . . . . . . . . . . . . . . . . . . . . . 299
Ignition Transmission Lock Check . . . . . . . . . . . . . . . . . . . . . . . 299
Park Brake and P (Park) Mechanism Check . . . . . . . . . . 300
Wiper Blade Replacement . . . . 300
Windshield Replacement . . . . . 301
Gas Strut(s) . . . . . . . . . . . . . . . . . . 301
Headlamp Aiming
Headlamp Aiming . . . . . . . . . . . . 302
Bulb Replacement
Bulb Replacement . . . . . . . . . . . . 302
Halogen Bulbs . . . . . . . . . . . . . . . . 302
Headlamps, Front Turn Signal, Sidemarker, and Parking
Lamps . . . . . . . . . . . . . . . . . . . . . . 303
Taillamps, Turn Signal, Stoplamps, and Back-Up
Lamps . . . . . . . . . . . . . . . . . . . . . . 303 Center High-Mounted
Stoplamp (CHMSL) and
Cargo Lamp . . . . . . . . . . . . . . . . . 304
Electrical System
Electrical System Overload . . . 305
Fuses and Circuit Breakers . . . 305
Engine Compartment FuseBlock . . . . . . . . . . . . . . . . . . . . . . . . 306
Instrument Panel Fuse Block . . . . . . . . . . . . . . . . . . . . . . . . 310
Wheels and Tires
Tires . . . . . . . . . . . . . . . . . . . . . . . . . . 312
All-Season Tires . . . . . . . . . . . . . . 313
Winter Tires . . . . . . . . . . . . . . . . . . 313
All-Terrain Tires . . . . . . . . . . . . . . . 314
Tire Sidewall Labeling . . . . . . . . 314
Tire Designations . . . . . . . . . . . . . 316
Tire Terminology andDefinitions . . . . . . . . . . . . . . . . . . 317
Tire Pressure . . . . . . . . . . . . . . . . . 320
Tire Pressure Monitor System . . . . . . . . . . . . . . . . . . . . . . 321
Tire Pressure Monitor Operation . . . . . . . . . . . . . . . . . . . 322
Tire Inspection . . . . . . . . . . . . . . . . 325
Tire Rotation . . . . . . . . . . . . . . . . . 325
When It Is Time for New Tires . . . . . . . . . . . . . . . . . . . . . . . . 326
Buying New Tires . . . . . . . . . . . . . 327
Page 286 of 421
Chevrolet Colorado Owner Manual (GMNA-Localizing-U.S./Canada/Mexico-
11349743) - 2018 - crc - 10/12/17
Vehicle Care 285
Automatic Transmission
Fluid
How to Check Automatic
Transmission Fluid
It is not necessary to check the
transmission fluid level.
A transmission fluid leak is the only
reason for fluid loss. If a leak
occurs, take the vehicle to your
dealer and have it repaired as soon
as possible.
There is a special procedure for
checking and changing the
transmission fluid. Because this
procedure is difficult, this should be
done at your dealer. Contact your
dealer for additional information or
the procedure can be found in the
service manual. To purchase a
service manual, seeService
Publications Ordering Information
0 391.
Change the fluid and filter at the
intervals listed in Maintenance
Schedule 0365, and be sure to use
the fluid listed in Recommended
Fluids and Lubricants 0374.
Manual Transmission
Fluid
How to Check Manual
Transmission Fluid
It is not necessary to check the
manual transmission fluid level.
A transmission fluid leak is the only
reason for fluid loss. If a leak
occurs, take the vehicle to your
dealer and have it repaired as soon
as possible. See Recommended
Fluids and Lubricants 0374 for the
proper fluid to use.
Hydraulic Clutch
For vehicles with a manual
transmission, it is not necessary to
regularly check brake/clutch fluid
unless there is a leak suspected.
Adding fluid will not correct a leak.
A fluid loss in this system could
indicate a problem. Have the
system inspected and repaired.
When to Check and What
to Use
The brake/hydraulic clutch fluid
reservoir cap has this symbol on it.
The common brake/clutch fluid
reservoir is filled with DOT 3 brake
fluid as indicated on the reservoir
cap. See Engine Compartment
Overview 0278 for reservoir
location.
How to Check and Add Fluid
Visually check the brake/clutch fluid
reservoir to make sure the fluid level
is at the MIN (minimum) line on the
front of the reservoir. The brake/
hydraulic clutch fluid system should
be closed and sealed.
Page 300 of 421
Chevrolet Colorado Owner Manual (GMNA-Localizing-U.S./Canada/Mexico-
11349743) - 2018 - crc - 10/12/17
Vehicle Care 299
2. Apply both the parking brakeand the regular brake.
Do not use the accelerator
pedal, and be ready to turn off
the engine immediately if it
starts.
3. For automatic transmission vehicles, try to start the engine
in each gear. The vehicle
should start only in P (Park) or
N (Neutral). If the vehicle starts
in any other position, contact
your dealer for service.
For manual transmission
vehicles, put the shift lever in
Neutral, push the clutch pedal
down halfway, and try to start
the engine. The vehicle should
start only when the clutch
pedal is pushed down all the
way to the floor. If the vehicle
starts when the clutch pedal is
not pushed all the way down,
contact your dealer for service.Automatic Transmission
Shift Lock Control
Function Check
{Warning
When you are doing this
inspection, the vehicle could
move suddenly. If the vehicle
moves, you or others could be
injured.
1. Before starting this check, be sure there is enough room
around the vehicle. It should be
parked on a level surface.
2. Apply the parking brake. Be ready to apply the regular
brake immediately if the vehicle
begins to move.
3. With the engine off, turn the ignition on, but do not start the
engine. Without applying the
regular brake, try to move the
shift lever out of P (Park) with normal effort. If the shift lever
moves out of P (Park), contact
your dealer for service.
Ignition Transmission
Lock Check
While parked, and with the parking
brake set, try to turn the ignition off
in each shift lever position.
.
For automatic transmission
vehicles, the ignition should turn
to off only when the shift lever is
in P (Park).
. For manual transmission
vehicles, the ignition should turn
off only when you press the key
release button.
On all vehicles, the ignition key
should come out only when the
ignition is off.
Contact your dealer if service is
required.
Page 318 of 421
Chevrolet Colorado Owner Manual (GMNA-Localizing-U.S./Canada/Mexico-
11349743) - 2018 - crc - 10/12/17
Vehicle Care 317
(2) Tire Width:The three-digit
number indicates the tire section
width in millimeters from
sidewall to sidewall.
(3) Aspect Ratio
:A two-digit
number that indicates the tire
height-to-width measurements.
For example, if the tire size
aspect ratio is 60, as shown in
item 3 of the illustration, it would
mean that the tire's sidewall is
60 percent as high as it is wide.
(4) Construction Code
:A letter
code is used to indicate the type
of ply construction in the tire.
The letter R means radial ply
construction; the letter D means
diagonal or bias ply
construction; and the letter B
means belted-bias ply
construction.
(5) Rim Diameter
:Diameter of
the wheel in inches.
(6) Service Description
:These
characters represent the load
index and speed rating of the tire. The load index represents
the load carrying capacity a tire
is certified to carry. The speed
rating is the maximum speed a
tire is certified to carry a load.
Tire Terminology and
Definitions
Air Pressure:The amount of
air inside the tire pressing
outward on each square inch of
the tire. Air pressure is
expressed in kPa (kilopascal)
or psi (pounds per square inch).
Accessory Weight
:The
combined weight of optional
accessories. Some examples of
optional accessories are
automatic transmission, power
windows, power seats, and air
conditioning.
Aspect Ratio
:The relationship
of a tire's height to its width. Belt
:A rubber coated layer of
cords between the plies and the
tread. Cords may be made from
steel or other reinforcing
materials.
Bead
:The tire bead contains
steel wires wrapped by steel
cords that hold the tire onto
the rim.
Bias Ply Tire
:A pneumatic tire
in which the plies are laid at
alternate angles less than
90 degrees to the centerline of
the tread.
Cold Tire Pressure
:The
amount of air pressure in a tire,
measured in kPa (kilopascal)
or psi (pounds per square inch)
before a tire has built up heat
from driving. See Tire Pressure
0 320.
Curb Weight
:The weight of a
motor vehicle with standard and
optional equipment including the
Page 334 of 421

Chevrolet Colorado Owner Manual (GMNA-Localizing-U.S./Canada/Mexico-
11349743) - 2018 - crc - 10/12/17
Vehicle Care 333
A rear blowout, particularly on a
curve, acts much like a skid and
may require the same correction as
used in a skid. Stop pressing the
accelerator pedal and steer to
straighten the vehicle. It may be
very bumpy and noisy. Gently brake
to a stop, well off the road,
if possible.
{Warning
Driving on a flat tire will cause
permanent damage to the tire.
Re-inflating a tire after it has been
driven on while severely
underinflated or flat may cause a
blowout and a serious crash.
Never attempt to re-inflate a tire
that has been driven on while
severely underinflated or flat.
Have your dealer or an authorized
tire service center repair or
replace the flat tire as soon as
possible.
{Warning
Lifting a vehicle and getting under
it to do maintenance or repairs is
dangerous without the
appropriate safety equipment and
training. If a jack is provided with
the vehicle, it is designed only for
changing a flat tire. If it is used for
anything else, you or others could
be badly injured or killed if the
vehicle slips off the jack. If a jack
is provided with the vehicle, only
use it for changing a flat tire.
If a tire goes flat, avoid further tire
and wheel damage by driving slowly
to a level place, well off the road,
if possible. Turn on the hazard
warning flashers. See Hazard
Warning Flashers 0145.
{Warning
Changing a tire can be
dangerous. The vehicle can slip
off the jack and roll over or fall
causing injury or death. Find a
level place to change the tire. To
help prevent the vehicle from
moving:
1. Set the parking brake firmly.
2. Put an automatictransmission in P (Park) or a
manual transmission in
1 (First) or R (Reverse).
3. For four-wheel-drive vehicles, be sure the
transfer case is in a drive
gear– not in N (Neutral).
4. Turn off the engine and do not restart while the vehicle
is raised.
5. Do not allow passengers to remain in the vehicle.
(Continued)
Page 347 of 421
Chevrolet Colorado Owner Manual (GMNA-Localizing-U.S./Canada/Mexico-
11349743) - 2018 - crc - 10/12/17
346 Vehicle Care
Caution
Ignoring these steps could result
in costly damage to the vehicle
that would not be covered by the
vehicle warranty. Trying to start
the vehicle by pushing or pulling it
will not work, and it could damage
the vehicle.
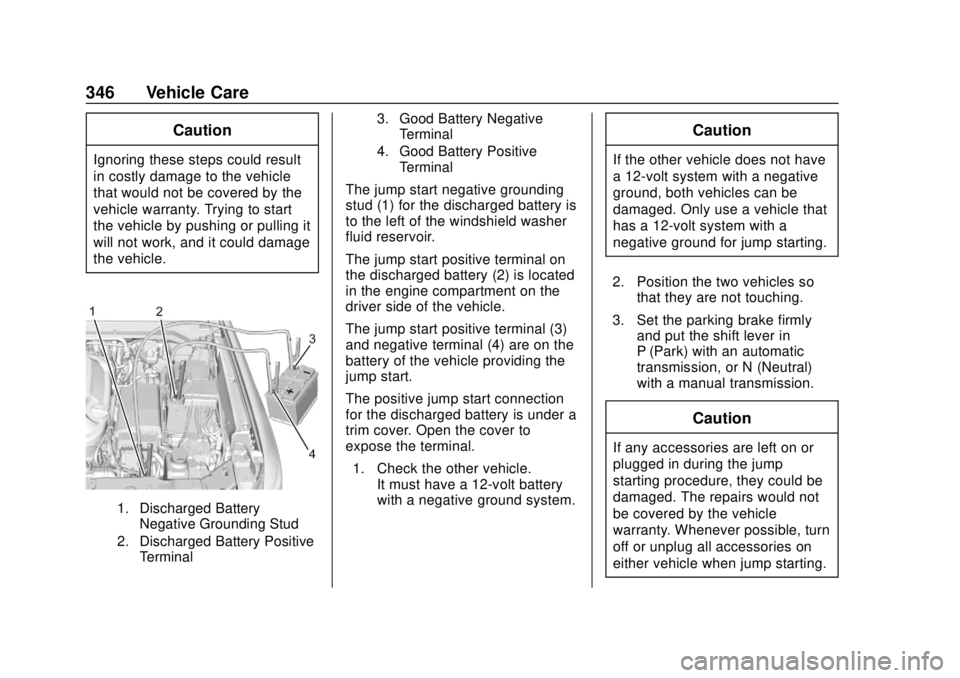
1. Discharged BatteryNegative Grounding Stud
2. Discharged Battery Positive Terminal 3. Good Battery Negative
Terminal
4. Good Battery Positive Terminal
The jump start negative grounding
stud (1) for the discharged battery is
to the left of the windshield washer
fluid reservoir.
The jump start positive terminal on
the discharged battery (2) is located
in the engine compartment on the
driver side of the vehicle.
The jump start positive terminal (3)
and negative terminal (4) are on the
battery of the vehicle providing the
jump start.
The positive jump start connection
for the discharged battery is under a
trim cover. Open the cover to
expose the terminal.
1. Check the other vehicle. It must have a 12-volt battery
with a negative ground system.
Caution
If the other vehicle does not have
a 12-volt system with a negative
ground, both vehicles can be
damaged. Only use a vehicle that
has a 12-volt system with a
negative ground for jump starting.
2. Position the two vehicles so that they are not touching.
3. Set the parking brake firmly and put the shift lever in
P (Park) with an automatic
transmission, or N (Neutral)
with a manual transmission.
Caution
If any accessories are left on or
plugged in during the jump
starting procedure, they could be
damaged. The repairs would not
be covered by the vehicle
warranty. Whenever possible, turn
off or unplug all accessories on
either vehicle when jump starting.
Page 367 of 421

Chevrolet Colorado Owner Manual (GMNA-Localizing-U.S./Canada/Mexico-
11349743) - 2018 - crc - 10/12/17
366 Service and Maintenance
.Check tire inflation pressures.
See Tire Pressure 0320.
. Inspect tire wear. See Tire
Inspection 0325.
. Visually check for fluid leaks.
. Inspect engine air cleaner filter.
See Engine Air Cleaner/Filter
0 286.
. Inspect brake system. See
Exterior Care 0353.
. Visually inspect steering,
suspension, and chassis
components for damaged, loose,
or missing parts or signs of
wear. See Exterior Care 0353.
. Check restraint system
components. See Safety System
Check 059.
. Visually inspect fuel system for
damage or leaks.
. Visually inspect exhaust system
and nearby heat shields for
loose or damaged parts.
. Lubricate body components. See
Exterior Care 0353. .
Check starter switch. See Starter
Switch Check 0298.
. Check automatic transmission
shift lock control function. See
Automatic Transmission Shift
Lock Control Function Check
0299.
. Check ignition transmission lock.
See Ignition Transmission Lock
Check 0299.
. Check parking brake and
automatic transmission park
mechanism. See Park Brake and
P (Park) Mechanism Check
0 300.
. Check accelerator pedal for
damage, high effort, or binding.
Replace if needed.
. Visually inspect gas strut for
signs of wear, cracks, or other
damage. Check the hold open
ability of the strut. If the hold
open is low, service the gas
strut. See Gas Strut(s) 0301. .
Verify spare tire key lock
operation and lubricate as
needed. See Tire Changing
0 334.
Page 368 of 421
Chevrolet Colorado Owner Manual (GMNA-Localizing-U.S./Canada/Mexico-
11349743) - 2018 - crc - 10/12/17
Service and Maintenance 367
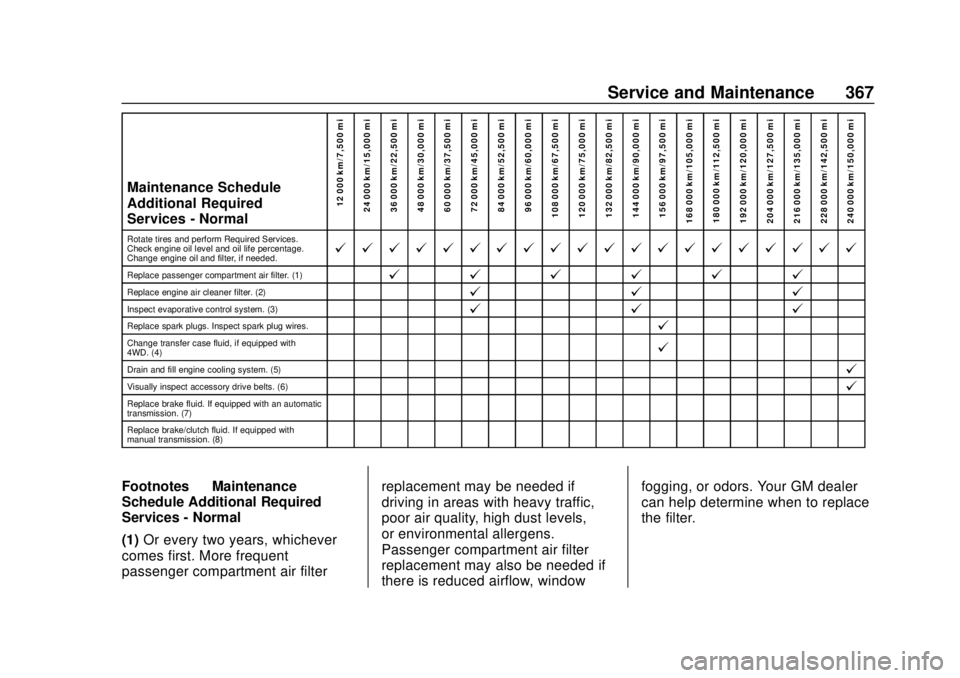
Maintenance Schedule
Additional Required
Services - Normal12 000 km/7,500 mi
24 000 km/15,000 mi
36 000 km/22,500 mi
48 000 km/30,000 mi
60 000 km/37,500 mi
72 000 km/45,000 mi
84 000 km/52,500 mi
96 000 km/60,000 mi
108 000 km/67,500 mi
120 000 km/75,000 mi
132 000 km/82,500 mi
144 000 km/90,000 mi
156 000 km/97,500 mi
168 000 km/105,000 mi 180 000 km/112,500 mi
192 000 km/120,000 mi
204 000 km/127,500 mi
216 000 km/135,000 mi
228 000 km/142,500 mi
240 000 km/150,000 mi
Rotate tires and perform Required Services.
Check engine oil level and oil life percentage.
Change engine oil and filter, if needed.@ @ @ @ @ @ @ @ @ @ @ @ @ @ @ @ @ @ @ @
Replace passenger compartment air filter. (1)@ @@@@@
Replace engine air cleaner filter. (2)@ @@
Inspect evaporative control system. (3)@@@
Replace spark plugs. Inspect spark plug wires.@
Change transfer case fluid, if equipped with
4WD. (4)@
Drain and fill engine cooling system. (5)@
Visually inspect accessory drive belts. (6)@
Replace brake fluid. If equipped with an automatic
transmission. (7)
Replace brake/clutch fluid. If equipped with
manual transmission. (8)
Footnotes—Maintenance
Schedule Additional Required
Services - Normal
(1) Or every two years, whichever
comes first. More frequent
passenger compartment air filter replacement may be needed if
driving in areas with heavy traffic,
poor air quality, high dust levels,
or environmental allergens.
Passenger compartment air filter
replacement may also be needed if
there is reduced airflow, windowfogging, or odors. Your GM dealer
can help determine when to replace
the filter.