front end CHEVROLET COLORADO 2019 Service Manual
[x] Cancel search | Manufacturer: CHEVROLET, Model Year: 2019, Model line: COLORADO, Model: CHEVROLET COLORADO 2019Pages: 387, PDF Size: 5.69 MB
Page 232 of 387
Chevrolet Colorado Owner Manual (GMNA-Localizing-U.S./Canada/Mexico-
12460274) - 2019 - CRC - 10/1/18
Driving and Operating 231
Trailer Brake Control Wiring
Harness
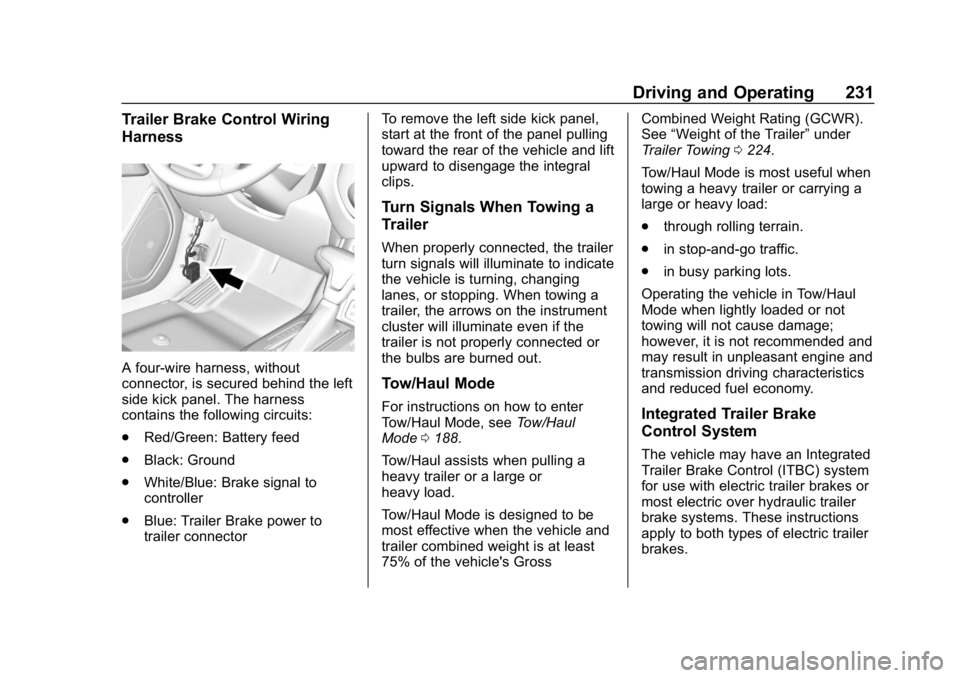
A four-wire harness, without
connector, is secured behind the left
side kick panel. The harness
contains the following circuits:
.Red/Green: Battery feed
. Black: Ground
. White/Blue: Brake signal to
controller
. Blue: Trailer Brake power to
trailer connector To remove the left side kick panel,
start at the front of the panel pulling
toward the rear of the vehicle and lift
upward to disengage the integral
clips.
Turn Signals When Towing a
Trailer
When properly connected, the trailer
turn signals will illuminate to indicate
the vehicle is turning, changing
lanes, or stopping. When towing a
trailer, the arrows on the instrument
cluster will illuminate even if the
trailer is not properly connected or
the bulbs are burned out.
Tow/Haul Mode
For instructions on how to enter
Tow/Haul Mode, see
Tow/Haul
Mode 0188.
Tow/Haul assists when pulling a
heavy trailer or a large or
heavy load.
Tow/Haul Mode is designed to be
most effective when the vehicle and
trailer combined weight is at least
75% of the vehicle's Gross Combined Weight Rating (GCWR).
See
“Weight of the Trailer” under
Trailer Towing 0224.
Tow/Haul Mode is most useful when
towing a heavy trailer or carrying a
large or heavy load:
. through rolling terrain.
. in stop-and-go traffic.
. in busy parking lots.
Operating the vehicle in Tow/Haul
Mode when lightly loaded or not
towing will not cause damage;
however, it is not recommended and
may result in unpleasant engine and
transmission driving characteristics
and reduced fuel economy.Integrated Trailer Brake
Control System
The vehicle may have an Integrated
Trailer Brake Control (ITBC) system
for use with electric trailer brakes or
most electric over hydraulic trailer
brake systems. These instructions
apply to both types of electric trailer
brakes.
Page 263 of 387
Chevrolet Colorado Owner Manual (GMNA-Localizing-U.S./Canada/Mexico-
12460274) - 2019 - CRC - 10/1/18
262 Vehicle Care
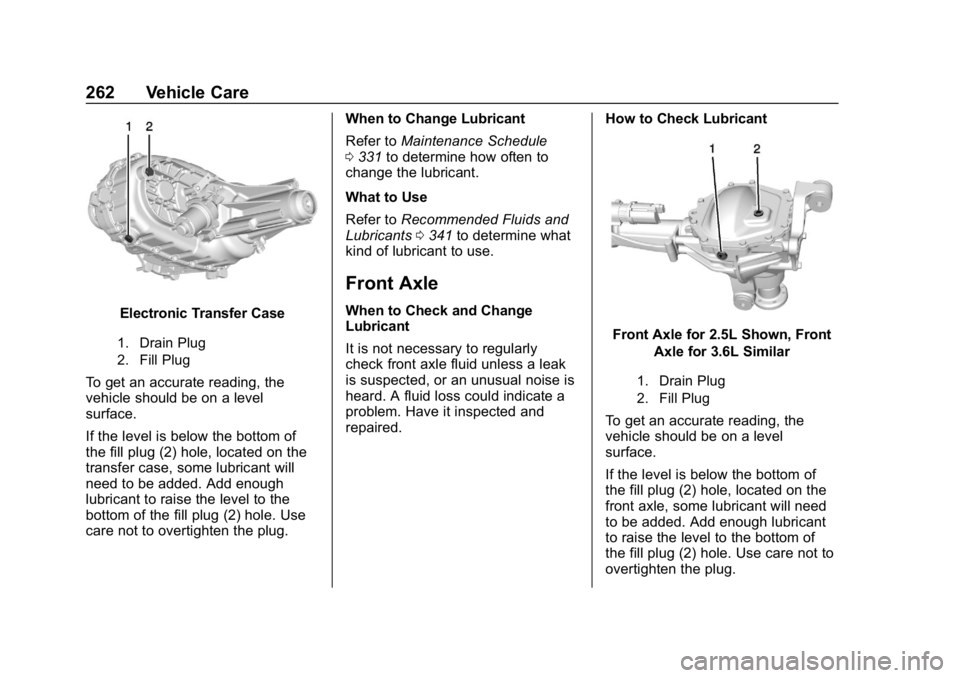
Electronic Transfer Case
1. Drain Plug
2. Fill Plug
To get an accurate reading, the
vehicle should be on a level
surface.
If the level is below the bottom of
the fill plug (2) hole, located on the
transfer case, some lubricant will
need to be added. Add enough
lubricant to raise the level to the
bottom of the fill plug (2) hole. Use
care not to overtighten the plug.When to Change Lubricant
Refer to
Maintenance Schedule
0 331 to determine how often to
change the lubricant.
What to Use
Refer to Recommended Fluids and
Lubricants 0341 to determine what
kind of lubricant to use.
Front Axle
When to Check and Change
Lubricant
It is not necessary to regularly
check front axle fluid unless a leak
is suspected, or an unusual noise is
heard. A fluid loss could indicate a
problem. Have it inspected and
repaired. How to Check Lubricant
Front Axle for 2.5L Shown, Front
Axle for 3.6L Similar
1. Drain Plug
2. Fill Plug
To get an accurate reading, the
vehicle should be on a level
surface.
If the level is below the bottom of
the fill plug (2) hole, located on the
front axle, some lubricant will need
to be added. Add enough lubricant
to raise the level to the bottom of
the fill plug (2) hole. Use care not to
overtighten the plug.
Page 267 of 387
Chevrolet Colorado Owner Manual (GMNA-Localizing-U.S./Canada/Mexico-
12460274) - 2019 - CRC - 10/1/18
266 Vehicle Care
3. Remove the wiper blade.
4. Reverse Steps 1–3 for wiperblade replacement.
Windshield Replacement
Driver Assistance Systems
If the windshield needs to be
replaced and the vehicle is
equipped with a front camera sensor
for the Driver Assistance Systems, a
GM replacement windshield is
recommended. The replacement
windshield must be installed
according to GM specifications for
proper alignment. If it is not, these
systems may not work properly, they
may display messages, or they may
not work at all. See your dealer for
proper windshield replacement.
Gas Strut(s)
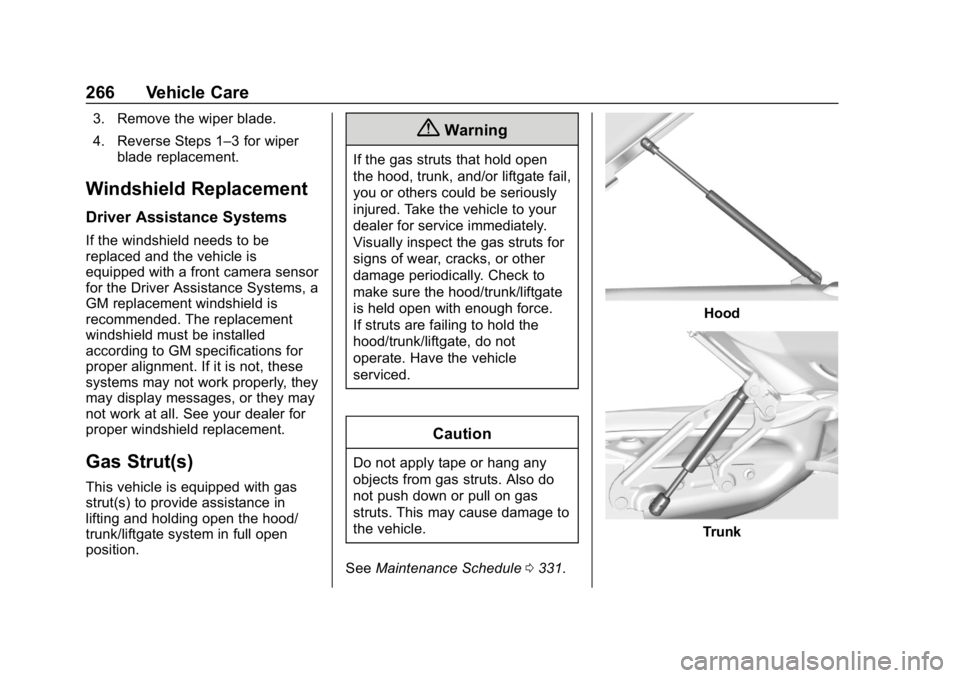
This vehicle is equipped with gas
strut(s) to provide assistance in
lifting and holding open the hood/
trunk/liftgate system in full open
position.
{Warning
If the gas struts that hold open
the hood, trunk, and/or liftgate fail,
you or others could be seriously
injured. Take the vehicle to your
dealer for service immediately.
Visually inspect the gas struts for
signs of wear, cracks, or other
damage periodically. Check to
make sure the hood/trunk/liftgate
is held open with enough force.
If struts are failing to hold the
hood/trunk/liftgate, do not
operate. Have the vehicle
serviced.
Caution
Do not apply tape or hang any
objects from gas struts. Also do
not push down or pull on gas
struts. This may cause damage to
the vehicle.
See Maintenance Schedule 0331.
Hood
Trunk
Page 293 of 387
Chevrolet Colorado Owner Manual (GMNA-Localizing-U.S./Canada/Mexico-
12460274) - 2019 - CRC - 10/1/18
292 Vehicle Care
Adjust the front and rear tires to
the recommended inflation
pressure on the Tire and
Loading Information label after
the tires have been rotated.
SeeTire Pressure 0285 and
Vehicle Load Limits 0168.
Reset the Tire Pressure Monitor
System. See Tire Pressure
Monitor Operation 0288.
Check that all wheel nuts are
properly tightened. See “Wheel
Nut Torque” underCapacities
and Specifications 0346, and
“Removing the Flat Tire and
Installing the Spare Tire” under
Tire Changing 0300.
{Warning
Rust or dirt on a wheel, or on the
parts to which it is fastened, can
make wheel nuts become loose
after time. The wheel could come
off and cause a crash. When
(Continued)
Warning (Continued)
changing a wheel, remove any
rust or dirt from places where the
wheel attaches to the vehicle. In
an emergency, a cloth or a paper
towel can be used; however, use
a scraper or wire brush later to
remove all rust or dirt.
Lightly coat the inner diameter of
the wheel hub opening with
wheel bearing grease after a
wheel change or tire rotation to
prevent corrosion or rust
buildup. Do not get grease on
the wheel mounting surface or
on the wheel nuts or bolts.
When It Is Time for New
Tires
Factors, such as maintenance,
temperatures, driving speeds,
vehicle loading, and road conditions
affect the wear rate of the tires.
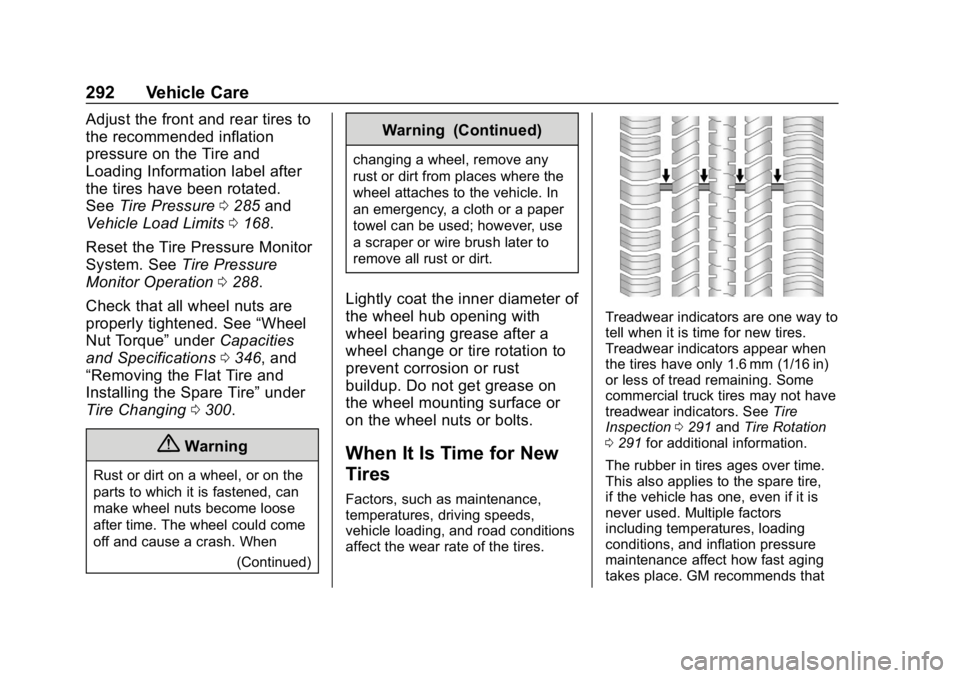
Treadwear indicators are one way to
tell when it is time for new tires.
Treadwear indicators appear when
the tires have only 1.6 mm (1/16 in)
or less of tread remaining. Some
commercial truck tires may not have
treadwear indicators. See Tire
Inspection 0291 andTire Rotation
0 291 for additional information.
The rubber in tires ages over time.
This also applies to the spare tire,
if the vehicle has one, even if it is
never used. Multiple factors
including temperatures, loading
conditions, and inflation pressure
maintenance affect how fast aging
takes place. GM recommends that
Page 299 of 387
Chevrolet Colorado Owner Manual (GMNA-Localizing-U.S./Canada/Mexico-
12460274) - 2019 - CRC - 10/1/18
298 Vehicle Care
Warning (Continued)
vehicle parts. The area damaged
by the tire chains could cause
loss of control and a crash.
Use another type of traction
device only if its manufacturer
recommends it for use on the
vehicle and tire size combination
and road conditions. Follow that
manufacturer's instructions. To
avoid vehicle damage, drive slow
and readjust or remove the
traction device if it contacts the
vehicle. Do not spin the wheels.
If traction devices are used, install
them on the rear tires.
Caution
If the vehicle has a tire size other
than 255/55R20, 255/65R17 AT,
265/60R18, 265/65R17, or
265/70R16, use tire chains only(Continued)
Caution (Continued)
where legal and only when
necessary. Use chains that are
the proper size for the tires. Install
them on the tires of the rear axle.
Do not use chains on the tires of
the front axle. Tighten them as
tightly as possible with the ends
securely fastened. Drive slowly
and follow the chain
manufacturer's instructions. If the
chains contact the vehicle, stop
and retighten them. If the contact
continues, slow down until it
stops. Driving too fast or spinning
the wheels with chains on will
damage the vehicle.
If a Tire Goes Flat
It is unusual for a tire to blowout
while driving, especially if the tires
are maintained properly. If air goes
out of a tire, it is much more likely to
leak out slowly. But if there ever is a
blowout, here are a few tips about
what to expect and what to do: If a front tire fails, the flat tire
creates a drag that pulls the vehicle
toward that side. Take your foot off
the accelerator pedal and grip the
steering wheel firmly. Steer to
maintain lane position, and then
gently brake to a stop, well off the
road, if possible.
A rear blowout, particularly on a
curve, acts much like a skid and
may require the same correction as
used in a skid. Stop pressing the
accelerator pedal and steer to
straighten the vehicle. It may be
very bumpy and noisy. Gently brake
to a stop, well off the road,
if possible.
{Warning
Driving on a flat tire will cause
permanent damage to the tire.
Re-inflating a tire after it has been
driven on while severely
underinflated or flat may cause a
blowout and a serious crash.
Never attempt to re-inflate a tire
(Continued)
Page 304 of 387
Chevrolet Colorado Owner Manual (GMNA-Localizing-U.S./Canada/Mexico-
12460274) - 2019 - CRC - 10/1/18
Vehicle Care 303
Removing the Flat Tire and
Installing the Spare Tire
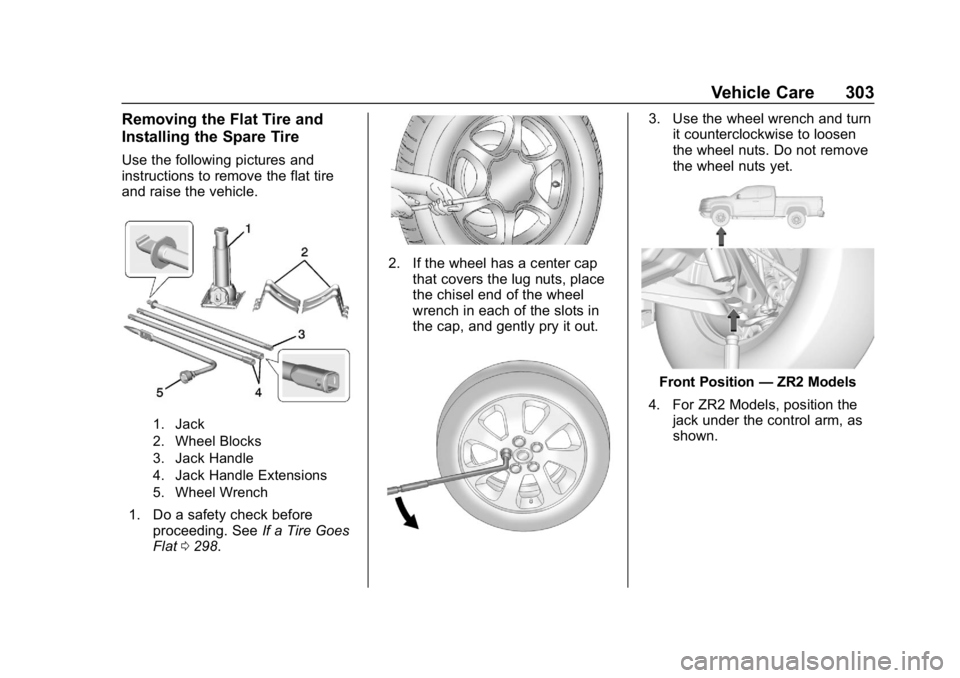
Use the following pictures and
instructions to remove the flat tire
and raise the vehicle.
1. Jack
2. Wheel Blocks
3. Jack Handle
4. Jack Handle Extensions
5. Wheel Wrench
1. Do a safety check beforeproceeding. See If a Tire Goes
Flat 0298.
2. If the wheel has a center cap
that covers the lug nuts, place
the chisel end of the wheel
wrench in each of the slots in
the cap, and gently pry it out.
3. Use the wheel wrench and turnit counterclockwise to loosen
the wheel nuts. Do not remove
the wheel nuts yet.
Front Position —ZR2 Models
4. For ZR2 Models, position the jack under the control arm, as
shown.
Page 316 of 387
Chevrolet Colorado Owner Manual (GMNA-Localizing-U.S./Canada/Mexico-
12460274) - 2019 - CRC - 10/1/18
Vehicle Care 315
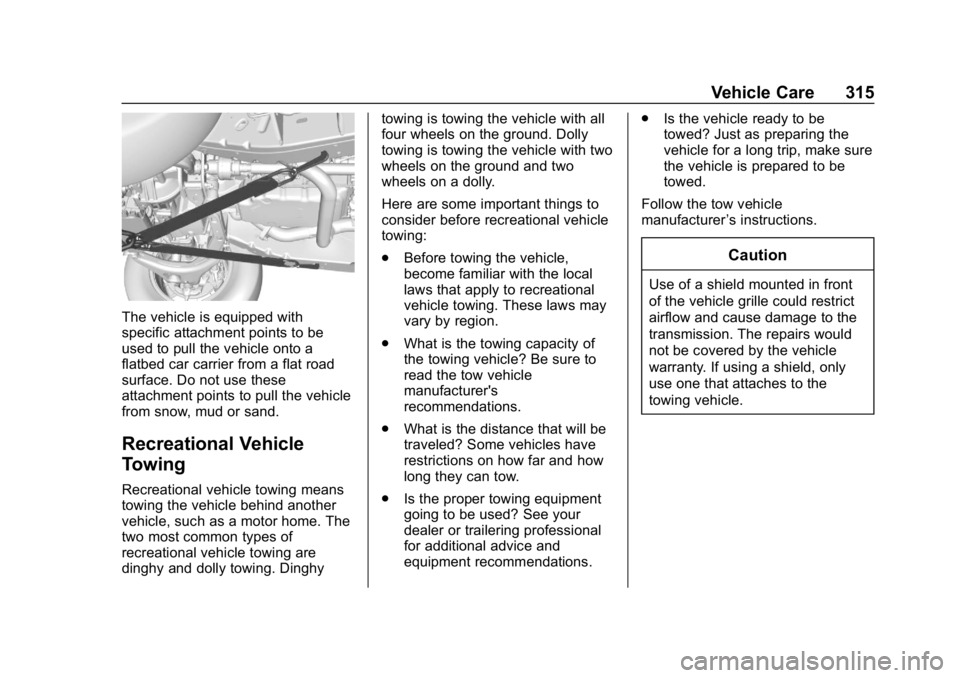
The vehicle is equipped with
specific attachment points to be
used to pull the vehicle onto a
flatbed car carrier from a flat road
surface. Do not use these
attachment points to pull the vehicle
from snow, mud or sand.
Recreational Vehicle
Towing
Recreational vehicle towing means
towing the vehicle behind another
vehicle, such as a motor home. The
two most common types of
recreational vehicle towing are
dinghy and dolly towing. Dinghytowing is towing the vehicle with all
four wheels on the ground. Dolly
towing is towing the vehicle with two
wheels on the ground and two
wheels on a dolly.
Here are some important things to
consider before recreational vehicle
towing:
.
Before towing the vehicle,
become familiar with the local
laws that apply to recreational
vehicle towing. These laws may
vary by region.
. What is the towing capacity of
the towing vehicle? Be sure to
read the tow vehicle
manufacturer's
recommendations.
. What is the distance that will be
traveled? Some vehicles have
restrictions on how far and how
long they can tow.
. Is the proper towing equipment
going to be used? See your
dealer or trailering professional
for additional advice and
equipment recommendations. .
Is the vehicle ready to be
towed? Just as preparing the
vehicle for a long trip, make sure
the vehicle is prepared to be
towed.
Follow the tow vehicle
manufacturer ’s instructions.
Caution
Use of a shield mounted in front
of the vehicle grille could restrict
airflow and cause damage to the
transmission. The repairs would
not be covered by the vehicle
warranty. If using a shield, only
use one that attaches to the
towing vehicle.
Page 342 of 387
Chevrolet Colorado Owner Manual (GMNA-Localizing-U.S./Canada/Mexico-
12460274) - 2019 - CRC - 10/1/18
Service and Maintenance 341
Recommended Fluids, Lubricants, and Parts
Recommended Fluids and Lubricants
This maintenance section applies to vehicles with a gasoline engine. If the vehicle has a diesel engine, see the
recommended fluids and lubricants section in the Duramax diesel supplement.
Fluids and lubricants identified below by name, part number, or specification can be obtained from your dealer.Usage Fluid/Lubricant
Automatic Transmission (6 Speed) DEXRON-VI Automatic Transmission Fluid.
Automatic Transmission (8 Speed) DEXRON-HP Automatic Transmission Fluid.
Chassis Lubrication Chassis Lubricant (GM Part No. 12377985, in Canada 88901242) or lubricant meeting requirements of NLGI #2, Category LB or GC-LB.
Engine Coolant 50/50 mixture of clean, drinkable water and use only DEX-COOL coolant.
See Cooling System 0253.
Engine Oil Engine oil meeting the dexos1 specification of the proper SAE viscosity
grade. ACDelco dexos1 full synthetic is recommended. See Engine Oil
0 246.
Floor Shift Linkage Lubriplate Lubricant Aerosol (GM Part No. 89021668, in Canada 89021674)
or lubricant meeting requirements of NLGI #2 Category LB or GC-LB.
Front (If Equipped With Four-Wheel Drive) and Rear Axle SAE 75W-90 Axle Lubricant (GM Part No. 19352759, in
Canada 88863090).
Hydraulic Brake/Clutch System DOT 3 Hydraulic Brake Fluid (GM Part No. 19353126, in Canada 19353127).
Page 379 of 387

Chevrolet Colorado Owner Manual (GMNA-Localizing-U.S./Canada/Mexico-
12460274) - 2019 - CRC - 10/1/18
378 Index
Driving (cont'd)Winter . . . . . . . . . . . . . . . . . . . . . . . . 165
E
Electrical Equipment,
Add-On . . . . . . . . . . . . . . . . . . . . . . . 237
Electrical System Engine Compartment FuseBlock . . . . . . . . . . . . . . . . . . . . . . . . 272
Fuses and Circuit Breakers . . . 271
Instrument Panel Fuse
Block . . . . . . . . . . . . . . . . . . . . . . . . 276
Overload . . . . . . . . . . . . . . . . . . . . . 270
Emergency
OnStar . . . . . . . . . . . . . . . . . . . . . . . 364
Engine Air Cleaner/Filter . . . . . . . . . . . . . 251
Check Light (MalfunctionIndicator) . . . . . . . . . . . . . . . . . . . . 120
Compartment Overview . . . . . . . 243
Coolant Temperature Gauge . . . . . . . . . . . . . . . . . . . . . . .117
Cooling System . . . . . . . . . . . . . . . 253
Drive Belt Routing . . . . . . . . . . . . 348
Exhaust . . . . . . . . . . . . . . . . . . . . . . 182
Fan . . . . . . . . . . . . . . . . . . . . . . . . . . . 257
Heater . . . . . . . . . . . . . . . . . . . . . . . . 177
Oil Life System . . . . . . . . . . . . . . . 248 Engine (cont'd)
Oil Pressure Light . . . . . . . . . . . . 126
Overheating . . . . . . . . . . . . . . . . . . 256
Power Messages . . . . . . . . . . . . . 135
Running While Parked . . . . . . . . 182
Starting . . . . . . . . . . . . . . . . . . . . . . . 176
Entry Lighting . . . . . . . . . . . . . . . . . . . 145
Equipment, Towing . . . . . . . . . . . . . 229
Event Data Recorders . . . . . . . . . . 361
Exit Lighting . . . . . . . . . . . . . . . . . . . . 145
Extender, Seat Belt . . . . . . . . . . . . . . 58
Exterior Cargo Lamps . . . . . . . . . . 143
Exterior Lamp Controls . . . . . . . . . 139
Exterior Lamps Off Reminder . . . 140
Exterior Lighting Battery Saver . . . . . . . . . . . . . . . . . . . . . . . . . 146
F
FanEngine . . . . . . . . . . . . . . . . . . . . . . . . 257
Filter, Engine Air Cleaner . . . . . . . . . . . 251
Flash-to-Pass . . . . . . . . . . . . . . . . . . . 140
Flashers, Hazard Warning . . . . . . 142
Flat Tire . . . . . . . . . . . . . . . . . . . . . . . . 298 Changing . . . . . . . . . . . . . . . . . . . . . 300
Floor Mats . . . . . . . . . . . . . . . . . . . . . . 327 Fluid
Automatic Transmission . . . . . . 250
Brakes . . . . . . . . . . . . . . . . . . . . . . . . 259
Four-Wheel Drive
Transfer Case . . . . . . . . . . . . . . . 190
Washer . . . . . . . . . . . . . . . . . . . . . . . 258
Fog Lamps . . . . . . . . . . . . . . . . . . . . . 143
Folding Mirrors . . . . . . . . . . . . . . . . . . 37
Forward Collision Alert
(FCA) System . . . . . . . . . . . . . . . . . 212
Four-Wheel Drive . . . . . . . . . . 190, 261
Frequency Statement
Radio . . . . . . . . . . . . . . . . . . . . . . . . . 359
Front Axle . . . . . . . . . . . . . . . . . . . . . . 262 Locking . . . . . . . . . . . . . . . . . . . . . . . 205
Front Fog Lamp
Light . . . . . . . . . . . . . . . . . . . . . . . . . . 128
Front Seats Adjustment . . . . . . . . . . . . . . . . . . . . . 45
Heated . . . . . . . . . . . . . . . . . . . . . . . . . 48
Fuel
Additives . . . . . . . . . . . . . . . . . . . . . 217
Economy Driving . . . . . . . . . . . . . . . 24
Filling a Portable FuelContainer . . . . . . . . . . . . . . . . . . . 218
Filling the Tank . . . . . . . . . . . . . . . 217
Foreign Countries . . . . . . . . . . . . 217
Gauge . . . . . . . . . . . . . . . . . . . . . . . . .117
Page 380 of 387

Chevrolet Colorado Owner Manual (GMNA-Localizing-U.S./Canada/Mexico-
12460274) - 2019 - CRC - 10/1/18
Index 379
Fuel (cont'd)Low Fuel Warning Light . . . . . . . 127
Prohibited Fuels . . . . . . . . . . . . . . 216
Recommended . . . . . . . . . . . . . . . 216
Top Tier . . . . . . . . . . . . . . . . . . . . . . 216
Full-Size Spare Tire . . . . . . . . . . . . 311
Fuses Engine Compartment FuseBlock . . . . . . . . . . . . . . . . . . . . . . . . 272
Fuses and Circuit Breakers . . . 271
Instrument Panel Fuse Block . . . . . . . . . . . . . . . . . . . . . . . . 276
G
Gas Strut(s) . . . . . . . . . . . . . . . . . . . . 266
GaugesEngine CoolantTemperature . . . . . . . . . . . . . . . . .117
Fuel . . . . . . . . . . . . . . . . . . . . . . . . . . .117
Odometer . . . . . . . . . . . . . . . . . . . . . .116
Speedometer . . . . . . . . . . . . . . . . . .116
Tachometer . . . . . . . . . . . . . . . . . . . .116
Trip Odometer . . . . . . . . . . . . . . . . .116
Warning Lights and
Indicators . . . . . . . . . . . . . . . . . . . . 111
General Information Service and Maintenance . . . . . 329
Towing . . . . . . . . . . . . . . . . . . . . . . . . 219 General Information (cont'd)
Vehicle Care . . . . . . . . . . . . . . . . . . 240
Glove Box . . . . . . . . . . . . . . . . . . . . . . 103
GM Mobility Reimbursement Program . . . . . . . . . . . . . . . . . . . . . . . 353
H
Halogen Bulbs . . . . . . . . . . . . . . . . . . 267
Hazard Warning Flashers . . . . . . . 142
Head Restraints . . . . . . . . . . . . . . . . . 44
HeadlampsAiming . . . . . . . . . . . . . . . . . . . . . . . . 267
Automatic . . . . . . . . . . . . . . . . . . . . . 141
Bulb Replacement . . . . . . . . . . . . 267
Daytime RunningLamps (DRL) . . . . . . . . . . . . . . . . 141
Flash-to-Pass . . . . . . . . . . . . . . . . . 140
Headlamps, Front Turn Signal, Sidemarker, and
Parking Lamps . . . . . . . . . . . . . . 268
High-Beam On Light . . . . . . . . . . 127
High/Low Beam Changer . . . . . 140
Lamps On Reminder . . . . . . . . . 128
Heated
Steering Wheel . . . . . . . . . . . . . . . 106
Heated Front Seats . . . . . . . . . . . . . . 48
Heated Mirrors . . . . . . . . . . . . . . . . . . . 37 Heater
Engine . . . . . . . . . . . . . . . . . . . . . . . . 177
Heating . . . . . . . . . . . . . . . . . . . . 148, 150
High-Beam On Light . . . . . . . . . . . . 127
Hill and Mountain Roads . . . . . . . . 165
Hill Descent Control (HDC) . . . . . 202
Hill Descent Control Light . . . . . . . 124
Hill Start Assist (HSA) . . . . . . . . . . 199
Hood . . . . . . . . . . . . . . . . . . . . . . . . . . . 242
Horn . . . . . . . . . . . . . . . . . . . . . . . . . . . . 107
How to Wear Seat Belts Properly . . . . . . . . . . . . . . . . . . . . . . . . 53
HVAC . . . . . . . . . . . . . . . . . . . . . . 148, 150
Hydraulic Clutch . . . . . . . . . . . . . . . . 250
I
Ignition Positions . . . . . . . . . . . . . . . 174
Ignition Transmission Lock Check . . . . . . . . . . . . . . . . . . . . . . . . . 264
Immobilizer . . . . . . . . . . . . . . . . . . . . . . 35
Indicator Vehicle Ahead . . . . . . . . . . . . . . . . 124
Infants and Young Children, Restraints . . . . . . . . . . . . . . . . . . . . . . 74
Information Publication Ordering . . . . . . . . . . 358
Infotainment . . . . . . . . . . . . . . . . . . . . 147
Infotainment System . . . . . . . . . . . . 362