horn CHEVROLET COLORADO 2019 Owner's Manual
[x] Cancel search | Manufacturer: CHEVROLET, Model Year: 2019, Model line: COLORADO, Model: CHEVROLET COLORADO 2019Pages: 387, PDF Size: 5.69 MB
Page 8 of 387

Chevrolet Colorado Owner Manual (GMNA-Localizing-U.S./Canada/Mexico-
12460274) - 2019 - CRC - 10/1/18
In Brief 7
1.Air Vents 0153.
2. Turn Signal Lever. See Turn
and Lane-Change Signals
0 142.
Driver Information Center (DIC)
(Base Level) Controls (If
Equipped). See Driver
Information Center (DIC) (Base
Level) 0129 orDriver
Information Center (DIC)
(Uplevel) 0131.
3. Instrument Cluster (Base
Level) 0112 orInstrument
Cluster (Uplevel) 0114.
4. Windshield Wiper/Washer
0107.
5. Light Sensor. See Automatic
Headlamp System 0141.
Vehicle Alarm System Indicator
(If Equipped). See Vehicle
Alarm System 034.
6. Infotainment 0147. 7.
Climate Control Systems 0148
(If Equipped).
Automatic Climate Control
System 0150 (If Equipped).
8. Heated Front Seats 048 (If
Equipped).
9. Power Outlets 0108 (If
Equipped).
10. Shift Lever. See Automatic
Transmission 0183 orManual
Transmission 0188.
11. Auxiliary Jack. See the infotainment manual.
USB Port. See the infotainment
manual.
12. Hazard Warning Flashers
0142.
Traction Control/Electronic
Stability Control 0199.
Exterior Cargo Lamps 0143.
Lane Departure Warning
(LDW) 0214 (If Equipped). Hill Descent Control (HDC)
0
202 (If Equipped).
Tow/Haul Mode 0188 (If
Equipped).
Locking Front Axle 0205 (If
Equipped).
Locking Rear Axle 0204 (If
Equipped).
13. Steering Wheel Controls 0106
(If Equipped).
Driver Information Center (DIC)
(Uplevel) Controls (If
Equipped). See Driver
Information Center (DIC) (Base
Level) 0129 orDriver
Information Center (DIC)
(Uplevel) 0131.
14. Horn 0107.
15. Steering Wheel Adjustment
0106 (Out of View).
16. Cruise Control 0206.
Forward Collision Alert (FCA)
System 0212 (If Equipped).
Page 30 of 387
Chevrolet Colorado Owner Manual (GMNA-Localizing-U.S./Canada/Mexico-
12460274) - 2019 - CRC - 10/1/18
Keys, Doors, and Windows 29
If enabled, the turn signal lamps
flash once to indicate locking has
occurred. If enabled, the horn chirps
when
Qis pressed again within
three seconds. See Vehicle
Personalization 0136.
Pressing
Qarms the vehicle alarm
system. See Vehicle Alarm System
0 34.
K:Press once to unlock only the
driver door. If
Kis pressed again
within three seconds, all remaining
doors unlock. The interior lamps
may come on and stay on for
20 seconds or until the ignition is
turned on.
If enabled, the turn signal lamps
flash twice to indicate unlocking has
occurred. If enabled, the exterior
lamps may turn on. See Vehicle
Personalization 0136.
Pressing
Kon the RKE transmitter
disarms the vehicle alarm system.
See Vehicle Alarm System 034.
7:Press and release one time to
initiate vehicle locator. The turn
signal lamps flash and the horn
sounds three times.
Press and hold
7for at least
three seconds to sound the panic
alarm. The turn signal lamps flash
and the horn sounds repeatedly for
30 seconds. The alarm turns off
when the ignition is turned on or
7
is pressed again. The ignition must
be off for the panic alarm to work.
Programming Transmitters to
the Vehicle
Only RKE transmitters programmed
to this vehicle will work. If a
transmitter is lost or stolen, a
replacement can be purchased and
programmed through your dealer.
Each vehicle can have up to
eight transmitters programmed to it.
See your dealer for transmitter
programming.
Battery Replacement
Replace the battery in the
transmitter soon if the DIC displays
REPLACE BATTERY IN
REMOTE KEY.
Caution
When replacing the battery, do
not touch any of the circuitry on
the transmitter. Static from your
body could damage the
transmitter.
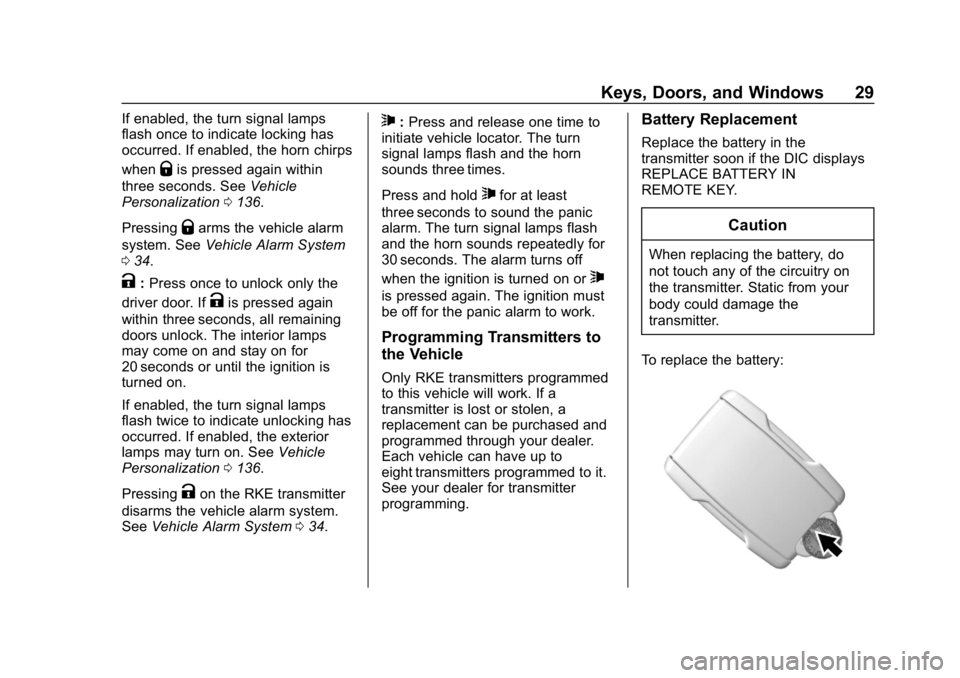
To replace the battery:
Page 36 of 387
Chevrolet Colorado Owner Manual (GMNA-Localizing-U.S./Canada/Mexico-
12460274) - 2019 - CRC - 10/1/18
Keys, Doors, and Windows 35
Fast Flash :Vehicle is unsecured.
A door or the hood is open.
Slow Flash : Alarm system is
armed.
Arming the Alarm System
1. Turn off the vehicle.
2. Lock the vehicle with one of the following:
.Use the Remote Keyless
Entry (RKE) transmitter.
. With a door open, press
Q
on the interior of the door.
3. After 30 seconds the alarm system will arm, and the
indicator light will begin to
slowly flash indicating the
alarm system is operating.
Pressing
Qon the RKE
transmitter a second time will
bypass the 30-second delay
and immediately arm the alarm
system. The theft-deterrent alarm system will
not arm if the doors are locked with
the key.
If the driver door is opened without
first unlocking with the RKE
transmitter, the horn will chirp and
the lights will flash to indicate
pre-alarm. If the vehicle is not
started, or the door is not unlocked
by pressing
Kon the RKE
transmitter during the 10-second
pre-alarm, the alarm will be
activated.
If a door or the hood is opened
without first disarming the system,
the turn signals will flash and the
horn will sound for about
30 seconds. The alarm system will
then re-arm to monitor for the next
unauthorized event.
Disarming the Alarm System
To disarm the alarm system or turn
off the alarm if it has been activated:
. Press
Kon the RKE transmitter.
. Start the vehicle. To avoid setting off the alarm by
accident:
.
Lock the vehicle after all
occupants have left the vehicle
and all doors are closed.
. Always unlock a door with the
RKE transmitter.
Unlocking the driver door with the
key will not disarm the system or
turn off the alarm.
Detecting a Tamper Condition
IfKis pressed on the RKE
transmitter and the horn chirps three
times, an alarm occurred previously
while the alarm system was armed.
Immobilizer
See Radio Frequency Statement
0 359.
Page 106 of 387
Chevrolet Colorado Owner Manual (GMNA-Localizing-U.S./Canada/Mexico-
12460274) - 2019 - CRC - 10/1/18
Instruments and Controls 105
Instruments and
Controls
Controls
Steering Wheel Adjustment . . . 106
Steering Wheel Controls . . . . . . 106
Heated Steering Wheel . . . . . . . 106
Horn . . . . . . . . . . . . . . . . . . . . . . . . . . 107
Windshield Wiper/Washer . . . . 107
Compass . . . . . . . . . . . . . . . . . . . . . 108
Clock . . . . . . . . . . . . . . . . . . . . . . . . . 108
Power Outlets . . . . . . . . . . . . . . . . 108
Wireless Charging . . . . . . . . . . . . 109
Warning Lights, Gauges, and
Indicators
Warning Lights, Gauges, andIndicators . . . . . . . . . . . . . . . . . . . . 111
Instrument Cluster (Base Level) . . . . . . . . . . . . . . . . . . . . . . . 112
Instrument Cluster
(Uplevel) . . . . . . . . . . . . . . . . . . . . 114
Speedometer . . . . . . . . . . . . . . . . . 116
Odometer . . . . . . . . . . . . . . . . . . . . . 116
Trip Odometer . . . . . . . . . . . . . . . . 116
Tachometer . . . . . . . . . . . . . . . . . . . 116
Fuel Gauge . . . . . . . . . . . . . . . . . . . 117 Engine Coolant Temperature
Gauge . . . . . . . . . . . . . . . . . . . . . . 117
Seat Belt Reminders . . . . . . . . . . 118
Airbag Readiness Light . . . . . . . 119
Passenger Airbag Status Indicator . . . . . . . . . . . . . . . . . . . . . 119
Charging System Light . . . . . . . 120
Malfunction Indicator Lamp (Check Engine Light) . . . . . . . . 120
Brake System Warning Light . . . . . . . . . . . . . . . . . . . . . . . . 122
Antilock Brake System (ABS) Warning Light . . . . . . . . . . . . . . . 123
Up-Shift Light (Manual Transmission) . . . . . . . . . . . . . . . 124
Tow/Haul Mode Light . . . . . . . . . 124
Hill Descent Control Light . . . . 124
Lane Departure Warning (LDW) Light . . . . . . . . . . . . . . . . . 124
Vehicle Ahead Indicator . . . . . . 124
Traction Off Light . . . . . . . . . . . . . 125
StabiliTrak OFF Light . . . . . . . . . 125
Traction Control System (TCS)/ StabiliTrak Light . . . . . . . . . . . . . 125
Tire Pressure Light . . . . . . . . . . . 126
Engine Oil Pressure Light . . . . 126
Low Fuel Warning Light (Base Level) . . . . . . . . . . . . . . . . . . . . . . . 127
Low Fuel Warning Light (Uplevel) . . . . . . . . . . . . . . . . . . . . 127 Security Light . . . . . . . . . . . . . . . . . 127
High-Beam On Light . . . . . . . . . . 127
Front Fog Lamp Light . . . . . . . . . 128
Lamps On Reminder . . . . . . . . . 128
Cruise Control Light . . . . . . . . . . 128
Door Ajar Light (Uplevel
Cluster) . . . . . . . . . . . . . . . . . . . . . 128
Information Displays
Driver Information Center (DIC)(Base Level) . . . . . . . . . . . . . . . . 129
Driver Information Center (DIC) (Uplevel) . . . . . . . . . . . . . . . . . . . . 131
Vehicle Messages
Vehicle Messages . . . . . . . . . . . . 135
Engine Power Messages . . . . . 135
Vehicle Speed Messages . . . . . 135
Vehicle Personalization
Vehicle Personalization . . . . . . . 136
Page 108 of 387
Chevrolet Colorado Owner Manual (GMNA-Localizing-U.S./Canada/Mexico-
12460274) - 2019 - CRC - 10/1/18
Instruments and Controls 107
Horn
To sound the horn, pressaon the
steering wheel.
Windshield Wiper/Washer
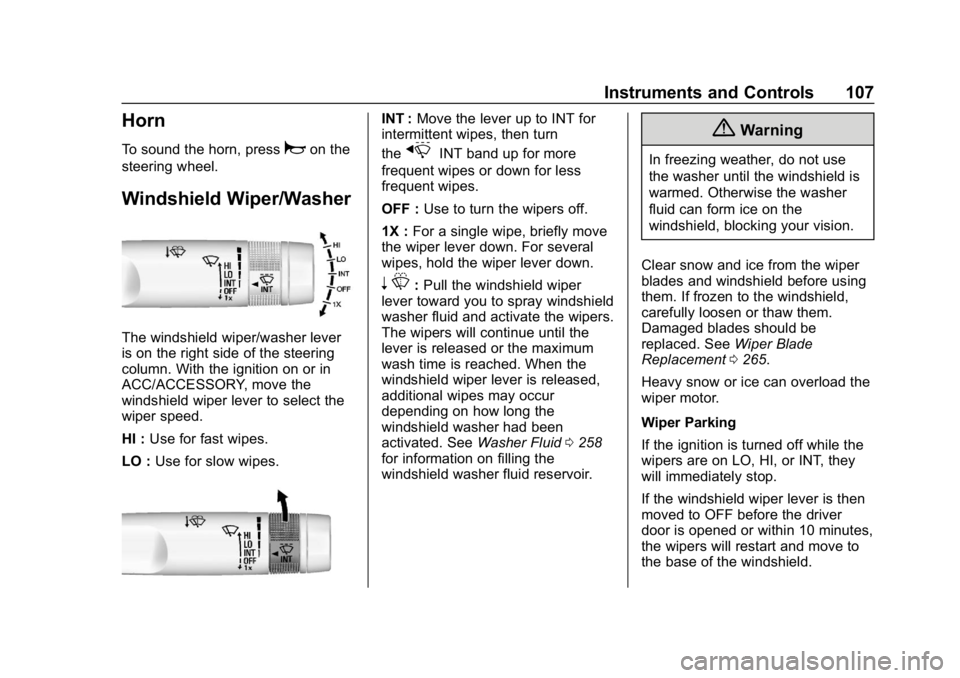
The windshield wiper/washer lever
is on the right side of the steering
column. With the ignition on or in
ACC/ACCESSORY, move the
windshield wiper lever to select the
wiper speed.
HI : Use for fast wipes.
LO : Use for slow wipes.
INT : Move the lever up to INT for
intermittent wipes, then turn
the
xINT band up for more
frequent wipes or down for less
frequent wipes.
OFF : Use to turn the wipers off.
1X : For a single wipe, briefly move
the wiper lever down. For several
wipes, hold the wiper lever down.
n L: Pull the windshield wiper
lever toward you to spray windshield
washer fluid and activate the wipers.
The wipers will continue until the
lever is released or the maximum
wash time is reached. When the
windshield wiper lever is released,
additional wipes may occur
depending on how long the
windshield washer had been
activated. See Washer Fluid0258
for information on filling the
windshield washer fluid reservoir.
{Warning
In freezing weather, do not use
the washer until the windshield is
warmed. Otherwise the washer
fluid can form ice on the
windshield, blocking your vision.
Clear snow and ice from the wiper
blades and windshield before using
them. If frozen to the windshield,
carefully loosen or thaw them.
Damaged blades should be
replaced. See Wiper Blade
Replacement 0265.
Heavy snow or ice can overload the
wiper motor.
Wiper Parking
If the ignition is turned off while the
wipers are on LO, HI, or INT, they
will immediately stop.
If the windshield wiper lever is then
moved to OFF before the driver
door is opened or within 10 minutes,
the wipers will restart and move to
the base of the windshield.
Page 138 of 387
Chevrolet Colorado Owner Manual (GMNA-Localizing-U.S./Canada/Mexico-
12460274) - 2019 - CRC - 10/1/18
Instruments and Controls 137
Comfort and Convenience
Touch and the following may
display:
.Chime Volume
Chime Volume
This determines the chime volume
level.
Touch the controls on the
infotainment display to adjust the
volume.
Lighting
Touch and the following may
display:
. Vehicle Locator Lights
. Exit Lighting
Vehicle Locator Lights
This setting flashes the vehicle’ s
headlamps when
Kis pressed on
the Remote Keyless Entry (RKE)
transmitter.
Touch Off or On. Exit Lighting
This setting specifies how long the
headlamps stay on after the vehicle
is turned off and exited.
Touch Off, 30 Seconds, 60 Seconds,
or 120 Seconds.
Power Door Locks
Touch and the following may
display:
.
Open Door Anti-Lockout
. Auto Door Unlock
. Delayed Door Lock
Open Door Anti Lock Out
This setting prevents the driver door
from locking when the door is open.
If this setting is on, the Delayed
Door Lock menu will not be
available.
Touch Off or On.
Auto Door Unlock
This allows selection of which of the
doors will automatically unlock when
the vehicle is shifted into P (Park).
Touch Off, All Doors, or Driver Door. Delayed Door Lock
When on, this feature will delay the
locking of the doors. To override the
delay, press the power door lock
switch on the door.
Touch Off or On.
Remote Lock, Unlock, Start
Touch and the following may
display:
.
Remote Unlock Light Feedback
. Remote Lock Feedback
. Remote Door Unlock
. Remote Start Auto Heat Seats
Remote Unlock Light Feedback
When on, the exterior lamps will
flash when unlocking the vehicle
with the RKE transmitter.
Touch Off or Flash Lights.
Remote Lock Feedback
This allows selection of what type of
feedback is given when locking the
vehicle with the RKE transmitter.
Touch Off, Lights and Horn, Lights
Only, or Horn Only.
Page 276 of 387
Chevrolet Colorado Owner Manual (GMNA-Localizing-U.S./Canada/Mexico-
12460274) - 2019 - CRC - 10/1/18
Vehicle Care 275
FusesUsage
F43 –
F44 –
F45 Vacuum pump
F46 Engine control module ignition 2
F47 Mid park phase lock/ Active fuel management/
Engine oil and canister
purge solenoid(s)/Oxygen
sensor.
F48 Fog lamps
F49 –
F50 Trailer parking lamps
F51 Horn
F52 –
F53 –
F54 –
F55 –
F56 Washer pump
F57 –
F58 – Fuses
Usage
F59 –
F60 Mirrors defogger
F61 –
F62 Canister vent solenoid
F63 –
F64 Trailer reverse lamp
F65 Left trailer stoplamp/Turn signal lamps
F66 Right trailer stoplamp/Turn signal lamps
F67 Electric power steering
F68 –
F69 Battery regulated voltage control
F70 –
F71 –
F72 –
F73 –
F74 Generator
F75 – Relays
Usage
K1 Air conditioning clutch
K2 Starter
K3 –
K4 Wipers speed
K5 Wipers control
K6 Cargo lamp/Bed lighting
K7 Powertrain
K8 –
K9 Rear differential lock actuators
K10 Front differential lock actuators
K11 Center high-mounted
stoplamp
K12 –
K13 Vacuum pump
K14 Trailer parking lamps
K15 Run/Crank
Page 277 of 387
Chevrolet Colorado Owner Manual (GMNA-Localizing-U.S./Canada/Mexico-
12460274) - 2019 - CRC - 10/1/18
276 Vehicle Care
RelaysUsage
K16 –
K17 Rear window/Mirror defogger
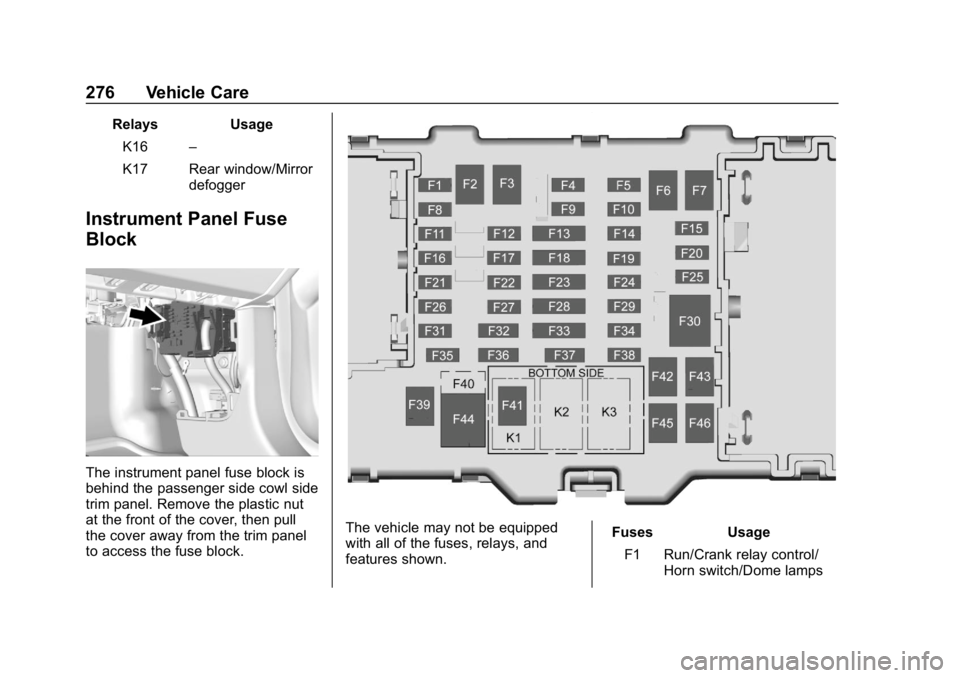
Instrument Panel Fuse
Block
The instrument panel fuse block is
behind the passenger side cowl side
trim panel. Remove the plastic nut
at the front of the cover, then pull
the cover away from the trim panel
to access the fuse block.
The vehicle may not be equipped
with all of the fuses, relays, and
features shown. Fuses Usage
F1 Run/Crank relay control/ Horn switch/Dome lamps
Page 291 of 387
Chevrolet Colorado Owner Manual (GMNA-Localizing-U.S./Canada/Mexico-
12460274) - 2019 - CRC - 10/1/18
290 Vehicle Care
following order: driver side front tire,
passenger side front tire, passenger
side rear tire, and driver side rear.
See your dealer for service or to
purchase a relearn tool. A TPMS
relearn tool can also be purchased.
See Tire Pressure Monitor Sensor
Activation Tool at
www.gmtoolsandequipment.com or
call 1-800-GM TOOLS
(1-800-468-6657).
There are two minutes to match the
first tire/wheel position, and
five minutes overall to match all four
tire/wheel positions. If it takes
longer, the matching process stops
and must be restarted.
The TPMS sensor matching
process is:1. Set the parking brake.
2. Turn the ignition on without starting the vehicle.
3. If the vehicle has an uplevel DIC, make sure the Tire
Pressure info page option is
turned on. The info pages on
the DIC can be turned on and
off through the Options menu. See
Driver Information Center
(DIC) (Base Level) 0129 or
Driver Information Center (DIC)
(Uplevel) 0131.
4. If the vehicle has an uplevel DIC, use the DIC controls on
the right side of the steering
wheel to scroll to the Tire
Pressure screen under the DIC
info page.
If the vehicle has a base level
DIC, use the MENU button to
select the Vehicle Information
menu in the DIC. Use the
thumbwheel to scroll to the Tire
Pressure Menu item screen.
5. If the vehicle has an uplevel DIC, press and hold
Vin the
center of the DIC controls.
If the vehicle has a base level
DIC, press SET/CLR on the
turn signal lever to begin the
sensor matching process.
A message asking if the
process should begin should
appear. Press SET/CLR again
to confirm the selection. The horn sounds twice to
signal the receiver is in relearn
mode and the TIRE
LEARNING ACTIVE message
displays on the DIC screen.
6. Start with the driver side front tire.
7. Place the relearn tool against the tire sidewall, near the valve
stem. Then press the button to
activate the TPMS sensor.
A horn chirp confirms that the
sensor identification code has
been matched to this tire and
wheel position.
8. Proceed to the passenger side front tire, and repeat the
procedure in Step 7.
9. Proceed to the passenger side rear tire, and repeat the
procedure in Step 7.
10. Proceed to the driver side rear tire, and repeat the procedure
in Step 7. The horn sounds two
times to indicate the sensor
identification code has been
matched to the driver side rear
tire, and the TPMS sensor
Page 374 of 387
Chevrolet Colorado Owner Manual (GMNA-Localizing-U.S./Canada/Mexico-
12460274) - 2019 - CRC - 10/1/18
Connected Services 373
vehicles, the SSID and
password can be changed in
the Wi-Fi Hotspot menu.
After initial set-up, your vehicle’s
Wi-Fi hotspot will connect
automatically to your mobile
devices. Manage data usage by
turning Wi-Fi on or off on your
mobile device, using the
myChevrolet mobile app, or by
contacting an OnStar Advisor. On
some vehicles, Wi-Fi can also be
managed from the Wi-Fi
Hotspot menu.
MyChevrolet Mobile App (If
Available)
Download the myChevrolet mobile
app to compatible Apple and
Android smartphones. Chevrolet
users can access the following
services from a smartphone:
. Remotely start/stop the vehicle,
if factory-equipped.
. Lock/unlock doors, if equipped
with automatic locks.
. Activate the horn and lamps. .
Check the vehicle’s fuel level, oil
life, or tire pressure,
if factory-equipped with the Tire
Pressure Monitor System.
. Send destinations to the vehicle.
. Locate the vehicle on a map
(U.S. market only).
. Turn the vehicle's Wi-Fi hotspot
on/off, manage settings, and
monitor data consumption,
if equipped.
. Locate a dealer and schedule
service.
. Request roadside assistance.
. Set a parking reminder with pin
drop, take a photo, make a note,
and set a timer.
. Connect with Chevrolet on social
media.
Features are subject to change. For
myChevrolet mobile app information
and compatibility, see
my.chevrolet.com.
An active OnStar or connected
service plan may be required.
A compatible device, factory-installed remote start, and
power locks are required. Data rates
apply. See www.onstar.com for
details and system limitations.
Remote Services
Contact an OnStar Advisor to
unlock the doors or sound the horn
and flash the lamps.
Marketplace
OnStar Advisors can provide offers
from restaurants and retailers on
your route, help locate hotels,
or book a room. These services
vary by market.
OnStar Hands-Free Calling
Make and receive calls with the
built-in wireless calling service,
which requires available minutes.
Functionality of the Voice Command
button may vary by vehicle and
region. For some vehicles, press
=
to open the OnStar app on the
infotainment display, then select
Hands-Free calling. For other
vehicles press
=as follows.