door lock CHEVROLET COLORADO 2023 User Guide
[x] Cancel search | Manufacturer: CHEVROLET, Model Year: 2023, Model line: COLORADO, Model: CHEVROLET COLORADO 2023Pages: 362, PDF Size: 13.62 MB
Page 20 of 362
Chevrolet Colorado Owner Manual (GMNA-Localizing-U.S./Canada/Mexico-
15274222) - 2022 - CRC - 11/2/21
Keys, Doors, and Windows 19
Using the window switch, press to open or
pull to close the window.
The windows may be temporarily disabled if
they are used repeatedly within a
short time.
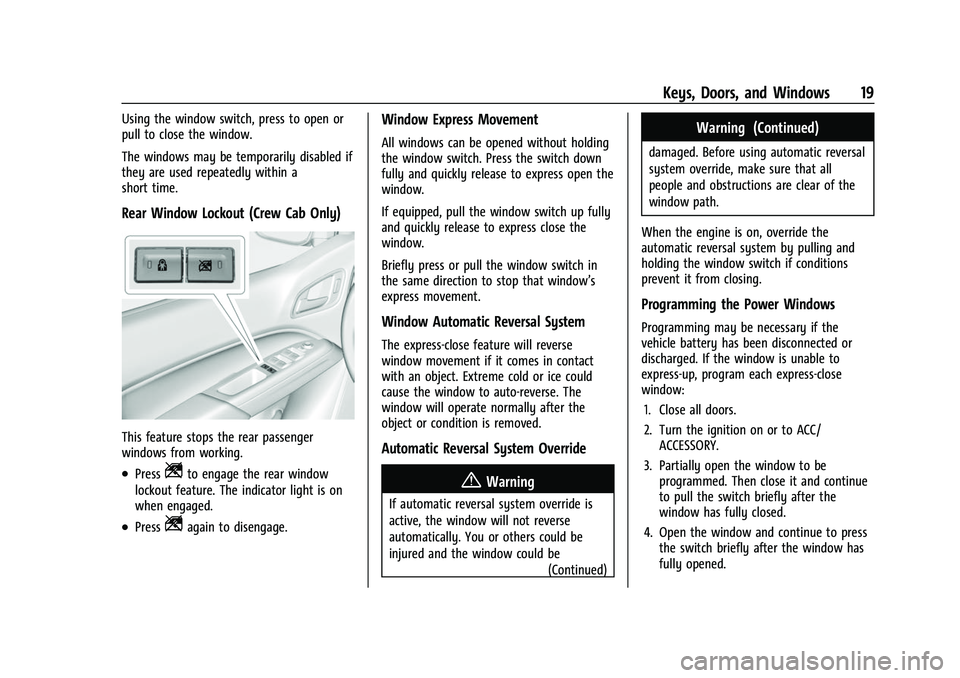
Rear Window Lockout (Crew Cab Only)
This feature stops the rear passenger
windows from working.
.PressZto engage the rear window
lockout feature. The indicator light is on
when engaged.
.PressZagain to disengage.
Window Express Movement
All windows can be opened without holding
the window switch. Press the switch down
fully and quickly release to express open the
window.
If equipped, pull the window switch up fully
and quickly release to express close the
window.
Briefly press or pull the window switch in
the same direction to stop that window’s
express movement.
Window Automatic Reversal System
The express-close feature will reverse
window movement if it comes in contact
with an object. Extreme cold or ice could
cause the window to auto-reverse. The
window will operate normally after the
object or condition is removed.
Automatic Reversal System Override
{Warning
If automatic reversal system override is
active, the window will not reverse
automatically. You or others could be
injured and the window could be
(Continued)
Warning (Continued)
damaged. Before using automatic reversal
system override, make sure that all
people and obstructions are clear of the
window path.
When the engine is on, override the
automatic reversal system by pulling and
holding the window switch if conditions
prevent it from closing.
Programming the Power Windows
Programming may be necessary if the
vehicle battery has been disconnected or
discharged. If the window is unable to
express-up, program each express-close
window: 1. Close all doors.
2. Turn the ignition on or to ACC/ ACCESSORY.
3. Partially open the window to be programmed. Then close it and continue
to pull the switch briefly after the
window has fully closed.
4. Open the window and continue to press the switch briefly after the window has
fully opened.
Page 21 of 362
Chevrolet Colorado Owner Manual (GMNA-Localizing-U.S./Canada/Mexico-
15274222) - 2022 - CRC - 11/2/21
20 Keys, Doors, and Windows
Rear Windows
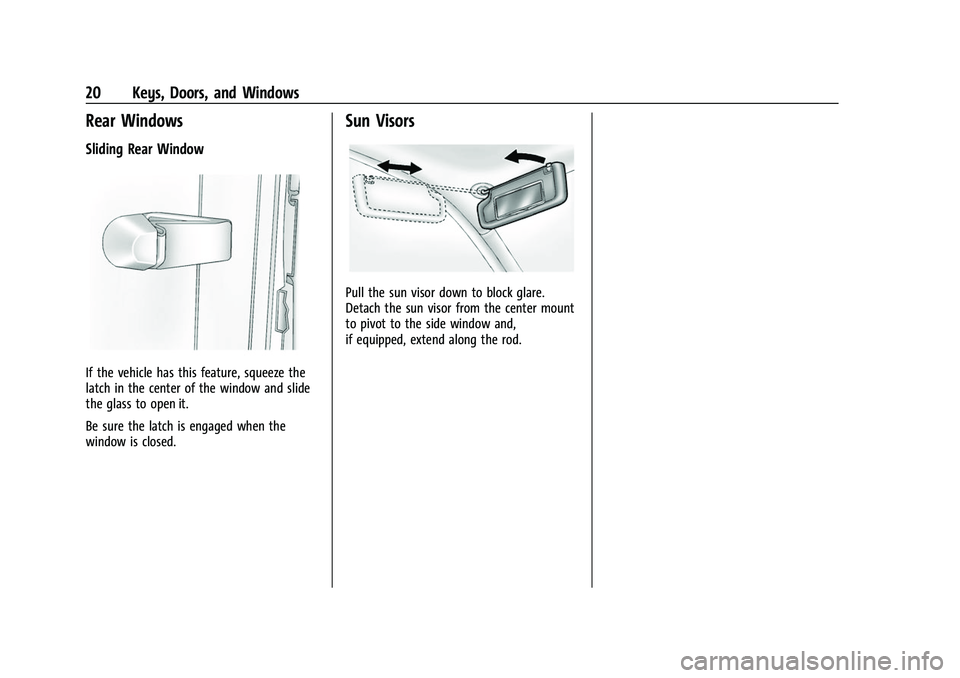
Sliding Rear Window
If the vehicle has this feature, squeeze the
latch in the center of the window and slide
the glass to open it.
Be sure the latch is engaged when the
window is closed.
Sun Visors
Pull the sun visor down to block glare.
Detach the sun visor from the center mount
to pivot to the side window and,
if equipped, extend along the rod.
Page 27 of 362
Chevrolet Colorado Owner Manual (GMNA-Localizing-U.S./Canada/Mexico-
15274222) - 2022 - CRC - 11/2/21
26 Seats and Restraints
The feature is active only once each time
the vehicle is turned on and off, and will
require reactivation by opening and closing
the second row doors. There may be an
alert even when there is nothing in the rear
seat; for example, if a child entered the
vehicle through the rear door and left the
vehicle without the vehicle being shut off.
The feature can be turned on or off. See
Vehicle Personalization099.
Folding the Rear Seat
On crew cab models, the rear seatbacks can
be folded forward.
Caution
Folding a rear seat with the seat belts
still fastened may cause damage to the
seat or the seat belts. Always unbuckle
the seat belts and return them to their
normal stowed position before folding a
rear seat.
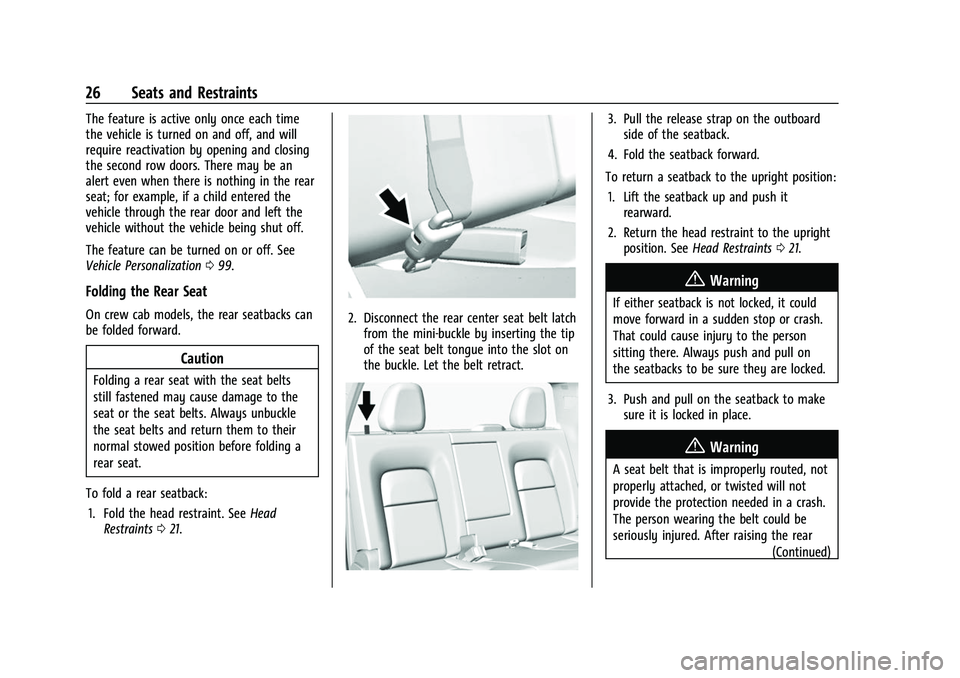
To fold a rear seatback: 1. Fold the head restraint. See Head
Restraints 021.
2. Disconnect the rear center seat belt latch
from the mini-buckle by inserting the tip
of the seat belt tongue into the slot on
the buckle. Let the belt retract.
3. Pull the release strap on the outboardside of the seatback.
4. Fold the seatback forward.
To return a seatback to the upright position: 1. Lift the seatback up and push it rearward.
2. Return the head restraint to the upright position. See Head Restraints 021.
{Warning
If either seatback is not locked, it could
move forward in a sudden stop or crash.
That could cause injury to the person
sitting there. Always push and pull on
the seatbacks to be sure they are locked.
3. Push and pull on the seatback to make sure it is locked in place.
{Warning
A seat belt that is improperly routed, not
properly attached, or twisted will not
provide the protection needed in a crash.
The person wearing the belt could be
seriously injured. After raising the rear
(Continued)
Page 33 of 362
Chevrolet Colorado Owner Manual (GMNA-Localizing-U.S./Canada/Mexico-
15274222) - 2022 - CRC - 11/2/21
32 Seats and Restraints
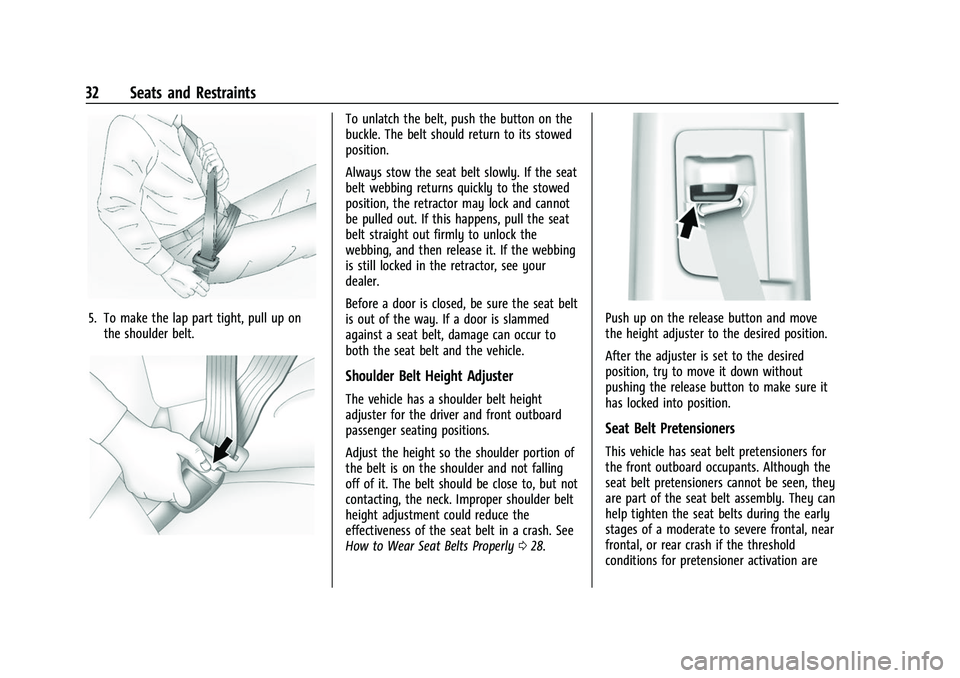
5. To make the lap part tight, pull up onthe shoulder belt.
To unlatch the belt, push the button on the
buckle. The belt should return to its stowed
position.
Always stow the seat belt slowly. If the seat
belt webbing returns quickly to the stowed
position, the retractor may lock and cannot
be pulled out. If this happens, pull the seat
belt straight out firmly to unlock the
webbing, and then release it. If the webbing
is still locked in the retractor, see your
dealer.
Before a door is closed, be sure the seat belt
is out of the way. If a door is slammed
against a seat belt, damage can occur to
both the seat belt and the vehicle.
Shoulder Belt Height Adjuster
The vehicle has a shoulder belt height
adjuster for the driver and front outboard
passenger seating positions.
Adjust the height so the shoulder portion of
the belt is on the shoulder and not falling
off of it. The belt should be close to, but not
contacting, the neck. Improper shoulder belt
height adjustment could reduce the
effectiveness of the seat belt in a crash. See
How to Wear Seat Belts Properly 028.
Push up on the release button and move
the height adjuster to the desired position.
After the adjuster is set to the desired
position, try to move it down without
pushing the release button to make sure it
has locked into position.
Seat Belt Pretensioners
This vehicle has seat belt pretensioners for
the front outboard occupants. Although the
seat belt pretensioners cannot be seen, they
are part of the seat belt assembly. They can
help tighten the seat belts during the early
stages of a moderate to severe frontal, near
frontal, or rear crash if the threshold
conditions for pretensioner activation are
Page 38 of 362
Chevrolet Colorado Owner Manual (GMNA-Localizing-U.S./Canada/Mexico-
15274222) - 2022 - CRC - 11/2/21
Seats and Restraints 37
Warning (Continued)
death. The path of an inflating airbag
must be kept clear. Do not put anything
between an occupant and an airbag, and
do not attach or put anything on the
steering wheel hub or on or near any
other airbag covering.
Do not use seat accessories that block the
inflation path of a seat-mounted side
impact airbag.
Never secure anything to the roof of a
vehicle with roof-rail airbags by routing a
rope or tie‐down through any door or
window opening. If you do, the path of
an inflating roof-rail airbag will be
blocked.
When Should an Airbag Inflate?
This vehicle is equipped with airbags. See
Airbag System034. Airbags are designed to
inflate if the impact exceeds the specific
airbag system's deployment threshold.
Deployment thresholds are used to predict
how severe a crash is likely to be in time
for the airbags to inflate and help restrain
the occupants. The vehicle has electronic
sensors that help the airbag system determine the severity of the impact.
Deployment thresholds can vary with
specific vehicle design.
Frontal airbags are designed to inflate in
moderate to severe frontal or near frontal
crashes to help reduce the potential for
severe injuries, mainly to the driver's or
front outboard passenger's head and chest.
Whether the frontal airbags will or should
inflate is not based primarily on how fast
the vehicle is traveling. It depends on what
is hit, the direction of the impact, and how
quickly the vehicle slows down.
Frontal airbags may inflate at different crash
speeds depending on whether the vehicle
hits an object straight on or at an angle,
and whether the object is fixed or moving,
rigid or deformable, narrow or wide.
Frontal airbags are not intended to inflate
during vehicle rollovers, in rear impacts,
or in many side impacts.
In addition, the vehicle has advanced
technology frontal airbags. Advanced
technology frontal airbags adjust the
restraint according to crash severity.
Seat-mounted side impact airbags are
designed to inflate in moderate to severe
side crashes depending on the location ofthe impact. Seat-mounted side impact
airbags are not designed to inflate in frontal
impacts, near frontal impacts, rollovers,
or rear impacts. A seat-mounted side impact
airbag is designed to inflate on the side of
the vehicle that is struck.
Roof-rail airbags are designed to inflate in
moderate to severe side crashes depending
on the location of the impact. In addition,
these roof-rail airbags are designed to inflate
during a rollover or in a severe frontal
impact. Roof-rail airbags are not designed to
inflate in rear impacts. Both roof-rail airbags
will inflate when either side of the vehicle is
struck, if the sensing system predicts that
the vehicle is about to roll over on its side,
or in a severe frontal impact.
In any particular crash, no one can say
whether an airbag should have inflated
simply because of the vehicle damage or
repair costs.
What Makes an Airbag Inflate?
In a deployment event, the sensing system
sends an electrical signal triggering a release
of gas from the inflator. Gas from the
inflator fills the airbag causing the bag to
Page 39 of 362
Chevrolet Colorado Owner Manual (GMNA-Localizing-U.S./Canada/Mexico-
15274222) - 2022 - CRC - 11/2/21
38 Seats and Restraints
break out of the cover. The inflator, the
airbag, and related hardware are all part of
the airbag module.
For airbag locations, seeWhere Are the
Airbags? 036.
How Does an Airbag Restrain?
In moderate to severe frontal or near frontal
collisions, even belted occupants can contact
the steering wheel or the instrument panel.
In moderate to severe side collisions, even
belted occupants can contact the inside of
the vehicle.
Airbags supplement the protection provided
by seat belts by distributing the force of the
impact more evenly over the
occupant's body.
Rollover capable roof-rail airbags are
designed to help contain the head and chest
of occupants in the outboard seating
positions in the first and second rows. The
rollover capable roof-rail airbags are
designed to help reduce the risk of full or
partial ejection in rollover events, although
no system can prevent all such ejections. But airbags would not help in many types
of collisions, primarily because the
occupant's motion is not toward those
airbags. See
When Should an Airbag Inflate?
0 37.
Airbags should never be regarded as
anything more than a supplement to seat
belts.
What Will You See after an
Airbag Inflates?
After frontal and seat-mounted side impact
airbags inflate, they quickly deflate, so
quickly that some people may not even
realize the airbags inflated. Roof-rail airbags
may still be at least partially inflated for
some time after they inflate. Some
components of the airbag module may be
hot for several minutes. For location of the
airbags, see Where Are the Airbags? 036.
The parts of the airbag that come into
contact with you may be warm, but not too
hot to touch. There may be some smoke
and dust coming from the vents in the
deflated airbags. Airbag inflation does not
prevent the driver from seeing out of the
windshield or being able to steer the
vehicle, nor does it prevent people from
leaving the vehicle.
{Warning
When an airbag inflates, there may be
dust in the air. This dust could cause
breathing problems for people with a
history of asthma or other breathing
trouble. To avoid this, everyone in the
vehicle should get out as soon as it is
safe to do so. If you have breathing
problems but cannot get out of the
vehicle after an airbag inflates, then get
fresh air by opening a window or a door.
If you experience breathing problems
following an airbag deployment, you
should seek medical attention.
The vehicle has a feature that may
automatically unlock the doors, turn on the
interior lamps and hazard warning flashers,
and shut off the fuel system after the
airbags inflate. The feature may also
activate, without airbag inflation, after an
event that exceeds a predetermined
threshold. After turning the ignition off and
then on again, the fuel system will return to
normal operation; the doors can be locked,
the interior lamps can be turned off, and
the hazard warning flashers can be turned
Page 76 of 362
Chevrolet Colorado Owner Manual (GMNA-Localizing-U.S./Canada/Mexico-
15274222) - 2022 - CRC - 11/2/21
Instruments and Controls 75
Instruments and Controls
Controls
Steering Wheel Adjustment . . . . . . . . . . . . 76
Steering Wheel Controls . . . . . . . . . . . . . . . . 76
Heated Steering Wheel . . . . . . . . . . . . . . . . . 76
Horn . . . . . . . . . . . . . . . . . . . . . . . . . . . . . . . . . . . 76
Windshield Wiper/Washer . . . . . . . . . . . . . . 77
Compass . . . . . . . . . . . . . . . . . . . . . . . . . . . . . . . . 78
Clock . . . . . . . . . . . . . . . . . . . . . . . . . . . . . . . . . . . 78
Power Outlets . . . . . . . . . . . . . . . . . . . . . . . . . . 78
Wireless Charging . . . . . . . . . . . . . . . . . . . . . . 79
Warning Lights, Gauges, and Indicators
Warning Lights, Gauges, andIndicators . . . . . . . . . . . . . . . . . . . . . . . . . . . . . 81
Instrument Cluster . . . . . . . . . . . . . . . . . . . . . . 81
Speedometer . . . . . . . . . . . . . . . . . . . . . . . . . . . 83
Odometer . . . . . . . . . . . . . . . . . . . . . . . . . . . . . . 83
Trip Odometer . . . . . . . . . . . . . . . . . . . . . . . . . 84
Tachometer . . . . . . . . . . . . . . . . . . . . . . . . . . . . 84
Fuel Gauge . . . . . . . . . . . . . . . . . . . . . . . . . . . . . 84
Engine Coolant Temperature Gauge . . . . 85
Seat Belt Reminders . . . . . . . . . . . . . . . . . . . . 85
Airbag Readiness Light . . . . . . . . . . . . . . . . . 86
Passenger Airbag Status Indicator . . . . . . 86
Charging System Light . . . . . . . . . . . . . . . . . 87
Malfunction Indicator Lamp (Check Engine Light) . . . . . . . . . . . . . . . . . . . . . . . . . 87 Brake System Warning Light . . . . . . . . . . . 88
Antilock Brake System (ABS) Warning
Light . . . . . . . . . . . . . . . . . . . . . . . . . . . . . . . . . 89
Four-Wheel-Drive Light . . . . . . . . . . . . . . . . . 89
Tow/Haul Mode Light . . . . . . . . . . . . . . . . . . 90
Hill Descent Control Light . . . . . . . . . . . . . . 90
Lane Departure Warning (LDW) Light . . . . . . . . . . . . . . . . . . . . . . . . . . . . . . . . . 90
Vehicle Ahead Indicator . . . . . . . . . . . . . . . . 90
Traction Off Light . . . . . . . . . . . . . . . . . . . . . . 90
StabiliTrak OFF Light . . . . . . . . . . . . . . . . . . . . 91
Traction Control System (TCS)/StabiliTrak Light . . . . . . . . . . . . . . . . . . . . . . . . . . . . . . . . . . 91
Tire Pressure Light . . . . . . . . . . . . . . . . . . . . . . 91
Engine Oil Pressure Light . . . . . . . . . . . . . . . 92
Low Fuel Warning Light . . . . . . . . . . . . . . . . 92
Security Light . . . . . . . . . . . . . . . . . . . . . . . . . . 92
High-Beam On Light . . . . . . . . . . . . . . . . . . . . 93
Front Fog Lamp Light . . . . . . . . . . . . . . . . . . . 93
Lamps On Reminder . . . . . . . . . . . . . . . . . . . . 93
Cruise Control Light . . . . . . . . . . . . . . . . . . . . 93
Door Ajar Light (Uplevel Cluster) . . . . . . . 93
Information Displays
Driver Information Center (DIC) (Base Level) . . . . . . . . . . . . . . . . . . . . . . . . . . . . . . . . . 93
Driver Information Center (DIC) (Uplevel) . . . . . . . . . . . . . . . . . . . . . . . . . . . . . 96
Vehicle Messages
Vehicle Messages . . . . . . . . . . . . . . . . . . . . . . 98
Engine Power Messages . . . . . . . . . . . . . . . . 98
Vehicle Speed Messages . . . . . . . . . . . . . . . 99
Vehicle Personalization
Vehicle Personalization . . . . . . . . . . . . . . . . . 99
Page 78 of 362
Chevrolet Colorado Owner Manual (GMNA-Localizing-U.S./Canada/Mexico-
15274222) - 2022 - CRC - 11/2/21
Instruments and Controls 77
Windshield Wiper/Washer
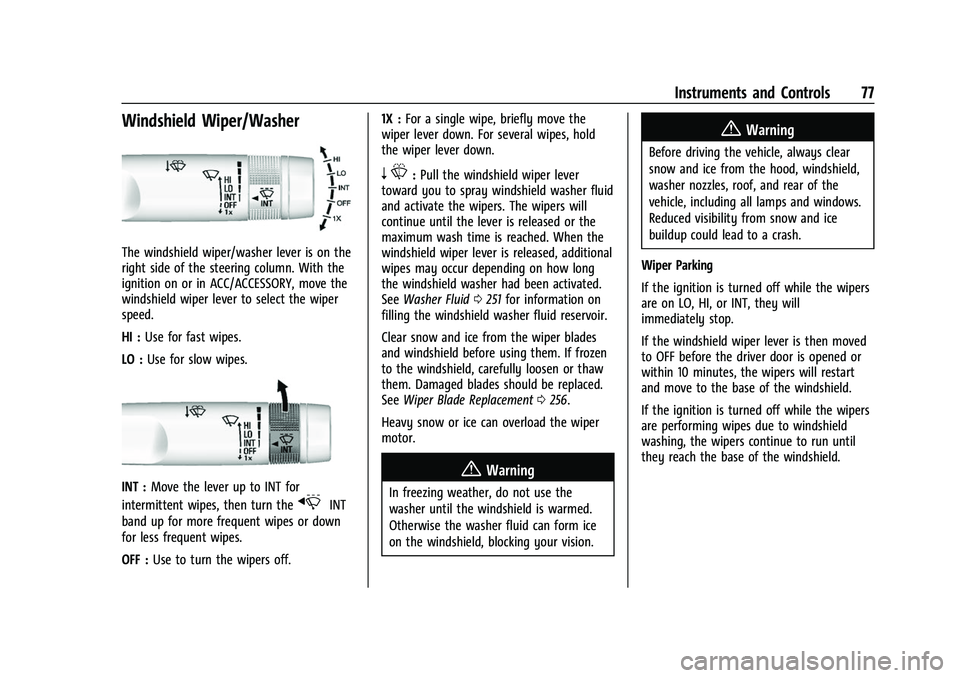
The windshield wiper/washer lever is on the
right side of the steering column. With the
ignition on or in ACC/ACCESSORY, move the
windshield wiper lever to select the wiper
speed.
HI :Use for fast wipes.
LO : Use for slow wipes.
INT : Move the lever up to INT for
intermittent wipes, then turn the
xINT
band up for more frequent wipes or down
for less frequent wipes.
OFF : Use to turn the wipers off. 1X :
For a single wipe, briefly move the
wiper lever down. For several wipes, hold
the wiper lever down.
n L: Pull the windshield wiper lever
toward you to spray windshield washer fluid
and activate the wipers. The wipers will
continue until the lever is released or the
maximum wash time is reached. When the
windshield wiper lever is released, additional
wipes may occur depending on how long
the windshield washer had been activated.
See Washer Fluid 0251 for information on
filling the windshield washer fluid reservoir.
Clear snow and ice from the wiper blades
and windshield before using them. If frozen
to the windshield, carefully loosen or thaw
them. Damaged blades should be replaced.
See Wiper Blade Replacement 0256.
Heavy snow or ice can overload the wiper
motor.
{Warning
In freezing weather, do not use the
washer until the windshield is warmed.
Otherwise the washer fluid can form ice
on the windshield, blocking your vision.
{Warning
Before driving the vehicle, always clear
snow and ice from the hood, windshield,
washer nozzles, roof, and rear of the
vehicle, including all lamps and windows.
Reduced visibility from snow and ice
buildup could lead to a crash.
Wiper Parking
If the ignition is turned off while the wipers
are on LO, HI, or INT, they will
immediately stop.
If the windshield wiper lever is then moved
to OFF before the driver door is opened or
within 10 minutes, the wipers will restart
and move to the base of the windshield.
If the ignition is turned off while the wipers
are performing wipes due to windshield
washing, the wipers continue to run until
they reach the base of the windshield.
Page 99 of 362
Chevrolet Colorado Owner Manual (GMNA-Localizing-U.S./Canada/Mexico-
15274222) - 2022 - CRC - 11/2/21
98 Instruments and Controls
and the timer is running. To reset the timer
to zero, press and hold
Vwhile this display
is active.
Battery Voltage : Displays the current
battery voltage, if equipped. Battery voltage
changes are normal while driving. See
Charging System Light 087. If there is a
problem with the battery charging system,
the DIC will display a message.
Oil Pressure : Oil pressure is displayed in
either kilopascal (kPa) or in pounds per
square inch (psi).
Engine Hours : Shows the total number of
hours the engine has run.
Off Road Page : This page shows the
traction, four wheel drive, and steering
angle states. When the front or rear axles
are locked, a lock icon is displayed. See
Off-Road Driving 0172.
Transmission Fluid Temperature : Shows the
temperature of the automatic transmission
fluid in either degrees Celsius (°C) or degrees
Fahrenheit (°F).
Trailer Brake (If Equipped) : TRAILER GAIN
shows the trailer gain setting. This setting
can be adjusted from 0.0 to 10.0 with either
a trailer connected or disconnected. OUTPUT shows the power output to the
trailer anytime a trailer with electric brakes
is connected. Output is displayed as a bar
graph. Dashes may appear in the OUTPUT
display if a trailer is not connected.
Blank Page :
Shows no information.
Vehicle Messages
Messages displayed on the DIC indicate the
status of the vehicle or some action that
may be needed to correct a condition.
Multiple messages may appear one after
another.
The messages that do not require
immediate action can be acknowledged and
cleared by pressing
V. The messages that
require immediate action cannot be cleared
until that action is performed.
All messages should be taken seriously;
clearing the message does not correct the
problem.
If a SERVICE message appears, see your
dealer.
Follow the instructions given in the
messages. The system displays messages
regarding the following topics:
.Service Messages
.Fluid Levels
.Vehicle Security
.Brakes
.Steering
.Ride Control Systems
.Driver Assistance Systems
.Cruise Control
.Lighting and Bulb Replacement
.Wiper/Washer Systems
.Doors and Windows
.Seat Belts
.Airbag Systems
.Engine and Transmission
.Tire Pressure
.Battery
Engine Power Messages
ENGINE POWER IS REDUCED
This message displays when the vehicle's
propulsion power is reduced. A reduction in
propulsion power can affect the vehicle's
ability to accelerate. If this message is on,
but there is no observed reduction in
performance, proceed to your destination.
Under certain conditions the performance
may be reduced the next time the vehicle is
driven. The vehicle may be driven while this
Page 101 of 362
Chevrolet Colorado Owner Manual (GMNA-Localizing-U.S./Canada/Mexico-
15274222) - 2022 - CRC - 11/2/21
100 Instruments and Controls
Park Assist
This allows the feature to be turned on or
off. SeeAssistance Systems for Parking or
Backing 0210.
Select Off, On, or On with Towbar.
Rear Camera Park Assist Symbols
This setting enables the Rear Camera Park
Assist Symbols. See Assistance Systems for
Parking or Backing 0210.
Touch Off or On.
Comfort and Convenience
Touch and the following may display:
.Chime Volume
Chime Volume
This determines the chime volume level.
Touch the controls on the infotainment
display to adjust the volume.
Lighting
Touch and the following may display:
.Vehicle Locator Lights
.Exit Lighting Vehicle Locator Lights
This setting flashes the vehicle’s headlamps
when
Kis pressed on the Remote Keyless
Entry (RKE) transmitter.
Touch Off or On.
Exit Lighting
This setting specifies how long the
headlamps stay on after the vehicle is
turned off and exited.
Touch Off, 30 Seconds, 60 Seconds,
or 120 Seconds.
Power Door Locks
Touch and the following may display:
.Open Door Anti-Lockout
.Auto Door Unlock
.Delayed Door Lock
Open Door Anti Lock Out
This setting prevents the driver door from
locking when the door is open. If this
setting is on, the Delayed Door Lock menu
will not be available.
Touch Off or On. Auto Door Unlock
This allows selection of which of the doors
will automatically unlock when the vehicle is
shifted into P (Park).
Touch Off, All Doors, or Driver Door.
Delayed Door Lock
When on, this feature will delay the locking
of the doors. To override the delay, press
the power door lock switch on the door.
Touch Off or On.
Remote Lock, Unlock, and Start
Touch and the following may display:
.Remote Unlock Light Feedback
.Remote Lock Feedback
.Remote Door Unlock
.Remote Start Auto Heat Seats
Remote Unlock Light Feedback
When on, the exterior lamps will flash when
unlocking the vehicle with the RKE
transmitter.
Touch Off or Flash Lights.