spare wheel CHEVROLET COLORADO 2023 User Guide
[x] Cancel search | Manufacturer: CHEVROLET, Model Year: 2023, Model line: COLORADO, Model: CHEVROLET COLORADO 2023Pages: 362, PDF Size: 13.62 MB
Page 290 of 362
Chevrolet Colorado Owner Manual (GMNA-Localizing-U.S./Canada/Mexico-
15274222) - 2022 - CRC - 11/2/21
Vehicle Care 289
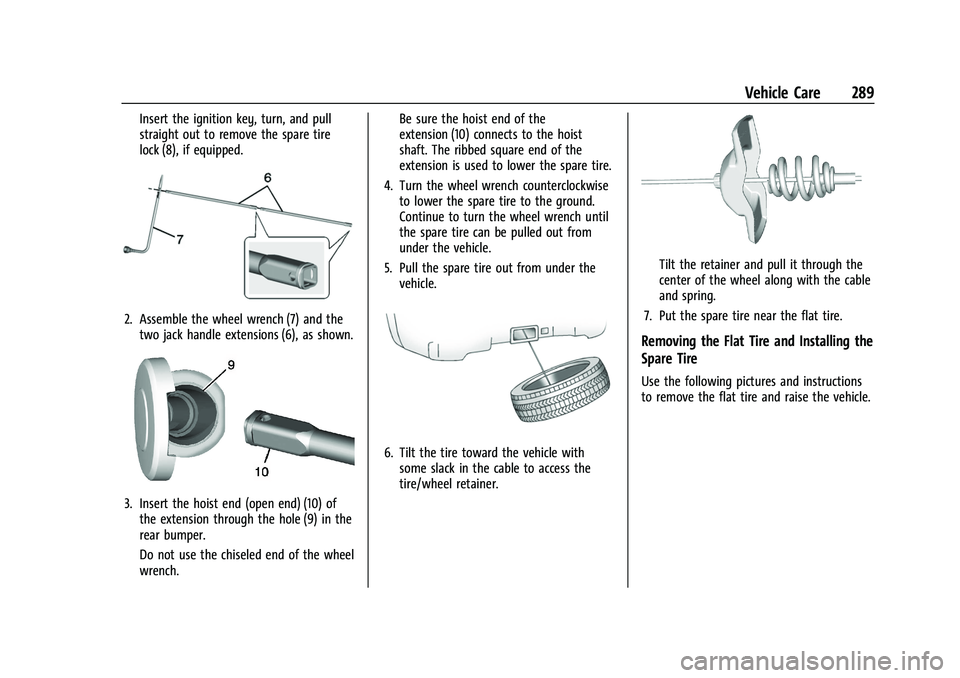
Insert the ignition key, turn, and pull
straight out to remove the spare tire
lock (8), if equipped.
2. Assemble the wheel wrench (7) and thetwo jack handle extensions (6), as shown.
3. Insert the hoist end (open end) (10) ofthe extension through the hole (9) in the
rear bumper.
Do not use the chiseled end of the wheel
wrench. Be sure the hoist end of the
extension (10) connects to the hoist
shaft. The ribbed square end of the
extension is used to lower the spare tire.
4. Turn the wheel wrench counterclockwise to lower the spare tire to the ground.
Continue to turn the wheel wrench until
the spare tire can be pulled out from
under the vehicle.
5. Pull the spare tire out from under the vehicle.
6. Tilt the tire toward the vehicle withsome slack in the cable to access the
tire/wheel retainer.
Tilt the retainer and pull it through the
center of the wheel along with the cable
and spring.
7. Put the spare tire near the flat tire.
Removing the Flat Tire and Installing the
Spare Tire
Use the following pictures and instructions
to remove the flat tire and raise the vehicle.
Page 292 of 362
Chevrolet Colorado Owner Manual (GMNA-Localizing-U.S./Canada/Mexico-
15274222) - 2022 - CRC - 11/2/21
Vehicle Care 291
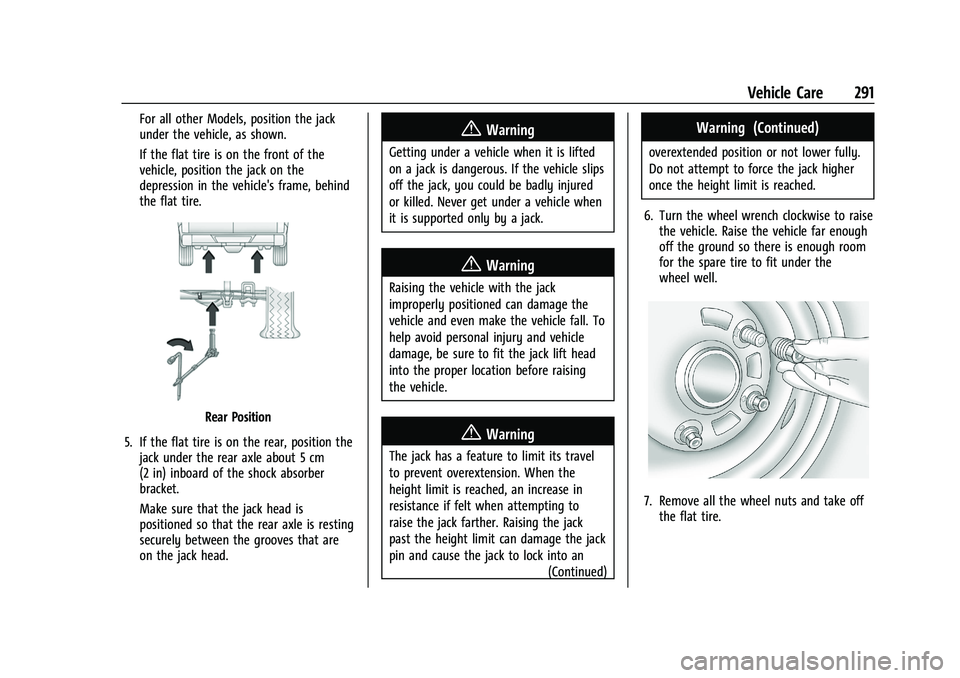
For all other Models, position the jack
under the vehicle, as shown.
If the flat tire is on the front of the
vehicle, position the jack on the
depression in the vehicle's frame, behind
the flat tire.
Rear Position
5. If the flat tire is on the rear, position the jack under the rear axle about 5 cm
(2 in) inboard of the shock absorber
bracket.
Make sure that the jack head is
positioned so that the rear axle is resting
securely between the grooves that are
on the jack head.
{Warning
Getting under a vehicle when it is lifted
on a jack is dangerous. If the vehicle slips
off the jack, you could be badly injured
or killed. Never get under a vehicle when
it is supported only by a jack.
{Warning
Raising the vehicle with the jack
improperly positioned can damage the
vehicle and even make the vehicle fall. To
help avoid personal injury and vehicle
damage, be sure to fit the jack lift head
into the proper location before raising
the vehicle.
{Warning
The jack has a feature to limit its travel
to prevent overextension. When the
height limit is reached, an increase in
resistance if felt when attempting to
raise the jack farther. Raising the jack
past the height limit can damage the jack
pin and cause the jack to lock into an
(Continued)
Warning (Continued)
overextended position or not lower fully.
Do not attempt to force the jack higher
once the height limit is reached.
6. Turn the wheel wrench clockwise to raise the vehicle. Raise the vehicle far enough
off the ground so there is enough room
for the spare tire to fit under the
wheel well.
7. Remove all the wheel nuts and take offthe flat tire.
Page 293 of 362
Chevrolet Colorado Owner Manual (GMNA-Localizing-U.S./Canada/Mexico-
15274222) - 2022 - CRC - 11/2/21
292 Vehicle Care
{Warning
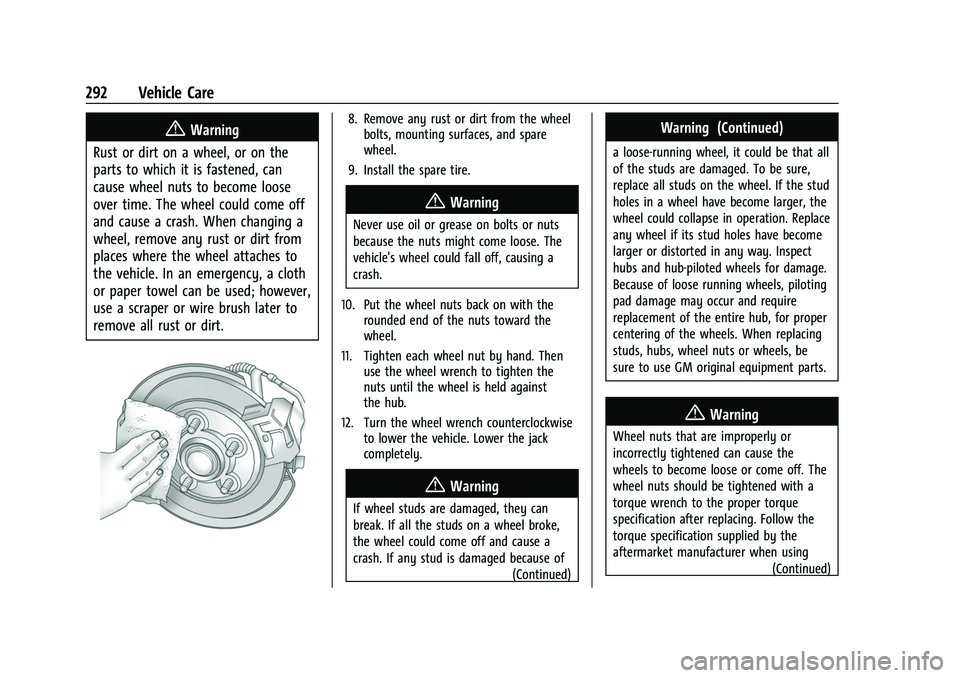
Rust or dirt on a wheel, or on the
parts to which it is fastened, can
cause wheel nuts to become loose
over time. The wheel could come off
and cause a crash. When changing a
wheel, remove any rust or dirt from
places where the wheel attaches to
the vehicle. In an emergency, a cloth
or paper towel can be used; however,
use a scraper or wire brush later to
remove all rust or dirt.8. Remove any rust or dirt from the wheel bolts, mounting surfaces, and spare
wheel.
9. Install the spare tire.
{Warning
Never use oil or grease on bolts or nuts
because the nuts might come loose. The
vehicle's wheel could fall off, causing a
crash.
10. Put the wheel nuts back on with the rounded end of the nuts toward the
wheel.
11. Tighten each wheel nut by hand. Then use the wheel wrench to tighten the
nuts until the wheel is held against
the hub.
12. Turn the wheel wrench counterclockwise to lower the vehicle. Lower the jack
completely.
{Warning
If wheel studs are damaged, they can
break. If all the studs on a wheel broke,
the wheel could come off and cause a
crash. If any stud is damaged because of
(Continued)
Warning (Continued)
a loose-running wheel, it could be that all
of the studs are damaged. To be sure,
replace all studs on the wheel. If the stud
holes in a wheel have become larger, the
wheel could collapse in operation. Replace
any wheel if its stud holes have become
larger or distorted in any way. Inspect
hubs and hub‐piloted wheels for damage.
Because of loose running wheels, piloting
pad damage may occur and require
replacement of the entire hub, for proper
centering of the wheels. When replacing
studs, hubs, wheel nuts or wheels, be
sure to use GM original equipment parts.
{Warning
Wheel nuts that are improperly or
incorrectly tightened can cause the
wheels to become loose or come off. The
wheel nuts should be tightened with a
torque wrench to the proper torque
specification after replacing. Follow the
torque specification supplied by the
aftermarket manufacturer when using
(Continued)
Page 294 of 362
Chevrolet Colorado Owner Manual (GMNA-Localizing-U.S./Canada/Mexico-
15274222) - 2022 - CRC - 11/2/21
Vehicle Care 293
Warning (Continued)
accessory locking wheel nuts. See
Capacities and Specifications0328 for
original equipment wheel nut torque
specifications.
Caution
Improperly tightened wheel nuts can lead
to brake pulsation and rotor damage. To
avoid expensive brake repairs, evenly
tighten the wheel nuts in the proper
sequence and to the proper torque
specification. See Capacities and
Specifications 0328 for the wheel nut
torque specification.
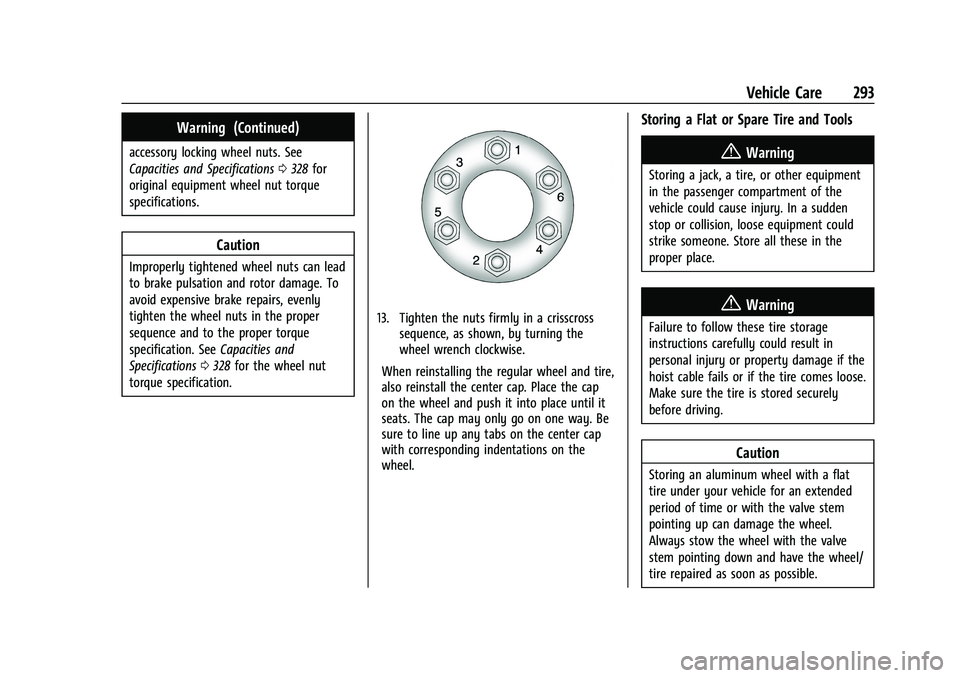
13. Tighten the nuts firmly in a crisscross sequence, as shown, by turning the
wheel wrench clockwise.
When reinstalling the regular wheel and tire,
also reinstall the center cap. Place the cap
on the wheel and push it into place until it
seats. The cap may only go on one way. Be
sure to line up any tabs on the center cap
with corresponding indentations on the
wheel.
Storing a Flat or Spare Tire and Tools
{Warning
Storing a jack, a tire, or other equipment
in the passenger compartment of the
vehicle could cause injury. In a sudden
stop or collision, loose equipment could
strike someone. Store all these in the
proper place.
{Warning
Failure to follow these tire storage
instructions carefully could result in
personal injury or property damage if the
hoist cable fails or if the tire comes loose.
Make sure the tire is stored securely
before driving.
Caution
Storing an aluminum wheel with a flat
tire under your vehicle for an extended
period of time or with the valve stem
pointing up can damage the wheel.
Always stow the wheel with the valve
stem pointing down and have the wheel/
tire repaired as soon as possible.
Page 295 of 362
Chevrolet Colorado Owner Manual (GMNA-Localizing-U.S./Canada/Mexico-
15274222) - 2022 - CRC - 11/2/21
294 Vehicle Care
Caution
The tire hoist can be damaged if there is
no tension on the cable when using it. To
have the necessary tension, the spare or
road tire and wheel assembly must be
installed on the tire hoist to use it.
{Warning
An improperly stored spare tire could
come loose and cause a crash. To avoid
personal injury or property damage,
always store the spare tire when the
vehicle is parked on a level surface.
Store the tire under the rear of the vehicle
in the spare tire carrier.
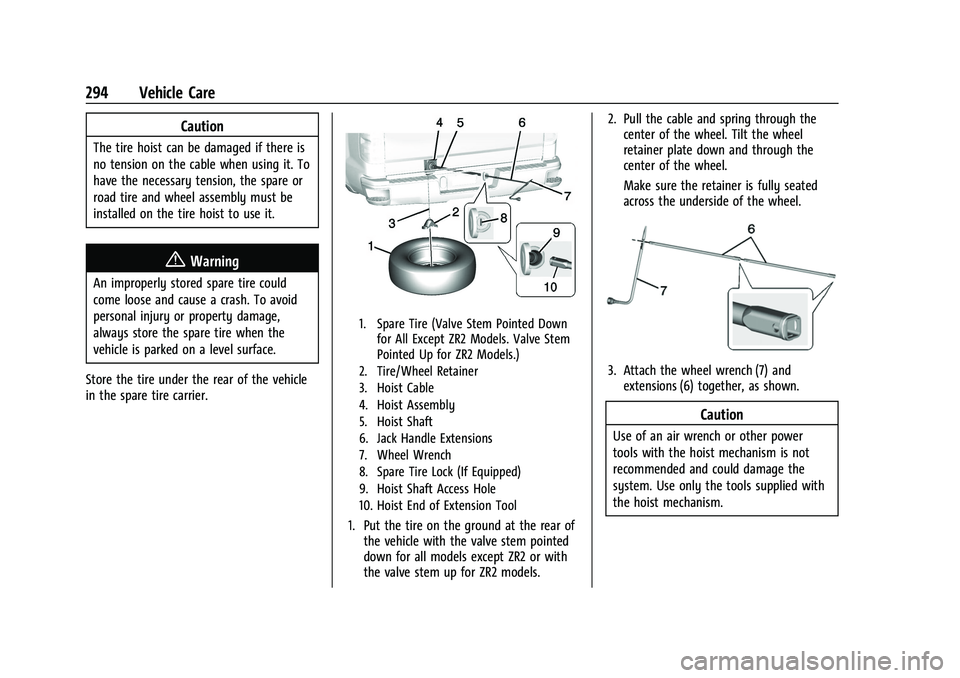
1. Spare Tire (Valve Stem Pointed Down for All Except ZR2 Models. Valve Stem
Pointed Up for ZR2 Models.)
2. Tire/Wheel Retainer
3. Hoist Cable
4. Hoist Assembly
5. Hoist Shaft
6. Jack Handle Extensions
7. Wheel Wrench
8. Spare Tire Lock (If Equipped)
9. Hoist Shaft Access Hole
10. Hoist End of Extension Tool
1. Put the tire on the ground at the rear of the vehicle with the valve stem pointed
down for all models except ZR2 or with
the valve stem up for ZR2 models. 2. Pull the cable and spring through the
center of the wheel. Tilt the wheel
retainer plate down and through the
center of the wheel.
Make sure the retainer is fully seated
across the underside of the wheel.
3. Attach the wheel wrench (7) andextensions (6) together, as shown.
Caution
Use of an air wrench or other power
tools with the hoist mechanism is not
recommended and could damage the
system. Use only the tools supplied with
the hoist mechanism.
Page 296 of 362
Chevrolet Colorado Owner Manual (GMNA-Localizing-U.S./Canada/Mexico-
15274222) - 2022 - CRC - 11/2/21
Vehicle Care 295
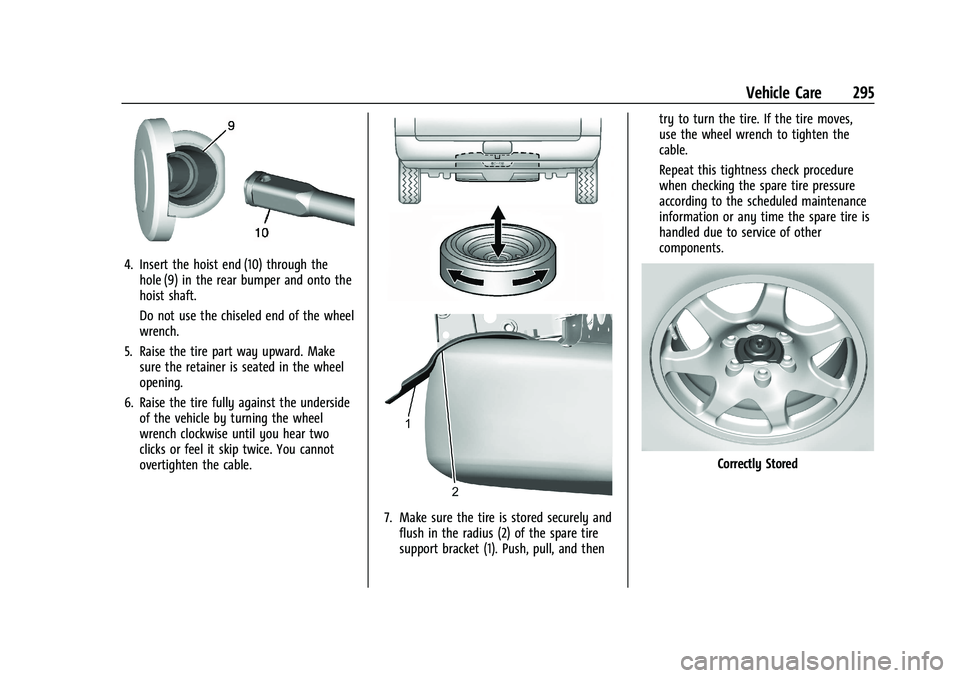
4. Insert the hoist end (10) through thehole (9) in the rear bumper and onto the
hoist shaft.
Do not use the chiseled end of the wheel
wrench.
5. Raise the tire part way upward. Make sure the retainer is seated in the wheel
opening.
6. Raise the tire fully against the underside of the vehicle by turning the wheel
wrench clockwise until you hear two
clicks or feel it skip twice. You cannot
overtighten the cable.
7. Make sure the tire is stored securely andflush in the radius (2) of the spare tire
support bracket (1). Push, pull, and then try to turn the tire. If the tire moves,
use the wheel wrench to tighten the
cable.
Repeat this tightness check procedure
when checking the spare tire pressure
according to the scheduled maintenance
information or any time the spare tire is
handled due to service of other
components.
Correctly Stored
Page 297 of 362
Chevrolet Colorado Owner Manual (GMNA-Localizing-U.S./Canada/Mexico-
15274222) - 2022 - CRC - 11/2/21
296 Vehicle Care
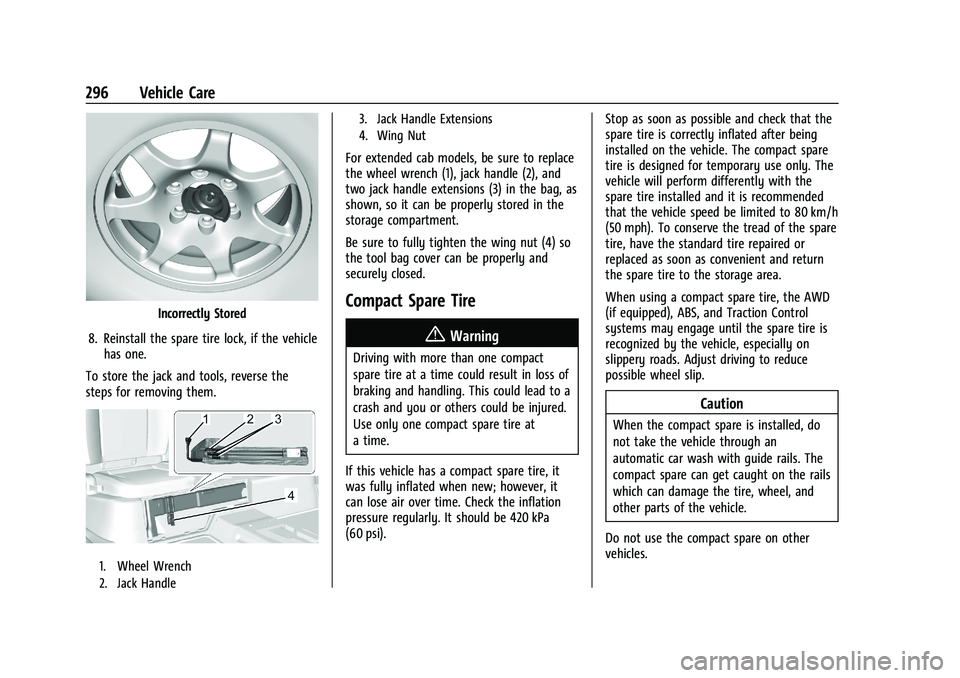
Incorrectly Stored
8. Reinstall the spare tire lock, if the vehicle has one.
To store the jack and tools, reverse the
steps for removing them.
1. Wheel Wrench
2. Jack Handle 3. Jack Handle Extensions
4. Wing Nut
For extended cab models, be sure to replace
the wheel wrench (1), jack handle (2), and
two jack handle extensions (3) in the bag, as
shown, so it can be properly stored in the
storage compartment.
Be sure to fully tighten the wing nut (4) so
the tool bag cover can be properly and
securely closed.
Compact Spare Tire
{Warning
Driving with more than one compact
spare tire at a time could result in loss of
braking and handling. This could lead to a
crash and you or others could be injured.
Use only one compact spare tire at
a time.
If this vehicle has a compact spare tire, it
was fully inflated when new; however, it
can lose air over time. Check the inflation
pressure regularly. It should be 420 kPa
(60 psi). Stop as soon as possible and check that the
spare tire is correctly inflated after being
installed on the vehicle. The compact spare
tire is designed for temporary use only. The
vehicle will perform differently with the
spare tire installed and it is recommended
that the vehicle speed be limited to 80 km/h
(50 mph). To conserve the tread of the spare
tire, have the standard tire repaired or
replaced as soon as convenient and return
the spare tire to the storage area.
When using a compact spare tire, the AWD
(if equipped), ABS, and Traction Control
systems may engage until the spare tire is
recognized by the vehicle, especially on
slippery roads. Adjust driving to reduce
possible wheel slip.
Caution
When the compact spare is installed, do
not take the vehicle through an
automatic car wash with guide rails. The
compact spare can get caught on the rails
which can damage the tire, wheel, and
other parts of the vehicle.
Do not use the compact spare on other
vehicles.
Page 298 of 362
Chevrolet Colorado Owner Manual (GMNA-Localizing-U.S./Canada/Mexico-
15274222) - 2022 - CRC - 11/2/21
Vehicle Care 297
Do not mix the compact spare tire or wheel
with other wheels or tires. They will not fit.
Keep the spare tire and its wheel together.
Caution
Tire chains will not fit the compact spare.
Using them can damage the vehicle and
the chains. Do not use tire chains on the
compact spare.
Full-Size Spare Tire
If this vehicle came with a full-size spare
tire, it was fully inflated when new,
however, it can lose air over time. Check the
inflation pressure regularly. SeeTire Pressure
0 275 and
Vehicle Load Limits 0178 for information
regarding proper tire inflation and loading
the vehicle. For instructions on how to
remove, install, or store a spare tire, see Tire
Changing 0287.
If equipped with a temporary use full-size
spare tire, it is indicated on the tire sidewall.
See Tire Sidewall Labeling 0271. This spare
tire should not be driven on over 112 km/h
(70 mph), or 88 km/h (55 mph) when
pulling a trailer, at the proper inflation pressure. Repair and replace the road tire as
soon as it is convenient, and stow the spare
tire for future use.
Caution
If the vehicle has four-wheel drive and a
different size spare tire is installed, do
not drive in four-wheel drive until the flat
tire is repaired and/or replaced. The
vehicle could be damaged and the repairs
would not be covered by the warranty.
Never use four-wheel drive when a
different size spare tire is installed on the
vehicle.
The vehicle may have a different size spare
tire than the road tires originally installed
on the vehicle. This spare tire was developed
for use on this vehicle, so it is all right to
drive on it. If the vehicle has four-wheel
drive and a different size spare tire is
installed, drive only in two-wheel drive.
After installing the spare tire on the vehicle,
stop as soon as possible and check that the
spare is correctly inflated. The spare tire is
made to perform well at speeds up to
112 km/h (70 MPH) at the recommended
inflation pressure, so you can finish
your trip. Have the damaged or flat road tire repaired
or replaced and installed back onto the
vehicle as soon as possible so the spare tire
will be available in case it is needed again.
Do not mix tires and wheels of difference
sizes, because they will not fit. Keep the
spare tire and its wheel together.
If the vehicle has a spare tire that does not
match the original road tires and wheels in
size and type, do not include the spare in
the tire rotation.
Jump Starting
Jump Starting - North America
For more information about the vehicle
battery, see
Battery - North America 0253.
If the battery has run down, try to use
another vehicle and some jumper cables to
start your vehicle. Be sure to use the
following steps to do it safely.
{Warning
WARNING: Battery posts, terminals and
related accessories can expose you to
chemicals including lead and lead
compounds, which are known to the
(Continued)
Page 353 of 362
Chevrolet Colorado Owner Manual (GMNA-Localizing-U.S./Canada/Mexico-
15274222) - 2022 - CRC - 11/2/21
352 Index
Climate Control Systems . . . . . . . . . . . . . . . . . 162Air Conditioning . . . . . . . . . . . . . . . . . . . . . . . 162
Automatic . . . . . . . . . . . . . . . . . . . . . . . . . . . . . 164
Heating . . . . . . . . . . . . . . . . . . . . . . . . . . . . . . . . 162
Clock . . . . . . . . . . . . . . . . . . . . . . . . . . . . . . . . . . . . . 78
Cluster, Instrument . . . . . . . . . . . . . . . . . . . . . . . .81
Collision Damage Repair . . . . . . . . . . . . . . . . . 337
Compact Spare Tire . . . . . . . . . . . . . . . . . . . . . . 296
Compartments Storage . . . . . . . . . . . . . . . . . . . . . . . . . . . . . . . . . 73
Compass . . . . . . . . . . . . . . . . . . . . . . . . . . . . . . . . . . 78
Connected Services
Connections . . . . . . . . . . . . . . . . . . . . . . . . . . . 347
Diagnostics . . . . . . . . . . . . . . . . . . . . . . . . . . . . 349
Navigation . . . . . . . . . . . . . . . . . . . . . . . . . . . . . 347
Connections
Connected Services . . . . . . . . . . . . . . . . . . . . 347
Control Hill Descent . . . . . . . . . . . . . . . . . . . . . . . . . . . . 204
Traction and Electronic Stability . . . . . . . 202
Control Light
Hill Descent . . . . . . . . . . . . . . . . . . . . . . . . . . . . . 90
Control of a Vehicle . . . . . . . . . . . . . . . . . . . . . 170
Controls Steering Wheel . . . . . . . . . . . . . . . . . . . . . . . . . 112
Convex Mirrors . . . . . . . . . . . . . . . . . . . . . . . . . . . .16
Coolant Engine Temperature Gauge . . . . . . . . . . . . . 85 Cooling . . . . . . . . . . . . . . . . . . . . . . . . . . . . . .162, 164
Cooling System . . . . . . . . . . . . . . . . . . . . . . . . . . 246
Courtesy Transportation Program . . . . . . . . 336
Coverage Explanations . . . . . . . . . . . . . . . . . . . .134
Cruise Control . . . . . . . . . . . . . . . . . . . . . . . . . . . 207
Light . . . . . . . . . . . . . . . . . . . . . . . . . . . . . . . . . . . . 93
Cupholders . . . . . . . . . . . . . . . . . . . . . . . . . . . . . . . .73
Customer Assistance . . . . . . . . . . . . . . . . . . . . . 333
Offices . . . . . . . . . . . . . . . . . . . . . . . . . . . . . . . . . 333
Text Telephone (TTY) Users . . . . . . . . . . . . 333
Customer Information
Publications Ordering Information . . . . . 338
Customer Satisfaction Procedure . . . . . . . . . . 331
Cybersecurity . . . . . . . . . . . . . . . . . . . . . . . . . . . . 340
D
Damage Repair, Collision . . . . . . . . . . . . . . . . . 337
Danger, Warning, and Caution . . . . . . . . . . . . . .2
Data Collection Infotainment System . . . . . . . . . . . . . . . . . . 341
OnStar . . . . . . . . . . . . . . . . . . . . . . . . . . . . . . . . . 341
Data Recorders, Event . . . . . . . . . . . . . . . . . . . .341
Database Coverage Explanations . . . . . . . . . .134
Daytime Running Lamps (DRL) . . . . . . . . . . . 103
Defensive Driving . . . . . . . . . . . . . . . . . . . . . . . . 169
Delayed Locking . . . . . . . . . . . . . . . . . . . . . . . . . . . 12
Destination . . . . . . . . . . . . . . . . . . . . . . . . . . . . . . . 127 Diagnostics
Connected Services . . . . . . . . . . . . . . . . . . . . 349
Differential, Limited-Slip . . . . . . . . . . . . . . . . . 205
Distracted Driving . . . . . . . . . . . . . . . . . . . . . . . . 169
Dome Lamps . . . . . . . . . . . . . . . . . . . . . . . . . . . . . 106
Door Ajar Light . . . . . . . . . . . . . . . . . . . . . . . . . . . . . . . 93
Delayed Locking . . . . . . . . . . . . . . . . . . . . . . . . . 12
Locks . . . . . . . . . . . . . . . . . . . . . . . . . . . . . . . . . . . . 12
Power Locks . . . . . . . . . . . . . . . . . . . . . . . . . . . . . 12
Drive Belt Routing, Engine . . . . . . . . . . . . . . . 330
Driver
Teen . . . . . . . . . . . . . . . . . . . . . . . . . . . . . . . . . . . . 151
Driver Assistance Systems . . . . . . . . . . . . . . . 209
Driver Information Center (DIC) . . . . . . . 93, 96
Driver Mode Control . . . . . . . . . . . . . . . . . . . . . 205
Driving Better Fuel Economy . . . . . . . . . . . . . . . . . . . 169
Characteristics and Towing Tips . . . . . . . . 219
Defensive . . . . . . . . . . . . . . . . . . . . . . . . . . . . . . 169
Hill and Mountain Roads . . . . . . . . . . . . . . 176
If the Vehicle is Stuck . . . . . . . . . . . . . . . . . . 177
Impaired . . . . . . . . . . . . . . . . . . . . . . . . . . . . . . . 170
Loss of Control . . . . . . . . . . . . . . . . . . . . . . . . . 171
Off-Road . . . . . . . . . . . . . . . . . . . . . . . . . . . . . . . . 172
Off-Road Recovery . . . . . . . . . . . . . . . . . . . . . . 171
Vehicle Load Limits . . . . . . . . . . . . . . . . . . . . 178
Wet Roads . . . . . . . . . . . . . . . . . . . . . . . . . . . . . . 175
Page 354 of 362
Chevrolet Colorado Owner Manual (GMNA-Localizing-U.S./Canada/Mexico-
15274222) - 2022 - CRC - 11/2/21
Index 353
Driving (cont'd)Winter . . . . . . . . . . . . . . . . . . . . . . . . . . . . . . . . . 176
E
Electrical Equipment, Add-On . . . . . . . . . . . . 234
Electrical System
Engine Compartment Fuse Block . . . . . . . 262
Fuses and Circuit Breakers . . . . . . . . . . . . . 262
Instrument Panel Fuse Block . . . . . . . . . . . 267
Overload . . . . . . . . . . . . . . . . . . . . . . . . . . . . . . . 260
Emergency OnStar . . . . . . . . . . . . . . . . . . . . . . . . . . . . . . . . . 343
Engine Air Cleaner/Filter . . . . . . . . . . . . . . . . . . . . . . 245
Check Light (Malfunction Indicator) . . . . . 87
Compartment Overview . . . . . . . . . . . . . . . . 239
Coolant Temperature Gauge . . . . . . . . . . . . 85
Cooling System . . . . . . . . . . . . . . . . . . . . . . . . 246
Drive Belt Routing . . . . . . . . . . . . . . . . . . . . . 330
Exhaust . . . . . . . . . . . . . . . . . . . . . . . . . . . . . . . . 190
Fan . . . . . . . . . . . . . . . . . . . . . . . . . . . . . . . . . . . . 250
Heater . . . . . . . . . . . . . . . . . . . . . . . . . . . . . . . . . 187
Oil Life System . . . . . . . . . . . . . . . . . . . . . . . . 244
Oil Pressure Light . . . . . . . . . . . . . . . . . . . . . . . 92
Overheating . . . . . . . . . . . . . . . . . . . . . . . . . . . 249
Power Messages . . . . . . . . . . . . . . . . . . . . . . . . 98
Running While Parked . . . . . . . . . . . . . . . . . 190
Starting . . . . . . . . . . . . . . . . . . . . . . . . . . . . . . . . 186 Entry Lighting . . . . . . . . . . . . . . . . . . . . . . . . . . . 107
Equipment, Towing . . . . . . . . . . . . . . . . . . . . . . 228
Event Data Recorders . . . . . . . . . . . . . . . . . . . . .341
Exit Lighting . . . . . . . . . . . . . . . . . . . . . . . . . . . . . 107
Extender, Seat Belt . . . . . . . . . . . . . . . . . . . . . . . .33
Exterior Cargo Lamps . . . . . . . . . . . . . . . . . . . . 105
Exterior Lamp Controls . . . . . . . . . . . . . . . . . . . 102
Exterior Lamps Off Reminder . . . . . . . . . . . . 103
Exterior Lighting Battery Saver . . . . . . . . . . 108
F
Fan
Engine . . . . . . . . . . . . . . . . . . . . . . . . . . . . . . . . . 250
Filter, Engine Air Cleaner . . . . . . . . . . . . . . . . . . . . . 245
Flash-to-Pass . . . . . . . . . . . . . . . . . . . . . . . . . . . . . 103
Flashers, Hazard Warning . . . . . . . . . . . . . . . . 104
Flat Tire . . . . . . . . . . . . . . . . . . . . . . . . . . . . . . . . . 286 Changing . . . . . . . . . . . . . . . . . . . . . . . . . . . . . . 287
Floor Mats . . . . . . . . . . . . . . . . . . . . . . . . . . . . . . . . 311
Fluid Automatic Transmission . . . . . . . . . . . . . . . 245
Brakes . . . . . . . . . . . . . . . . . . . . . . . . . . . . . . . . . 252
Washer . . . . . . . . . . . . . . . . . . . . . . . . . . . . . . . . 251
Fog Lamps . . . . . . . . . . . . . . . . . . . . . . . . . . . . . . . 105
Folding Mirrors . . . . . . . . . . . . . . . . . . . . . . . . . . . . 17
Forward Collision Alert (FCA) System . . . . . 212 Four-Wheel
Drive . . . . . . . . . . . . . . . . . . . . . . . . . . . . . . . . . . 254
Drive Light . . . . . . . . . . . . . . . . . . . . . . . . . . . . . . 89
Drive System . . . . . . . . . . . . . . . . . . . . . . . . . . 195
Frequency Statement Radio . . . . . . . . . . . . . . . . . . . . . . . . . . . . . . . . . . 339
Front Axle . . . . . . . . . . . . . . . . . . . . . . . . . . . . . . . 254
Locking . . . . . . . . . . . . . . . . . . . . . . . . . . . . . . . . 206
Front Fog Lamp Light . . . . . . . . . . . . . . . . . . . . . . . . . . . . . . . . . . . . 93
Front Seats
Adjustment . . . . . . . . . . . . . . . . . . . . . . . . . . . . . 23
Heated . . . . . . . . . . . . . . . . . . . . . . . . . . . . . . . . . 25
Fuel Additives . . . . . . . . . . . . . . . . . . . . . . . . . . . . . . . 217
Economy, Driving for Better . . . . . . . . . . . 169
Filling a Portable Fuel Container . . . . . . . 219
Filling the Tank . . . . . . . . . . . . . . . . . . . . . . . . . 217
Foreign Countries . . . . . . . . . . . . . . . . . . . . . . . 217
Gauge . . . . . . . . . . . . . . . . . . . . . . . . . . . . . . . . . . 84
Low Fuel Warning Light . . . . . . . . . . . . . . . . 92
Management, Active . . . . . . . . . . . . . . . . . . . 190
Prohibited Fuels . . . . . . . . . . . . . . . . . . . . . . . . 217
Recommended . . . . . . . . . . . . . . . . . . . . . . . . . 216
Top Tier . . . . . . . . . . . . . . . . . . . . . . . . . . . . . . . 216
Full-Size Spare Tire . . . . . . . . . . . . . . . . . . . . . . . 297
Fuses Engine Compartment Fuse Block . . . . . . . 262