engine start stop CHEVROLET COLORADO 2023 Owner's Manual
[x] Cancel search | Manufacturer: CHEVROLET, Model Year: 2023, Model line: COLORADO, Model: CHEVROLET COLORADO 2023Pages: 362, PDF Size: 13.62 MB
Page 223 of 362
Chevrolet Colorado Owner Manual (GMNA-Localizing-U.S./Canada/Mexico-
15274222) - 2022 - CRC - 11/2/21
222 Driving and Operating
When towing at higher altitudes, engine
coolant will boil at a lower temperature
than at lower altitudes. If the engine is
turned off immediately after towing at high
altitude on steep uphill grades, the vehicle
could show signs similar to engine
overheating. To avoid this, let the engine
run, preferably on level ground, with the
transmission in P (Park) for a few minutes
before turning the engine off. If the
overheat warning comes on, seeEngine
Overheating 0249.
Parking on Hills
{Warning
To prevent serious injury or death,
always park your vehicle and trailer on a
level surface when possible.
When parking your vehicle and your trailer
on a hill: 1. Press the brake pedal, but do not shift into P (Park) yet. Turn the wheels into
the curb if facing downhill or into traffic
if facing uphill. 2. Have someone place chocks under the
trailer wheels.
3. When the wheel chocks are in place, gradually release the brake pedal to
allow the chocks to absorb the load of
the trailer.
4. Reapply the brake pedal. Then apply the parking brake and shift into P (Park).
5. Release the brake pedal.
Leaving After Parking on a Hill
1. Apply and hold the brake pedal.
.Start the engine.
.Shift into a gear.
.Release the parking brake.
2. Let up on the brake pedal.
3. Drive slowly until the trailer is clear of the chocks.
4. Stop and have someone pick up and store the chocks.
Launching and Retrieving a Boat
Backing the Trailer into the Water
{Warning
.Have all passengers get out of the
vehicle before backing onto the sloped
part of the ramp. Lower the driver and
passenger side windows before
backing onto the ramp. This will
provide a means of escape in the
unlikely event the vehicle slides into
the water.
.If the boat launch surface is slippery,
have the driver remain in the vehicle
with the brake pedal applied while the
boat is being launched. The boat
launch can be especially slippery at
low tide when part of the ramp was
previously submerged at high tide. Do
not back onto the ramp to launch the
boat if you are not sure the vehicle
can maintain traction.
.Do not move the vehicle if someone is
in the path of the trailer. Some parts
of the trailer might be underwater and
not visible to people who are assisting
in launching the boat.
Page 224 of 362
Chevrolet Colorado Owner Manual (GMNA-Localizing-U.S./Canada/Mexico-
15274222) - 2022 - CRC - 11/2/21
Driving and Operating 223
Disconnect the wiring to the trailer before
backing the trailer into the water to prevent
damage to the electrical circuits on the
trailer. Reconnect the wiring to the trailer
after removing the trailer from the water.
If the trailer has electric brakes that can
function when the trailer is submerged, it
might help to leave the electrical trailer
connector attached to maintain trailer brake
functionality while on the boat ramp.
To back the trailer into the water:1. If equipped, place the vehicle in four-wheel-drive high.
2. Slowly back down the boat ramp until the boat is floating, but no further than
necessary.
3. Press and hold the brake pedal, but do not shift into P (Park) yet.
4. Have someone place chocks under the front wheels of the vehicle.
5. Gradually release the brake pedal to allow the chocks to absorb the load of
the trailer.
6. Reapply the brake pedal. Then apply the parking brake and shift into P (Park).
7. Release the brake pedal. Pulling the Trailer from the Water
To pull the trailer of the water:
1. Press and hold the brake pedals.
2. Start the engine and shift into gear.
3. Release the parking brake.
4. Let up on the brake pedal.
5. Drive slowly until the tires are clear of the chocks.
6. Stop and have someone pick up and store the chocks.
7. Slowly pull the trailer from the water.
8. Once the vehicle and trailer have been driven from the sloped part of the boat
ramp, the vehicle can be shifted from
four-wheel-drive high. Shift into the drive
mode that is appropriate for the road
conditions.
Caution
If the vehicle tires begin to spin and the
vehicle begins to slide toward the water,
remove your foot from the accelerator
pedal and apply the brake pedal. Seek
help to have the vehicle towed up
the ramp.
Maintenance when Trailer Towing
The vehicle needs service more often when
used to tow trailers. See Maintenance
Schedule 0314. It is especially important to
check the automatic transmission fluid,
engine oil, axle lubricant, belts, cooling
system, and brake system before and during
each trip.
Check periodically to see that all nuts and
bolts on the trailer hitch are tight.
Engine Cooling When Trailer Towing
The cooling system may temporarily
overheat during severe operating conditions.
See Engine Overheating 0249.
Trailer Towing
If equipped with a diesel engine, see the
Duramax diesel supplement.
Caution
Towing a trailer improperly can damage
the vehicle and result in costly repairs
not covered by the vehicle warranty. To
tow a trailer correctly, follow the
directions in this section and see your
dealer for important information about
towing a trailer with the vehicle.
Page 237 of 362
Chevrolet Colorado Owner Manual (GMNA-Localizing-U.S./Canada/Mexico-
15274222) - 2022 - CRC - 11/2/21
236 Vehicle Care
Vehicle Care
General Information
General Information . . . . . . . . . . . . . . . . . . . 237
California Perchlorate MaterialsRequirements . . . . . . . . . . . . . . . . . . . . . . . . 237
Accessories and Modifications . . . . . . . . . 237
Vehicle Checks
Doing Your Own Service Work . . . . . . . . . 237
Hood . . . . . . . . . . . . . . . . . . . . . . . . . . . . . . . . . . 238
Engine Compartment Overview . . . . . . . . 239
Engine Oil . . . . . . . . . . . . . . . . . . . . . . . . . . . . . 242
Engine Oil Life System . . . . . . . . . . . . . . . . 244
Automatic Transmission Fluid . . . . . . . . . 245
Engine Air Cleaner/Filter . . . . . . . . . . . . . . . 245
Cooling System . . . . . . . . . . . . . . . . . . . . . . . 246
Engine Overheating . . . . . . . . . . . . . . . . . . . 249
Engine Fan . . . . . . . . . . . . . . . . . . . . . . . . . . . . 250
Washer Fluid . . . . . . . . . . . . . . . . . . . . . . . . . . 251
Brakes . . . . . . . . . . . . . . . . . . . . . . . . . . . . . . . . . 251
Brake Fluid . . . . . . . . . . . . . . . . . . . . . . . . . . . . 252
Battery - North America . . . . . . . . . . . . . . . 253
Four-Wheel Drive . . . . . . . . . . . . . . . . . . . . . . 254
Front Axle . . . . . . . . . . . . . . . . . . . . . . . . . . . . . 254
Rear Axle . . . . . . . . . . . . . . . . . . . . . . . . . . . . . . 254
Starter Switch Check . . . . . . . . . . . . . . . . . . . 255
Automatic Transmission Shift Lock Control Function Check . . . . . . . . . . . . . . 255
Ignition Transmission Lock Check . . . . . . 255 Park Brake and P (Park) Mechanism
Check . . . . . . . . . . . . . . . . . . . . . . . . . . . . . . . . 255
Wiper Blade Replacement . . . . . . . . . . . . . 256
Windshield Replacement . . . . . . . . . . . . . . 256
Gas Strut(s) . . . . . . . . . . . . . . . . . . . . . . . . . . . 256
Headlamp Aiming
Front Headlamp Aiming . . . . . . . . . . . . . . . 257
Bulb Replacement
Bulb Replacement . . . . . . . . . . . . . . . . . . . . . 257
Halogen Bulbs . . . . . . . . . . . . . . . . . . . . . . . . . 258
Headlamps, Front Turn Signal, Sidemarker, and Parking Lamps . . . . . . 258
Taillamps, Turn Signal, Stoplamps, and Back-Up Lamps . . . . . . . . . . . . . . . . . . . . . . 258
Center High-Mounted Stoplamp (CHMSL) and Cargo Lamp . . . . . . . . . . . 260
Electrical System
Electrical System Overload . . . . . . . . . . . . 260
Fuses and Circuit Breakers . . . . . . . . . . . . . 262
Engine Compartment Fuse Block . . . . . . 262
Instrument Panel Fuse Block . . . . . . . . . . 267
Wheels and Tires
Tires . . . . . . . . . . . . . . . . . . . . . . . . . . . . . . . . . . 269
All-Season Tires . . . . . . . . . . . . . . . . . . . . . . . 270
Winter Tires . . . . . . . . . . . . . . . . . . . . . . . . . . . 270
All-Terrain Tires . . . . . . . . . . . . . . . . . . . . . . . . 271
Tire Sidewall Labeling . . . . . . . . . . . . . . . . . . 271
Tire Designations . . . . . . . . . . . . . . . . . . . . . . 273 Tire Terminology and Definitions . . . . . . 273
Tire Pressure . . . . . . . . . . . . . . . . . . . . . . . . . . 275
Tire Pressure Monitor System . . . . . . . . . 276
Tire Pressure Monitor Operation . . . . . . . 277
Tire Inspection . . . . . . . . . . . . . . . . . . . . . . . . 280
Tire Rotation . . . . . . . . . . . . . . . . . . . . . . . . . . 280
When It Is Time for New Tires . . . . . . . . . 281
Buying New Tires . . . . . . . . . . . . . . . . . . . . . 282
Different Size Tires and Wheels . . . . . . . 283
Uniform Tire Quality Grading . . . . . . . . . 283
Wheel Alignment and Tire Balance . . . . 284
Wheel Replacement . . . . . . . . . . . . . . . . . . . 284
Tire Chains . . . . . . . . . . . . . . . . . . . . . . . . . . . . 285
If a Tire Goes Flat . . . . . . . . . . . . . . . . . . . . . 286
Tire Changing . . . . . . . . . . . . . . . . . . . . . . . . . 287
Compact Spare Tire . . . . . . . . . . . . . . . . . . . 296
Full-Size Spare Tire . . . . . . . . . . . . . . . . . . . . 297
Jump Starting
Jump Starting - North America . . . . . . . . 297
Towing the Vehicle
Towing the Vehicle . . . . . . . . . . . . . . . . . . . 300
Recreational Vehicle Towing . . . . . . . . . . . 301
Appearance Care
Exterior Care . . . . . . . . . . . . . . . . . . . . . . . . . . 304
Interior Care . . . . . . . . . . . . . . . . . . . . . . . . . . 308
Floor Mats . . . . . . . . . . . . . . . . . . . . . . . . . . . . . 311
Page 250 of 362
Chevrolet Colorado Owner Manual (GMNA-Localizing-U.S./Canada/Mexico-
15274222) - 2022 - CRC - 11/2/21
Vehicle Care 249
{Warning
Steam and scalding liquids from a hot
cooling system are under pressure.
Turning the pressure cap, even a little,
can cause them to come out at high
speed and you could be burned. Never
turn the cap when the cooling system,
including the pressure cap, is hot. Wait
for the cooling system and pressure cap
to cool.
Caution
Failure to follow the specific coolant fill
procedure could cause the engine to
overheat and could cause system
damage. If coolant is not visible in the
surge tank, contact your dealer.
The coolant surge tank pressure cap can be
removed when the cooling system, including
the surge tank pressure cap and upper
radiator hose, is no longer hot.
1. Turn the pressure cap slowly counterclockwise. If a hiss is heard, wait
for that to stop. A hiss means there is
still some pressure left.
2. Keep turning the cap and remove it.
3. Fill the coolant surge tank with the proper mixture to the mark pointed to
on the front of the coolant surge tank. 4. With the coolant surge tank cap off,
start the engine and let it run until the
upper radiator hose starts getting hot.
Watch out for the engine cooling fan. By
this time, the coolant level inside the
coolant surge tank may be lower. If the
level is lower, add more of the proper
mixture to the coolant surge tank until
the level reaches the mark pointed to on
the front of the coolant surge tank.
5. Replace the cap tightly.
6. Verify coolant level after the engine is shut off and the coolant is cold.
If necessary, repeat coolant fill procedure
Steps 1–6.
Caution
If the pressure cap is not tightly installed,
coolant loss and engine damage may
occur. Be sure the cap is properly and
tightly secured.
Engine Overheating
The vehicle has an engine coolant
temperature gauge on the instrument
cluster to warn of engine overheating. See
Engine Coolant Temperature Gauge 085.
Page 254 of 362
Chevrolet Colorado Owner Manual (GMNA-Localizing-U.S./Canada/Mexico-
15274222) - 2022 - CRC - 11/2/21
Vehicle Care 253
{Warning
If too much brake fluid is added, it can
spill on the engine and burn, if the
engine is hot enough. You or others could
be burned, and the vehicle could be
damaged. Add brake fluid only when
work is done on the brake hydraulic
system.
When the brake fluid falls to a low level,
the brake warning light comes on. See Brake
System Warning Light 088.
Brake fluid absorbs water over time which
degrades the effectiveness of the brake fluid.
Replace brake fluid at the specified intervals
to prevent increased stopping distance. See
Maintenance Schedule 0314.
What to Add
Use only GM approved DOT 4 brake fluid
from a clean, sealed container. See
Recommended Fluids and Lubricants 0323.
{Warning
The wrong or contaminated brake fluid
could result in damage to the brake
system. This could result in the loss of
(Continued)
Warning (Continued)
braking leading to a possible injury.
Always use the proper GM approved
brake fluid.
Caution
If brake fluid is spilled on the vehicle's
painted surfaces, the paint finish can be
damaged. Immediately wash off any
painted surface.
Battery - North America
For diesel engine vehicles, see“Battery”in
the Duramax diesel supplement.
The original equipment battery is
maintenance free. Do not remove the cap
and do not add fluid.
Refer to the replacement number shown on
the original battery label when a new
battery is needed. See Engine Compartment
Overview 0239 for battery location.
{Warning
WARNING: Battery posts, terminals and
related accessories can expose you to
chemicals including lead and lead
compounds, which are known to the
State of California to cause cancer and
birth defects or other reproductive harm.
Wash hands after handling. For more
information go to
www.P65Warnings.ca.gov.
See the warning on the back cover.
Vehicle Storage
{Warning
Batteries have acid that can burn you and
gas that can explode. You can be badly
hurt if you are not careful. See Jump
Starting - North America 0297 for tips on
working around a battery without
getting hurt.
Infrequent Usage: Remove the black,
negative (−) cable from the battery to keep
the battery from running down.
Page 262 of 362
Chevrolet Colorado Owner Manual (GMNA-Localizing-U.S./Canada/Mexico-
15274222) - 2022 - CRC - 11/2/21
Vehicle Care 261
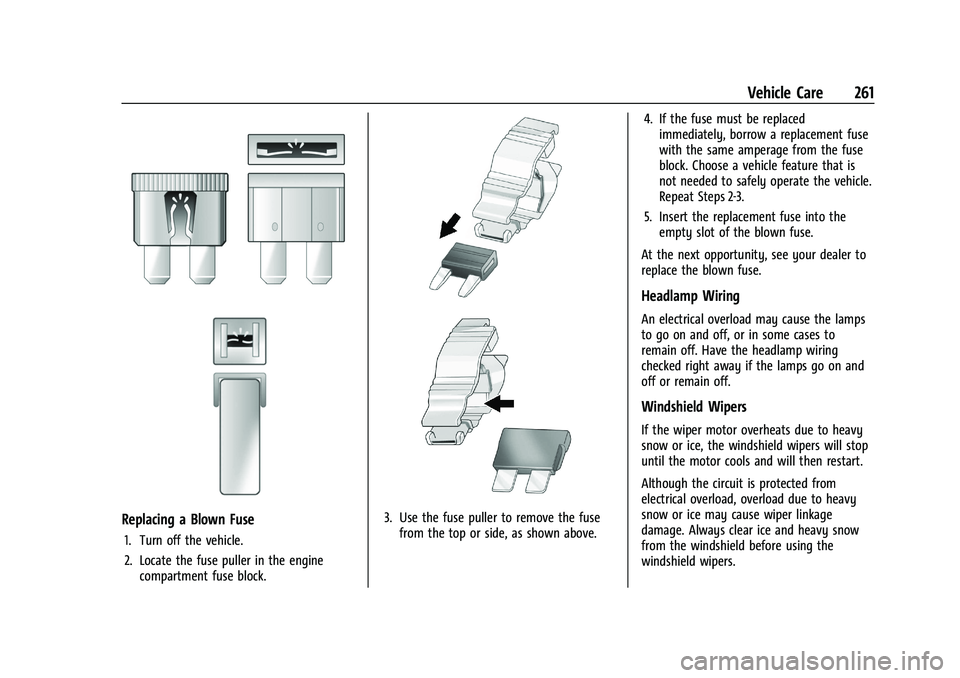
Replacing a Blown Fuse
1. Turn off the vehicle.
2. Locate the fuse puller in the enginecompartment fuse block.
3. Use the fuse puller to remove the fusefrom the top or side, as shown above. 4. If the fuse must be replaced
immediately, borrow a replacement fuse
with the same amperage from the fuse
block. Choose a vehicle feature that is
not needed to safely operate the vehicle.
Repeat Steps 2-3.
5. Insert the replacement fuse into the empty slot of the blown fuse.
At the next opportunity, see your dealer to
replace the blown fuse.
Headlamp Wiring
An electrical overload may cause the lamps
to go on and off, or in some cases to
remain off. Have the headlamp wiring
checked right away if the lamps go on and
off or remain off.
Windshield Wipers
If the wiper motor overheats due to heavy
snow or ice, the windshield wipers will stop
until the motor cools and will then restart.
Although the circuit is protected from
electrical overload, overload due to heavy
snow or ice may cause wiper linkage
damage. Always clear ice and heavy snow
from the windshield before using the
windshield wipers.
Page 267 of 362
Chevrolet Colorado Owner Manual (GMNA-Localizing-U.S./Canada/Mexico-
15274222) - 2022 - CRC - 11/2/21
266 Vehicle Care
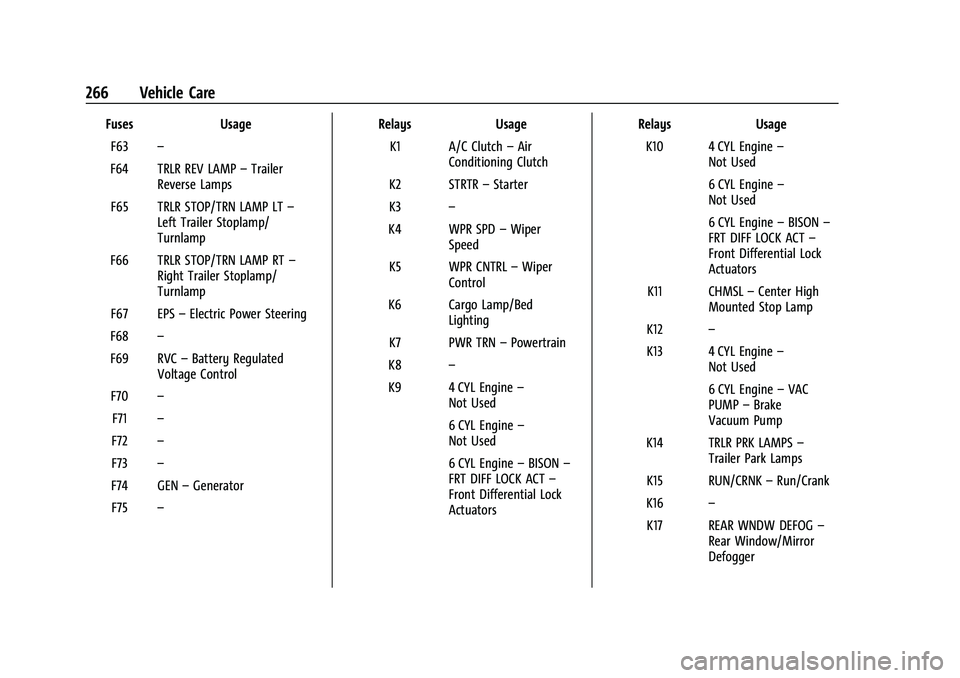
FusesUsage
F63 –
F64 TRLR REV LAMP –Trailer
Reverse Lamps
F65 TRLR STOP/TRN LAMP LT –
Left Trailer Stoplamp/
Turnlamp
F66 TRLR STOP/TRN LAMP RT –
Right Trailer Stoplamp/
Turnlamp
F67 EPS –Electric Power Steering
F68 –
F69 RVC –Battery Regulated
Voltage Control
F70 –
F71 –
F72 –
F73 –
F74 GEN –Generator
F75 – Relays
Usage
K1 A/C Clutch –Air
Conditioning Clutch
K2 STRTR –Starter
K3 –
K4 WPR SPD –Wiper
Speed
K5 WPR CNTRL –Wiper
Control
K6 Cargo Lamp/Bed Lighting
K7 PWR TRN –Powertrain
K8 –
K9 4 CYL Engine –
Not Used
6 CYL Engine –
Not Used
6 CYL Engine –BISON –
FRT DIFF LOCK ACT –
Front Differential Lock
Actuators Relays
Usage
K10 4 CYL Engine –
Not Used
6 CYL Engine –
Not Used
6 CYL Engine –BISON –
FRT DIFF LOCK ACT –
Front Differential Lock
Actuators
K11 CHMSL –Center High
Mounted Stop Lamp
K12 –
K13 4 CYL Engine –
Not Used
6 CYL Engine –VAC
PUMP –Brake
Vacuum Pump
K14 TRLR PRK LAMPS –
Trailer Park Lamps
K15 RUN/CRNK –Run/Crank
K16 –
K17 REAR WNDW DEFOG –
Rear Window/Mirror
Defogger
Page 287 of 362
Chevrolet Colorado Owner Manual (GMNA-Localizing-U.S./Canada/Mexico-
15274222) - 2022 - CRC - 11/2/21
286 Vehicle Care
If a Tire Goes Flat
It is unusual for a tire to blow out while
driving, especially if the tires are maintained
properly. If air goes out of a tire, it is much
more likely to leak out slowly. But if there
ever is a blowout, here are a few tips about
what to expect and what to do:
If a front tire fails, the flat tire creates a
drag that pulls the vehicle toward that side.
Take your foot off the accelerator pedal and
grip the steering wheel firmly. Steer to
maintain lane position, and then gently
brake to a stop, well off the road,
if possible.
A rear blowout, particularly on a curve, acts
much like a skid and may require the same
correction as used in a skid. Stop pressing
the accelerator pedal and steer to straighten
the vehicle. It may be very bumpy and
noisy. Gently brake to a stop, well off the
road, if possible.
{Warning
Driving on a flat tire will cause
permanent damage to the tire.
Re-inflating a tire after it has been driven
on while severely underinflated or flat(Continued)
Warning (Continued)
may cause a blowout and a serious crash.
Never attempt to re-inflate a tire that has
been driven on while severely
underinflated or flat. Have your dealer or
an authorized tire service center repair or
replace the flat tire as soon as possible.
{Warning
Lifting a vehicle and getting under it to
do maintenance or repairs is dangerous
without the appropriate safety equipment
and training. If a jack is provided with
the vehicle, it is designed only for
changing a flat tire. If it is used for
anything else, you or others could be
badly injured or killed if the vehicle slips
off the jack. If a jack is provided with the
vehicle, only use it for changing a
flat tire.
If a tire goes flat, avoid further tire and
wheel damage by driving slowly to a level
place, well off the road, if possible. Turn on
the hazard warning flashers. See Hazard
Warning Flashers 0104.
{Warning
Changing a tire can be dangerous. The
vehicle can slip off the jack and roll over
or fall causing injury or death. Find a
level place to change the tire. To help
prevent the vehicle from moving:
1. Set the parking brake firmly.
2. Put the shift lever in P (Park).
3. For vehicles with four-wheel drive with an N (Neutral) transfer case
position, be sure the transfer case is
in a drive gear —not in N (Neutral).
4. Turn off the engine and do not restart while the vehicle is raised.
5. Do not allow passengers to remain in the vehicle.
6. Place wheel blocks, if equipped, on both sides of the tire at the opposite
corner of the tire being changed.
When the vehicle has a flat tire (2), use the
following example as a guide to assist in the
placement of the wheel blocks (1),
if equipped.
Page 359 of 362
Chevrolet Colorado Owner Manual (GMNA-Localizing-U.S./Canada/Mexico-
15274222) - 2022 - CRC - 11/2/21
358 Index
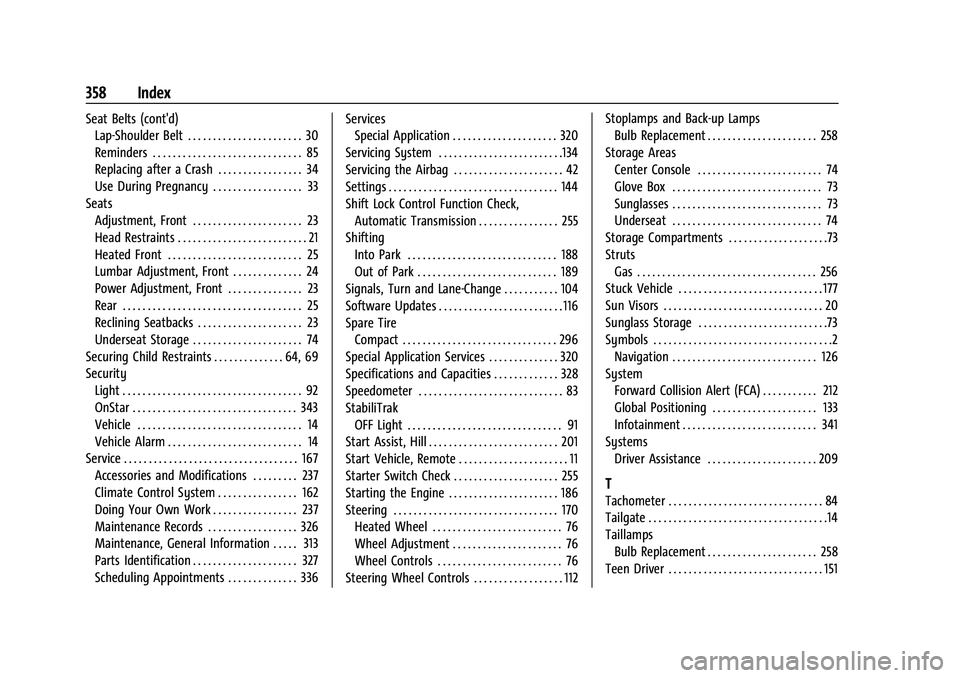
Seat Belts (cont'd)Lap-Shoulder Belt . . . . . . . . . . . . . . . . . . . . . . . 30
Reminders . . . . . . . . . . . . . . . . . . . . . . . . . . . . . . 85
Replacing after a Crash . . . . . . . . . . . . . . . . . 34
Use During Pregnancy . . . . . . . . . . . . . . . . . . 33
Seats Adjustment, Front . . . . . . . . . . . . . . . . . . . . . . 23
Head Restraints . . . . . . . . . . . . . . . . . . . . . . . . . . 21
Heated Front . . . . . . . . . . . . . . . . . . . . . . . . . . . 25
Lumbar Adjustment, Front . . . . . . . . . . . . . . 24
Power Adjustment, Front . . . . . . . . . . . . . . . 23
Rear . . . . . . . . . . . . . . . . . . . . . . . . . . . . . . . . . . . . 25
Reclining Seatbacks . . . . . . . . . . . . . . . . . . . . . 23
Underseat Storage . . . . . . . . . . . . . . . . . . . . . . 74
Securing Child Restraints . . . . . . . . . . . . . . 64, 69
Security Light . . . . . . . . . . . . . . . . . . . . . . . . . . . . . . . . . . . . 92
OnStar . . . . . . . . . . . . . . . . . . . . . . . . . . . . . . . . . 343
Vehicle . . . . . . . . . . . . . . . . . . . . . . . . . . . . . . . . . 14
Vehicle Alarm . . . . . . . . . . . . . . . . . . . . . . . . . . . 14
Service . . . . . . . . . . . . . . . . . . . . . . . . . . . . . . . . . . . 167
Accessories and Modifications . . . . . . . . . 237
Climate Control System . . . . . . . . . . . . . . . . 162
Doing Your Own Work . . . . . . . . . . . . . . . . . 237
Maintenance Records . . . . . . . . . . . . . . . . . . 326
Maintenance, General Information . . . . . 313
Parts Identification . . . . . . . . . . . . . . . . . . . . . 327
Scheduling Appointments . . . . . . . . . . . . . . 336 Services
Special Application . . . . . . . . . . . . . . . . . . . . . 320
Servicing System . . . . . . . . . . . . . . . . . . . . . . . . .134
Servicing the Airbag . . . . . . . . . . . . . . . . . . . . . . 42
Settings . . . . . . . . . . . . . . . . . . . . . . . . . . . . . . . . . . 144
Shift Lock Control Function Check, Automatic Transmission . . . . . . . . . . . . . . . . 255
Shifting Into Park . . . . . . . . . . . . . . . . . . . . . . . . . . . . . . 188
Out of Park . . . . . . . . . . . . . . . . . . . . . . . . . . . . 189
Signals, Turn and Lane-Change . . . . . . . . . . . 104
Software Updates . . . . . . . . . . . . . . . . . . . . . . . . . 116
Spare Tire
Compact . . . . . . . . . . . . . . . . . . . . . . . . . . . . . . . 296
Special Application Services . . . . . . . . . . . . . . 320
Specifications and Capacities . . . . . . . . . . . . . 328
Speedometer . . . . . . . . . . . . . . . . . . . . . . . . . . . . . 83
StabiliTrak OFF Light . . . . . . . . . . . . . . . . . . . . . . . . . . . . . . . 91
Start Assist, Hill . . . . . . . . . . . . . . . . . . . . . . . . . . 201
Start Vehicle, Remote . . . . . . . . . . . . . . . . . . . . . . 11
Starter Switch Check . . . . . . . . . . . . . . . . . . . . . 255
Starting the Engine . . . . . . . . . . . . . . . . . . . . . . 186
Steering . . . . . . . . . . . . . . . . . . . . . . . . . . . . . . . . . 170 Heated Wheel . . . . . . . . . . . . . . . . . . . . . . . . . . 76
Wheel Adjustment . . . . . . . . . . . . . . . . . . . . . . 76
Wheel Controls . . . . . . . . . . . . . . . . . . . . . . . . . 76
Steering Wheel Controls . . . . . . . . . . . . . . . . . . 112 Stoplamps and Back-up Lamps
Bulb Replacement . . . . . . . . . . . . . . . . . . . . . . 258
Storage Areas Center Console . . . . . . . . . . . . . . . . . . . . . . . . . 74
Glove Box . . . . . . . . . . . . . . . . . . . . . . . . . . . . . . 73
Sunglasses . . . . . . . . . . . . . . . . . . . . . . . . . . . . . . 73
Underseat . . . . . . . . . . . . . . . . . . . . . . . . . . . . . . 74
Storage Compartments . . . . . . . . . . . . . . . . . . . .73
Struts Gas . . . . . . . . . . . . . . . . . . . . . . . . . . . . . . . . . . . . 256
Stuck Vehicle . . . . . . . . . . . . . . . . . . . . . . . . . . . . . 177
Sun Visors . . . . . . . . . . . . . . . . . . . . . . . . . . . . . . . . 20
Sunglass Storage . . . . . . . . . . . . . . . . . . . . . . . . . .73
Symbols . . . . . . . . . . . . . . . . . . . . . . . . . . . . . . . . . . . .2
Navigation . . . . . . . . . . . . . . . . . . . . . . . . . . . . . 126
System
Forward Collision Alert (FCA) . . . . . . . . . . . 212
Global Positioning . . . . . . . . . . . . . . . . . . . . . 133
Infotainment . . . . . . . . . . . . . . . . . . . . . . . . . . . 341
Systems Driver Assistance . . . . . . . . . . . . . . . . . . . . . . 209
T
Tachometer . . . . . . . . . . . . . . . . . . . . . . . . . . . . . . . 84
Tailgate . . . . . . . . . . . . . . . . . . . . . . . . . . . . . . . . . . . .14
Taillamps
Bulb Replacement . . . . . . . . . . . . . . . . . . . . . . 258
Teen Driver . . . . . . . . . . . . . . . . . . . . . . . . . . . . . . . 151