horn CHEVROLET COLORADO 2023 Owners Manual
[x] Cancel search | Manufacturer: CHEVROLET, Model Year: 2023, Model line: COLORADO, Model: CHEVROLET COLORADO 2023Pages: 362, PDF Size: 13.62 MB
Page 6 of 362
Chevrolet Colorado Owner Manual (GMNA-Localizing-U.S./Canada/Mexico-
15274222) - 2022 - CRC - 11/2/21
Introduction 5
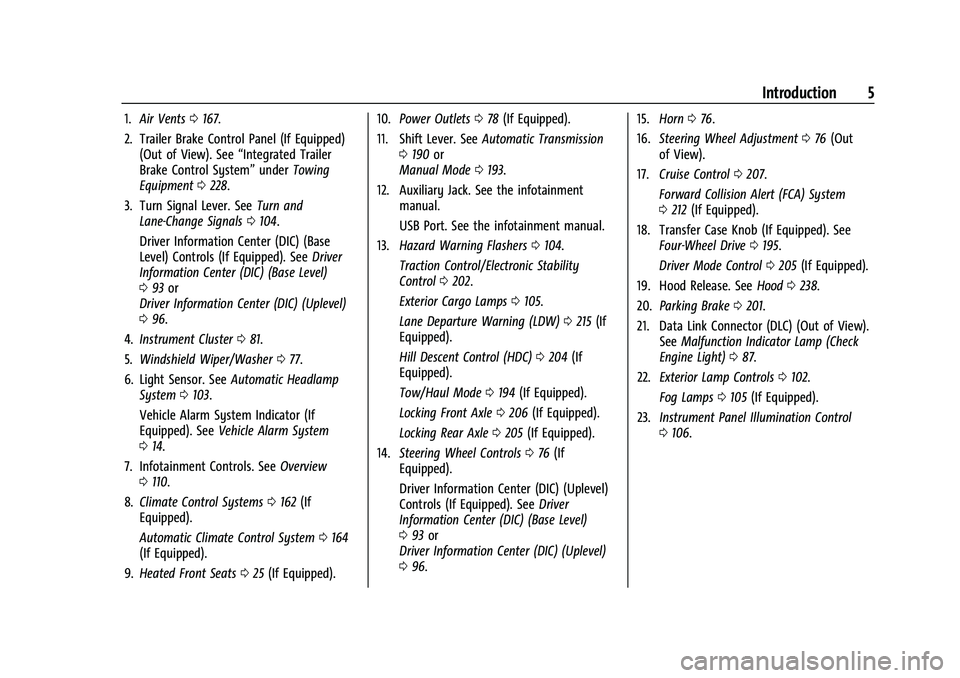
1.Air Vents 0167.
2. Trailer Brake Control Panel (If Equipped) (Out of View). See “Integrated Trailer
Brake Control System” underTowing
Equipment 0228.
3. Turn Signal Lever. See Turn and
Lane-Change Signals 0104.
Driver Information Center (DIC) (Base
Level) Controls (If Equipped). See Driver
Information Center (DIC) (Base Level)
0 93 or
Driver Information Center (DIC) (Uplevel)
0 96.
4. Instrument Cluster 081.
5. Windshield Wiper/Washer 077.
6. Light Sensor. See Automatic Headlamp
System 0103.
Vehicle Alarm System Indicator (If
Equipped). See Vehicle Alarm System
0 14.
7. Infotainment Controls. See Overview
0 110.
8. Climate Control Systems 0162 (If
Equipped).
Automatic Climate Control System 0164
(If Equipped).
9. Heated Front Seats 025 (If Equipped). 10.
Power Outlets 078 (If Equipped).
11. Shift Lever. See Automatic Transmission
0 190 or
Manual Mode 0193.
12. Auxiliary Jack. See the infotainment manual.
USB Port. See the infotainment manual.
13. Hazard Warning Flashers 0104.
Traction Control/Electronic Stability
Control 0202.
Exterior Cargo Lamps 0105.
Lane Departure Warning (LDW) 0215 (If
Equipped).
Hill Descent Control (HDC) 0204 (If
Equipped).
Tow/Haul Mode 0194 (If Equipped).
Locking Front Axle 0206 (If Equipped).
Locking Rear Axle 0205 (If Equipped).
14. Steering Wheel Controls 076 (If
Equipped).
Driver Information Center (DIC) (Uplevel)
Controls (If Equipped). See Driver
Information Center (DIC) (Base Level)
0 93 or
Driver Information Center (DIC) (Uplevel)
0 96. 15.
Horn 076.
16. Steering Wheel Adjustment 076 (Out
of View).
17. Cruise Control 0207.
Forward Collision Alert (FCA) System
0 212 (If Equipped).
18. Transfer Case Knob (If Equipped). See Four-Wheel Drive 0195.
Driver Mode Control 0205 (If Equipped).
19. Hood Release. See Hood0238.
20. Parking Brake 0201.
21. Data Link Connector (DLC) (Out of View). SeeMalfunction Indicator Lamp (Check
Engine Light) 087.
22. Exterior Lamp Controls 0102.
Fog Lamps 0105 (If Equipped).
23. Instrument Panel Illumination Control
0106.
Page 10 of 362
Chevrolet Colorado Owner Manual (GMNA-Localizing-U.S./Canada/Mexico-
15274222) - 2022 - CRC - 11/2/21
Keys, Doors, and Windows 9
Remote Keyless Entry (RKE)
System Operation
The Keyless Access system allows for vehicle
entry when the Remote Keyless Entry (RKE)
transmitter is within 1 m (3 ft).
The RKE transmitter functions may work up
to 60 m (197 ft) away from the vehicle.
Other conditions can affect the performance
of the transmitter. SeeRemote Keyless Entry
(RKE) System 08.
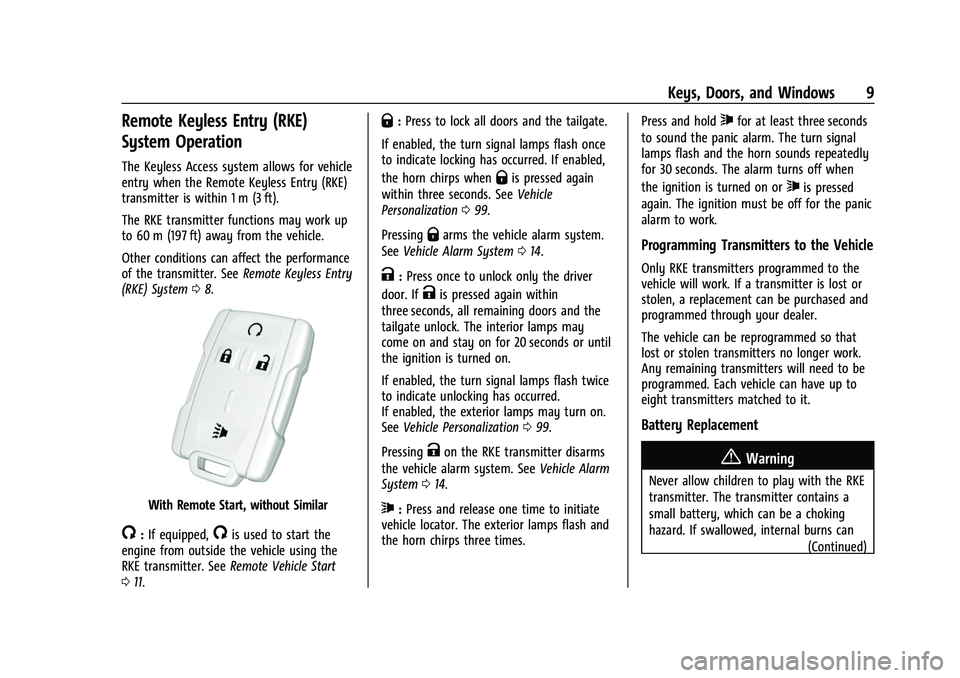
With Remote Start, without Similar
/:If equipped,/is used to start the
engine from outside the vehicle using the
RKE transmitter. See Remote Vehicle Start
0 11.
Q:Press to lock all doors and the tailgate.
If enabled, the turn signal lamps flash once
to indicate locking has occurred. If enabled,
the horn chirps when
Qis pressed again
within three seconds. See Vehicle
Personalization 099.
Pressing
Qarms the vehicle alarm system.
See Vehicle Alarm System 014.
K:Press once to unlock only the driver
door. If
Kis pressed again within
three seconds, all remaining doors and the
tailgate unlock. The interior lamps may
come on and stay on for 20 seconds or until
the ignition is turned on.
If enabled, the turn signal lamps flash twice
to indicate unlocking has occurred.
If enabled, the exterior lamps may turn on.
See Vehicle Personalization 099.
Pressing
Kon the RKE transmitter disarms
the vehicle alarm system. See Vehicle Alarm
System 014.
7:Press and release one time to initiate
vehicle locator. The exterior lamps flash and
the horn chirps three times. Press and hold
7for at least three seconds
to sound the panic alarm. The turn signal
lamps flash and the horn sounds repeatedly
for 30 seconds. The alarm turns off when
the ignition is turned on or
7is pressed
again. The ignition must be off for the panic
alarm to work.
Programming Transmitters to the Vehicle
Only RKE transmitters programmed to the
vehicle will work. If a transmitter is lost or
stolen, a replacement can be purchased and
programmed through your dealer.
The vehicle can be reprogrammed so that
lost or stolen transmitters no longer work.
Any remaining transmitters will need to be
programmed. Each vehicle can have up to
eight transmitters matched to it.
Battery Replacement
{Warning
Never allow children to play with the RKE
transmitter. The transmitter contains a
small battery, which can be a choking
hazard. If swallowed, internal burns can (Continued)
Page 16 of 362
Chevrolet Colorado Owner Manual (GMNA-Localizing-U.S./Canada/Mexico-
15274222) - 2022 - CRC - 11/2/21
Keys, Doors, and Windows 15
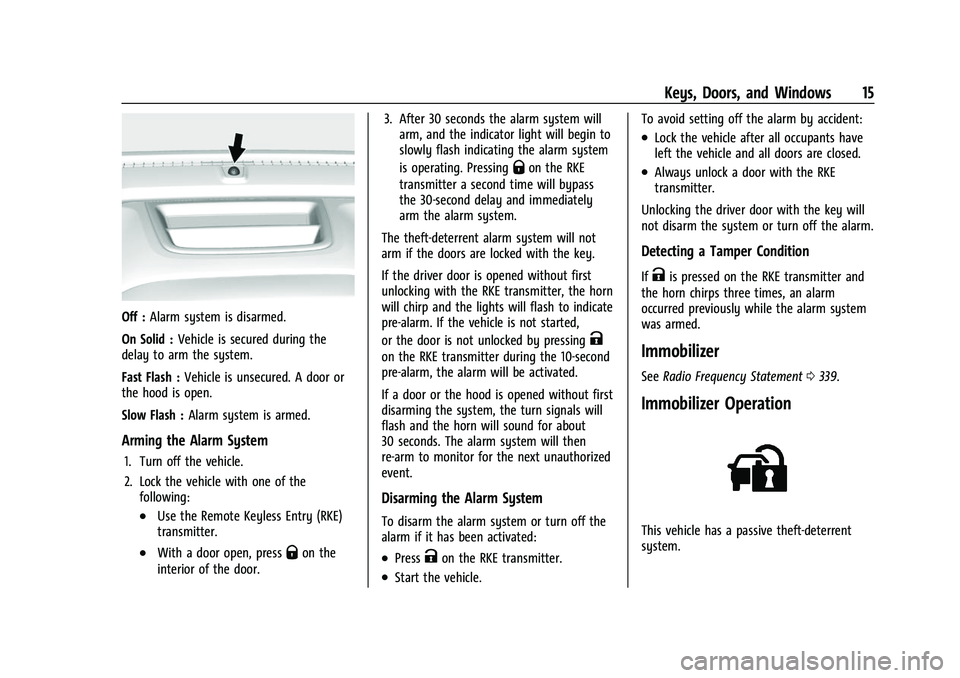
Off :Alarm system is disarmed.
On Solid : Vehicle is secured during the
delay to arm the system.
Fast Flash : Vehicle is unsecured. A door or
the hood is open.
Slow Flash : Alarm system is armed.
Arming the Alarm System
1. Turn off the vehicle.
2. Lock the vehicle with one of the
following:
.Use the Remote Keyless Entry (RKE)
transmitter.
.With a door open, pressQon the
interior of the door. 3. After 30 seconds the alarm system will
arm, and the indicator light will begin to
slowly flash indicating the alarm system
is operating. Pressing
Qon the RKE
transmitter a second time will bypass
the 30-second delay and immediately
arm the alarm system.
The theft-deterrent alarm system will not
arm if the doors are locked with the key.
If the driver door is opened without first
unlocking with the RKE transmitter, the horn
will chirp and the lights will flash to indicate
pre-alarm. If the vehicle is not started,
or the door is not unlocked by pressing
K
on the RKE transmitter during the 10-second
pre-alarm, the alarm will be activated.
If a door or the hood is opened without first
disarming the system, the turn signals will
flash and the horn will sound for about
30 seconds. The alarm system will then
re-arm to monitor for the next unauthorized
event.
Disarming the Alarm System
To disarm the alarm system or turn off the
alarm if it has been activated:
.PressKon the RKE transmitter.
.Start the vehicle. To avoid setting off the alarm by accident:
.Lock the vehicle after all occupants have
left the vehicle and all doors are closed.
.Always unlock a door with the RKE
transmitter.
Unlocking the driver door with the key will
not disarm the system or turn off the alarm.
Detecting a Tamper Condition
IfKis pressed on the RKE transmitter and
the horn chirps three times, an alarm
occurred previously while the alarm system
was armed.
Immobilizer
See Radio Frequency Statement 0339.
Immobilizer Operation
This vehicle has a passive theft-deterrent
system.
Page 76 of 362
Chevrolet Colorado Owner Manual (GMNA-Localizing-U.S./Canada/Mexico-
15274222) - 2022 - CRC - 11/2/21
Instruments and Controls 75
Instruments and Controls
Controls
Steering Wheel Adjustment . . . . . . . . . . . . 76
Steering Wheel Controls . . . . . . . . . . . . . . . . 76
Heated Steering Wheel . . . . . . . . . . . . . . . . . 76
Horn . . . . . . . . . . . . . . . . . . . . . . . . . . . . . . . . . . . 76
Windshield Wiper/Washer . . . . . . . . . . . . . . 77
Compass . . . . . . . . . . . . . . . . . . . . . . . . . . . . . . . . 78
Clock . . . . . . . . . . . . . . . . . . . . . . . . . . . . . . . . . . . 78
Power Outlets . . . . . . . . . . . . . . . . . . . . . . . . . . 78
Wireless Charging . . . . . . . . . . . . . . . . . . . . . . 79
Warning Lights, Gauges, and Indicators
Warning Lights, Gauges, andIndicators . . . . . . . . . . . . . . . . . . . . . . . . . . . . . 81
Instrument Cluster . . . . . . . . . . . . . . . . . . . . . . 81
Speedometer . . . . . . . . . . . . . . . . . . . . . . . . . . . 83
Odometer . . . . . . . . . . . . . . . . . . . . . . . . . . . . . . 83
Trip Odometer . . . . . . . . . . . . . . . . . . . . . . . . . 84
Tachometer . . . . . . . . . . . . . . . . . . . . . . . . . . . . 84
Fuel Gauge . . . . . . . . . . . . . . . . . . . . . . . . . . . . . 84
Engine Coolant Temperature Gauge . . . . 85
Seat Belt Reminders . . . . . . . . . . . . . . . . . . . . 85
Airbag Readiness Light . . . . . . . . . . . . . . . . . 86
Passenger Airbag Status Indicator . . . . . . 86
Charging System Light . . . . . . . . . . . . . . . . . 87
Malfunction Indicator Lamp (Check Engine Light) . . . . . . . . . . . . . . . . . . . . . . . . . 87 Brake System Warning Light . . . . . . . . . . . 88
Antilock Brake System (ABS) Warning
Light . . . . . . . . . . . . . . . . . . . . . . . . . . . . . . . . . 89
Four-Wheel-Drive Light . . . . . . . . . . . . . . . . . 89
Tow/Haul Mode Light . . . . . . . . . . . . . . . . . . 90
Hill Descent Control Light . . . . . . . . . . . . . . 90
Lane Departure Warning (LDW) Light . . . . . . . . . . . . . . . . . . . . . . . . . . . . . . . . . 90
Vehicle Ahead Indicator . . . . . . . . . . . . . . . . 90
Traction Off Light . . . . . . . . . . . . . . . . . . . . . . 90
StabiliTrak OFF Light . . . . . . . . . . . . . . . . . . . . 91
Traction Control System (TCS)/StabiliTrak Light . . . . . . . . . . . . . . . . . . . . . . . . . . . . . . . . . . 91
Tire Pressure Light . . . . . . . . . . . . . . . . . . . . . . 91
Engine Oil Pressure Light . . . . . . . . . . . . . . . 92
Low Fuel Warning Light . . . . . . . . . . . . . . . . 92
Security Light . . . . . . . . . . . . . . . . . . . . . . . . . . 92
High-Beam On Light . . . . . . . . . . . . . . . . . . . . 93
Front Fog Lamp Light . . . . . . . . . . . . . . . . . . . 93
Lamps On Reminder . . . . . . . . . . . . . . . . . . . . 93
Cruise Control Light . . . . . . . . . . . . . . . . . . . . 93
Door Ajar Light (Uplevel Cluster) . . . . . . . 93
Information Displays
Driver Information Center (DIC) (Base Level) . . . . . . . . . . . . . . . . . . . . . . . . . . . . . . . . . 93
Driver Information Center (DIC) (Uplevel) . . . . . . . . . . . . . . . . . . . . . . . . . . . . . 96
Vehicle Messages
Vehicle Messages . . . . . . . . . . . . . . . . . . . . . . 98
Engine Power Messages . . . . . . . . . . . . . . . . 98
Vehicle Speed Messages . . . . . . . . . . . . . . . 99
Vehicle Personalization
Vehicle Personalization . . . . . . . . . . . . . . . . . 99
Page 77 of 362
Chevrolet Colorado Owner Manual (GMNA-Localizing-U.S./Canada/Mexico-
15274222) - 2022 - CRC - 11/2/21
76 Instruments and Controls
Controls
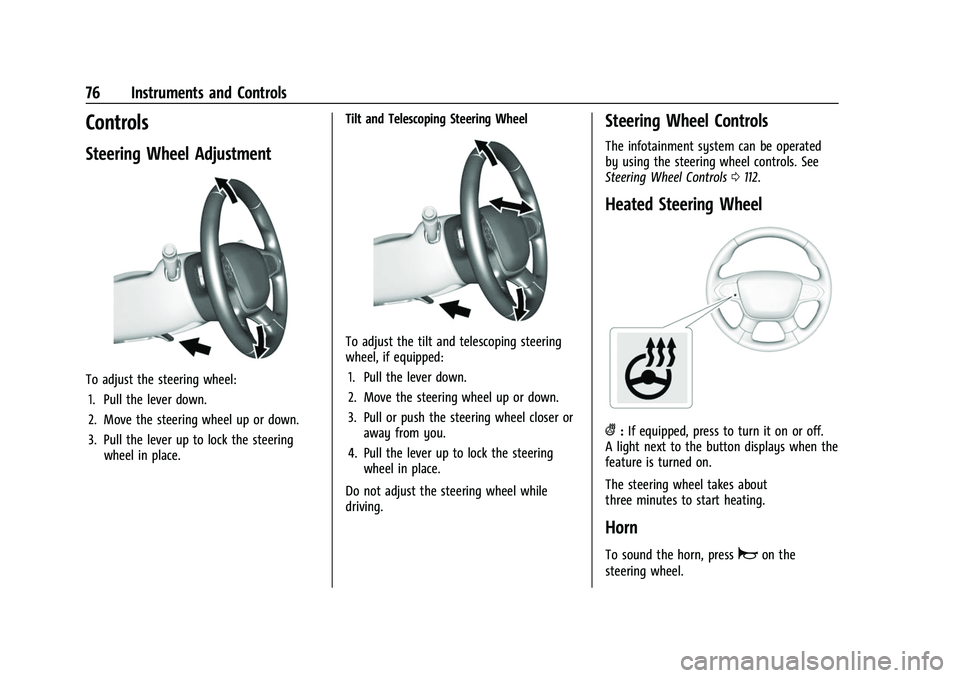
Steering Wheel Adjustment
To adjust the steering wheel:1. Pull the lever down.
2. Move the steering wheel up or down.
3. Pull the lever up to lock the steering wheel in place. Tilt and Telescoping Steering Wheel
To adjust the tilt and telescoping steering
wheel, if equipped:
1. Pull the lever down.
2. Move the steering wheel up or down.
3. Pull or push the steering wheel closer or away from you.
4. Pull the lever up to lock the steering wheel in place.
Do not adjust the steering wheel while
driving.
Steering Wheel Controls
The infotainment system can be operated
by using the steering wheel controls. See
Steering Wheel Controls 0112.
Heated Steering Wheel
(:If equipped, press to turn it on or off.
A light next to the button displays when the
feature is turned on.
The steering wheel takes about
three minutes to start heating.
Horn
To sound the horn, pressaon the
steering wheel.
Page 102 of 362
Chevrolet Colorado Owner Manual (GMNA-Localizing-U.S./Canada/Mexico-
15274222) - 2022 - CRC - 11/2/21
Instruments and Controls 101
Remote Lock Feedback
This allows selection of what type of
feedback is given when locking the vehicle
with the RKE transmitter.
Touch Off, Lights and Horn, Lights Only,
or Horn Only.
Remote Door Unlock
This allows selection of which doors will
unlock when pressing
Kon the RKE
transmitter.
Touch All Doors or Driver Door.
Remote Start Auto Heat Seats
If equipped and turned on, this feature will
turn on the heated seats when using remote
start on cold days. See Heated Front Seats
0 25 and
Remote Vehicle Start 011.
Touch Off or On.
Teen Driver
See Teen Driver 0151.
Valet Mode
This will lock the infotainment system and
steering wheel controls. It may also limit
access to vehicle storage locations,
if equipped.
To enable valet mode:
1. Enter a four-digit code on the keypad.
2. Select Enter to go to the confirmation screen.
3. Re-enter the four-digit code.
Touch Lock or Unlock to lock or unlock the
system. Touch Back to go back to the
previous menu.
Page 266 of 362
Chevrolet Colorado Owner Manual (GMNA-Localizing-U.S./Canada/Mexico-
15274222) - 2022 - CRC - 11/2/21
Vehicle Care 265
FusesUsage
F33 BCM 3 –Body Control
Module 3 –Right Headlamp
Low Beam Supply Voltage,
Right Front Turn Signal Lamp
Supply Voltage, Left Park
Lamp Supply Voltage, Left
Rear Park Lamp Supply
Voltage
F34 FPPM –Fuel Pump Power
Module
F35 4 CYL Engine –Not Used
6 CYL Engine –ICCM –
Integrated Chassis Control
Module
F36 CHMSL –Center High
Mounted Stoplamp
F37 HI BEAM RT –Right
High-beam Headlamp
F38 HI BEAM LT –Left High-beam
Headlamp Fuses
Usage
F39 4 CYL Engine –Not Used
6 CYL Engine –Not Used
6 CYL Engine –BISON –RR
DIFF LOCK ACT –Rear
Differential Lock Actuators
F40 4 CYL Engine –Not Used
6 CYL Engine –Not Used
6 CYL Engine –BISON –FRT
DIFF LOCK ACT –Front
Differential Lock Actuators
F41 –
F42 –
F43 4 CYL Engine –COOL FAN –
Cooling Fan
6 CYL Engine –Not Used
F44 –
F45 4 CYL Engine –Not Used
6 CYL Engine –VAC PUMP –
Brake Vacuum Pump
F46 4 CYL Engine –Not Used
6 CYL Engine –ECM 2 –
Engine Control Module 2 Fuses
Usage
F47 MISC 2 –Mid Park Phase
Lock/Active Fuel
Management/Engine Oil and
Canister Purge Solenoid(s)/
Oxygen Sensor
F48 Fog lamps
F49 –
F50 TRLR PRK LAMP –Trailer
Parking Lamp
F51 Horn
F52 –
F53 –
F54 –
F55 –
F56 WASH PUMP –Washer Pump
F57 –
F58 –
F59 –
F60 MIR DEFOG –Mirror Defogger
F61 –
F62 CNSTR VENT SOL –Canister
Vent Solenoid
Page 280 of 362
Chevrolet Colorado Owner Manual (GMNA-Localizing-U.S./Canada/Mexico-
15274222) - 2022 - CRC - 11/2/21
Vehicle Care 279
Tire Fill Alert (If Equipped)
This feature provides visual and audible
alerts outside the vehicle to help when
inflating an underinflated tire to the
recommended cold tire pressure.
When the low tire pressure warning light
comes on:1. Park the vehicle in a safe, level place.
2. Set the parking brake firmly.
3. Place the vehicle in P (Park).
4. Add air to the tire that is underinflated. The turn signal lamp will flash.
When the recommended pressure is
reached, the horn sounds once and the
turn signal lamp will stop flashing and
briefly turn solid.
Repeat these steps for all underinflated tires
that have illuminated the low tire pressure
warning light.
{Warning
Overinflating a tire could cause the tire
to rupture and you or others could be
injured. Do not exceed the maximum (Continued)
Warning (Continued)
pressure listed on the tire sidewall. See
Tire Sidewall Labeling0271 and
Vehicle Load Limits 0178.
If the tire is overinflated by more than
35 kPa (5 psi), the horn will sound multiple
times and the turn signal lamp will continue
to flash for several seconds after filling
stops. To release and correct the pressure,
while the turn signal lamp is still flashing,
briefly press the center of the valve stem.
When the recommended pressure is reached,
the horn sounds once.
If the turn signal lamp does not flash within
15 seconds after starting to inflate the tire,
the tire fill alert has not been activated or is
not working.
If the hazard warning flashers are on, the
tire fill alert visual feedback will not work
properly.
The TPMS will not activate the tire fill alert
properly under the following conditions:
.There is interference from an external
device or transmitter.
.The air pressure from the inflation device
is not sufficient to inflate the tire.
.There is a malfunction in the TPMS.
.There is a malfunction in the horn or turn
signal lamps.
.The identification code of the TPMS
sensor is not registered to the system.
.The battery of the TPMS sensor is low.
If the tire fill alert does not operate due to
TPMS interference, move the vehicle about
1 m (3 ft) back or forward and try again.
If the tire fill alert feature is not working,
use a tire pressure gauge.
TPMS Sensor Matching Process —Auto
Learn Function
Each TPMS sensor has a unique
identification code. The identification code
needs to be matched to a new tire/wheel
position after rotating the tires or replacing
one or more of the TPMS sensors. When a
tire is installed, the vehicle must be
stationary for about 20 minutes before the
system recalculates. The following relearn
process takes up to 10 minutes, driving at a
minimum speed of 20 km/h (12 mph).
A dash (-) or pressure value will display in
the DIC. See Driver Information Center (DIC)
(Base Level) 093 or
Page 349 of 362
Chevrolet Colorado Owner Manual (GMNA-Localizing-U.S./Canada/Mexico-
15274222) - 2022 - CRC - 11/2/21
348 Connected Services
Ensuring Security
.Change the default passwords for the
Wi-Fi hotspot and myChevrolet mobile
application. Make these passwords
different from each other and use a
combination of letters and numbers to
increase the security.
.Change the default name of the SSID
(Service Set Identifier). This is your
network’s name that is visible to other
wireless devices. Choose a unique name
and avoid family names or vehicle
descriptions.
Wi-Fi Hotspot (If Equipped)
The vehicle may have a built-in Wi-Fi
hotspot that provides access to the Internet
and web content at 4G LTE speed. Up to
seven mobile devices can be connected.
A data plan is required. Use the in-vehicle
controls only when it is safe to do so. 1. To retrieve Wi-Fi hotspot information, press
=to open the OnStar app on the
infotainment display, then select Wi-Fi
Hotspot. On some vehicles, touch Wi-Fi
or Wi-Fi Settings on the screen. 2. The Wi-Fi settings will display the Wi-Fi
hotspot name (SSID), password, and on
some vehicles, the connection type (no
Internet connection, 3G, 4G, 4G LTE), and
signal quality (poor, good, excellent).
3. To change the SSID or password, press
Qor call 1-888-4ONSTAR to connect
with an Advisor. On some vehicles, the
SSID and password can be changed in
the Wi-Fi Hotspot menu.
After initial set-up, your vehicle’s Wi-Fi
hotspot will connect automatically to your
mobile devices. Manage data usage by
turning Wi-Fi on or off on your mobile
device, using the myChevrolet mobile app,
or by contacting an OnStar Advisor. On
some vehicles, Wi-Fi can also be managed
from the Wi-Fi Hotspot menu.
MyChevrolet Mobile App (If Available)
Download the myChevrolet mobile app to
compatible Apple and Android smartphones.
Chevrolet users can access the following
services from a smartphone:
.Remotely start/stop the vehicle,
if factory-equipped.
.Lock/unlock doors, if equipped with
automatic locks.
.Activate the horn and lamps.
.Check the vehicle’s fuel level, oil life,
or tire pressure, if factory-equipped with
the Tire Pressure Monitor System.
.Send destinations to the vehicle.
.Locate the vehicle on a map (U.S.
market only).
.Turn the vehicle's Wi-Fi hotspot on/off,
manage settings, and monitor data
consumption, if equipped.
.Locate a dealer and schedule service.
.Request roadside assistance.
.Set a parking reminder with pin drop,
take a photo, make a note, and set a
timer.
.Connect with Chevrolet on social media.
Features are subject to change. For
myChevrolet mobile app information and
compatibility, see my.chevrolet.com.
An active OnStar or connected service plan
may be required. A compatible device,
factory-installed remote start, and power
locks are required. Data rates apply. See
www.onstar.com for details and system
limitations.
Page 350 of 362
Chevrolet Colorado Owner Manual (GMNA-Localizing-U.S./Canada/Mexico-
15274222) - 2022 - CRC - 11/2/21
Connected Services 349
Remote Services
Contact an OnStar Advisor to unlock the
doors or sound the horn and flash the
lamps.
Marketplace
OnStar Advisors can provide offers from
restaurants and retailers on your route, help
locate hotels, or book a room. These services
vary by market.
Diagnostics
By monitoring and reporting on the vehicle's
key systems, OnStar Advanced Diagnostics,
if equipped, provides a way to keep up on
maintenance. Capabilities vary by model.
See www.onstar.com for details and system
limitations. Features are subject to change.
For updates on feature capabilities, see
my.chevrolet.com. Message and data rates
may apply.