turn signal CHEVROLET CORVETTE 1964 Owners Manual
[x] Cancel search | Manufacturer: CHEVROLET, Model Year: 1964, Model line: CORVETTE, Model: CHEVROLET CORVETTE 1964Pages: 52, PDF Size: 11.2 MB
Page 19 of 52

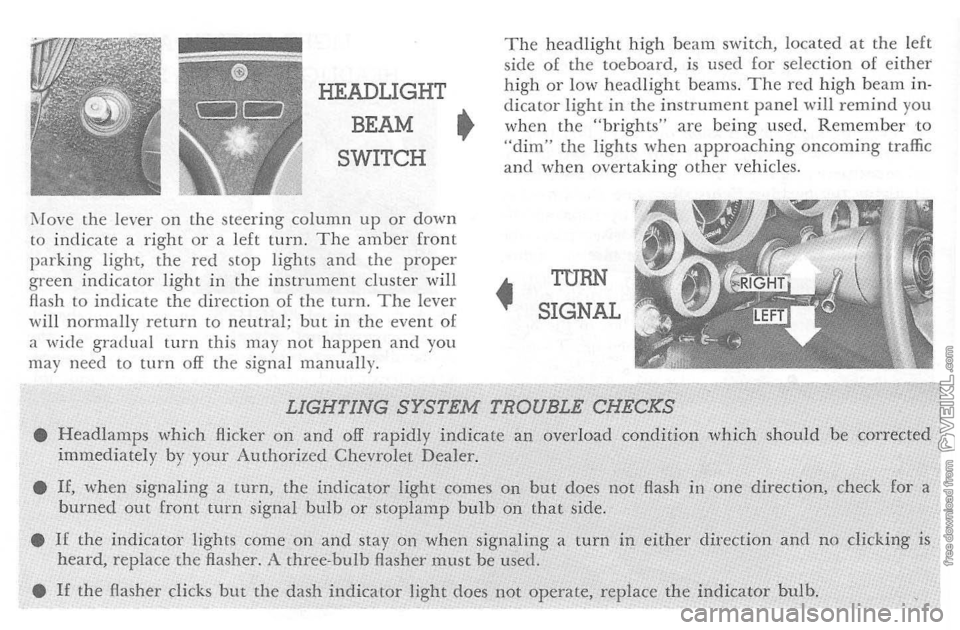
HEADLIGHT
BEAM •
SWITCH
i\fove the lever on t h e steering column up or down to indicate a right o r a left turn. The amber front parking light, the red stop lights and the proper green indicator light in the instrument cluster will
flash to indicate the d irection of the turn. The lever
wi ll normally return to neutral; but in the event of
a wide gradual turn this may not happen and you
may nee d to turn off the signa l manually.
The headlight high beam switch, located at the left
side of the toeboard. is used for selection of either high or low headlight beams. The red high beam indicator light in the instrument p a nel will remind you when the "brights" are being used. Remember to "dim" the lights when approaching oncoming traffic and when overtaking other vehicles .
•
TURN
SIGNAL
LIGHTING SYSTEM TROUBLE CHECKS • Headlamps which Hickel' on and off rapidly indicate an overload condition which should be corrected immediately by your Authorized Chevrolet Dealer.
•
If, when signaling a turn, the indicator light comes on but does not Hash in one direction, check for a burned out front turn signal bulb or stoplamp bulb on that side.
•
If the indicator lights come on and stay on when signaling a turn in either direction and no clicking is heard, replace the flasher. A three-bulb Aasher must be used.
•
If the Hasher clicks but the dash indicator light does not operate, replace the indicator bulb.
Page 23 of 52

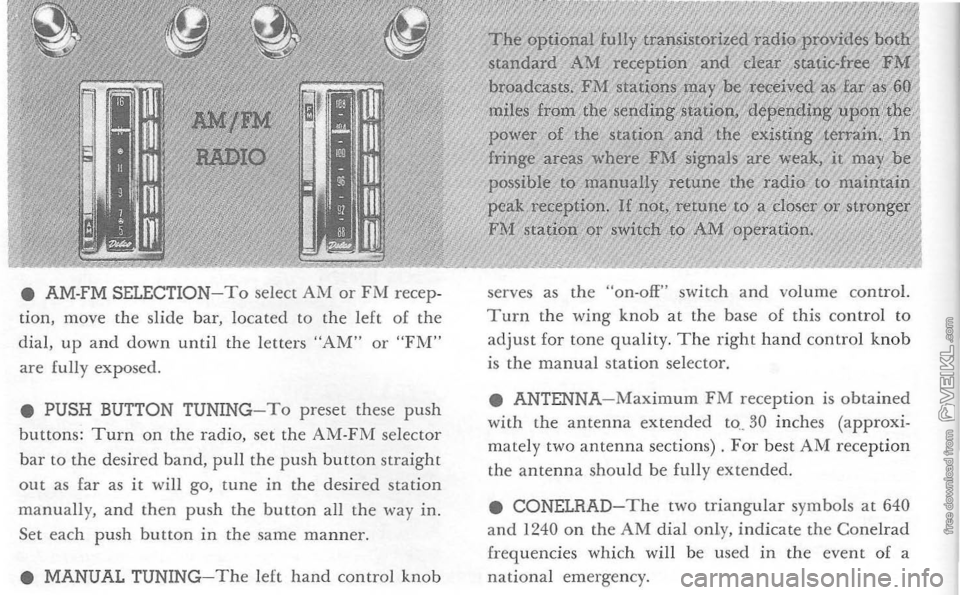
• AM-FM SELECTION-To select AM or FM recep
ti on, move the sli de bar, located to the left of the
dia l, up and down until
the letters "AM" or "FT\1" are fully exposed.
• PUSH BUTTON TUNING
-To preset these push
buttons: Turn on the radio, set the AM-FM selector
bar to the desired band, pull the push button stra ight out as far as i t will go, tune in the desir ed station manually, and then push the button all the way in.
Set each push button in the same manner.
• MANUAL TUNING-
The left hand control knob
The optional 'fully ttansis'toriz~,d standaTd AM reception clear
broadcasts. FM stations nla y pe
mpes from. th,e ,endil)g station, .dc~p'~*dlil)J~.~I!l<'l'!;'~l1li,l power of the station and the
fringe areas where FM signals are weak, it may be possi
ble to manually retune the radio to mair,ltain
peak reception. lf nOt, retune to
serves as the "on-off" switch
and volume control. Turn the wing knob at the base of this contro l to
adjust for tone quality . T he right hand control knob is the manual station selector.
• ANTENNA
-Maximum FM recept io n is obtained
wi th the antenna extended to .. 30 inches (app roxi
mately two antenna sections) . For best AM reception
the antenna should be fully extend ed.
• CONELRAD- T h e t
wo triangular symbols a t 640 and 1240 on the AM dial only, indicate the Cone lrad
freq uencies which will be used in the event of a
nationa l em ergency .
Page 49 of 52

INDEX Page
Page Hard Top Care
. 29 Pushing Tips. .10 Installation .25 Radio .22
Headlight Operation .17 Rear Compartment 24
Page
Heater .20
Seat
Adjustment .23
Air
Conditioning . .21 High Beam Switch .... 18 Spare Tire Stowage .
33
Ammeter 14 Hood Release . 19 Specificat ions .44-47 Automatic Transmission 7
Ignition Switch . 6 Speedometer 13
Batter y Care .. 34
Jack Stowage . .... 33 Starting 6 Brakes . 19
Lighter 16 Steering Adjustments II Bright Metal Care . .... 27 Light Switch . .. 17 Tachometer .13 Changing
Wheels .34 Lighting System Trouble Checks. 18 Temperature Gauge . 15 Cleaning-Exterior .26-27 Locks . .... 23 T h ermostac .32 Interior
.28 Maintenance and Lubrication . .
35-40 Tire Care .
32
C l ock . 15
Manual Transmission .8-9 10 Tire Chains Cililch Adjustments . .... 11 Metallic Brake Linings 9
. . 10 Towing Tips . Cooling System Care . . 31-32 Odometer 13 Trailer Towing II Courtesy Lights. ... 15 Oil Pressure Gauge. . .. 14 Trip Odometer . .13 D e f
roster
20 Oil Requirements .... 30 Troubl e Shooting Guide .41·43
Doors ... 23 Parking Brakes 19 Turn Signal .18 Folding Top Care .... 28
Plastic \oVindow Care . .. 29 Ventilation 20 Operation ... 25 Polishing Your Corvette . .27 Washing Your Corvette .
26
Removal ... 24 Positraction Rear Axle. Waxing Your Corvette .26
Fuel Gauge ... 15 Power Brakes 19 Whitewall Tire Cleaning .27
Fuel Requirements . 30 Power
Steering . . 19 Windshield Washer .
. 16 G love Box
.24 Powerglide Transmission
7 Windshield Wiper 16