CHEVROLET CORVETTE 2004 5.G Owners Manual
Manufacturer: CHEVROLET, Model Year: 2004, Model line: CORVETTE, Model: CHEVROLET CORVETTE 2004 5.GPages: 384, PDF Size: 2.46 MB
Page 311 of 384
If you need to replace any of your wheels, wheel bolts
or wheel nuts, replace them only with new GM
original equipment parts. This way, you will be sure to
have the right wheel, wheel bolts and wheel nuts
for your vehicle.
{CAUTION:
Using the wrong replacement wheels, wheel
bolts or wheel nuts on your vehicle can be
dangerous. It could affect the braking and
handling of your vehicle, make your tires lose
air and make you lose control. You could have
a collision in which you or others could be
injured. Always use the correct wheel, wheel
bolts and wheel nuts for replacement.
Notice:The wrong wheel can also cause problems
with bearing life, brake cooling, speedometer or
odometer calibration, headlamp aim, bumper height,
vehicle ground clearance and tire clearance to the
body and chassis.
{CAUTION:
Rust or dirt on a wheel, or on the parts to
which it is fastened, can make wheel nuts
become loose after a time. The wheel could
come off and cause a crash. When you change
a wheel, remove any rust or dirt from places
where the wheel attaches to the vehicle. In an
emergency, you can use a cloth or a paper
towel to do this; but be sure to use a scraper
or wire brush later, if you need to, to get all the
rust or dirt off.
{CAUTION:
Never use oil or grease on studs or the
threads of the wheel nuts. If you do, the wheel
nuts might come loose and the wheel could
fall off, causing a crash.
5-69
Page 312 of 384
{CAUTION:
Incorrect wheel nuts or improperly tightened
wheel nuts can cause the wheel to become
loose and even come off. This could lead to a
crash. Be sure to use the correct wheel nuts. If
you have to replace them, be sure to get new
GM original equipment wheel nuts.
Notice:Improperly tightened wheel nuts can lead
to brake pulsation and rotor damage. To avoid
expensive brake repairs, evenly tighten the wheel
nuts in the proper sequence and to the proper
torque speci�cation.
Magnesium Wheels
Notice:If your vehicle has magnesium wheels,
moisture on or around the mounting surface of the
magnesium wheel will cause corrosion and
damage to the wheel. To help prevent this, a
magnesium wheel uses two rubber O-rings. One
goes on the inboard side of the wheel and the other
on the back of the center hubcap. When you put
a magnesium wheel back on, be sure the O-rings are
correctly installed. On the inboard side, of the
wheel, work the O-ring into the groove. When
properly installed, this O-ring �ts snugly. The other
O-ring goes around the retaining legs of the
center cap.
Used Replacement Wheels
{CAUTION:
Putting a used wheel on your vehicle is
dangerous. You can’t know how it’s been used
or how far it’s been driven. It could fail suddenly
and cause a crash. If you have to replace a
wheel, use a new GM original equipment wheel.
5-70
Page 313 of 384
Tire Chains
{CAUTION:
Don’t use tire chains. There’s not enough
clearance. Tire chains used on a vehicle without
the proper amount of clearance can cause
damage to the brakes, suspension or other
vehicle parts. The area damaged by the tire
chains could cause you to lose control of your
vehicle and you or others may be injured in a
crash. Use another type of traction device only
if its manufacturer recommends it for use on
your vehicle and tire size combination and road
conditions. Follow that manufacturer’s
instructions. To help avoid damage to your
vehicle, drive slowly, readjust or remove the
device if it’s contacting your vehicle, and don’t
spin your wheels. If you do �nd traction devices
that will �t, install them on the rear tires.
Lifting Your Vehicle
{CAUTION:
Lifting a vehicle can cause an injury. The
vehicle can slip off the jack and roll over you
or other people. You and they could be badly
injured. Find a level place to lift your vehicle.
To help prevent the vehicle from moving:
1. Set the parking brake �rmly.
2. Put an automatic transmission shift lever
in PARK (P), or shift a manual transmission
to FIRST (1) or REVERSE (R).
3. Turn off the engine.
To be even more certain the vehicle won’t move,
you can put blocks in front of and behind the
wheels.
5-71
Page 314 of 384
{CAUTION:
Getting under a vehicle when it is jacked up is
dangerous. If the vehicle slips off the jack, you
could be badly injured or killed. Never get
under a vehicle when it is supported only
by a jack.
{CAUTION:
Raising your vehicle with the jack improperly
positioned can damage the vehicle and even
make the vehicle fall. To help avoid personal
injury and vehicle damage, be sure to place
the jack in the proper location before raising
the vehicle.If you ever use a jack to lift your Corvette, such as to
display it at a show, follow the instructions that
came with the jack, and be sure to use the correct lifting
points to avoid damaging your vehicle.
Notice:Lifting your vehicle improperly can damage
your vehicle and result in costly repairs not
covered by your warranty. To lift your vehicle
properly, follow the advice in this part.
To help prevent vehicle damage:
Be sure to place a block or pad between the
jack and the vehicle.
Make sure the jack you’re using spans at least
two crossmember ribs.
Lift only in the areas shown in the following
pictures.
For additional information, see your dealer and the
Chevrolet Corvette service manual.
5-72
Page 315 of 384
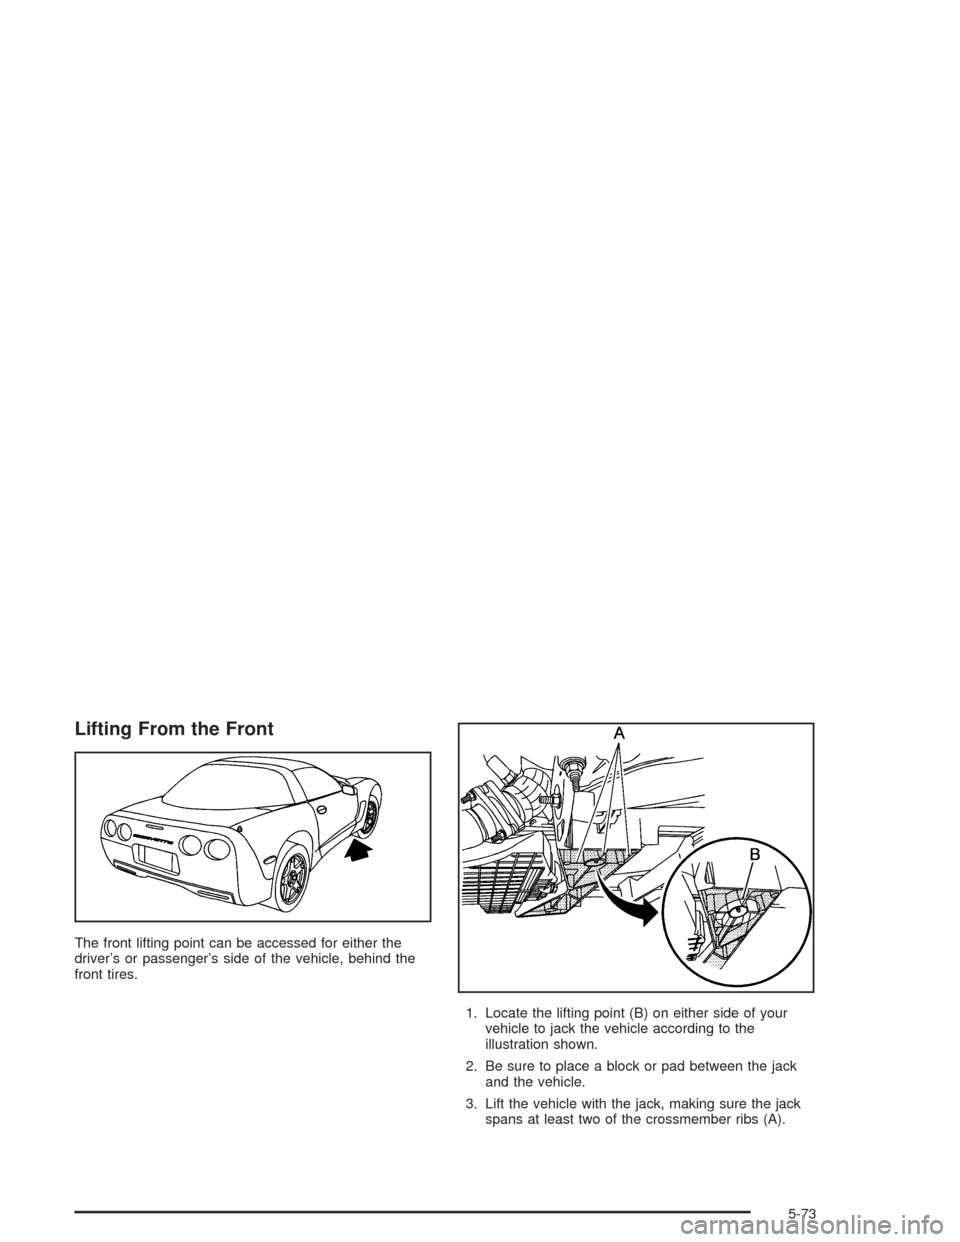
Lifting From the Front
The front lifting point can be accessed for either the
driver’s or passenger’s side of the vehicle, behind the
front tires.
1. Locate the lifting point (B) on either side of your
vehicle to jack the vehicle according to the
illustration shown.
2. Be sure to place a block or pad between the jack
and the vehicle.
3. Lift the vehicle with the jack, making sure the jack
spans at least two of the crossmember ribs (A).
5-73
Page 316 of 384
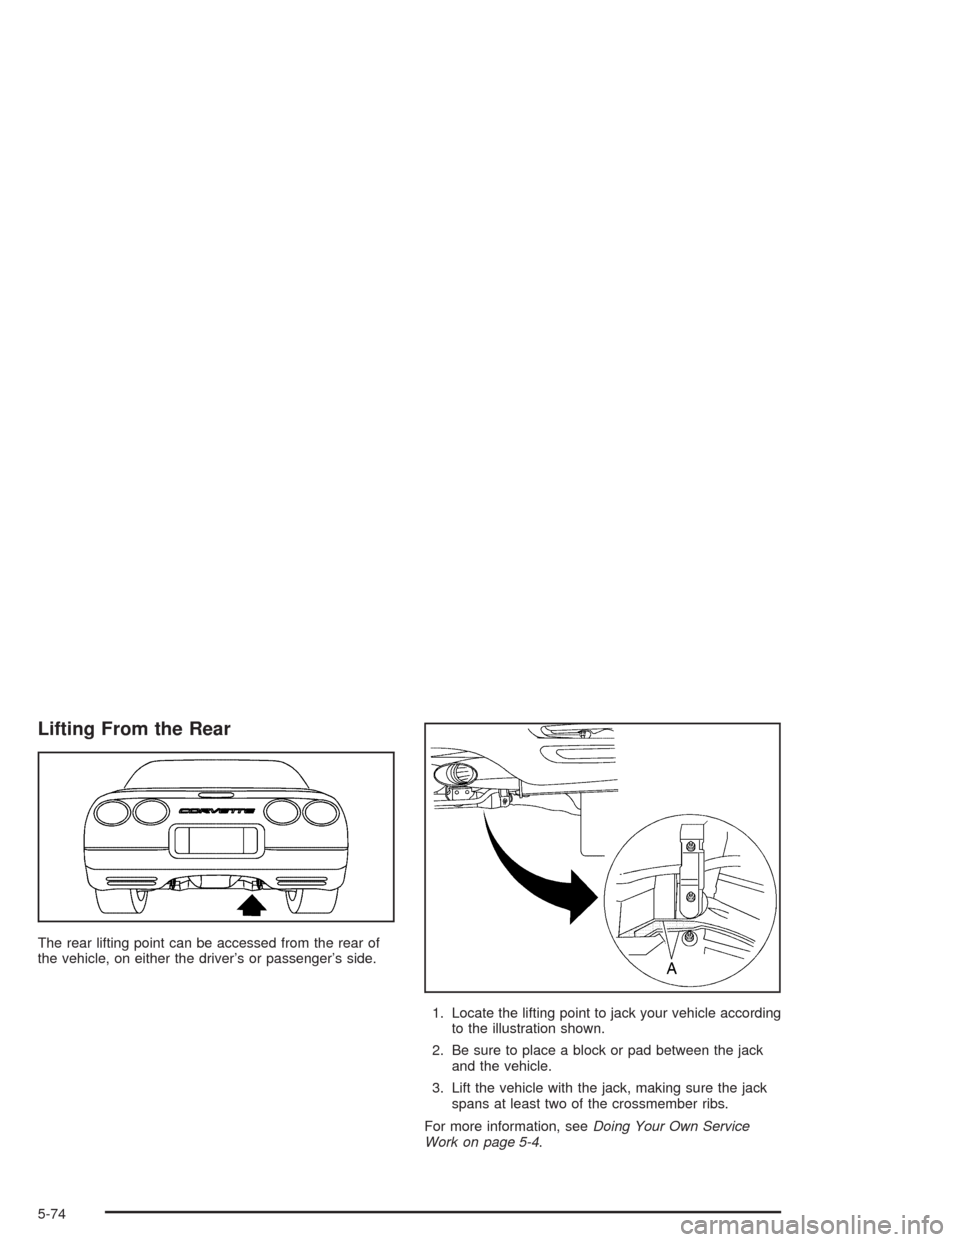
Lifting From the Rear
The rear lifting point can be accessed from the rear of
the vehicle, on either the driver’s or passenger’s side.
1. Locate the lifting point to jack your vehicle according
to the illustration shown.
2. Be sure to place a block or pad between the jack
and the vehicle.
3. Lift the vehicle with the jack, making sure the jack
spans at least two of the crossmember ribs.
For more information, seeDoing Your Own Service
Work on page 5-4.
5-74
Page 317 of 384
If a Tire Goes Flat
Your Corvette has no spare tire, no tire changing
equipment and no place to store a tire.
It’s unusual for a tire to “blow out” while you’re driving,
especially if you maintain your tires properly. See
Tires on page 5-55. If air goes out of a tire, it’s much
more likely to leak out slowly.
If your vehicle has Extended Mobility Tires (EMT), you
won’t need to stop on the side of the road to change
a flat tire. EMT tires can operate effectively with no air
pressure. If you drive on a deflated EMT for 50 miles
(80 km) or less and at speeds of 55 mph (90 km/h) or
less, there is a good chance that the tire can be
repaired. Contact the nearest authorized Chevrolet or
Goodyear EMT servicing facility, as soon as possible, to
have the flat tire inspected and repaired or replaced.
For more information, seeExtended Mobility Tires
(Except Z06) on page 5-61.{CAUTION:
Special tools and procedures are required to
service an Extended Mobility Tire (EMT). If
these special tools and procedures aren’t used
you or others could be injured and your
vehicle could be damaged. Always be sure the
proper tools and procedures, as described in
the service manual, are used.
To order a service manual, seeService Publications
Ordering Information on page 7-11.
5-75
Page 318 of 384
Z06 models do not have Extended Mobility Tires. If a
Z06 model tire goes flat, avoid further tire and wheel
damage by driving slowly to a level place and stopping.
Then do this:
1. Turn on the hazard warning flashers.
2. Set the parking brake firmly.
3. Put the shift lever (manual transmission) in
REVERSE (R).
4. Turn off the engine.
5. Inspect the flat tire.
If the tire has been separated from the wheel or has
damaged sidewalls or large tears that allow rapid
air loss, call a tire repair facility. SeeRoadside
Assistance Program on page 7-6.
If the flat tire is due to a slow leak caused by a nail or
other similar road hazard, the tire inflator kit may
be used to repair the damaged tire temporarily. The kit
uses a liquid tire sealant to seal small punctures inthe tread area of the tire. The flat tire is then inflated to
at least 26 psi (179 kPa) and driven to evenly distribute
the tire sealant. The tire pressure is checked after
driving for a maximum of 10 minutes to see if the slow
leak has been stopped. If the tire pressure is 19 psi
(131 kPa) or more, inflate the tire up to the standard
operating pressure as shown on the Tire Pressure Label
found on the rear edge of the driver’s door. See
In�ation - Tire Pressure on page 5-62.
You should have the damaged tire repaired as soon as
possible. The tire sealant is a temporary repair only.
For more information regarding the tire inflator kit
see “Tire Inflator Kit (Z06 Only)” following this section.
Notice:If the tire pressure has dropped below
19 psi (131 kPa), the vehicle should not be driven
further. Damage to the tire may be severe and
the sealant will not be effective. Contact Roadside
Assistance. See “Roadside Assistance” in the Index.
5-76
Page 319 of 384
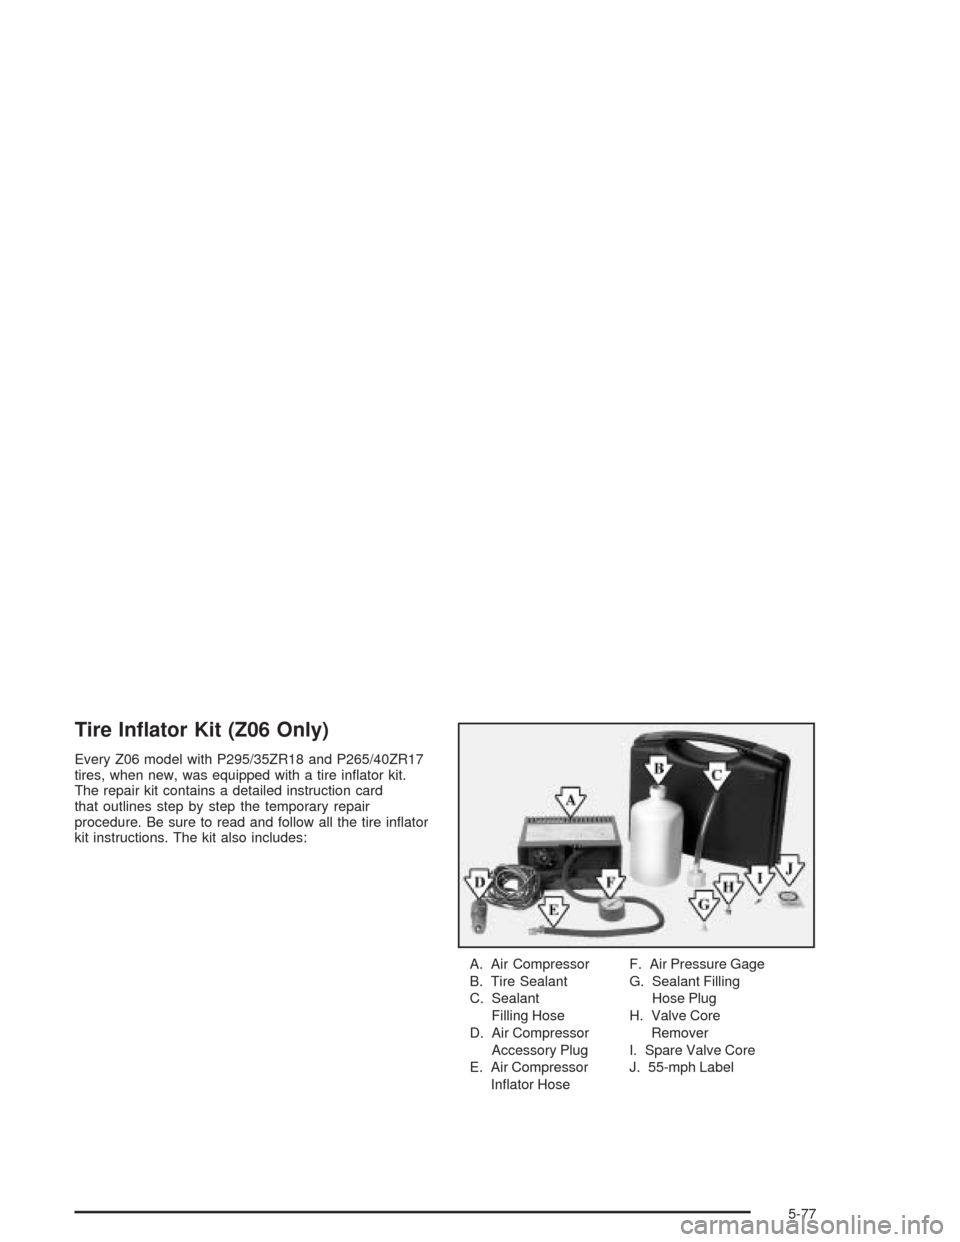
Tire In�ator Kit (Z06 Only)
Every Z06 model with P295/35ZR18 and P265/40ZR17
tires, when new, was equipped with a tire inflator kit.
The repair kit contains a detailed instruction card
that outlines step by step the temporary repair
procedure. Be sure to read and follow all the tire inflator
kit instructions. The kit also includes:
A. Air Compressor
B. Tire Sealant
C. Sealant
Filling Hose
D. Air Compressor
Accessory Plug
E. Air Compressor
Inflator HoseF. Air Pressure Gage
G. Sealant Filling
Hose Plug
H. Valve Core
Remover
I. Spare Valve Core
J. 55-mph Label
5-77
Page 320 of 384
Tire Sealant
The kit contains a liquid sealant that when injected into
a flat tire, may temporarily repair nail holes or cuts
in the tread area of the tire. The tire sealant cannot
repair tire damage caused while driving on a flat tire or
a tire that has had a “blow out” or a tire that has
punctures in the sidewall areas. The tire sealant solution
is a one-time use application for one tire only. Check
the tire sealant expiration date; the sealant may not be
as effective beyond the expiration date. The tire
sealant can be peeled off easily after drying.
Notice:Do not use a tire sealant if your vehicle is
equipped with Extended Mobility Tires or tire
pressure monitors. The tire sealant can damage tire
pressure monitor sensors. See “Extended Mobility
Tires” in the Index.
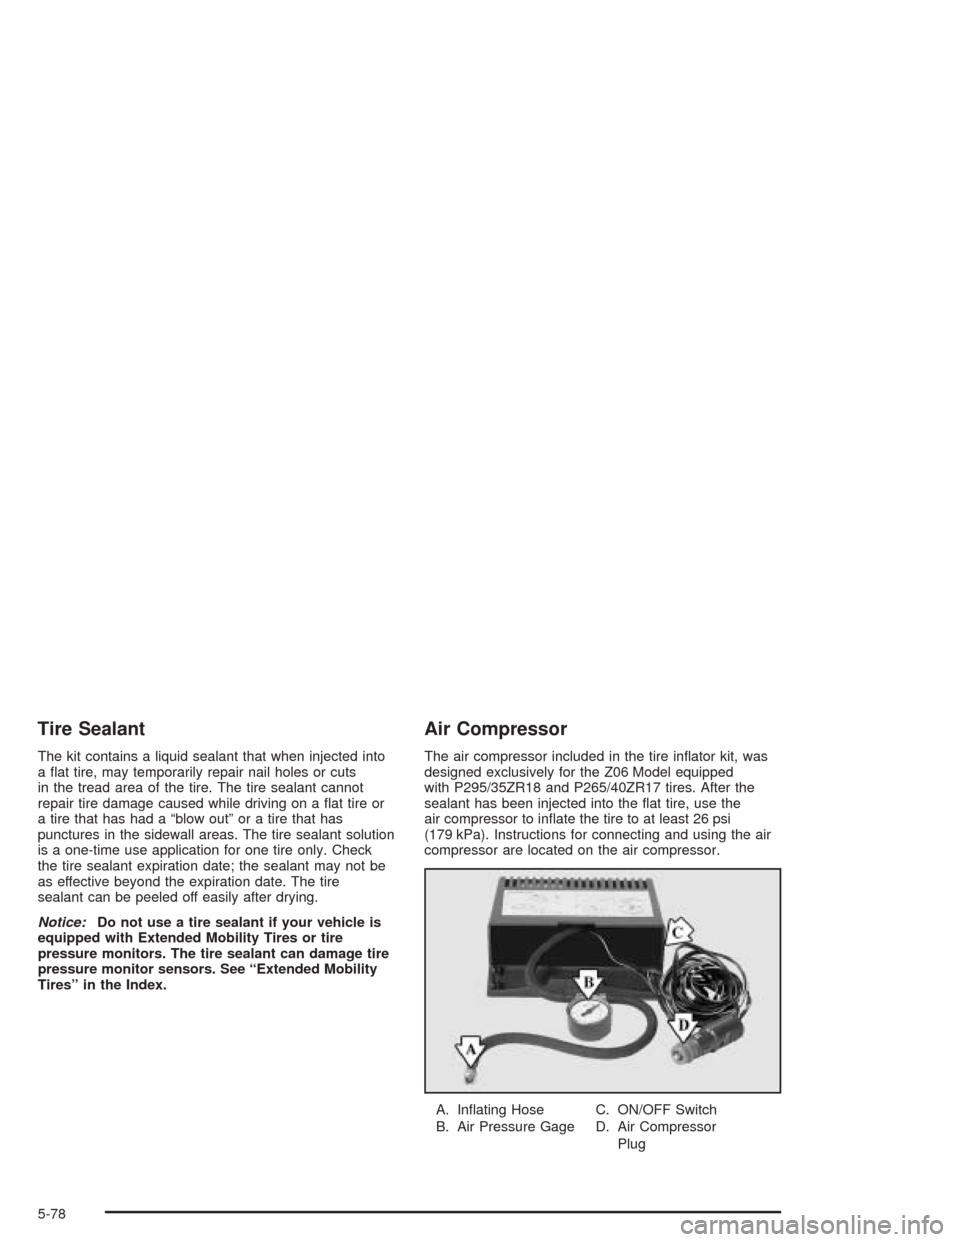
Air Compressor
The air compressor included in the tire inflator kit, was
designed exclusively for the Z06 Model equipped
with P295/35ZR18 and P265/40ZR17 tires. After the
sealant has been injected into the flat tire, use the
air compressor to inflate the tire to at least 26 psi
(179 kPa). Instructions for connecting and using the air
compressor are located on the air compressor.
A. Inflating Hose
B. Air Pressure GageC. ON/OFF Switch
D. Air Compressor
Plug
5-78