window CHEVROLET CORVETTE 2006 6.G User Guide
[x] Cancel search | Manufacturer: CHEVROLET, Model Year: 2006, Model line: CORVETTE, Model: CHEVROLET CORVETTE 2006 6.GPages: 426, PDF Size: 2.48 MB
Page 80 of 426
Express-Down Window
This feature is on both power windows. Press the front
of the switch to the second position to activate the
express-down feature. If you want to stop the window
as it is lowering, press the switch again.
Window Indexing
This feature automatically lowers the window a small
amount when the door is opened. Then, when the door
is closed, the window will raise to its full up position.
If either window does not index properly, it could be due
to loss of power. Before returning to your dealer for
service, perform the power window initialize procedure
following.
Power Window Initialize
After a power reconnect such as battery replacement,
the window index-up feature will not function until
the system is initialized. Once power is restored, do the
following:
1. Close the door.
2. Raise the window by pulling up the switch.
3. Hold the up switch for three seconds after the
window is closed. Release the switch.
4. Hold the up switch again for three seconds and
release.
2-18
Page 82 of 426
Arming the System
Use one of the three following items listed here to arm
the system:
Press the lock button on the keyless access
transmitter.
Open the door. Lock the door with the power door
lock switch. The security light should �ash.
Remove the keyless access transmitter from inside
the vehicle and close the door. The security light
will stop �ashing and stay on. After 30 seconds, the
light should turn off.
The vehicle can be programmed to automatically
lock the doors and arm the theft-deterrent system
when you exit the vehicle. SeeDIC Vehicle
Personalization on page 3-68.
Now, if a door or the hatch/trunk is opened without
the keyless access transmitter, the alarm will go
off. Your horn will sound for two minutes, then it will go
off to save battery power. Your vehicle will not start
without a keyless access transmitter present.
The theft-deterrent system will not arm if you lock the
driver’s door with the power door lock switch after
the doors are closed.
If your passenger stays in the vehicle when you leave
with the keyless access transmitter, have the passenger
lock the vehicle after the doors are closed. This way the
alarm will not arm, and your passenger will not set it off.
Testing the Alarm
Do the following to test the system:
1. Make sure the trunk lid/hatch is latched.
2. Lower the window on the driver’s door.
3. Manually arm the system.
4. Close the doors and wait 30 seconds.
5. Reach through the open window and manually pull
the release lever on the �oor.
6. Turn off the alarm by pressing the unlock button on
the transmitter.
If the alarm is inoperative, check to see if the horn
works. If not, check the horn fuse. SeeFuses and Circuit
Breakers on page 5-93. If the horn works, but the
alarm doesn’t go off, see your dealer.
Disarming the System
Always use your keyless access transmitter to unlock
a door either by pressing the unlock button on the
transmitter or by squeezing the door handle sensor while
you have the transmitter with you. Unlocking a door
any other way will set off the alarm. If your alarm
sounds, press the unlock button on the keyless access
transmitter to disarm it.
2-20
Page 85 of 426
Retained Accessory Power (RAP)
With RAP, your power windows and the audio system
will continue to work for up to 10 minutes after the
engine is turned off or until either door is opened. If a
door is opened, the power windows and audio system
will shut off.
Starting the Engine
Move the shift lever to PARK (P) or NEUTRAL (N) for
an automatic transmission. For a manual transmission
the vehicle can be started in NEUTRAL or any other
gear as long as the clutch is depressed. To restart
a manual when you are already moving, use the
NEUTRAL position only. To restart an automatic when
you are already moving, use NEUTRAL (N).
The keyless access transmitter must be inside the
vehicle for the ignition to work.
Cell phone chargers may interfere with the operation of
the Keyless Access System. Battery chargers should
not be plugged in when starting or turning off the engine.
Notice:Do not try to shift to PARK (P) if your
vehicle is moving. If you do, you could damage the
transmission. Shift to PARK (P) only when your
vehicle is stopped.To start you vehicle, do the following:
1. For an automatic transmission, with your foot on the
brake pedal, press the START button located on the
instrument panel. For a manual transmission, while
pressing in the clutch, press the START button.
If there is not a keyless access transmitter in the
vehicle or if there is something causing interference
with it, the DIC will display NO FOB DETECTED.
SeeDIC Warnings and Messages on page 3-53for
more information.
2. When the engine begins cranking, let go of the
button. The idle speed will decrease as your
engine gets warm.
If the battery in the keyless access transmitter
is weak, the DIC will display FOB BATTERY LOW.
You can still drive the vehicle. See “Battery
Replacement” underKeyless Access System
Operation on page 2-5for more information.
3. If the engine does not start and no DIC message is
displayed, wait 15 seconds before trying again.
Notice:Your engine is designed to work with the
electronics in your vehicle. If you add electrical
parts or accessories, you could change the way the
engine operates. Before adding electrical equipment,
check with your dealer. If you do not, your engine
might not perform properly. Any resulting damage
would not be covered by your vehicle’s warranty.
2-23
Page 98 of 426
Parking Over Things That Burn
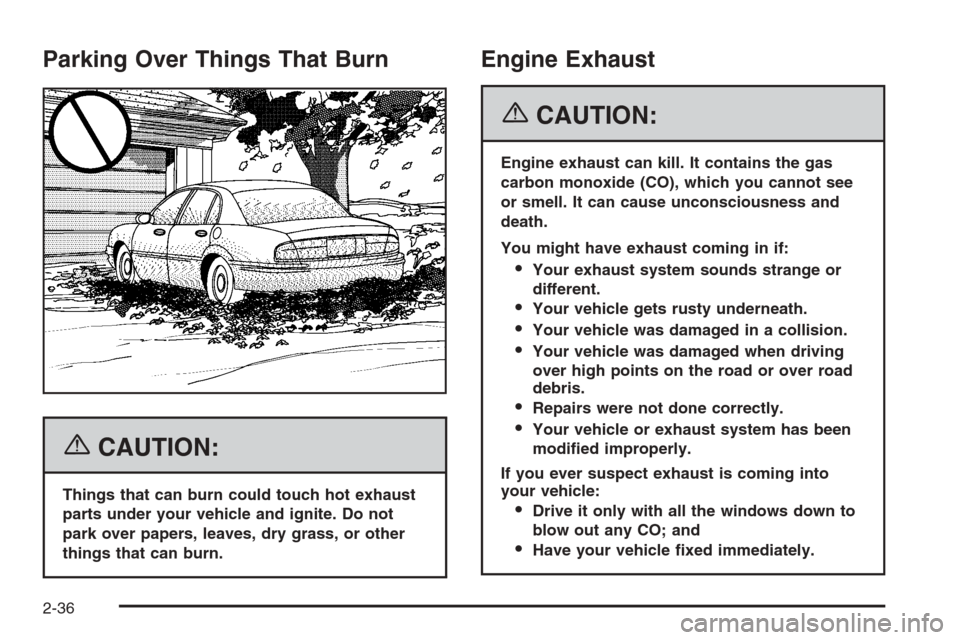
{CAUTION:
Things that can burn could touch hot exhaust
parts under your vehicle and ignite. Do not
park over papers, leaves, dry grass, or other
things that can burn.
Engine Exhaust
{CAUTION:
Engine exhaust can kill. It contains the gas
carbon monoxide (CO), which you cannot see
or smell. It can cause unconsciousness and
death.
You might have exhaust coming in if:
Your exhaust system sounds strange or
different.
Your vehicle gets rusty underneath.
Your vehicle was damaged in a collision.
Your vehicle was damaged when driving
over high points on the road or over road
debris.
Repairs were not done correctly.
Your vehicle or exhaust system has been
modi�ed improperly.
If you ever suspect exhaust is coming into
your vehicle:
Drive it only with all the windows down to
blow out any CO; and
Have your vehicle �xed immediately.
2-36
Page 101 of 426
Map Lamps
The mirror has map lamps located at the bottom of the
mirror. To manually turn the lamps on or off, press the
button next to each lamp.
Compass Operation
The mirror has an eight-point compass display in the
bottom of the mirror face.
When the ignition and the compass feature are on, the
compass will show two character boxes for approximately
two seconds. After two seconds, the mirror will display
the current compass heading. For example, NE is
displayed for north-east.
Compass Calibration
If after two seconds the display does not show a
compass heading, there may be a strong magnetic �eld
interfering with the compass. Such interference may
be caused by a magnetic antenna mount, note
pad holder or similar object. If the letter C appears in
the compass window, the compass needs calibration.
The mirror compass can be calibrated by driving
the vehicle in circles at 5 mph (8 km/h) or less until
the display reads a direction.
The compass can be placed in calibration mode by
pressing and holding the left map light button until
a C appears on the compass display.
2-39
Page 102 of 426
Compass Variance
Compass variance is the difference between earth’s
magnetic north and true geographic north. If the mirror
is not adjusted for compass variance, your compass
could give false readings.
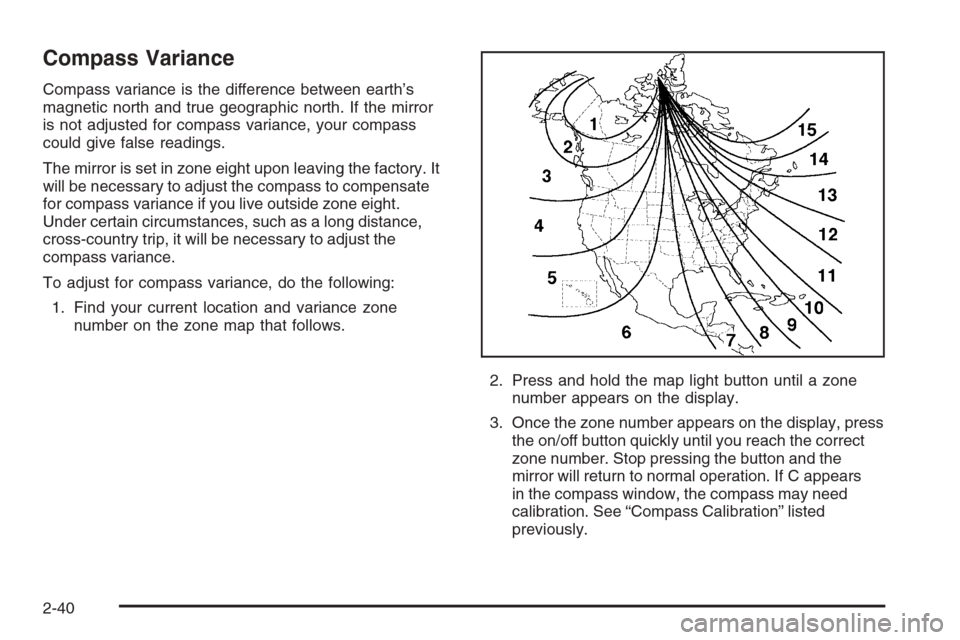
The mirror is set in zone eight upon leaving the factory. It
will be necessary to adjust the compass to compensate
for compass variance if you live outside zone eight.
Under certain circumstances, such as a long distance,
cross-country trip, it will be necessary to adjust the
compass variance.
To adjust for compass variance, do the following:
1. Find your current location and variance zone
number on the zone map that follows.
2. Press and hold the map light button until a zone
number appears on the display.
3. Once the zone number appears on the display, press
the on/off button quickly until you reach the correct
zone number. Stop pressing the button and the
mirror will return to normal operation. If C appears
in the compass window, the compass may need
calibration. See “Compass Calibration” listed
previously.
2-40
Page 105 of 426
Compass Calibration
The compass may need calibration if one of the
following occurs:
After approximately �ve seconds, the display does
not show a compass heading (N for North, for
example), there may be a strong magnetic �eld
interfering with the compass. Such interference may
be caused by a magnetic antenna mount, magnetic
note pad holder, or a similar magnetic item.
The compass does not display the correct heading
and the compass zone variance is set correctly.
In order to calibrate, CAL must be displayed in the mirror
compass windows. If CAL is not displayed, push the
on/off button for approximately 12 seconds or until CAL
is displayed.
The compass can be calibrated by driving the vehicle in
circles at 5 mph (8 km/h) or less until the display reads a
direction.
Cleaning the Mirror
When cleaning the mirror, use a paper towel or similar
material dampened with glass cleaner. Do not spray
glass cleaner directly on the mirror as that may cause
the liquid cleaner to enter the mirror housing.
Outside Power Heated Mirrors
The controls for the outside
power mirrors are located
on the driver’s door.
Move the top selector control to the left or right to select
either the driver’s or passenger’s mirror. To adjust the
direction of the mirror, use the arrows on the round
four-way control. Adjust each outside mirror so that a
little of the vehicle and the area behind it can be seen
while sitting in a comfortable, driving position. Keep the
control in the center position when not adjusting
either outside mirror.
If the vehicle has the memory feature, a preferred mirror
position can be stored. SeeMemory on page 2-72.
2-43
Page 106 of 426
Both mirrors are heated to rid them of snow, ice, or
condensation. They will heat when the rear window
defogger is turned on. See “Rear Window Defogger”
underDual Automatic Climate Control System on
page 3-25.
Both mirrors can manually be folded inward by pulling
them toward the vehicle. This feature may be useful
when going through a car wash or a con�ned space.
Push the mirrors away from the vehicle, to the normal
position, before driving.
Outside Automatic Dimming Mirror
If your vehicle has this feature, the driver’s side
outside mirror will adjust for the glare of headlamps
behind you. This feature is controlled by the on and off
setting on the inside mirror.
Outside Convex Mirror
{CAUTION:
A convex mirror can make things (like other
vehicles) look farther away than they really are.
If you cut too sharply into the right lane, you
could hit a vehicle on your right. Check your
inside mirror or glance over your shoulder
before changing lanes.
The passenger’s side mirror is convex. A convex mirror’s
surface is curved so more can be seen from the driver’s
seat. It also makes things look farther away than they
really are.
2-44
Page 118 of 426
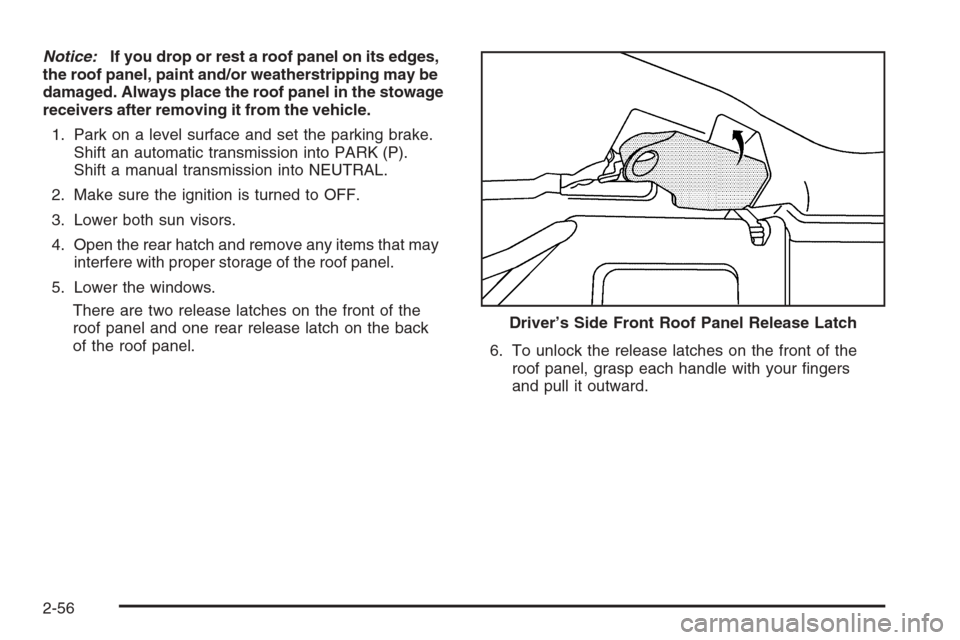
Notice:If you drop or rest a roof panel on its edges,
the roof panel, paint and/or weatherstripping may be
damaged. Always place the roof panel in the stowage
receivers after removing it from the vehicle.
1. Park on a level surface and set the parking brake.
Shift an automatic transmission into PARK (P).
Shift a manual transmission into NEUTRAL.
2. Make sure the ignition is turned to OFF.
3. Lower both sun visors.
4. Open the rear hatch and remove any items that may
interfere with proper storage of the roof panel.
5. Lower the windows.
There are two release latches on the front of the
roof panel and one rear release latch on the back
of the roof panel.
6. To unlock the release latches on the front of the
roof panel, grasp each handle with your �ngers
and pull it outward. Driver’s Side Front Roof Panel Release Latch
2-56
Page 123 of 426
Notice:Leaving the convertible top down and
exposing the interior of your vehicle to outdoor
conditions may cause damage. Always close
the convertible top if leaving your vehicle outdoors.
Notice:Lowering the convertible top when there are
objects in the storage area could damage it or break
the glass rear window. Always verify that no objects
are in the storage area before lowering the
convertible top.
Notice:Lowering the top if it is damp, wet, or dirty
can cause stains, mildew, and damage to the inside
of your vehicle. Dry off the top before lowering it.
Notice:If you lower the top on your vehicle in cold
weather (0°F/-18°C or lower), you may damage top
components. Do not lower the top in cold weather.
Notice:If you raise or lower the convertible top
while the vehicle is in motion, you could damage the
top or the top mechanism. The repairs would not be
covered by your warranty. Always put an automatic
transmission in PARK (P) or a manual transmission
in NEUTRAL before raising or lowering the
convertible top.Lowering the Manual Convertible Top
1. Park on a level surface. Shift an automatic
transmission into PARK (P) and set the parking
brake. Shift a manual transmission into NEUTRAL
and set the parking brake.
2. Make sure the ignition is turned off.
3. Make sure the trunk is closed and the rear trunk
partition in the rear storage area is in the fastened
upright position. See “Rear Trunk Partition”
underRear Storage Area on page 2-52.
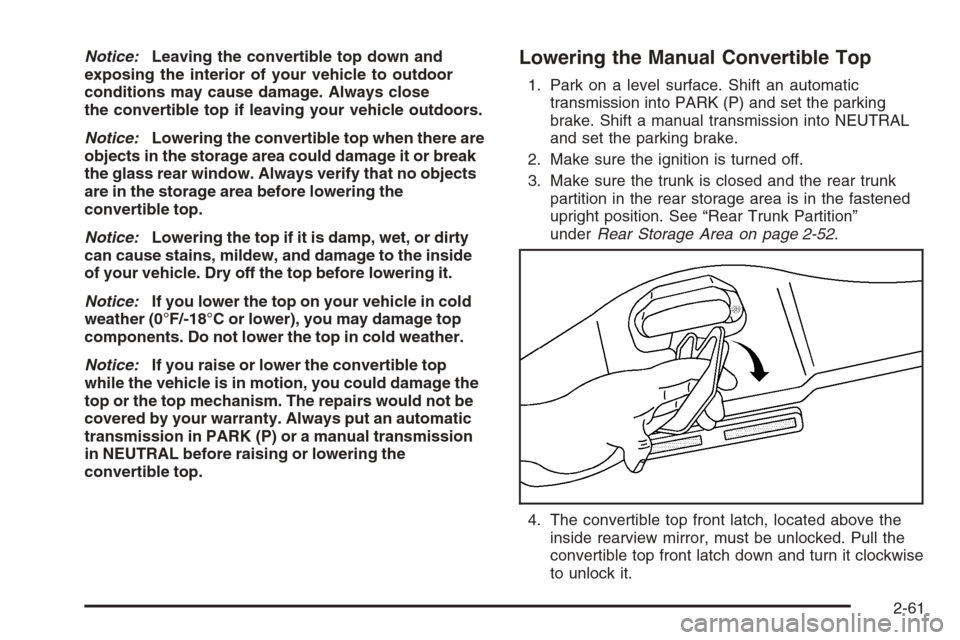
4. The convertible top front latch, located above the
inside rearview mirror, must be unlocked. Pull the
convertible top front latch down and turn it clockwise
to unlock it.
2-61