ESP CHEVROLET CORVETTE 2010 6.G User Guide
[x] Cancel search | Manufacturer: CHEVROLET, Model Year: 2010, Model line: CORVETTE, Model: CHEVROLET CORVETTE 2010 6.GPages: 472, PDF Size: 11.44 MB
Page 126 of 472
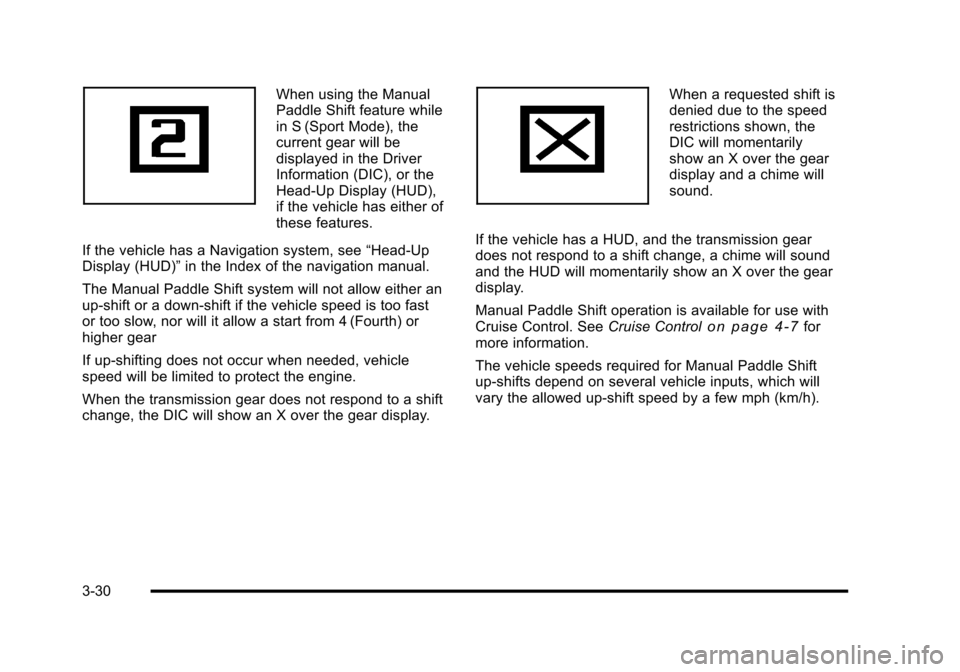
When using the Manual
Paddle Shift feature while
in S (Sport Mode), the
current gear will be
displayed in the Driver
Information (DIC), or the
Head-Up Display (HUD),
if the vehicle has either of
these features.
If the vehicle has a Navigation system, see “Head-Up
Display (HUD)” in the Index of the navigation manual.
The Manual Paddle Shift system will not allow either an
up-shift or a down-shift if the vehicle speed is too fast
or too slow, nor will it allow a start from 4 (Fourth) or
higher gear
If up-shifting does not occur when needed, vehicle
speed will be limited to protect the engine.
When the transmission gear does not respond to a shift
change, the DIC will show an X over the gear display. When a requested shift is
denied due to the speed
restrictions shown, the
DIC will momentarily
show an X over the gear
display and a chime will
sound.
If the vehicle has a HUD, and the transmission gear
does not respond to a shift change, a chime will sound
and the HUD will momentarily show an X over the gear
display.
Manual Paddle Shift operation is available for use with
Cruise Control. See Cruise Control
on page 4‑7for
more information.
The vehicle speeds required for Manual Paddle Shift
up-shifts depend on several vehicle inputs, which will
vary the allowed up-shift speed by a few mph (km/h).
3-30
Page 186 of 472
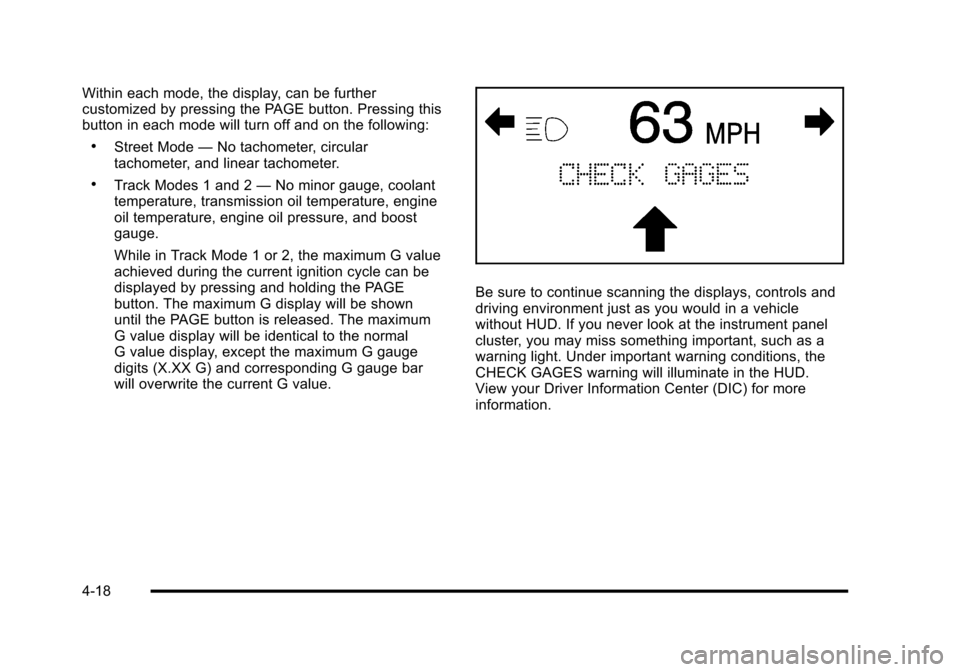
Within each mode, the display, can be further
customized by pressing the PAGE button. Pressing this
button in each mode will turn off and on the following:
.Street Mode —No tachometer, circular
tachometer, and linear tachometer.
.Track Modes 1 and 2 —No minor gauge, coolant
temperature, transmission oil temperature, engine
oil temperature, engine oil pressure, and boost
gauge.
While in Track Mode 1 or 2, the maximum G value
achieved during the current ignition cycle can be
displayed by pressing and holding the PAGE
button. The maximum G display will be shown
until the PAGE button is released. The maximum
G value display will be identical to the normal
G value display, except the maximum G gauge
digits (X.XX G) and corresponding G gauge bar
will overwrite the current G value.
Be sure to continue scanning the displays, controls and
driving environment just as you would in a vehicle
without HUD. If you never look at the instrument panel
cluster, you may miss something important, such as a
warning light. Under important warning conditions, the
CHECK GAGES warning will illuminate in the HUD.
View your Driver Information Center (DIC) for more
information.
4-18
Page 239 of 472

DIC Vehicle Personalization
Many features on your vehicle can be personalized.
This means that the operation of these features can be
set to operate differently depending on who is driving
the vehicle. See “Personal Options” later in this section
for the features that you can personalize.
The personalization settings for other features are
automatically updated and saved as the driver adjusts
them. These include the following settings and presets:
.The radio presets, tone, volume, fade, balance,
equalization (EQ) settings and source (radio
or CD)
.The last climate control setting
.The Head-Up Display (HUD) position and dimming
level, if your vehicle has this feature
.The instrument panel cluster dimming level and
last selected DIC display
Separate personalization settings are saved for two
different drivers. One of the keyless access transmitters
is assigned to driver 1. The other is assigned to driver 2.
The back of the keyless access transmitters are
labelled 1 or 2 to correspond to each driver. The current driver's preferences are recalled when one
of the following occurs:
.The lock or unlock button on the keyless access
transmitter, labelled 1 or 2, is pressed.
.The appropriate memory button, 1 or 2, located on
the driver's door is pressed. See
Memory Seat,
Mirrors and Steering Wheel
on page 2‑4for
more information.
.A valid keyless access transmitter is detected upon
opening the driver's door.
If more than one valid keyless access transmitter is
detected upon opening the driver's door, the driver
preferences for the lowest driver number will be
recalled.
If a keyless access transmitter that is not labelled
1 or 2 is used, the personalization system will not
recognize the transmitter. The Driver Information
Center (DIC) will not display a current driver number
and the features that are normally programmed through
the DIC will be set to the default states. Also, if the
OPTION button is pressed, the DIC does not display
the menus used to set personalizations, but instead
displays OPTIONS UNAVAILABLE for a few seconds.
4-71
Page 246 of 472
When the mode you want is selected, press the
OPTION button to set your choice and advance to the
next personal option.
Language : This option allows you to select the
language the DIC, the Head-Up Display (HUD), if your
vehicle has this feature, and the radio uses to display
messages. Each language mode will be displayed in its
own language. For example, English will be displayed
as ENGLISH, Spanish as ESPANOL, etc. If your vehicle
has the navigation system, you will not have the
Japanese language mode.
Press the OPTION button until LANGUAGE appears on
the display, then press the RESET button to scroll
through the following modes:
.ENGLISH (default)
.DEUTSCH (German)
.FRANCAIS (French)
.ITALIANO (Italian)
.ESPANOL (Spanish)
If you choose a language that you do not understand,
press the OPTION and RESET buttons for
five seconds. The DIC will begin displaying all of the
various languages one by one for as long as the
buttons are pressed. When the desired language is
displayed, release the buttons and the DIC will set to
this language. When the mode you want is selected, press the
OPTION button to set your choice and advance
to the next personal option.
Personalize Name :
This option allows you to type
in a name or greeting that will appear on the DIC
display whenever the corresponding keyless access
transmitter (1 or 2) is used or one of the memory
buttons (1 or 2) located on the driver's door is pressed.
Press the OPTION button until PERSONALIZE NAME
appears on the display, then press the RESET button to
scroll through the following modes:
.YES
.NO (default)
If you choose YES, you can type in a name that will
appear on the DIC display.
To program a name, use the following procedure: 1. Enter the PERSONAL OPTIONS menu and select the driver number (1 or 2) that you would like to
program by following the instructions listed
previously under “Entering the Personal
Options Menu”.
2. Press the OPTION button until the PERSONALIZE NAME option appears on the display.
3. Select YES under PERSONALIZE NAME by pressing the RESET button.
4-78
Page 247 of 472
4. Press the OPTION button and a cursor will display where you can insert a letter.
5. Press the OPTION button again until the letter you want is displayed. To scroll through the letters
faster and without a beeping noise, keep the
OPTIONS button depressed. There are alpha/
numeric characters and a blank space available.
6. Then press the RESET button to select the letter of your choice and proceed on to the next space to
the right.
If you make a mistake and would like to clear or
replace a letter, perform the following steps:
6. 1. Press the RESET button to reach the letter
you would like to change.
6. 2. Press the OPTION button to scroll through the letter choices.
6. 3. Press the RESET button to select the letter and proceed on to the next space to the right. 7. Repeat Steps 5 and 6 until the name or greeting
you want is complete. After the name or greeting is
complete, keep pressing the RESET button until
the display turns blank and exits out of this option.
You can program up to 20 characters.
If you choose NO, this option will turn off.
If a customized name or greeting is not programmed,
the DIC display will show Driver 1 or Driver 2 to
correspond with either the number on the back of the
keyless access transmitter (1 or 2) that is being used
or to the memory button (1 or 2) that is pressed.
PERSONALIZE NAME is the last option available to
program in the PERSONAL OPTIONS menu. Pressing
the OPTION button after this setting will exit you from
the PERSONAL OPTIONS menu. The last item you
were in prior to entering PERSONAL OPTIONS will
then display on the DIC.
4-79
Page 264 of 472
Navigation/Radio System
For vehicles with a navigation radio system, see the
separate Navigation System manual.
Bluetooth®
Vehicles with a Bluetooth system can use a Bluetooth
capable cell phone with a Hands Free Profile to make
and receive phone calls. The system can be used while
the key is in ON/RUN or ACC/ACCESSORY position.
The range of the Bluetooth system can be up to
9.1 m (30 ft). Not all phones support all functions,
and not all phones are guaranteed to work with
the in-vehicle Bluetooth system. See www.gm.com/
bluetooth for more information on compatible phones.
Voice Recognition
The Bluetooth system uses voice recognition to
interpret voice commands to dial phone numbers and
name tags.
Noise : Keep interior noise levels to a minimum.
The system may not recognize voice commands
if there is too much background noise.
When to Speak : A short tone sounds after the system
responds indicating when it is waiting for a voice
command. Wait until the tone and then speak.
How to Speak : Speak clearly in a calm and natural
voice.
Audio System
When using the in‐vehicle Bluetooth system, sound
comes through the vehicle's front audio system
speakers and over‐rides the audio system. Use the
audio system volume knob, during a call, to change
the volume level. The adjusted volume level remains
in memory for later calls. To prevent missed calls, a
minimum volume level is used if the volume is turned
down too low.
Bluetooth Controls
Use the buttons located on the steering wheel to
operate the in‐vehicle Bluetooth system. See Audio
Steering Wheel Controls
on page 4‑107for more
information.
b g(Push To Talk) : Press to answer incoming calls,
to confirm system information, and to start speech
recognition.
c(Phone On Hook): Press to end a call, reject a
call, or to cancel an operation.
4-96
Page 265 of 472
Pairing
A Bluetooth enabled cell phone must be paired to the
in‐vehicle Bluetooth system first and then connected to
the vehicle before it can be used. See the cell phone
manufacturers user guide for Bluetooth functions before
pairing the cell phone. If a Bluetooth phone is not
connected, calls will be made using OnStar
®Hands‐
Free Calling, if available. Refer to the OnStar owner's
guide for more information.
Pairing Information:
.Up to five cell phones can be paired to the
in‐vehicle Bluetooth system.
.The pairing process is disabled when the vehicle is
moving.
.The in‐vehicle Bluetooth system automatically links
with the first available paired cell phone in the
order the phone was paired.
.Only one paired cell phone can be connected to
the in‐vehicle Bluetooth system at a time.
.Pairing should only need to be completed once,
unless changes to the pairing information have
been made or the phone is deleted.
To link to a different paired phone, see Linking to a
Different Phone later in this section.
Pairing a Phone
1. Press and holdb gfor two seconds. The system
responds with “Ready”followed by a tone.
2. Say “Bluetooth”. The system responds with
“Bluetooth ready” followed by a tone.
3. Say “Pair”. The system responds with instructions
and a four digit PIN number. The PIN number will
be used in Step 4.
4. Start the Pairing process on the cell phone that will be paired to the vehicle. Reference the cell phone
manufacturers user guide for information on this
process.
Locate the device named “General Motors”in the
list on the cellular phone and follow the instructions
on the cell phone to enter the four digit PIN
number that was provided in Step 3.
5. The system prompts for a name for the phone. Use a name that best describes the phone. This name
will be used to indicate which phone is connected.
The system then confirms the name provided.
6. The system responds with “
been successfully paired” after the pairing process
is complete.
7. Repeat Steps 1 through 7 for additional phones to be paired.
4-97
Page 266 of 472
Listing All Paired and Connected Phones
1. Press and holdbgfor two seconds. The system
responds with “Ready”followed by a tone.
2. Say “Bluetooth”. The system responds with
“Bluetooth ready” followed by a tone.
3. Say “List”. The system lists all the paired Bluetooth
devices. If a phone is connected to the vehicle, the
system will say “Is connected”after the connected
phone.
Deleting a Paired Phone
1. Press and holdb gfor two seconds. The system
responds with “Ready”followed by a tone.
2. Say “Bluetooth”. The system responds with
“Bluetooth ready” followed by a tone.
3. Say “Delete”. The system asks which phone to
delete followed by a tone.
4. Say the name of the phone to be deleted. If the phone name is unknown, use the “List”command
for a list of all paired phones. The system responds
with “Would you like to delete
or No” followed by a tone
5. Say “Yes”to delete the phone. The system
responds with “OK, deleting
Linking to a Different Phone
1. Press and holdbgfor two seconds. The system
responds with “Ready”followed by a tone.
2. Say “Bluetooth”. The system responds with
“Bluetooth ready” followed by a tone.
3. Say “Change phone”. The system responds with
“Please wait while I search for other phones”.
.If another phone is found, the response will
be “
.If another phone is not found, the original
phone remains connected.
Storing Name Tags
The system can store up to thirty phone numbers as
name tags that are shared between the Bluetooth and
OnStar systems.
The system uses the following commands to store and
retrieve phone numbers:
.Store
.Digit Store
.Directory
4-98
Page 267 of 472
Using the Store Command
The store command allows a phone number to be
stored without entering the digits individually. 1. Press and hold
b gfor two seconds. The system
responds with “Ready”followed by a tone.
2. Say “Store”. The system responds with “Store,
number please” followed by a tone.
3. Say the complete phone number to be stored at once with no pauses.
.If the system recognizes the number it
responds with “OK, Storing”and repeats the
phone number.
.If the system is unsure it recognizes the phone
number, it responds with “Store”and repeats
the number followed by “Please say yes or no”.
If the number is correct, say “Yes”. If the
number is not correct, say “No”. The system
will ask for the number to be re‐entered. 4. After the system stores the phone number, it
responds with “Please say the name tag” followed
by a tone.
5. Say a name tag for the phone number. The name tag is recorded and the system responds with
“About to store
sound OK?”.
.If the name tag does not sound correct, say
“No” and repeat Step 5.
.If the name tag sounds correct, say “Yes”and
the name tag is stored. After the number is
stored the system returns to the main menu.
Using the Digit Store Command
The digit store command allows a phone number to be
stored by entering the digits individually.
1. Press and hold
b gfor two seconds. The system
responds with “Ready”followed by a tone.
2. Say “Digit Store”. The system responds with
“Please say the first digit to store” followed by
a tone.
4-99
Page 268 of 472
3. Say the first digit to be stored. The system will repeat back the digit it heard followed by a tone.
Continue entering digits until the number to be
stored is complete.
.If an unwanted number is recognized by the
system, say “Clear”at any time to clear the last
number.
.To hear all of the numbers recognized by the
system, say “Verify”at any time and the system
will repeat them.
4. After the complete number has been entered, say “Store”. The system responds with “Please say the
name tag” followed by a tone.
5. Say a name tag for the phone number. The name tag is recorded and the system responds with
“About to store
sound OK?”.
.If the name tag does not sound correct, say
“No” and repeat Step 5.
.If the name tag sounds correct, say “Yes”and
the name tag is stored. After the number is
stored the system returns to the main menu.
Using the Directory Command
The directory command lists all of the name tags stored
by the system. To use the directory command:
1. Press and hold
b gfor two seconds. The system
responds with “Ready”followed by a tone.
2. Say “Directory”. The system responds with
“Directory” and then plays back all of the stored
name tags. When the list is complete, the system
returns to the main menu.
Deleting Name Tags
The system uses the following commands to delete
name tags:
.Delete
.Delete all name tags
Using the Delete Command
The delete command allows specific name tags to be
deleted.
To use the delete command:
1. Press and hold
b gfor two seconds. The system
responds with “Ready”followed by a tone.
2. Say “Delete”. The system responds with “Delete,
please say the name tag” followed by a tone.
4-100