headlamp CHEVROLET CORVETTE 2010 6.G Owner's Manual
[x] Cancel search | Manufacturer: CHEVROLET, Model Year: 2010, Model line: CORVETTE, Model: CHEVROLET CORVETTE 2010 6.GPages: 472, PDF Size: 11.44 MB
Page 367 of 472
Rear Axle
When to Check Lubricant
It is not necessary to regularly check rear axle fluid
unless you suspect there is a leak or you hear an
unusual noise. A fluid loss could indicate a problem.
Have it inspected and repaired.
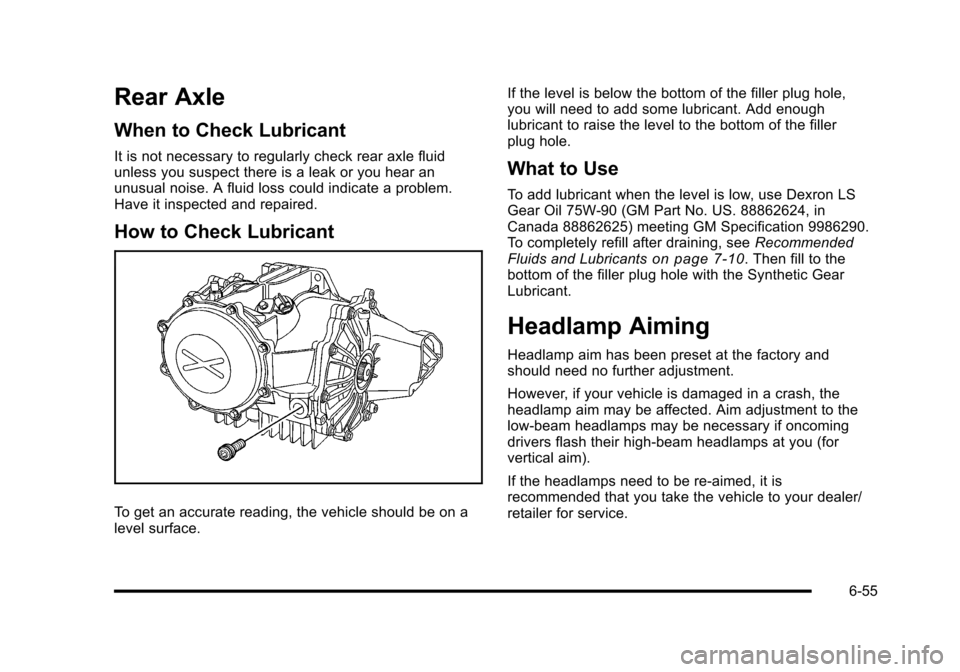
How to Check Lubricant
To get an accurate reading, the vehicle should be on a
level surface. If the level is below the bottom of the filler plug hole,
you will need to add some lubricant. Add enough
lubricant to raise the level to the bottom of the filler
plug hole.
What to Use
To add lubricant when the level is low, use Dexron LS
Gear Oil 75W-90 (GM Part No. US. 88862624, in
Canada 88862625) meeting GM Specification 9986290.
To completely refill after draining, see
Recommended
Fluids and Lubricants
on page 7‑10. Then fill to the
bottom of the filler plug hole with the Synthetic Gear
Lubricant.
Headlamp Aiming
Headlamp aim has been preset at the factory and
should need no further adjustment.
However, if your vehicle is damaged in a crash, the
headlamp aim may be affected. Aim adjustment to the
low-beam headlamps may be necessary if oncoming
drivers flash their high-beam headlamps at you (for
vertical aim).
If the headlamps need to be re-aimed, it is
recommended that you take the vehicle to your dealer/
retailer for service.
6-55
Page 368 of 472
Bulb Replacement
For the proper type of replacement bulbs, see
Replacement Bulbs on page 6‑58.
For any bulb changing procedure not listed in this
section, contact your dealer/retailer.
High Intensity Discharge (HID)
Lighting
{WARNING:
The low beam high intensity discharge lighting
system operates at a very high voltage. If you try
to service any of the system components, you
could be seriously injured. Have your dealer/
retailer or a qualified technician service them.
The vehicle may have HID headlamps. After an HID
headlamp bulb has been replaced, you may notice
that the beam is a slightly different shade than it was
originally. This is normal.
Halogen Bulbs
{WARNING:
Halogen bulbs have pressurized gas inside and
can burst if you drop or scratch the bulb. You or
others could be injured. Be sure to read and
follow the instructions on the bulb package.
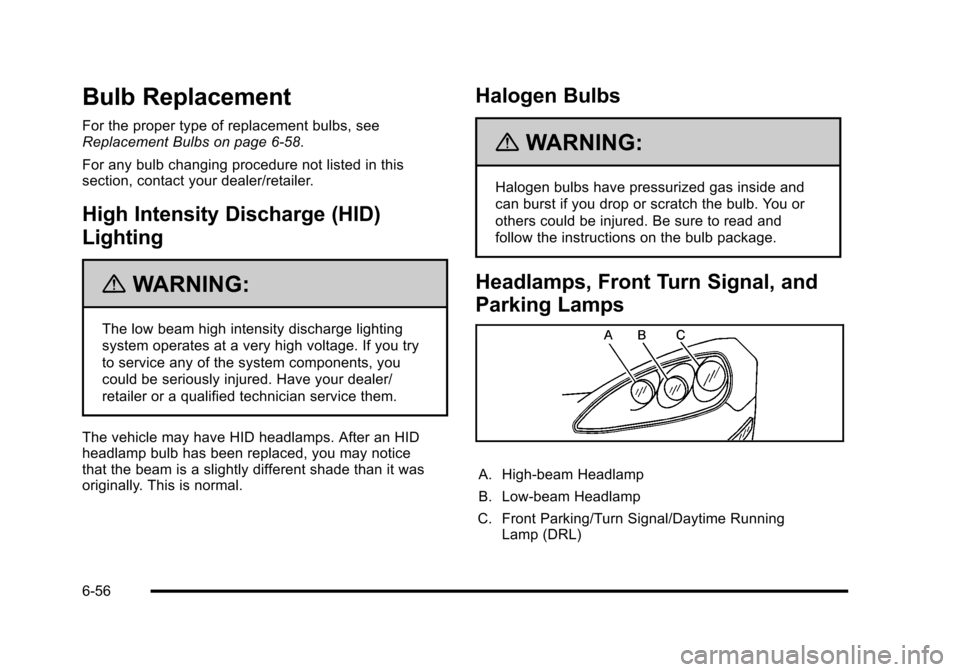
Headlamps, Front Turn Signal, and
Parking Lamps
A. High-beam Headlamp
B. Low-beam Headlamp
C. Front Parking/Turn Signal/Daytime Running Lamp (DRL)
6-56
Page 369 of 472
If the low-beam headlamp needs to be replaced, see
your dealer/retailer. See High Intensity Discharge (HID)
Lighting
on page 6‑56for more information.
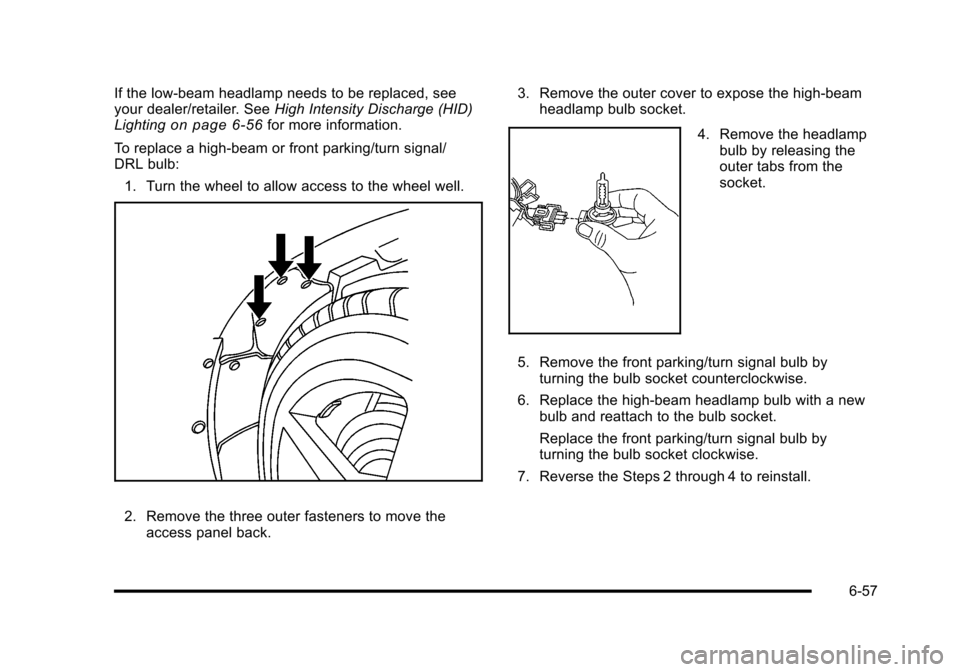
To replace a high-beam or front parking/turn signal/
DRL bulb: 1. Turn the wheel to allow access to the wheel well.
2. Remove the three outer fasteners to move the access panel back. 3. Remove the outer cover to expose the high-beam
headlamp bulb socket.
4. Remove the headlamp
bulb by releasing the
outer tabs from the
socket.
5. Remove the front parking/turn signal bulb by turning the bulb socket counterclockwise.
6. Replace the high-beam headlamp bulb with a new bulb and reattach to the bulb socket.
Replace the front parking/turn signal bulb by
turning the bulb socket clockwise.
7. Reverse the Steps 2 through 4 to reinstall.
6-57
Page 370 of 472
Taillamps, Turn Signal, and
Stoplamps
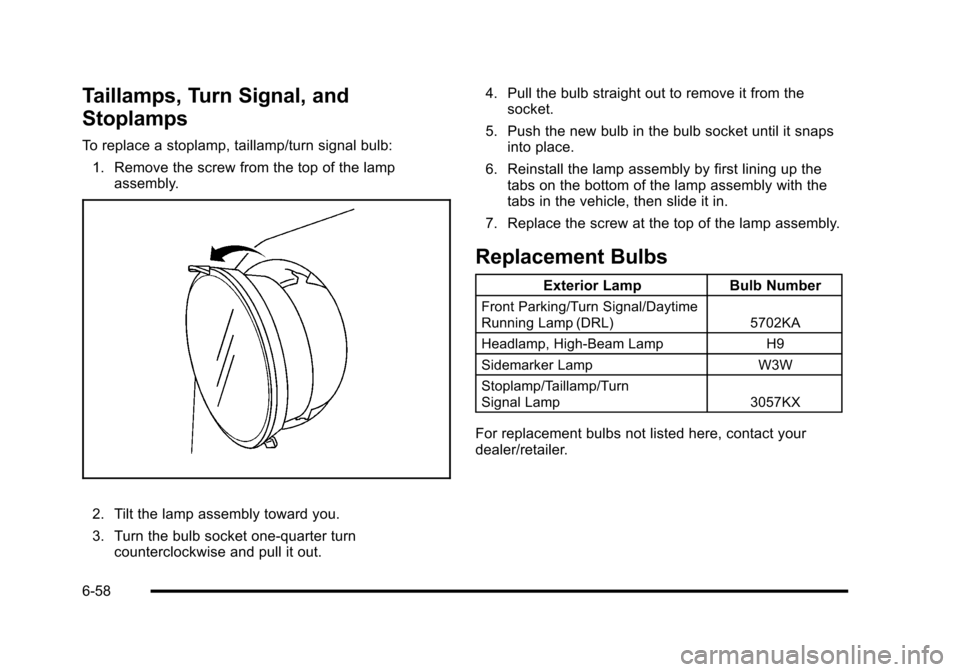
To replace a stoplamp, taillamp/turn signal bulb: 1. Remove the screw from the top of the lamp assembly.
2. Tilt the lamp assembly toward you.
3. Turn the bulb socket one-quarter turn counterclockwise and pull it out. 4. Pull the bulb straight out to remove it from the
socket.
5. Push the new bulb in the bulb socket until it snaps into place.
6. Reinstall the lamp assembly by first lining up the tabs on the bottom of the lamp assembly with the
tabs in the vehicle, then slide it in.
7. Replace the screw at the top of the lamp assembly.
Replacement Bulbs
Exterior Lamp Bulb Number
Front Parking/Turn Signal/Daytime
Running Lamp (DRL) 5702KA
Headlamp, High‐Beam Lamp H9
Sidemarker Lamp W3W
Stoplamp/Taillamp/Turn
Signal Lamp 3057KX
For replacement bulbs not listed here, contact your
dealer/retailer.
6-58
Page 394 of 472
If you need to replace any of your wheels, wheel bolts
or wheel nuts, replace them only with new GM original
equipment parts. This way, you will be sure to have
the right wheel, wheel bolts, and wheel nuts for your
vehicle.
{WARNING:
Using the wrong replacement wheels, wheel bolts,
or wheel nuts on your vehicle can be dangerous.
It could affect the braking and handling of your
vehicle, make your tires lose air and make you
lose control. You could have a collision in which
you or others could be injured. Always use the
correct wheel, wheel bolts, and wheel nuts for
replacement.
{WARNING:
Putting a used wheel on the vehicle is dangerous.
You cannot know how it has been used or how
far it has been driven. It could fail suddenly and
cause a crash. If you have to replace a wheel,
use a new GM original equipment wheel. Notice:
The wrong wheel can also cause problems
with bearing life, brake cooling, speedometer or
odometer calibration, headlamp aim, bumper height,
vehicle ground clearance, and tire clearance to the
body and chassis.
{WARNING:
Rust or dirt on a wheel, or on the parts to
which it is fastened, can make wheel nuts
become loose after a time. The wheel could
come off and cause a crash. When you
change a wheel, remove any rust or dirt from
places where the wheel attaches to the
vehicle. In an emergency, you can use a
cloth or a paper towel to do this; but be sure
to use a scraper or wire brush later, if you
need to, to get all the rust or dirt off.
6-82
Page 407 of 472

Finish Care
Occasional waxing or mild polishing of the vehicle by
hand may be necessary to remove residue from the
paint finish. Approved cleaning products can be
obtained from your dealer/retailer.
If the vehicle has a basecoat/clearcoat paint finish, the
clearcoat gives more depth and gloss to the colored
basecoat. Always use waxes and polishes that are
non-abrasive and made for a basecoat/clearcoat paint
finish.
Notice: Machine compounding or aggressive
polishing on a basecoat/clearcoat paint finish
may damage it. Use only non-abrasive waxes and
polishes that are made for a basecoat/clearcoat
paint finish on the vehicle.
Foreign materials such as calcium chloride and other
salts, ice melting agents, road oil and tar, tree sap,
bird droppings, chemicals from industrial chimneys,
etc., can damage the vehicle's finish if they remain
on painted surfaces. Wash the vehicle as soon as
possible. If necessary, use non-abrasive cleaners
that are marked safe for painted surfaces to remove
foreign matter.
Exterior painted surfaces are subject to aging, weather
and chemical fallout that can take their toll over a period
of years. To help keep the paint finish looking new, keep
the vehicle garaged or covered whenever possible.
Protecting Exterior Bright Metal Parts
Bright metal parts should be cleaned regularly to keep
their luster. Washing with water is all that is usually
needed. However, chrome polish may be used on
chrome or stainless steel trim, if necessary.
Use special care with aluminum trim. To avoid
damaging protective trim, never use auto or chrome
polish, steam or caustic soap to clean aluminum.
A coating of wax, rubbed to high polish, is
recommended for all bright metal parts.
ZR1 Carbon Fiber Panels
Carbon fiber panels can be washed and waxed like any
other panels.
Use a clear or black pigmented wax on the inner hood
carbon fiber panel.
ZR1 Hood Window
The hood window on the ZR1 can be cleaned in the
same manner as the headlamp lenses. See Cleaning
Exterior Lamps/Lenses
on page 6‑94for more
information.
6-95
Page 412 of 472
Service Parts Identification Label
This label, on the inside of the glove box, has the
following information:
.Vehicle Identification Number (VIN)
.Model designation
.Paint information
.Production options and special equipment
Do not remove this label from the vehicle.
Electrical System
Add-On Electrical Equipment
Notice: Do not add anything electrical to the vehicle
unless you check with your dealer/retailer first.
Some electrical equipment can damage the vehicle
and the damage would not be covered by the
vehicle's warranty. Some add-on electrical
equipment can keep other components from
working as they should.
Add-on equipment can drain the vehicle battery, even if
the vehicle is not operating. The vehicle has an airbag system. Before attempting
to add anything electrical to the vehicle, see
Servicing
Your Airbag-Equipped Vehicle
on page 2‑58and
Adding Equipment to Your Airbag-Equipped Vehicleon
page 2‑59.
Headlamp Wiring
The headlamp wiring is protected by fuses in the fuse
block. An electrical overload will cause the lamps to turn
off. If this happens, have the headlamp wiring checked
right away.
Windshield Wiper Fuses
The windshield wiper motor is protected by a circuit
breaker and a fuse. If the motor overheats due to heavy
snow, etc., the wiper will stop until the motor cools.
If the overload is caused by some electrical problem,
have it fixed.
Power Windows and Other Power
Options
Circuit breakers protect the power seats, power
windows, and other power accessories. When the
current load is too heavy, the circuit breaker opens and
closes, protecting the circuit until the problem is fixed
or goes away.
6-100
Page 418 of 472
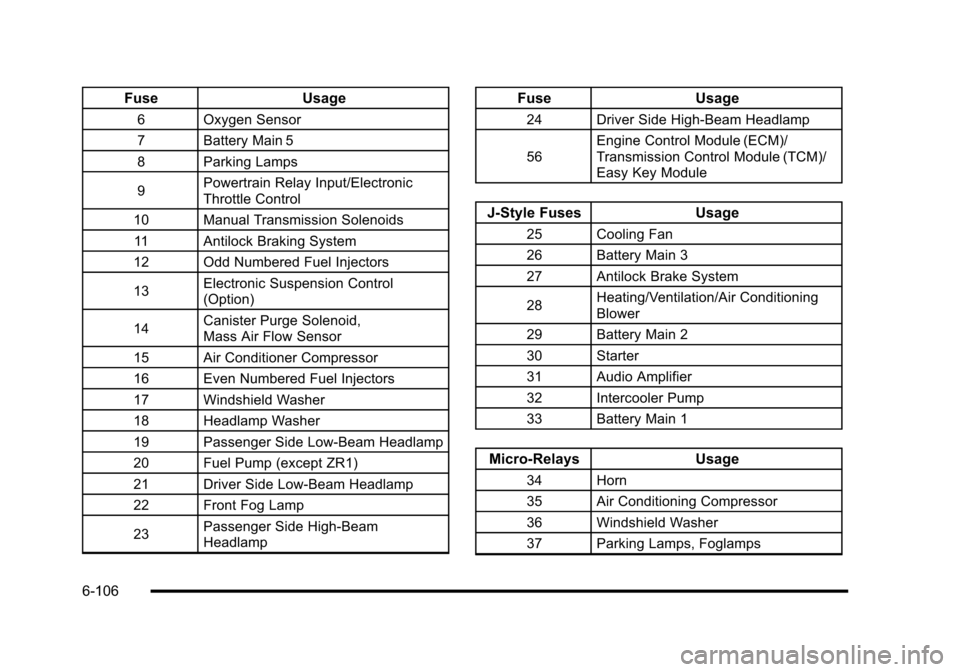
FuseUsage
6Oxygen Sensor
7 Battery Main 5
8 Parking Lamps
9 Powertrain Relay Input/Electronic
Throttle Control
10 Manual Transmission Solenoids
11 Antilock Braking System
12 Odd Numbered Fuel Injectors
13 Electronic Suspension Control
(Option)
14 Canister Purge Solenoid,
Mass Air Flow Sensor
15 Air Conditioner Compressor
16 Even Numbered Fuel Injectors
17 Windshield Washer
18 Headlamp Washer
19 Passenger Side Low-Beam Headlamp
20 Fuel Pump (except ZR1)
21 Driver Side Low-Beam Headlamp
22 Front Fog Lamp
23 Passenger Side High-Beam
Headlamp
Fuse
Usage
24Driver Side High-Beam Headlamp
56 Engine Control Module (ECM)/
Transmission Control Module (TCM)/
Easy Key Module
J-Style Fuses
Usage
25Cooling Fan
26 Battery Main 3
27 Antilock Brake System
28 Heating/Ventilation/Air Conditioning
Blower
29 Battery Main 2
30 Starter
31 Audio Amplifier
32 Intercooler Pump
33 Battery Main 1
Micro-Relays Usage
34Horn
35 Air Conditioning Compressor
36 Windshield Washer
37 Parking Lamps, Foglamps
6-106
Page 419 of 472

Micro-RelaysUsage
38Front Fog Lamp
39 High-Beam Headlamp
46 Headlamp Washer
55 Fuel Pump (except ZR1)
Mini-Relays Usage
40Rear Defog
41 Windshield Wiper High/Low
42 Windshield Wiper Run/Accessory
43 Crank
44 Powertrain Ignition 1
45 Windshield Wiper On/Off
47 Low-Beam Headlamp
Spare Fuses Usage
48Spare
49 Spare
50 Spare
51 Spare
52 Spare
53 Spare
54 Fuse Puller
Diodes Usage
§ Diode 1
§ Wiper
§ Diode 2
6-107
Page 460 of 472

Ashtray . . . . . . . . . . . . . . . . . . . . . . . . . . . . . . . . . . . . . . . . . . . . 4-21
Assistance Program, Roadside . . . . . . . . . . . . . . . . . . . . . .8-7
Audio System . . . . . . . . . . . . . . . . . . . . . . . . . . . . . . . . . . . . . . 4-80Audio Steering Wheel Controls . . . . . . . . . . . . . . . . . .4-107
Navigation/Radio System, see NavigationManual . . . . . . . . . . . . . . . . . . . . . . . . . . . . . . . . . . . . . . . . . . 4-96
Radio Reception . . . . . . . . . . . . . . . . . . . . . . . . . . . . . . . . .4-108
Setting the Clock . . . . . . . . . . . . . . . . . . . . . . . . . . . . . . . . . 4-80
Theft-Deterrent Feature . . . . . . . . . . . . . . . . . . . . . . . . . .4-106
XM™ Satellite Radio Antenna System . . . . . . . . . . .4-109
Audio System(s) . . . . . . . . . . . . . . . . . . . . . . . . . . . . . . . . . . . 4-81
Automatic Door Lock . . . . . . . . . . . . . . . . . . . . . . . . . . . . . . 3-13
Automatic Transmission
Fluid . . . . . . . . . . . . . . . . . . . . . . . . . . . . . . . . . . . . . . . . . . . . . . 6-31
Operation . . . . . . . . . . . . . . . . . . . . . . . . . . . . . . . . . . . . . . . . . 3-26
Axle, Rear . . . . . . . . . . . . . . . . . . . . . . . . . . . . . . . . . . . . . . . . . 6-55
B
Battery . . . . . . . . . . . . . . . . . . . . . . . . . . . . . . . . . . . . . . . . . . . . 6-49
Exterior Lighting Battery Saver . . . . . . . . . . . . . . . . . . . 4-15
Run-Down Protection . . . . . . . . . . . . . . . . . . . . . . . . . . . . . 4-16
Belt Routing, Engine . . . . . . . . . . . . . . . . . . . . . . . . . . . . . . . 7-13
Bluetooth
®. . . . . . . . . . . . . . . . . . . . . . . . . . . . . . . . . . . . . . . . . 4-96
Boost Gauge . . . . . . . . . . . . . . . . . . . . . . . . . . . . . . . . . . . . . . 4-47
Brake Emergencies . . . . . . . . . . . . . . . . . . . . . . . . . . . . . . . . . . . . . . 5-6 Brakes . . . . . . . . . . . . . . . . . . . . . . . . . . . . . . . . . . . . . . . . . . . . . 6-43
Antilock . . . . . . . . . . . . . . . . . . . . . . . . . . . . . . . . . . . . . . . . . . . . 5-5
Parking . . . . . . . . . . . . . . . . . . . . . . . . . . . . . . . . . . . . . . . . . . . 3-34
System Warning Light . . . . . . . . . . . . . . . . . . . . . . . . . . . . 4-36
Braking . . . . . . . . . . . . . . . . . . . . . . . . . . . . . . . . . . . . . . . . . . . . . .5-4
Braking in Emergencies . . . . . . . . . . . . . . . . . . . . . . . . . . . . .5-6
Break-In, New Vehicle . . . . . . . . . . . . . . . . . . . . . . . . . . . . . 3-21
Bulb Replacement . . . . . . . . . . . . . . . . . . . . . . . . . . . . . . . . . 6-58 Fog Lamps . . . . . . . . . . . . . . . . . . . . . . . . . . . . . . . . . . . . . . . 4-13
Halogen Bulbs . . . . . . . . . . . . . . . . . . . . . . . . . . . . . . . . . . . . 6-56
Headlamp Aiming . . . . . . . . . . . . . . . . . . . . . . . . . . . . . . . . . 6-55
Headlamps . . . . . . . . . . . . . . . . . . . . . . . . . . . . . . . . . . . . . . . 6-56
Headlamps, Front Turn Signal, and ParkingLamps . . . . . . . . . . . . . . . . . . . . . . . . . . . . . . . . . . . . . . . . . . 6-56
High Intensity Discharge (HID) Lighting . . . . . . . . . . . 6-56
Taillamps, Turn Signal and Stoplamps . . . . . . . . . . . . 6-58
Buying New Tires . . . . . . . . . . . . . . . . . . . . . . . . . . . . . . . . . . 6-77
C
Calibration . . . . . . . . . . . . . . . . . . . . . . . . . . . . . . . . . . . . . . . . . 3-39
California Perchlorate Materials Requirements . . . . . . . . . . . . . . . 6-4
Warning . . . . . . . . . . . . . . . . . . . . . . . . . . . . . . . . . . . . . . . . . . . 6-4
California Fuel . . . . . . . . . . . . . . . . . . . . . . . . . . . . . . . . . . . . . . .6-7
Canadian Owners . . . . . . . . . . . . . . . . . . . . . . . . . . . . . . . . . . . . iii
Capacities and Specifications . . . . . . . . . . . . . . . . . . . . . 6-108
i - 2