clutch CHEVROLET CORVETTE 2010 6.G Owners Manual
[x] Cancel search | Manufacturer: CHEVROLET, Model Year: 2010, Model line: CORVETTE, Model: CHEVROLET CORVETTE 2010 6.GPages: 472, PDF Size: 11.44 MB
Page 105 of 472
8. The DIC reads WAIT 10 MINUTES and counts down to zero.
9. The DIC displays OFF-ACCESSORY TO LEARN again.
10. Press Acc. on the ignition switch. 11. Steps 8, 9 and 10 will be repeated two more times.
12. A beep sounds and the DIC reads READY FOR FOB #1. All previously known transmitter
programming has been erased.
13. A beep sounds once programming in complete. The DIC displays READY FOR FOB #2.
To program additional transmitters, take transmitter
1 out of the transmitter pocket and place
transmitter 2 in the pocket. Up to four transmitters
can be programmed. The DIC then displays
MAXIMUM NUMBER OF FOBS LEARNED
and exits the programming mode.
Press Acc. on the ignition switch to complete the
process. 14. Press Acc. on the ignition switch if programming is
complete.
15. Press
Kon each newly programmed transmitter to
complete the process.
Starting the Vehicle with a Low
Transmitter Battery
If the transmitter battery is weak, the DIC may display
NO FOBS DETECTED when trying to start the vehicle.
To start the vehicle, place the transmitter in the glove
box transmitter pocket with the buttons facing the
passenger side. Then, with the vehicle in P (Park)
for an automatic transmission, press the brake pedal
and
/. If the vehicle has a manual transmission, press
the clutch and
/. Replace the transmitter battery as
soon as possible. Change the transmitter battery if the
DIC displays FOB BATTERY LOW.
3-9
Page 119 of 472
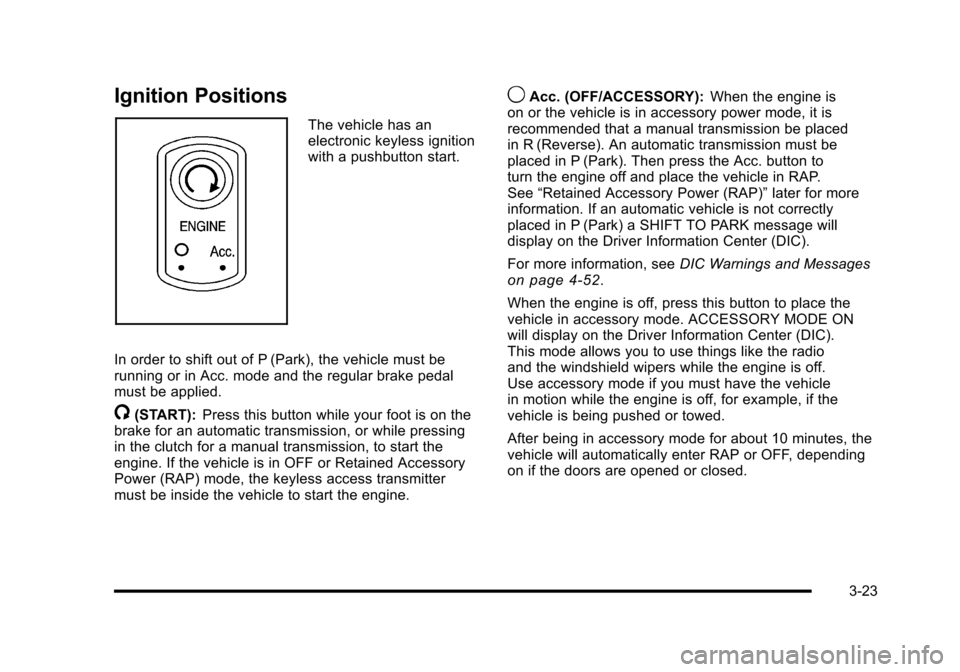
Ignition Positions
The vehicle has an
electronic keyless ignition
with a pushbutton start.
In order to shift out of P (Park), the vehicle must be
running or in Acc. mode and the regular brake pedal
must be applied.
/(START): Press this button while your foot is on the
brake for an automatic transmission, or while pressing
in the clutch for a manual transmission, to start the
engine. If the vehicle is in OFF or Retained Accessory
Power (RAP) mode, the keyless access transmitter
must be inside the vehicle to start the engine.
9Acc. (OFF/ACCESSORY): When the engine is
on or the vehicle is in accessory power mode, it is
recommended that a manual transmission be placed
in R (Reverse). An automatic transmission must be
placed in P (Park). Then press the Acc. button to
turn the engine off and place the vehicle in RAP.
See “Retained Accessory Power (RAP)” later for more
information. If an automatic vehicle is not correctly
placed in P (Park) a SHIFT TO PARK message will
display on the Driver Information Center (DIC).
For more information, see DIC Warnings and Messages
on page 4‑52.
When the engine is off, press this button to place the
vehicle in accessory mode. ACCESSORY MODE ON
will display on the Driver Information Center (DIC).
This mode allows you to use things like the radio
and the windshield wipers while the engine is off.
Use accessory mode if you must have the vehicle
in motion while the engine is off, for example, if the
vehicle is being pushed or towed.
After being in accessory mode for about 10 minutes, the
vehicle will automatically enter RAP or OFF, depending
on if the doors are opened or closed.
3-23
Page 120 of 472
Retained Accessory Power (RAP)
These vehicle accessories can be used for up to
10 minutes after the engine is turned off:
.Audio System
.Power Windows
These features continue to work up to 10 minutes after
the engine is turned off or until either door is opened.
If a door is opened, the power windows and audio
system will shut off.
Starting the Engine
Move the shift lever to P (Park) or N (Neutral) for an
automatic transmission. For a manual transmission the
vehicle can be started in Neutral or any other gear as
long as the clutch pedal is pressed. To restart a vehicle
with a manual transmission when you are already
moving, use the Neutral position only. To restart a
vehicle with an automatic transmission when you
are already moving, use N (Neutral).
Notice: Do not try to shift to P (Park) if the vehicle
is moving. If you do, you could damage the
transmission. Shift to P (Park) only when the
vehicle is stopped.
The keyless access transmitter must be inside the
vehicle for the ignition to work. Cell phone chargers can interfere with the operation of
the Keyless Access System. Battery chargers should
not be plugged in when starting or turning off the
engine.
To start the vehicle, do the following:
1. For vehicles with an automatic transmission, with your foot on the brake pedal, press the
START button located on the instrument panel.
For vehicles with a manual transmission, you must
also press in the clutch pedal while pressing the
START button.
If there is not a keyless access transmitter in
the vehicle or if there is something causing
interference with it, the DIC will display NO FOBS
DETECTED. See DIC Warnings and Messages
on
page 4‑52for more information.
2. When the engine begins cranking, let go of the button and the engine cranks automatically until
it starts. If the battery in the keyless access
transmitter is weak, the DIC displays FOB
BATTERY LOW. You can still drive the vehicle.
See “Battery Replacement” underKeyless Access
System Operation
on page 3‑5for more
information. If the fob battery is dead, you need to
insert the fob into the fob slot to enable engine
starting. See “No Fobs Detected” underDIC
Warnings and Messages on page 4‑52.
3-24
Page 128 of 472
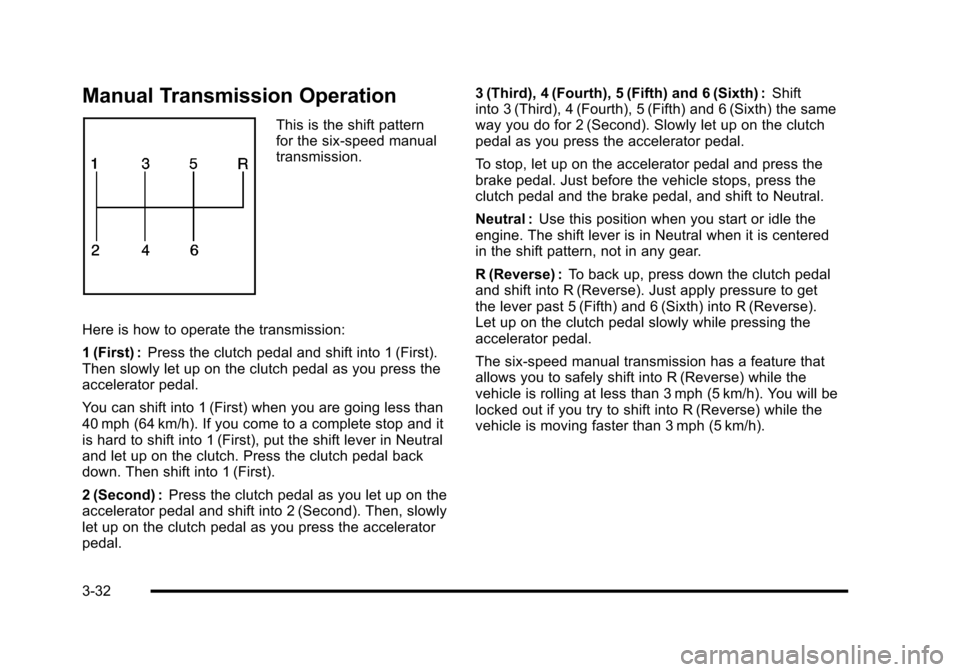
Manual Transmission Operation
This is the shift pattern
for the six-speed manual
transmission.
Here is how to operate the transmission:
1 (First) : Press the clutch pedal and shift into 1 (First).
Then slowly let up on the clutch pedal as you press the
accelerator pedal.
You can shift into 1 (First) when you are going less than
40 mph (64 km/h). If you come to a complete stop and it
is hard to shift into 1 (First), put the shift lever in Neutral
and let up on the clutch. Press the clutch pedal back
down. Then shift into 1 (First).
2 (Second) : Press the clutch pedal as you let up on the
accelerator pedal and shift into 2 (Second). Then, slowly
let up on the clutch pedal as you press the accelerator
pedal. 3 (Third), 4 (Fourth), 5 (Fifth) and 6 (Sixth) :
Shift
into 3 (Third), 4 (Fourth), 5 (Fifth) and 6 (Sixth) the same
way you do for 2 (Second). Slowly let up on the clutch
pedal as you press the accelerator pedal.
To stop, let up on the accelerator pedal and press the
brake pedal. Just before the vehicle stops, press the
clutch pedal and the brake pedal, and shift to Neutral.
Neutral : Use this position when you start or idle the
engine. The shift lever is in Neutral when it is centered
in the shift pattern, not in any gear.
R (Reverse) : To back up, press down the clutch pedal
and shift into R (Reverse). Just apply pressure to get
the lever past 5 (Fifth) and 6 (Sixth) into R (Reverse).
Let up on the clutch pedal slowly while pressing the
accelerator pedal.
The six-speed manual transmission has a feature that
allows you to safely shift into R (Reverse) while the
vehicle is rolling at less than 3 mph (5 km/h). You will be
locked out if you try to shift into R (Reverse) while the
vehicle is moving faster than 3 mph (5 km/h).
3-32
Page 130 of 472
Downshifting (Manual Transmission)
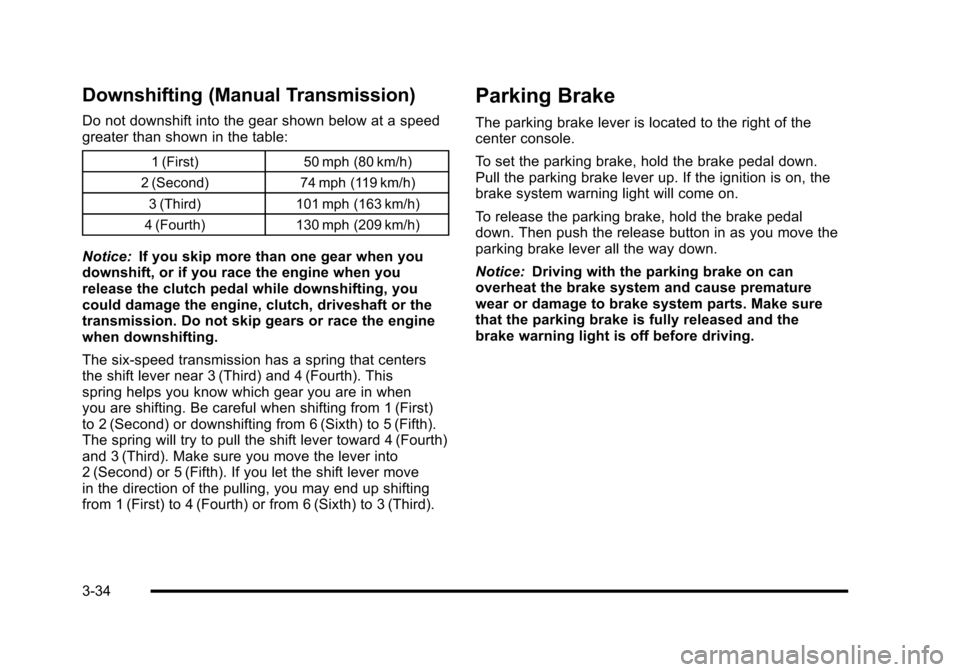
Do not downshift into the gear shown below at a speed
greater than shown in the table:
1 (First)50 mph (80 km/h)
2 (Second) 74 mph (119 km/h)
3 (Third) 101 mph (163 km/h)
4 (Fourth) 130 mph (209 km/h)
Notice: If you skip more than one gear when you
downshift, or if you race the engine when you
release the clutch pedal while downshifting, you
could damage the engine, clutch, driveshaft or the
transmission. Do not skip gears or race the engine
when downshifting.
The six-speed transmission has a spring that centers
the shift lever near 3 (Third) and 4 (Fourth). This
spring helps you know which gear you are in when
you are shifting. Be careful when shifting from 1 (First)
to 2 (Second) or downshifting from 6 (Sixth) to 5 (Fifth).
The spring will try to pull the shift lever toward 4 (Fourth)
and 3 (Third). Make sure you move the lever into
2 (Second) or 5 (Fifth). If you let the shift lever move
in the direction of the pulling, you may end up shifting
from 1 (First) to 4 (Fourth) or from 6 (Sixth) to 3 (Third).
Parking Brake
The parking brake lever is located to the right of the
center console.
To set the parking brake, hold the brake pedal down.
Pull the parking brake lever up. If the ignition is on, the
brake system warning light will come on.
To release the parking brake, hold the brake pedal
down. Then push the release button in as you move the
parking brake lever all the way down.
Notice: Driving with the parking brake on can
overheat the brake system and cause premature
wear or damage to brake system parts. Make sure
that the parking brake is fully released and the
brake warning light is off before driving.
3-34
Page 132 of 472
Torque Lock (Automatic Transmission)
If you are parking on a hill and you do not shift the
transmission into P (Park) properly, the weight of the
vehicle may put too much force on the parking pawl
in the transmission. You may find it difficult to pull the
shift lever out of P (Park). This is called “torque lock.”
To prevent torque lock, set the parking brake and then
shift into P (Park) properly before you leave the driver
seat. To find out how, see “Shifting Into P (Park)”listed
previously in this section.
When you are ready to drive, move the shift lever out
of P (Park) before you release the parking brake.
If torque lock does occur, you may need to have
another vehicle push yours a little uphill to take some
of the pressure from the transmission parking pawl, so
you can pull the shift lever out of P (Park).
Shifting Out of Park
Shift lock release prevents shifting out of P (Park)
unless the vehicle is running or in Accessory mode and
the brake pedal is applied.
The shift lock release is always functional except in the
case of an uncharged or low voltage (less than 9‐volt)
battery. See Jump Starting
on page 6‑50for more
information. To shift out of P (Park) use the following:
1. Apply the brake pedal.
2. Press the shift lever button.
3. Move the shift lever to the desired position.
If you still are unable to shift out of P (Park): 1. Fully release the shift lever button.
2. While holding down the brake pedal, press the shift lever button again.
3. Move the shift lever to the desired position.
If you still cannot move the shift lever from P (Park),
consult your dealer/retailer or a professional towing
service.
Parking the Vehicle
(Manual Transmission)
Before you get out of the vehicle, move the shift lever
into R (Reverse) and firmly apply the parking brake.
Once the shift lever has been placed into R (Reverse)
with the clutch pedal pressed in, you can turn the
ignition off and release the clutch.
3-36
Page 178 of 472
Using Cruise Control on Hills
How well the cruise control works on hills depends upon
the vehicle's speed, load, and the steepness of the hills.
When going up steep hills, you might want to step on
the accelerator pedal to maintain the vehicle's speed.
When going downhill, you might have to brake or shift
to a lower gear to keep the vehicle's speed down. When
the brakes are applied the cruise control turns off.
Cruise Control in Sport and Manual Paddle
Shift Gear Selection
When the vehicle is in S (Sport) and the manual paddle
shift controls are not being used, cruise control
operates in the same manner as D (Drive).
When the vehicle is in S (Sport) and the manual paddle
shift controls are being used, cruise control operates as
follows:
.If cruise control is active and a gear is selected
with the manual paddle shift controls, the vehicle
speed is maintained in the driver selected gear
and will not automatically up-shift or down-shift
the transmission while the driver ’s gear selection
is active.
.If driving in hilly terrain, cruise control may not be
able to maintain vehicle speed if an up-shift or
down-shift is not selected by the driver. While
driving on hilly terrain and cruise control is active
with a manual paddle shift gear selection, the
driver must select the proper gear for the terrain or
select D (Drive) on the gear range selector for full
automatic transmission operation.
Ending Cruise Control
To end a cruise control session, step lightly on the
brake pedal. If the vehicle has a manual transmission,
lightly tapping the clutch will also end a cruise control
session.
Move the cruise control switch to
9to turn the system
completely off.
When cruise control is disengaged, the CRUISE
DISENGAGED message displays on the Driver
Information Center (DIC). See DIC Warnings and
Messages on page 4‑52.
Erasing Speed Memory
The cruise control set speed memory is erased when
the cruise control or the ignition is turned off.
4-10
Page 224 of 472
COOLANT OVER TEMPERATURE
This message displays and a sound will be heard if the
engine coolant exceeds 124°C (255°F). If you have
been operating the vehicle under normal driving
conditions, pull off the road, stop the vehicle, and
turn off the engine as soon as possible.
You can monitor the coolant temperature with the
gauges button on the DIC or the engine coolant
temperature gauge on the instrument panel cluster.
See Engine Overheating
on page 6‑38,DIC Operation
and Displayson page 4‑47, and Engine Coolant
Temperature Gauge on page 4‑40.
To acknowledge the message, press the RESET button.
The message and sound will come back on until this
condition changes. If you do not press the RESET
button, the message remains on until the condition
changes.
CRUISE DISENGAGED
This message displays briefly when you disengage
the cruise control system by stepping on the brake on
an automatic transmission vehicle or the clutch on a
manual transmission vehicle, or by turning off the cruise
control switch. See Cruise Control
on page 4‑7for
more information.
ENGINE DRAG CONTROL ACTIVE
This message displays when engine drag control is
active. When driving in a lower gear in rainy, snowy,
or icy conditions and then letting up on the accelerator
or downshifting, the rear wheels may begin to slip and
this message displays. This message stays on for a few
seconds following the engine drag control event.
ENGINE OVERHEATED –STOP ENGINE
This message displays and a sound will be heard when
the engine has overheated. Stop and turn the engine
off immediately to avoid severe engine damage.
See Engine Overheating on page 6‑38.
ENGINE PROTECTION REDUCE
ENGINE RPM
This message displays if the engine oil temperature
exceeds 160°C (320°F). Check the engine coolant
temperature and engine oil level. If the engine is
too hot, see Engine Overheating
on page 6‑38.
The vehicle may need service, so see your dealer/
retailer.
You can monitor the oil temperature with the gauges
button on the DIC. See DIC Operation and Displays
on
page 4‑47.
4-56
Page 237 of 472
TRANSMISSION HOT IDLE ENGINE
This message displays and four chimes sound if the
transmission fluid temperature rises above 132°C
(270°F) or rises rapidly. The transmission may shift
gears or apply the torque converter clutch to reduce the
fluid temperature. Driving aggressively or driving on
long hills can cause the transmission fluid temperature
to be higher than normal. If this message appears, you
may continue to drive at a slower speed. Monitor the
transmission fluid temperature and allow it to cool to at
least 110°C (230°F). The transmission fluid temperature
can be monitored with the gauges button on the DIC.
See DIC Operation and Displays
on page 4‑47and
Automatic Transmission Fluidon page 6‑31. Also
check the engine coolant temperature. If it is also hot,
see Engine Overheating on page 6‑38.
If this message is displayed during normal vehicle
operation on flat roads, the vehicle may need service.
See your dealer/retailer for an inspection.
If driving in a performance or competitive manner, the
use of (S) Sport Automatic Mode or (S) Sport Manual
Paddle Shift gear selection is recommended. See
Automatic Transmission Operation
on page 3‑26for
more information. To acknowledge the message, press the RESET button.
The message reappears every 10 minutes until this
condition changes. If you do not press the RESET
button, the message remains on the display until the
condition changes.
TURN SIGNAL ON
This message displays and a sound will be heard if a
turn signal is left on for 1.2 km (three-quarters of a mile).
Move the turn signal/multifunction lever to the off
position.
To acknowledge this message, press the RESET
button.
UNLATCH HEADER TO MOVE TOP
This message displays and a sound will be heard if you
try to lower the convertible top without first unlocking
the top. Move the latch handle to unlock the convertible
top. See
Convertible Top (Manual)
on page 3‑59or
Convertible Top (Power) on page 3‑66.
4-69
Page 291 of 472
Launch Control
A Launch Control feature is available, within
Competitive Driving Mode (except ZR1) or Performance
Traction Management (ZR1), on vehicles with a manual
transmission to allow the driver to achieve high levels of
vehicle acceleration in a straight line. Launch Control is
a form of traction control that manages tire spin while
launching the vehicle. This feature is intended for use
during closed course race events where consistent
zero to sixty and quarter mile times are desirable.
Launch Control is only available when the following
criteria are met:
.Competitive Driving Mode is selected (except ZR1)
or any of the Performance Traction Management
modes are selected (ZR1). The TCS light comes
on the instrument panel and the appropriate
DIC message displays.
.The vehicle is not moving.
.The steering wheel is pointing straight.
.The clutch is pressed and the vehicle is in
first gear.
.The accelerator pedal is rapidly applied to wide
open throttle. The Launch Control feature will initially limit engine
speed as the driver rapidly applies the accelerator pedal
to wide open throttle. A smooth, quick release of the
clutch, while maintaining the fully pressed accelerator
pedal, will manage wheel slip. Complete shifts as
described in
Manual Transmission Operation
on
page 3‑32.
After the vehicle is launched, the system continues in
Competitive Mode (except ZR1) or Performance
Traction Management (ZR1).
Competitive Driving Mode, Performance Traction
Management, and Launch Control are systems
designed for a closed course race track and not
intended for use on public roads. The systems are not
intended to compensate for lack of driver experience or
familiarity with the race track.
5-13