key battery CHEVROLET CORVETTE 2010 6.G Owners Manual
[x] Cancel search | Manufacturer: CHEVROLET, Model Year: 2010, Model line: CORVETTE, Model: CHEVROLET CORVETTE 2010 6.GPages: 472, PDF Size: 11.44 MB
Page 7 of 472

Section 1 In Brief
Instrument Panel. . . . . . . . . . . . . . . . . . . . . . . . . . . . . . . . . . . 1-2
Initial Drive Information . . . . . . . . . . . . . . . . . . . . . . . . . . . 1-4
Remote Keyless Entry (RKE) System . . . . . . . . . . . 1-4
Door Locks . . . . . . . . . . . . . . . . . . . . . . . . . . . . . . . . . . . . . 1-5
Trunk Release . . . . . . . . . . . . . . . . . . . . . . . . . . . . . . . . . . 1-6
Windows . . . . . . . . . . . . . . . . . . . . . . . . . . . . . . . . . . . . . . . . 1-6
Seat Adjustment . . . . . . . . . . . . . . . . . . . . . . . . . . . . . . . . 1-7
Safety Belt . . . . . . . . . . . . . . . . . . . . . . . . . . . . . . . . . . . . . . 1-9
Sensing System for Passenger Airbag . . . . . . . . . 1-10
Mirror Adjustment . . . . . . . . . . . . . . . . . . . . . . . . . . . . . . 1-11
Steering Wheel Adjustment . . . . . . . . . . . . . . . . . . . . 1-12
Interior Lighting . . . . . . . . . . . . . . . . . . . . . . . . . . . . . . . . 1-13
Exterior Lighting . . . . . . . . . . . . . . . . . . . . . . . . . . . . . . . 1-13
Windshield Wiper/Washer . . . . . . . . . . . . . . . . . . . . . . 1-14
Climate Controls . . . . . . . . . . . . . . . . . . . . . . . . . . . . . . . 1-15
Transmission . . . . . . . . . . . . . . . . . . . . . . . . . . . . . . . . . . 1-15
Vehicle Features . . . . . . . . . . . . . . . . . . . . . . . . . . . . . . . . . . 1-16
Radio(s) . . . . . . . . . . . . . . . . . . . . . . . . . . . . . . . . . . . . . . . 1-16
Satellite Radio . . . . . . . . . . . . . . . . . . . . . . . . . . . . . . . . . 1-17 Portable Audio Devices . . . . . . . . . . . . . . . . . . . . . . . . 1-18
Steering Wheel Controls . . . . . . . . . . . . . . . . . . . . . . . 1-18
Bluetooth
®. . . . . . . . . . . . . . . . . . . . . . . . . . . . . . . . . . . . . 1-18
Navigation System . . . . . . . . . . . . . . . . . . . . . . . . . . . . . 1-19
Driver Information Center (DIC) . . . . . . . . . . . . . . . . 1-19
Cruise Control . . . . . . . . . . . . . . . . . . . . . . . . . . . . . . . . . 1-20
Power Outlets . . . . . . . . . . . . . . . . . . . . . . . . . . . . . . . . . 1-21
Roof Panel . . . . . . . . . . . . . . . . . . . . . . . . . . . . . . . . . . . . 1-21
Convertible . . . . . . . . . . . . . . . . . . . . . . . . . . . . . . . . . . . . 1-21
Performance and Maintenance . . . . . . . . . . . . . . . . . . 1-21
Traction Control System (TCS) . . . . . . . . . . . . . . . . 1-21
Towing . . . . . . . . . . . . . . . . . . . . . . . . . . . . . . . . . . . . . . . . . 1-22
Tire Pressure Monitor . . . . . . . . . . . . . . . . . . . . . . . . . . 1-22
Z06, Z16, and ZR1 Features . . . . . . . . . . . . . . . . . . . 1-23
Engine Oil Life System . . . . . . . . . . . . . . . . . . . . . . . . 1-24
Driving for Better Fuel Economy . . . . . . . . . . . . . . . 1-24
Battery . . . . . . . . . . . . . . . . . . . . . . . . . . . . . . . . . . . . . . . . . 1-24
Roadside Assistance Program . . . . . . . . . . . . . . . . . 1-25
OnStar
®. . . . . . . . . . . . . . . . . . . . . . . . . . . . . . . . . . . . . . . 1-25
1-1
Page 11 of 472
Door Locks
From the outside, press theQor Kbutton on the
keyless access transmitter.
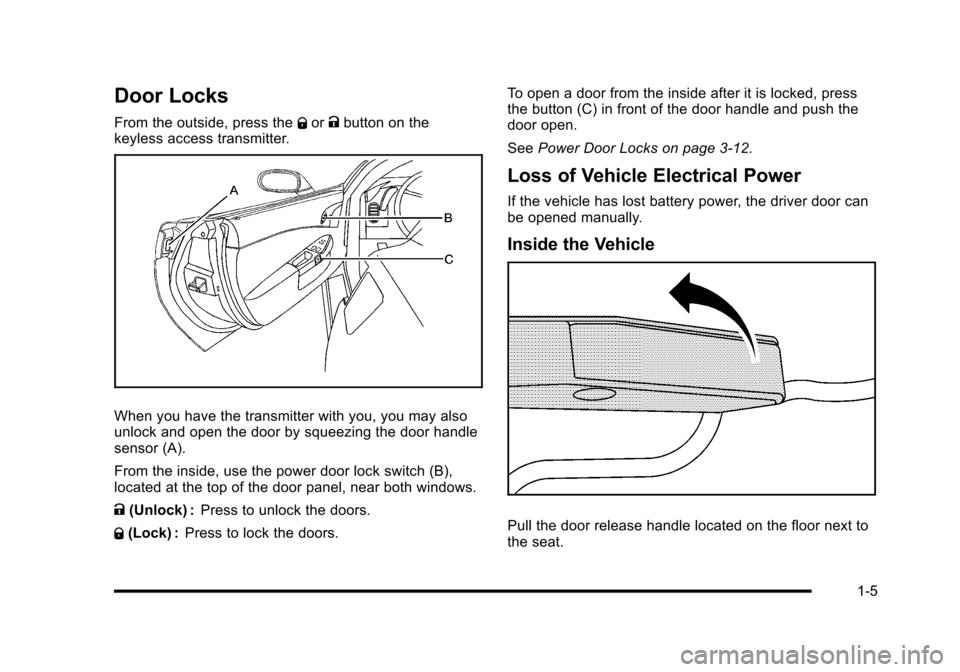
When you have the transmitter with you, you may also
unlock and open the door by squeezing the door handle
sensor (A).
From the inside, use the power door lock switch (B),
located at the top of the door panel, near both windows.
K (Unlock) : Press to unlock the doors.
Q (Lock) : Press to lock the doors. To open a door from the inside after it is locked, press
the button (C) in front of the door handle and push the
door open.
See
Power Door Locks on page 3‑12.
Loss of Vehicle Electrical Power
If the vehicle has lost battery power, the driver door can
be opened manually.
Inside the Vehicle
Pull the door release handle located on the floor next to
the seat.
1-5
Page 101 of 472
Keyless Access System
SeeRadio Frequency Statementon page 8‑20for information regarding Part 15 of the Federal
Communications Commission (FCC) Rules and
RSS-210/211 of Industry Canada.
Changes or modifications to this system by other than
an authorized service facility could void authorization to
use this equipment.
If there is a decrease in the RKE operating range,
try this:
.Check the distance. The transmitter may be too
far from the vehicle. Stand closer during rainy or
snowy weather.
.Check the location. Other vehicles or objects may
be blocking the signal. Take a few steps to the left
or right, hold the transmitter higher, and try again.
.Check the transmitter's battery. See “Battery
Replacement” later in this section.
.If the transmitter is still not working correctly, see
your dealer/retailer or a qualified technician for
service.
Keyless Access System Operation
The Keyless Access System transmitter functions work
up to 30 m (100 feet) away from the vehicle.
Keyless Unlocking
Press the door handle sensor to unlock and open the
doors if the keyless access transmitter is within range.
See Door Locks
on page 3‑10and“Passive Door
Unlock” underDIC Vehicle Personalizationon
page 4‑71for additional information.
Keyless Locking
The doors lock after several seconds if all doors are
closed and at least one keyless access transmitter
has been removed from the interior of the vehicle.
To customize whether the doors automatically lock
when exiting the vehicle, see “Passive Door Locking”
under DIC Vehicle Personalization
on page 4‑71for
additional information.
3-5
Page 111 of 472
Hatch/Trunk Lid Release
There are several ways to release the hatch/trunk lid.
If your vehicle has an automatic transmission, the shift
lever must be in P (Park). For manual transmission
vehicles, the parking brake must be set when the
ignition is started for the hatch/trunk release to operate.
The parking brake does not need to be set when the
ignition is off for the hatch/trunk release to operate.
See Parking Brake on page 3‑34.
V (Hatch/Trunk) : Press the hatch/trunk lid release
button, located on the instrument panel to the left of the
steering wheel. The theft-deterrent alarm system must
not be armed.
} (Hatch/Trunk) : Press the hatch/trunk lid release
button on the keyless access transmitter. See Keyless
Access System on page 3‑5.
Press the hatch/trunk release button located on the rear
of the hatch/trunk lid above the license plate, as long as
you have your transmitter with you.
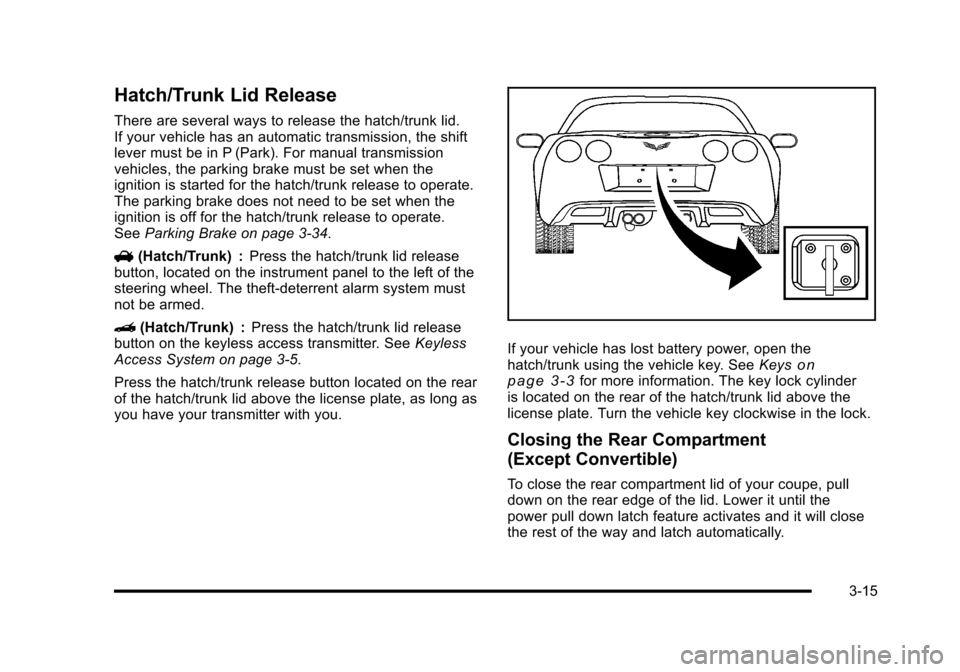
If your vehicle has lost battery power, open the
hatch/trunk using the vehicle key. See Keyson
page 3‑3for more information. The key lock cylinder
is located on the rear of the hatch/trunk lid above the
license plate. Turn the vehicle key clockwise in the lock.
Closing the Rear Compartment
(Except Convertible)
To close the rear compartment lid of your coupe, pull
down on the rear edge of the lid. Lower it until the
power pull down latch feature activates and it will close
the rest of the way and latch automatically.
3-15
Page 115 of 472
Theft-Deterrent Systems
Vehicle theft is big business, especially in some cities.
This vehicle has theft-deterrent features, however, they
do not make it impossible to steal.
Theft-Deterrent System
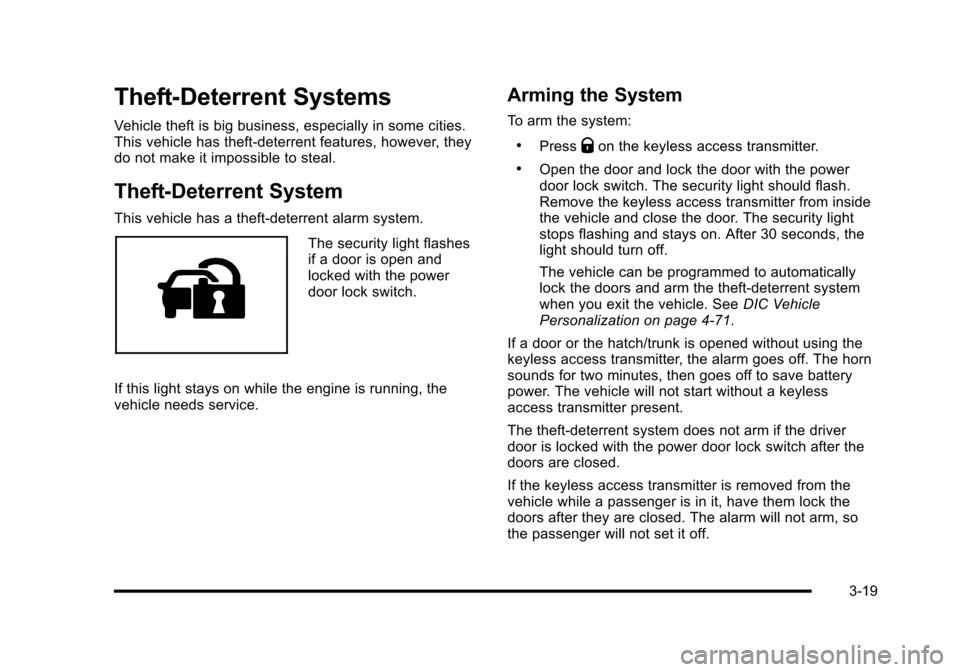
This vehicle has a theft-deterrent alarm system.
The security light flashes
if a door is open and
locked with the power
door lock switch.
If this light stays on while the engine is running, the
vehicle needs service.
Arming the System
To arm the system:
.PressQon the keyless access transmitter.
.Open the door and lock the door with the power
door lock switch. The security light should flash.
Remove the keyless access transmitter from inside
the vehicle and close the door. The security light
stops flashing and stays on. After 30 seconds, the
light should turn off.
The vehicle can be programmed to automatically
lock the doors and arm the theft-deterrent system
when you exit the vehicle. See DIC Vehicle
Personalization on page 4‑71.
If a door or the hatch/trunk is opened without using the
keyless access transmitter, the alarm goes off. The horn
sounds for two minutes, then goes off to save battery
power. The vehicle will not start without a keyless
access transmitter present.
The theft-deterrent system does not arm if the driver
door is locked with the power door lock switch after the
doors are closed.
If the keyless access transmitter is removed from the
vehicle while a passenger is in it, have them lock the
doors after they are closed. The alarm will not arm, so
the passenger will not set it off.
3-19
Page 120 of 472
Retained Accessory Power (RAP)
These vehicle accessories can be used for up to
10 minutes after the engine is turned off:
.Audio System
.Power Windows
These features continue to work up to 10 minutes after
the engine is turned off or until either door is opened.
If a door is opened, the power windows and audio
system will shut off.
Starting the Engine
Move the shift lever to P (Park) or N (Neutral) for an
automatic transmission. For a manual transmission the
vehicle can be started in Neutral or any other gear as
long as the clutch pedal is pressed. To restart a vehicle
with a manual transmission when you are already
moving, use the Neutral position only. To restart a
vehicle with an automatic transmission when you
are already moving, use N (Neutral).
Notice: Do not try to shift to P (Park) if the vehicle
is moving. If you do, you could damage the
transmission. Shift to P (Park) only when the
vehicle is stopped.
The keyless access transmitter must be inside the
vehicle for the ignition to work. Cell phone chargers can interfere with the operation of
the Keyless Access System. Battery chargers should
not be plugged in when starting or turning off the
engine.
To start the vehicle, do the following:
1. For vehicles with an automatic transmission, with your foot on the brake pedal, press the
START button located on the instrument panel.
For vehicles with a manual transmission, you must
also press in the clutch pedal while pressing the
START button.
If there is not a keyless access transmitter in
the vehicle or if there is something causing
interference with it, the DIC will display NO FOBS
DETECTED. See DIC Warnings and Messages
on
page 4‑52for more information.
2. When the engine begins cranking, let go of the button and the engine cranks automatically until
it starts. If the battery in the keyless access
transmitter is weak, the DIC displays FOB
BATTERY LOW. You can still drive the vehicle.
See “Battery Replacement” underKeyless Access
System Operation
on page 3‑5for more
information. If the fob battery is dead, you need to
insert the fob into the fob slot to enable engine
starting. See “No Fobs Detected” underDIC
Warnings and Messages on page 4‑52.
3-24
Page 184 of 472
Battery Run-Down Protection
This vehicle has a feature to help prevent the battery
from being drained in case any of the following lamps
are left on; the underhood lamp, if your vehicle has
this feature, vanity mirror lamps, cargo lamps, reading
lamps, console or glove box lamps. If any of these
lamps are left on, they will automatically time-out after
about 10 minutes. To reset it, all of the above lamps
must be turned off or the ignition key on.
Head-Up Display (HUD)
{WARNING:
If the HUD image is too bright, or too high in your
field of view, it may take you more time to see
things you need to see when it is dark outside.
Be sure to keep the HUD image dim and placed
low in your field of view.
For vehicles with the Head-Up Display (HUD), you can
see some of the driver information that appears on the
instrument panel cluster. The information may be displayed in English or metric
units and appears as an image focused out toward the
front of the vehicle. The HUD consists of the following
information:
.Speedometer
.Turn Signal Indicators
.High-Beam Indicator Symbol
.Tachometer
.Manual Paddle Shift Gear Indicator (If Equipped)
These displays on the HUD are for use when
using the manual paddle shift controls to shift
the transmission. See
“Manual Paddle Shift”in
Automatic Transmission Operation on page 3‑26.
.Shift Light
This light is used for performance driving to
indicate that the vehicle's best performance level
has been reached to shift the transmission into the
next higher gear. An arrow pointing up will light up
on the display just prior to reaching the engine fuel
cut-off mode. This cut-off is about 6,500 RPM for
the LS3 engine, 6,600 RPM for the LS9 & ZR1
engines and 7,000 RPM for the LS7 engine.
.Check Gauges Warning
.Engine Coolant Temperature Gauge
4-16
Page 211 of 472
If none of the above have made the light turn off, your
dealer/retailer can check the vehicle. The dealer/retailer
has the proper test equipment and diagnostic tools to fix
any mechanical or electrical problems that might have
developed.
Emissions Inspection and Maintenance
Programs
Some state/provincial and local governments have
or might begin programs to inspect the emission
control equipment on the vehicle. Failure to pass this
inspection could prevent getting a vehicle registration.
Here are some things to know to help the vehicle pass
an inspection:
.The vehicle will not pass this inspection if the
check engine light is on with the engine running.
To perform a check engine light bulb check with
the keyless ignition, make sure the transmitter fob
is in the passenger compartment. See Ignition
Positions
on page 3‑23. Press the bottom of the
Acc. button on the instrument panel and hold the button down for five seconds. The instrument
panel, including the check engine light, will light up
and the ignition will be on, but the engine will not
start
—press the bottom of the Acc. button only
briefly, less than five seconds, the accessory
power mode will be turned on, but not the ignition.
After the bulb check, press and release the Acc.
button again to turn the ignition off and avoid
draining the vehicle's battery.
.The vehicle will not pass this inspection if the
OBD II (on-board diagnostic) system determines
that critical emission control systems have not
been completely diagnosed by the system.
The vehicle would be considered not ready for
inspection. This can happen if the battery has
recently been replaced or if the battery has run
down. The diagnostic system is designed to
evaluate critical emission control systems during
normal driving. This can take several days of
routine driving. If this has been done and the
vehicle still does not pass the inspection for lack
of OBD II system readiness, your dealer/retailer
can prepare the vehicle for inspection.
4-43
Page 227 of 472
MAXIMUM SPEED 129 km/h (80 MPH)
This message displays when a malfunction is present in
the Selective Ride Control system. The vehicle speed
will be limited to a value determined by the vehicle
when the shock absorber system has failed and the
shocks are in their full soft mode. Have the vehicle
serviced by your dealer/retailer as soon as possible.
To acknowledge the message, press the RESET button.
The message reappears every 10 minutes until this
condition changes.
NO FOBS DETECTED
This message displays if the vehicle does not detect the
presence of a keyless access transmitter when you
have attempted to start the vehicle or a vehicle door
has just closed. The following conditions may cause this
message to appear:
.Driver-added equipment plugged into the
accessory power outlet on the center console
is causing interference. Examples of these
devices are cell phones and cell phone chargers,
two-way radios, power inverters, or similar items.
Try moving the keyless access transmitter away
from these devices when starting the vehicle.
In addition, PDA devices and remote garage and
gate openers may also generate Electromagnetic
Interference (EMI) that may interfere with the keyless access transmitter. Do not carry the
keyless access transmitter in the same pocket or
bag as these devices.
.The vehicle is experiencing Electromagnetic
Interference (EMI). Some locations, such as
airports, automatic toll booths, and some gas
stations have EMI fields which may interfere
with the keyless access transmitter.
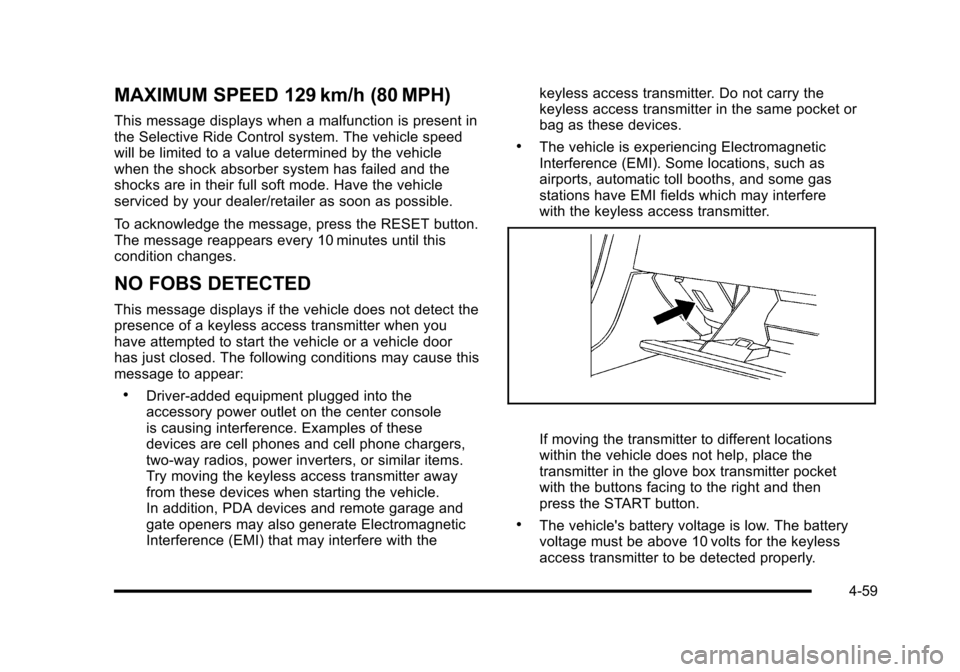
If moving the transmitter to different locations
within the vehicle does not help, place the
transmitter in the glove box transmitter pocket
with the buttons facing to the right and then
press the START button.
.The vehicle's battery voltage is low. The battery
voltage must be above 10 volts for the keyless
access transmitter to be detected properly.
4-59
Page 238 of 472

Other Messages
Here are more messages that you can receive on your
Driver Information Center (DIC). To acknowledge a
message and read another message that may have
come on at the same time, press the RESET button.
.ACCESSORY MODE ON
.BATTERY VOLTAGE HIGH
See Voltmeter Gauge on page 4‑35.
.BATTERY VOLTAGE LOW
See Voltmeter Gauge on page 4‑35.
.CHECK WASHER FLUID
See Windshield Washer Fluid on page 6‑42.
.CRUISE SET TO XXX MPH (XXX km/h)
See Cruise Control on page 4‑7.
.DRIVER DOOR AJAR
.FOB AUTOLEARN WAIT XX MINUTES
See “Matching Transmitter(s) to Your Vehicle”
under Keyless Access System Operation
on
page 3‑5.
.FOB BATTERY LOW
See “Battery Replacement” underKeyless Access
System Operation on page 3‑5.
.HATCH AJAR (Coupe)
.INTRUSION SENSOR OFF, if your vehicle has this
feature
.INTRUSION SENSOR ON, if your vehicle has this
feature
.KNOWN FOB
See “Matching Transmitter(s) to Your Vehicle”
under Keyless Access System Operation
on
page 3‑5.
.MAXIMUM NUMBER OF FOBS LEARNED
See “Matching Transmitter(s) to Your Vehicle”
under Keyless Access System Operation
on
page 3‑5.
.OFF–ACCESSORY TO LEARN
See “Matching Transmitter(s) to Your Vehicle”
under Keyless Access System Operation
on
page 3‑5.
.PASSENGER DOOR AJAR
.READY FOR FOB #X
See “Matching Transmitter(s) to Your Vehicle”
under Keyless Access System Operation
on
page 3‑5.
.TONNEAU AJAR (Convertible)
.TRUNK AJAR (Convertible)
.UPSHIFT NOW
See Manual Transmission Operation on page 3‑32.
4-70