sensor CHEVROLET CORVETTE 2010 6.G Owners Manual
[x] Cancel search | Manufacturer: CHEVROLET, Model Year: 2010, Model line: CORVETTE, Model: CHEVROLET CORVETTE 2010 6.GPages: 472, PDF Size: 11.44 MB
Page 11 of 472
Door Locks
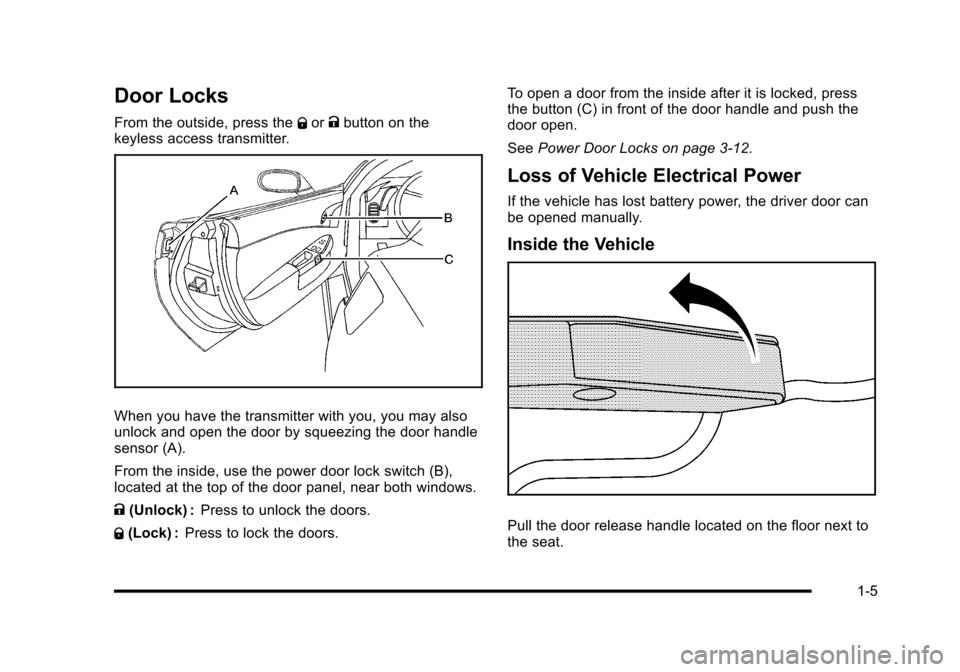
From the outside, press theQor Kbutton on the
keyless access transmitter.
When you have the transmitter with you, you may also
unlock and open the door by squeezing the door handle
sensor (A).
From the inside, use the power door lock switch (B),
located at the top of the door panel, near both windows.
K (Unlock) : Press to unlock the doors.
Q (Lock) : Press to lock the doors. To open a door from the inside after it is locked, press
the button (C) in front of the door handle and push the
door open.
See
Power Door Locks on page 3‑12.
Loss of Vehicle Electrical Power
If the vehicle has lost battery power, the driver door can
be opened manually.
Inside the Vehicle
Pull the door release handle located on the floor next to
the seat.
1-5
Page 31 of 472
Roadside Assistance Program
U.S.:1-800-CHEV-USA (1-800-243-8872)
TTY Users: 1-888-889-2438
Canada: 1-800-268-6800
As the owner of a new Chevrolet, you are automatically
enrolled in the Roadside Assistance program. This
program provides technically trained advisors who are
available 24 hours a day, 365 days a year, minor repair
information or towing arrangements.
Roadside Assistance and OnStar
If you have a current OnStar subscription, press the
OnStar button and the current GPS location will be sent
to an OnStar Advisor who will assess your problem,
contact Roadside Assistance, and relay exact location
to get you the help you need.
Online Owner Center
The Online Owner Center is a complimentary service
that includes online service reminders, vehicle
maintenance tips, online owner manual, special
privileges and more.
Sign up today at:
www.gmownercenter.com/chevrolet (U.S.) or
www.gm.ca (Canada).
OnStar®
OnStar®uses several innovative technologies and live
advisors to provide a wide range of safety, security,
navigation, diagnostics, and calling services.
Automatic Crash Response
In a crash, built in sensors can automatically alert an
OnStar advisor who is immediately connected to the
vehicle to see if you need help.
1-25
Page 83 of 472
Thresholds can also vary with specific vehicle design.
Frontal airbags are not intended to inflate during vehicle
rollovers, rear impacts, or in many side impacts.
In addition, your vehicle has dual-stage frontal airbags.
Dual-stage airbags adjust the restraint according to
crash severity. Your vehicle has electronic frontal
sensors, which help the sensing system distinguish
between a moderate frontal impact and a more severe
frontal impact. For moderate frontal impacts, dual-stage
airbags inflate at a level less than full deployment.
For more severe frontal impacts, full deployment
occurs.
Your vehicle may have one or two seat position
sensors, depending on what model you have.
The seat position sensor(s) enable the sensing system
to monitor the position of the driver seat (all models
except Z06 and ZR1) and the right front passenger seat
(all models). Seat position sensor(s) provide information
that is used to determine if the airbags should deploy at
a reduced level or at full deployment. Your vehicle may or may not have seat-mounted side
impact airbags. See
Airbag Systemon page 2‑44.
Seat-mounted side impact airbags are intended
to inflate in moderate to severe side crashes.
Seat-mounted side impact airbags will inflate if
the crash severity is above the system's designed
threshold level. The threshold level can vary with
specific vehicle design.
Seat-mounted side impact airbags are not intended to
inflate in frontal impacts, near-frontal impacts, rollovers,
or rear impacts. A seat-mounted side impact airbag is
intended to deploy on the side of the vehicle that
is struck.
In any particular crash, no one can say whether an
airbag should have inflated simply because of the
damage to a vehicle or because of what the repair
costs were. For seat-mounted side impact airbags,
deployment is determined by the location and
severity of the side impact.
2-49
Page 87 of 472
Passenger Sensing System
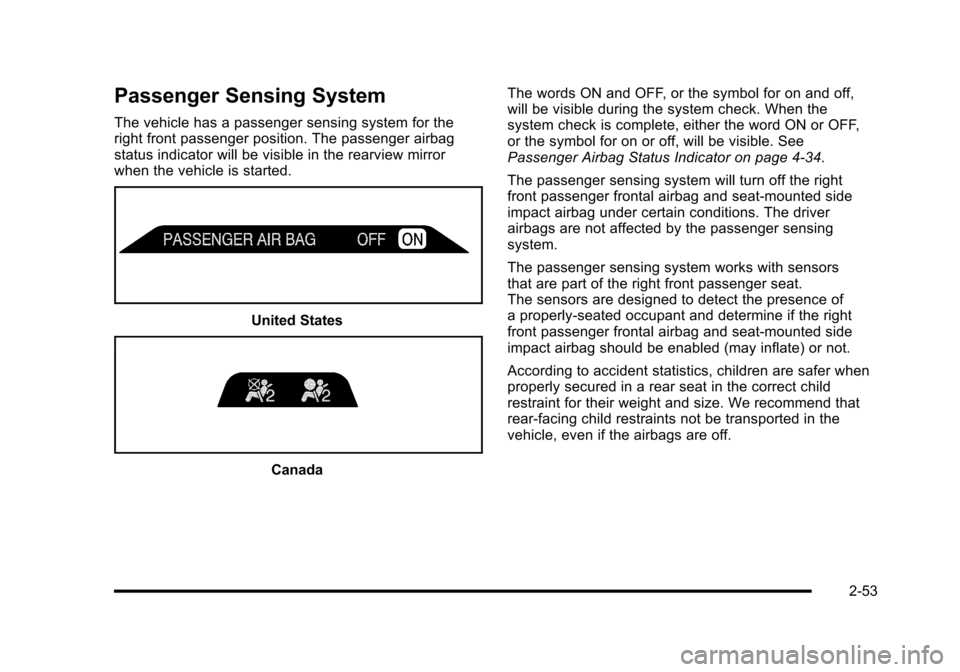
The vehicle has a passenger sensing system for the
right front passenger position. The passenger airbag
status indicator will be visible in the rearview mirror
when the vehicle is started.
United States
Canada The words ON and OFF, or the symbol for on and off,
will be visible during the system check. When the
system check is complete, either the word ON or OFF,
or the symbol for on or off, will be visible. See
Passenger Airbag Status Indicator on page 4‑34.
The passenger sensing system will turn off the right
front passenger frontal airbag and seat-mounted side
impact airbag under certain conditions. The driver
airbags are not affected by the passenger sensing
system.
The passenger sensing system works with sensors
that are part of the right front passenger seat.
The sensors are designed to detect the presence of
a properly-seated occupant and determine if the right
front passenger frontal airbag and seat-mounted side
impact airbag should be enabled (may inflate) or not.
According to accident statistics, children are safer when
properly secured in a rear seat in the correct child
restraint for their weight and size. We recommend that
rear-facing child restraints not be transported in the
vehicle, even if the airbags are off.
2-53
Page 93 of 472
Adding Equipment to Your
Airbag-Equipped Vehicle
Q: Is there anything I might add to or change about the vehicle that could keep the airbags from
working properly?
A: Yes. If you add things that change your vehicle's
frame, bumper system, height, front end or side
sheet metal, they may keep the airbag system from
working properly. Changing or moving any parts of
the front seats, safety belts, the airbag sensing and
diagnostic module, steering wheel, instrument panel,
the inside review mirror, front sensors, or airbag
wiring can affect the operation of the airbag system.
In addition, the vehicle has a passenger sensing
system for the right front passenger position, which
includes sensors that are part of the passenger seat.
The passenger sensing system may not operate
properly if the original seat trim is replaced with
non-GM covers, upholstery or trim, or with
GM covers, upholstery or trim designed for a
different vehicle. Any object, such as an aftermarket
seat heater or a comfort enhancing pad or device,
installed under or on top of the seat fabric, could also interfere with the operation of the passenger
sensing system. This could either prevent proper
deployment of the passenger airbag(s) or prevent
the passenger sensing system from properly turning
off the passenger airbag(s). See
Passenger Sensing
System
on page 2‑53.
If you have any questions about this, you should
contact Customer Assistance before you modify
your vehicle. The phone numbers and addresses
for Customer Assistance are in Step Two of the
Customer Satisfaction Procedure in this manual.
See Customer Satisfaction Procedure on page 8‑2.
Q: Because I have a disability, I have to get my vehicle modified. How can I find out whether this
will affect my airbag system?
A: If you have questions, call Customer Assistance.
The phone numbers and addresses for Customer
Assistance are in Step Two of the Customer
Satisfaction Procedure in this manual. See
Customer Satisfaction Procedure on page 8‑2.
Your dealer/retailer and the service manual have
information about the location of the airbag sensors,
sensing and diagnostic module and airbag wiring.
2-59
Page 101 of 472
Keyless Access System
SeeRadio Frequency Statementon page 8‑20for information regarding Part 15 of the Federal
Communications Commission (FCC) Rules and
RSS-210/211 of Industry Canada.
Changes or modifications to this system by other than
an authorized service facility could void authorization to
use this equipment.
If there is a decrease in the RKE operating range,
try this:
.Check the distance. The transmitter may be too
far from the vehicle. Stand closer during rainy or
snowy weather.
.Check the location. Other vehicles or objects may
be blocking the signal. Take a few steps to the left
or right, hold the transmitter higher, and try again.
.Check the transmitter's battery. See “Battery
Replacement” later in this section.
.If the transmitter is still not working correctly, see
your dealer/retailer or a qualified technician for
service.
Keyless Access System Operation
The Keyless Access System transmitter functions work
up to 30 m (100 feet) away from the vehicle.
Keyless Unlocking
Press the door handle sensor to unlock and open the
doors if the keyless access transmitter is within range.
See Door Locks
on page 3‑10and“Passive Door
Unlock” underDIC Vehicle Personalizationon
page 4‑71for additional information.
Keyless Locking
The doors lock after several seconds if all doors are
closed and at least one keyless access transmitter
has been removed from the interior of the vehicle.
To customize whether the doors automatically lock
when exiting the vehicle, see “Passive Door Locking”
under DIC Vehicle Personalization
on page 4‑71for
additional information.
3-5
Page 107 of 472
There are several ways to lock and unlock your vehicle.
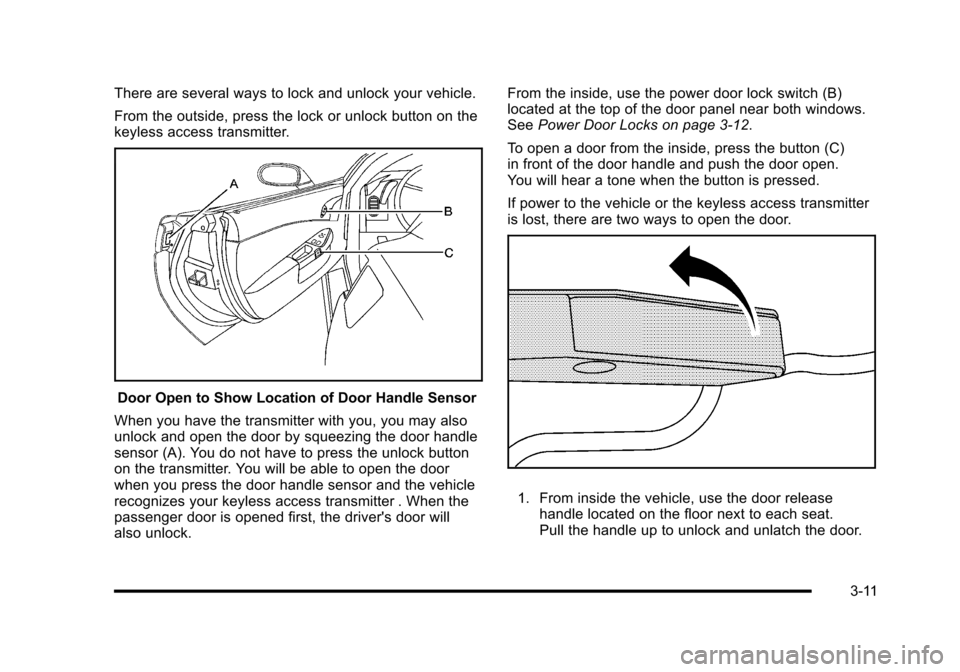
From the outside, press the lock or unlock button on the
keyless access transmitter.
Door Open to Show Location of Door Handle Sensor
When you have the transmitter with you, you may also
unlock and open the door by squeezing the door handle
sensor (A). You do not have to press the unlock button
on the transmitter. You will be able to open the door
when you press the door handle sensor and the vehicle
recognizes your keyless access transmitter . When the
passenger door is opened first, the driver's door will
also unlock. From the inside, use the power door lock switch (B)
located at the top of the door panel near both windows.
See
Power Door Locks on page 3‑12.
To open a door from the inside, press the button (C)
in front of the door handle and push the door open.
You will hear a tone when the button is pressed.
If power to the vehicle or the keyless access transmitter
is lost, there are two ways to open the door.
1. From inside the vehicle, use the door release handle located on the floor next to each seat.
Pull the handle up to unlock and unlatch the door.
3-11
Page 116 of 472
Testing the Alarm
To test the system: 1. Make sure the trunk lid/hatch is latched.
2. Lower the window on the driver door.
3. Manually arm the system.
4. Close the doors and wait 30 seconds.
5. Reach through the open window and manually pull the release lever on the floor.
6. Press the unlock button on the transmitter to turn off the alarm.
If the alarm does not sound, check to see if the horn
works. The horn fuse may be blown. See Fuses and
Circuit Breakers
on page 6‑101. If the horn works, but
the alarm does not go off, see your dealer/retailer.
Disarming the System
Press the unlock button on the keyless access
transmitter or squeeze the door handle sensor while
the transmitter is near the vehicle to unlock a door.
Unlocking a door any other way sets off the alarm.
If the alarm sounds, press the unlock button on the
keyless access transmitter to disarm it.
Do not leave the key or device that disarms or
deactivates the theft deterrent system in the vehicle.
Immobilizer
See Radio Frequency Statementon page 8‑20for information regarding Part 15 of the Federal
Communications Commission (FCC) Rules and
RSS-210/211 of Industry Canada.
Immobilizer Operation
The vehicle has a passive theft-deterrent system.
The system is automatically armed when the ignition is
turned off.
The immobilization system is disarmed when the
ignition is turned to OFF/ACCESSORY or START and
a valid transmitter is found in the vehicle.
You do not have to manually arm or disarm the system.
The security light comes on if there is a problem with
arming or disarming the theft-deterrent system.
The system has one or more keyless access
transmitters that are matched to an immobilizer control
unit in the vehicle. Only a correctly matched keyless
access transmitter starts the vehicle. The vehicle may
not start if the keyless access transmitter is damaged.
If the engine does not start and the security light comes
on, there may be a problem with the immobilizer
system. Press the START button again.
3-20
Page 182 of 472
Twilight Sentinel®
Twilight Sentinel®can turn the lamps on and off for you.
A light sensor on top of the instrument panel makes the
Twilight Sentinel
®work, so be sure it is not covered.
With Twilight Sentinel
®, the following will happen:
.When it is dark enough outside, the front turn
signal lamps (DRL) will go off, and the headlamps
and parking lamps will come on. The other lamps
that come on with headlamps will also come on.
.When it is bright enough outside, the headlamps
will go off, and the front turn signal lamps (DRL)
will come on, as long as the exterior lamp switch is
in the AUTO position.
If the vehicle is started in a dark garage, the automatic
headlamp system come on immediately. Once the
vehicle leaves the garage, it takes about one minute for
the automatic headlamp system to change to DRL if it
is light outside. During that delay, the instrument panel
cluster may not be as bright as usual. Make sure the
instrument panel brightness control is in full bright
position. See Instrument Panel Brightness
on
page 4‑15.
You can idle the vehicle with the lamps off, even when
it is dark outside. After starting the vehicle, turn the exterior lamp control
band on the multifunction lever to off and then release
it. The lamps will remain off until the control band is
turned to off again.
Twilight Sentinel
®also provides exterior illumination as
you leave the vehicle. If Twilight Sentinel®has turned
on the lamps when you turn off the ignition, the lamps
will remain on until:
.The exterior lamp switch is moved from off to the
parking lamp position, or
.A delay time that you select has elapsed.
See “Personal Options” underDIC Vehicle
Personalization
on page 4‑71to select the delay time
that you want. You can also select no delay time.
If you turn off the ignition with the exterior lamp switch
in the parking lamp or headlamp position, the Twilight
Sentinel
®delay will not occur. The lamps will turn off as
soon as the switch is turned off.
The regular headlamp system should be turned on
when needed.
4-14
Page 191 of 472
The system operates to reach the set temperature
as quickly as possible. The AUTO control system
works best with the windows up and the removable
roof installed or the convertible top up. 1. Press the AUTO button.
2. Adjust the temperature to a comfortable setting between 16°C (60°F) and 32°C (90°F). Choosing
the coldest or warmest temperature setting will
not cause the system to heat or cool any faster.
A setting of 23°C (73°F) is suggested.
In cold weather, the system will start at reduced
fan speeds to avoid blowing cold air into your
vehicle until warmer air is available. The system
starts out blowing air at the floor but may change
modes automatically as the vehicle warms up to
maintain the chosen temperature setting. The
length of time needed for warm up depends on the
outside temperature and the length of time that has
elapsed since the vehicle was last driven.
3. Wait for the system to regulate. This may take from 10 to 30 minutes. Then adjust the temperature,
if necessary.
Do not cover the solar sensor located in the center of
the instrument panel, near the windshield. For more
information on the solar sensor, see “Sensor”later in
this section.Manual Operation
Driver Power/Temperature : Press the driver
temperature knob to turn the climate control system off.
This is the only setting that completely shuts off the fan.
The digital display shows only the outside temperature.
The driver and the passenger set temperature and the
air intake mode can still be adjusted when the climate
control is off.
Passenger Power/Temperature : Press the passenger
temperature knob to turn the passenger's climate
control system on or off. Turn the knob to increase or
decrease the temperature for the passenger. If the
passenger's climate control system is off, the driver's
temperature knob will control the temperature for the
entire vehicle.
x 9 w (Fan) :Press to increase or decrease the fan
speed. The fan speed setting will appear in the display.
Pressing the arrows will delete AUTO from the digital
display. The fan graphics with the fan speed bars will be
shown. The AUTO button must be pressed to return to
the automatic fan control.
If the airflow seems low when the fan speed is at the
highest setting, the passenger compartment air filter
may need to be replaced. For more information, see
Passenger Compartment Air Filter
on page 4‑28and
Scheduled Maintenance on page 7‑3.
4-23