capacities CHEVROLET CORVETTE 2016 7.G Owners Manual
[x] Cancel search | Manufacturer: CHEVROLET, Model Year: 2016, Model line: CORVETTE, Model: CHEVROLET CORVETTE 2016 7.GPages: 351, PDF Size: 6.02 MB
Page 163 of 351
Chevrolet Corvette Owner Manual (GMNA-Localizing-U.S./Canada/Mexico-
9085364) - 2016 - crc - 9/15/15
162 Driving and Operating
The vehicle may straighten out.
Be ready for a second skid if it
occurs.
. Slow down and adjust your
driving according to weather
conditions. Stopping distance
can be longer and vehicle
control can be affected when
traction is reduced by water,
snow, ice, gravel, or other
material on the road. Learn to
recognize warning clues —such
as enough water, ice, or packed
snow on the road to make a
mirrored surface —and slow
down when you have any doubt.
. Try to avoid sudden steering,
acceleration, or braking,
including reducing vehicle speed
by shifting to a lower gear. Any
sudden changes could cause
the tires to slide.
Remember: Antilock brakes help
avoid only the braking skid.Track Events and
Competitive Driving
Participating in track events or other
competitive driving without following
the instructions provided may affect
the vehicle warranty. See the
warranty manual before using the
vehicle for racing or other
competitive driving.
Refer to Competitive Driving
Mode 0198.
Be sure to follow all service
procedures before driving the
vehicle at track events or
competitively.
Engine Sound Management
Setting
Caution
Do not place vehicle in Engine
Sound Management –Stealth
mode. Damage could result to
exhaust valve actuators. Engine Oil
Caution
If the vehicle is used for track
events and competitive driving,
the engine may use more oil than
it would with normal use. Low oil
levels can damage the engine.
Check the oil level often and
maintain the proper level. See
Engine Oil
0223.
Caution
Not changing the engine oil to
15W-50 may cause engine
damage. Engine oil must be
changed to 15W-50 synthetic.
See Capacities and
Specifications 0312.
Z51 Performance Package and Z06
Only: Check the oil level often
during track events and competitive
driving and keep the level at or near
0.5 L (0.5 qt) above the upper mark
that shows the proper operating
Page 166 of 351
Chevrolet Corvette Owner Manual (GMNA-Localizing-U.S./Canada/Mexico-
9085364) - 2016 - crc - 9/15/15
Driving and Operating 165
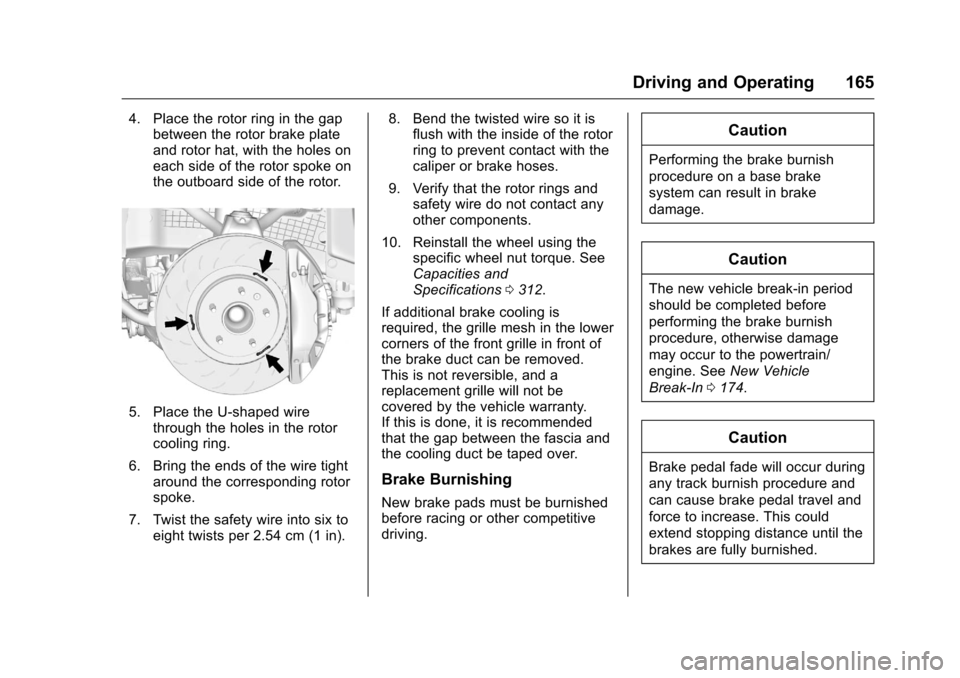
4. Place the rotor ring in the gapbetween the rotor brake plate
and rotor hat, with the holes on
each side of the rotor spoke on
the outboard side of the rotor.
5. Place the U-shaped wire
through the holes in the rotor
cooling ring.
6. Bring the ends of the wire tight around the corresponding rotor
spoke.
7. Twist the safety wire into six to eight twists per 2.54 cm (1 in). 8. Bend the twisted wire so it is
flush with the inside of the rotor
ring to prevent contact with the
caliper or brake hoses.
9. Verify that the rotor rings and safety wire do not contact any
other components.
10. Reinstall the wheel using the specific wheel nut torque. See
Capacities and
Specifications 0312.
If additional brake cooling is
required, the grille mesh in the lower
corners of the front grille in front of
the brake duct can be removed.
This is not reversible, and a
replacement grille will not be
covered by the vehicle warranty.
If this is done, it is recommended
that the gap between the fascia and
the cooling duct be taped over.
Brake Burnishing
New brake pads must be burnished
before racing or other competitive
driving.
Caution
Performing the brake burnish
procedure on a base brake
system can result in brake
damage.
Caution
The new vehicle break-in period
should be completed before
performing the brake burnish
procedure, otherwise damage
may occur to the powertrain/
engine. See New Vehicle
Break-In 0174.
Caution
Brake pedal fade will occur during
any track burnish procedure and
can cause brake pedal travel and
force to increase. This could
extend stopping distance until the
brakes are fully burnished.
Page 225 of 351
Chevrolet Corvette Owner Manual (GMNA-Localizing-U.S./Canada/Mexico-
9085364) - 2016 - crc - 9/15/15
224 Vehicle Care
{Warning
The engine oil dipstick handle
may be hot; it could burn you.
Use a towel or glove to touch the
dipstick handle.
2. Pull the dipstick and wipe it with a clean paper towel or
cloth, then push it back in all
the way. Remove it again,
keeping the tip down, and
check the level.
When to Add Engine Oil
(Except Stingray with
Z51 and Z06)
If the oil is below the cross-hatched
area at the tip of the dipstick, add
1 L (1 qt) of the recommended oil
and then recheck the level. See
“Selecting the Right Engine Oil” inthis section for an explanation of
what kind of oil to use. For engine
oil crankcase capacity, see
Capacities and Specifications
0312.
See Track Events and Competitive
Driving 0162 for additional
information on engine oil.
Caution
Do not add too much oil. Oil
levels above or below the
acceptable operating range
shown on the dipstick are harmful
to the engine. If you find that you
have an oil level above the
operating range, i.e., the engine
has so much oil that the oil level
gets above the cross-hatched
area that shows the proper
operating range, the engine could
be damaged. You should drain
out the excess oil or limit driving
of the vehicle and seek a service
professional to remove the
excess amount of oil. See
Engine Compartment Overview
0 218 for the location of the engine
oil fill cap.
Add enough oil to put the level
somewhere in the proper operating
range. Push the dipstick all the way
back in when through.
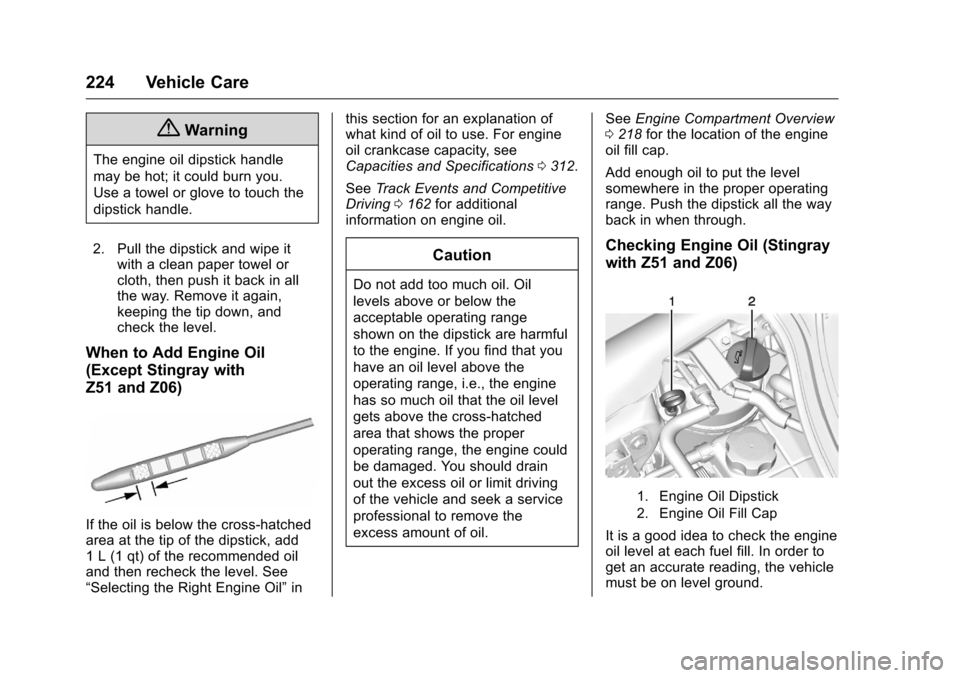
Checking Engine Oil (Stingray
with Z51 and Z06)
1. Engine Oil Dipstick
2. Engine Oil Fill Cap
It is a good idea to check the engine
oil level at each fuel fill. In order to
get an accurate reading, the vehicle
must be on level ground.
Page 227 of 351

Chevrolet Corvette Owner Manual (GMNA-Localizing-U.S./Canada/Mexico-
9085364) - 2016 - crc - 9/15/15
226 Vehicle Care
When to Add Engine Oil
(Stingray with Z51 and Z06)
If the oil is below the cross-hatched
area at the tip of the dipstick, add
1 L (1 qt) of the recommended oil
through the oil fill cap opening in the
oil tank and then recheck the level.
See“Selecting the Right Engine Oil”
for an explanation of what kind of oil
to use. For engine oil crankcase
capacity, see Capacities and
Specifications 0312.
See Track Events and Competitive
Driving 0162 for additional
information on engine oil.
Caution
Do not add too much oil. Oil
levels above or below the
acceptable operating range
shown on the dipstick are harmful
to the engine. If you find that you
have an oil level above the
operating range, i.e., the engine
has so much oil that the oil level
gets above the cross-hatched
area that shows the proper
operating range, the engine could
be damaged. You should drain
out the excess oil or limit driving
of the vehicle and seek a service
professional to remove the
excess amount of oil.
See Engine Compartment Overview
0 218 for the location of the external
engine oil tank and fill cap.
Add enough oil to put the level
somewhere in the proper operating
range. Push the dipstick all the way
back into the oil tank when through.
Changing Engine Oil and Filter
(Stingray with Z51 and Z06)
The vehicle may have a
racetrack-ready dry sump engine
lubrication system. This high
performance system operates
differently than a standard engine
lubrication system and requires a
special procedure when changing
the engine oil and filter. Follow this
procedure closely when changing
the engine oil and filter.
1. Engine Oil Drain Plugs
2. Seals
Page 228 of 351

Chevrolet Corvette Owner Manual (GMNA-Localizing-U.S./Canada/Mexico-
9085364) - 2016 - crc - 9/15/15
Vehicle Care 227
Steps to follow:1. Remove the two engine oil drain plugs from the bottom of
the engine oil pan. One drain
plug drains the external oil tank
via the oil transfer supply line.
The other drain plug drains
residual oil from the crankcase
sump. Allow the oil to drain.
2. Once the oil has been drained from the engine, remove the
engine oil filter and allow the oil
to drain.
3. Reinstall both drain plugs and tighten them to 25 Y
(18 lb ft).
4. Replace the oil filter and tighten it three-quarters to one
turn after gasket contact. See
Maintenance Replacement
Parts 0309 for the correct filter.
5. Oil is filled through the opening in the top of the external
engine oil tank. Remove the oil
fill cap.
6. Add oil to the oil tank. See Capacities and
Specifications 0312. 7. Install the oil fill cap and insert
the dipstick, if removed.
8. Start the engine and let it run at idle for at least 15 seconds.
This will circulate the fresh
engine oil through the
lubrication system.
9. Shut off the engine and check the oil level as described under
“Checking Engine Oil
(Z51 and Z06).”
Selecting the Right Engine Oil
Selecting the right engine oil
depends on both the proper oil
specification and viscosity grade.
See Recommended Fluids and
Lubricants 0307.
Specification
Ask for and use engine oils that
meet the dexos1™ specification.
Engine oils that have been
approved by GM as meeting the
dexos1 specification are marked
with the dexos1 approved logo. See
www.gmdexos.com.
GM recommends Mobil 1
®engine
oils that show the dexos1 approved
logo for its dry sump equipped
engines.
Caution
Failure to use the recommended
engine oil or equivalent can result
in engine damage not covered by
the vehicle warranty.
Viscosity Grade
Use SAE 5W-30 viscosity grade
engine oil.
Cold Temperature Operation: In an
area of extreme cold, where the
temperature falls below −29 °C
(−20 °F), an SAE 0W-30 oil may be
used. An oil of this viscosity grade
will provide easier cold starting for
the engine at extremely low
temperatures. When selecting an oil
of the appropriate viscosity grade, it
Page 270 of 351
Chevrolet Corvette Owner Manual (GMNA-Localizing-U.S./Canada/Mexico-
9085364) - 2016 - crc - 9/15/15
Vehicle Care 269
Check that all wheel nuts are
properly tightened. See“Wheel
Nut Torque” underCapacities
and Specifications 0312.
{Warning
Rust or dirt on a wheel, or on the
parts to which it is fastened, can
make wheel nuts become loose
after time. The wheel could come
off and cause an accident. When
changing a wheel, remove any
rust or dirt from places where the
wheel attaches to the vehicle. In
an emergency, a cloth or a paper
towel can be used; however, use
a scraper or wire brush later to
remove all rust or dirt.
Lightly coat the center of the
wheel hub with wheel bearing
grease after a wheel change or
tire rotation to prevent corrosion
or rust build-up. Do not get
grease on the flat wheel
mounting surface or on the
wheel nuts or bolts.
When It Is Time for New
Tires
Factors such as maintenance,
temperatures, driving speeds,
vehicle loading, and road conditions
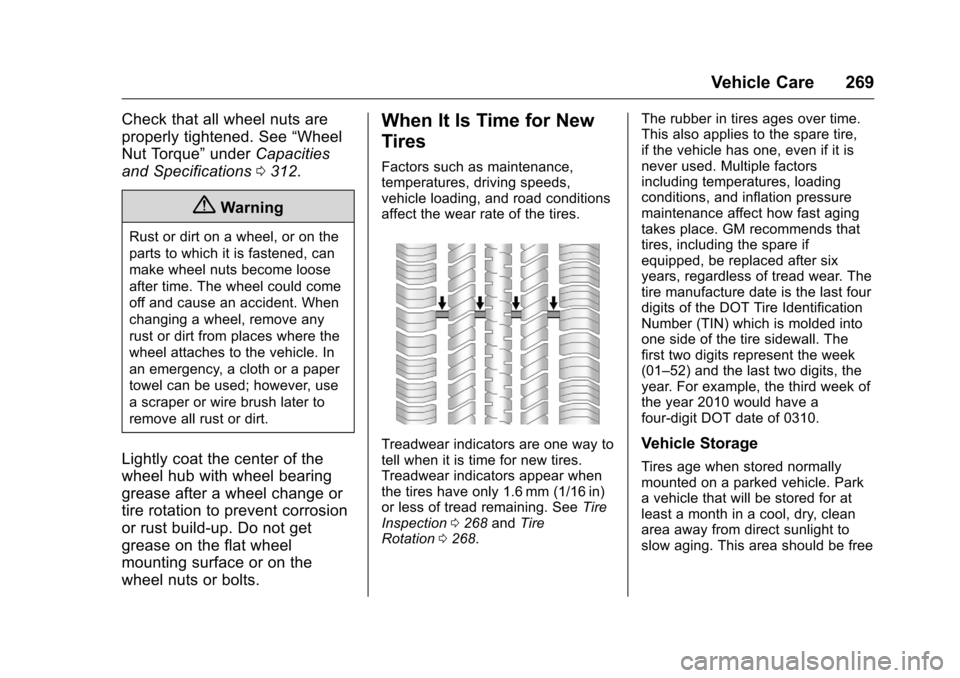
affect the wear rate of the tires.
Treadwear indicators are one way to
tell when it is time for new tires.
Treadwear indicators appear when
the tires have only 1.6 mm (1/16 in)
or less of tread remaining. See Tire
Inspection 0268 andTire
Rotation 0268. The rubber in tires ages over time.
This also applies to the spare tire,
if the vehicle has one, even if it is
never used. Multiple factors
including temperatures, loading
conditions, and inflation pressure
maintenance affect how fast aging
takes place. GM recommends that
tires, including the spare if
equipped, be replaced after six
years, regardless of tread wear. The
tire manufacture date is the last four
digits of the DOT Tire Identification
Number (TIN) which is molded into
one side of the tire sidewall. The
first two digits represent the week
(01–52) and the last two digits, the
year. For example, the third week of
the year 2010 would have a
four-digit DOT date of 0310.Vehicle Storage
Tires age when stored normally
mounted on a parked vehicle. Park
a vehicle that will be stored for at
least a month in a cool, dry, clean
area away from direct sunlight to
slow aging. This area should be free
Page 276 of 351
Chevrolet Corvette Owner Manual (GMNA-Localizing-U.S./Canada/Mexico-
9085364) - 2016 - crc - 9/15/15
Vehicle Care 275
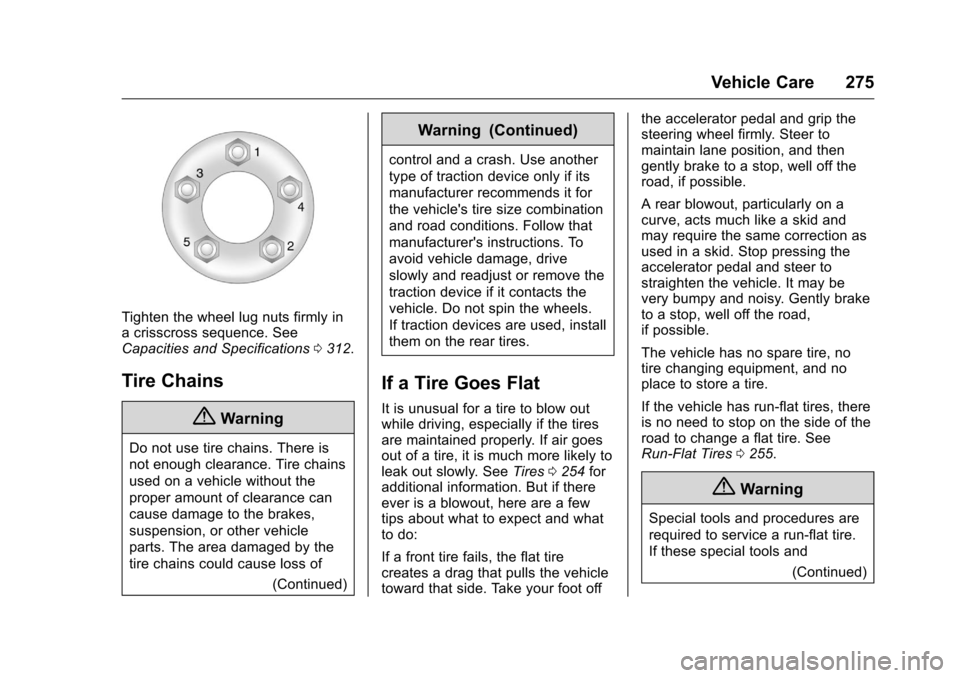
Tighten the wheel lug nuts firmly in
a crisscross sequence. See
Capacities and Specifications0312.
Tire Chains
{Warning
Do not use tire chains. There is
not enough clearance. Tire chains
used on a vehicle without the
proper amount of clearance can
cause damage to the brakes,
suspension, or other vehicle
parts. The area damaged by the
tire chains could cause loss of
(Continued)
Warning (Continued)
control and a crash. Use another
type of traction device only if its
manufacturer recommends it for
the vehicle's tire size combination
and road conditions. Follow that
manufacturer's instructions. To
avoid vehicle damage, drive
slowly and readjust or remove the
traction device if it contacts the
vehicle. Do not spin the wheels.
If traction devices are used, install
them on the rear tires.
If a Tire Goes Flat
It is unusual for a tire to blow out
while driving, especially if the tires
are maintained properly. If air goes
out of a tire, it is much more likely to
leak out slowly. SeeTires0254 for
additional information. But if there
ever is a blowout, here are a few
tips about what to expect and what
to do:
If a front tire fails, the flat tire
creates a drag that pulls the vehicle
toward that side. Take your foot off the accelerator pedal and grip the
steering wheel firmly. Steer to
maintain lane position, and then
gently brake to a stop, well off the
road, if possible.
A rear blowout, particularly on a
curve, acts much like a skid and
may require the same correction as
used in a skid. Stop pressing the
accelerator pedal and steer to
straighten the vehicle. It may be
very bumpy and noisy. Gently brake
to a stop, well off the road,
if possible.
The vehicle has no spare tire, no
tire changing equipment, and no
place to store a tire.
If the vehicle has run-flat tires, there
is no need to stop on the side of the
road to change a flat tire. See
Run-Flat Tires
0255.
{Warning
Special tools and procedures are
required to service a run-flat tire.
If these special tools and
(Continued)
Page 312 of 351

Chevrolet Corvette Owner Manual (GMNA-Localizing-U.S./Canada/Mexico-
9085364) - 2016 - crc - 9/15/15
Technical Data 311
Technical Data
Vehicle Identification
Vehicle IdentificationNumber (VIN) . . . . . . . . . . . . . . . 311
Service Parts Identification Label . . . . . . . . . . . . . . . . . . . . . . . . 311
Vehicle Data
Capacities andSpecifications . . . . . . . . . . . . . . . 312
Engine Drive Belt Routing . . . . 314
Vehicle Identification
Vehicle Identification
Number (VIN)
This legal identifier is in the front
corner of the instrument panel, on
the left side of the vehicle. It can be
seen through the windshield from
outside. The VIN also appears on
the Vehicle Certification and Service
Parts labels and certificates of title
and registration.
Engine Identification
The eighth character in the VIN is
the engine code. This code
identifies the vehicle's engine,
specifications, and replacement
parts. See “Engine Specifications”
under Capacities and Specifications
0 312 for the vehicle's engine code.
Service Parts
Identification Label
This label, under the carpet in the
hatch/trunk area on the passenger
side, has the following information:
.
Vehicle Identification
Number (VIN).
. Model designation.
. Paint information.
. Production options and special
equipment.
Do not remove this label from the
vehicle.
Page 313 of 351

Chevrolet Corvette Owner Manual (GMNA-Localizing-U.S./Canada/Mexico-
9085364) - 2016 - crc - 9/15/15
312 Technical Data
Vehicle Data
Capacities and Specifications
The following approximate capacities are given in metric and English conversions.
SeeRecommended Fluids and Lubricants 0307.
Application Capacities
Metric English
Air Conditioning Refrigerant For the air conditioning system refrigerant charge type and amount, see the refrigerant label underthe hood. See your dealer for more information.
Engine Cooling System 11.2 L 11.8 qt
Intercooler System (LT4) 4.3 L 4.5 qt
Engine Oil with Filter 6.2L LT1 Engine Except Z51 6.6 L 7.0 qt
6.2L LT1 Engine With Z51 9.3 L 9.8 qt
6.2L LT4 Supercharged Engine 9.3 L 9.8 qt
Fuel Tank 70.4 L 18.6 gal
Wheel Nut Torque 140 Y100 lb ft
All capacities are approximate. When adding, be sure to fill to the approximate level, as recommended in this
manual. Recheck fluid level after filling
Page 342 of 351
Chevrolet Corvette Owner Manual (GMNA-Localizing-U.S./Canada/Mexico-
9085364) - 2016 - crc - 9/15/15
Index 341
Automatic (cont'd)Transmission Fluid . . . . . . . . . . . 229
Automatic Transmission Manual Mode . . . . . . . . . . . . . . . . . 184
Shift Lock Control Function
Check . . . . . . . . . . . . . . . . . . . . . . . 243
Axle, Rear . . . . . . . . . . . . . . . . . . . . . . 242
B
Battery Exterior Lighting BatterySaver . . . . . . . . . . . . . . . . . . . . . . . 145
Power Protection . . . . . . . . . . . . . 145
Voltage and Charging Messages . . . . . . . . . . . . . . . . . . . 120
Battery - North America . . . . 241, 284
Blade Replacement, Wiper . . . . . 244
Boost Gauge . . . . . . . . . . . . . . . . . . . 102
Brake Parking, Electric . . . . . . . . . . . . . . 190
System Warning Light . . . . . . . . 108
Brakes . . . . . . . . . . . . . . . . . . . . . . . . . . 239 Antilock . . . . . . . . . . . . . . . . . . . . . . . 189
Assist . . . . . . . . . . . . . . . . . . . . . . . . . 192
Fluid . . . . . . . . . . . . . . . . . . . . . . . . . . 240
System Messages . . . . . . . . . . . . 120
Braking . . . . . . . . . . . . . . . . . . . . . . . . . 160
Break-In, New Vehicle . . . . . . . . . . 174
Bulb Replacement . . . . . . . . . . . . . . 246 Bulb Replacement (cont'd)
Headlamp Aiming . . . . . . . . . . . . . 245
Headlamps . . . . . . . . . . . . . . . . . . . 245
High Intensity Discharge
(HID) Lighting . . . . . . . . . . . . . . . 245
License Plate Lamps . . . . . . . . . 246
Buying New Tires . . . . . . . . . . . . . . . 270
C
Calibration . . . . . . . . . . . . . . . . . . . . . . . 93
California Fuel Requirements . . . . . . . . . . . 207
Perchlorate MaterialsRequirements . . . . . . . . . . . . . . . 213
California Proposition
65 Warning . . . . . . . . . .213, 241, 284
Canadian Vehicle Owners . . . . . . . . 2
Capacities and Specifications . . . . . . . . . . . . . . . . . 312
Carbon Fiber . . . . . . . . . . . . . . . . . . . 175
Carbon Monoxide Engine Exhaust . . . . . . . . . . . . . . . 181
Hatch . . . . . . . . . . . . . . . . . . . . . . . . . . . 37
Winter Driving . . . . . . . . . . . . . . . . 169
Cargo Cover . . . . . . . . . . . . . . . . . . . . . . . . . . . 89
Caution, Danger, and Warning . . . . 3
Center Console Storage . . . . . . . . . 89 Chains, Tire . . . . . . . . . . . . . . . . . . . . 275
Charging System Light . . . . . . . . . 106
Check
Malfunction IndicatorEngine Light . . . . . . . . . . . . . . . . 106
Child Restraints Infants and Young Children . . . . . 79
Lower Anchors and Tethers
for Children . . . . . . . . . . . . . . . . . . . 83
Older Children . . . . . . . . . . . . . . . . . . 78
Securing . . . . . . . . . . . . . . . . . . . . . . . . 84
Systems . . . . . . . . . . . . . . . . . . . . . . . . 81
Cleaning Exterior Care . . . . . . . . . . . . . . . . . 288
Interior Care . . . . . . . . . . . . . . . . . . 292
Climate Control Systems
Dual Automatic . . . . . . . . . . . . . . . 152
Clock . . . . . . . . . . . . . . . . . . . . . . . . . . . . 94
Cluster, Instrument . . . . . . . . . . . . . . 96
Clutch, Hydraulic . . . . . . . . . . . . . . . 230
Collision Damage Repair . . . . . . . 322
Compartments Storage . . . . . . . . . . . . . . . . . . . . . . . . . 87
Compass . . . . . . . . . . . . . . . . . . . . . . . . 93 Messages . . . . . . . . . . . . . . . . . . . . 121
Competition Oriented Tires . . . . . 257
Competitive Driving Mode . . . . . . 198
Compressor Kit, Tire Sealant . . . 276