Recommended Fluids CHEVROLET CORVETTE 2017 7.G Owners Manual
[x] Cancel search | Manufacturer: CHEVROLET, Model Year: 2017, Model line: CORVETTE, Model: CHEVROLET CORVETTE 2017 7.GPages: 360, PDF Size: 6.3 MB
Page 166 of 360
Chevrolet Corvette Owner Manual (GMNA-Localizing-U.S./Canada/Mexico-
9956103) - 2017 - crc - 4/28/16
Driving and Operating 165
Engine Oil
Caution
If the vehicle is used for track
events and competitive driving,
the engine may use more oil than
it would with normal use. Low oil
levels can damage the engine.
Check the oil level often and
maintain the proper level. See
Engine Oil0230.
Caution
Not changing the engine oil to
15W-50 may cause engine
damage. Engine oil must be
changed to 15W-50 synthetic.
See Capacities and
Specifications 0321.
Z51 Performance Package, Grand
Sport, and Z06 Only: Check the oil
level often during track events and
competitive driving and keep the
level at or near 0.5 L (0.5 qt) above
the upper mark that shows the proper operating range on the
engine oil dipstick. After the
competitive driving, remove excess
oil so that the level on the dipstick is
not above the upper mark that
shows the proper operating range.
Stingray without Z51 Performance
Package: Additional oil fill above the
upper mark on the dipstick is not
recommended for track events or
other competitive driving. Check the
oil level often during racing or other
competitive driving and keep the
level at or near the upper mark that
shows the proper operating range
on the engine oil dipstick. After the
competitive driving, remove excess
oil so that the level on the dipstick is
not above the upper mark that
shows the proper operating range.
After track use, change the oil back
to 5W-30 for street use. See
Engine
Oil 0230.
Brake Fluid
Replace existing brake fluid with a
qualified high performance brake
fluid from a sealed container. Brake
fluid with a dry boiling point >279 °C
(534 °F) is qualified. If high performance brake fluid is used,
replace it with GM approved brake
fluid before driving on public roads.
If high performance brake fluid is in
the vehicle and the age of the brake
fluid is over a month old or
unknown, replace the brake fluid
before track events and competitive
driving. Do not use silicone or
DOT-5 brake fluids.
Load Limit
Z51 Performance Package Only:
Limit vehicle load to the driver only,
with no other cargo. Inflate tires to
180 kPa (26 psi) and drive at a
maximum speed of 280 km/h
(174 mph).
Grand Sport and Z06 Only: Limit
vehicle load to the driver only, with
no other cargo. Inflate tires to
180 kPa (26 psi) and drive at a
maximum speed of 296 km/h
(184 mph).
Page 167 of 360
Chevrolet Corvette Owner Manual (GMNA-Localizing-U.S./Canada/Mexico-
9956103) - 2017 - crc - 4/28/16
166 Driving and Operating
Wheel Alignment
Caution
Using these wheel alignment
settings may cause excessive tire
wear. Only use these wheel
alignment settings for racing or
competitive driving. Excessive tire
wear is not covered under the
vehicle warranty.
If the vehicle is equipped with the
Z51 package, is a Z06, or is a
Grand Sport, the racing and
competitive driving wheel alignment
settings should be set as described
here. Alignment should be
performed by first removing washers
between the upper control arms and
frame according to the following
instructions:
. Z51 - Remove maximum of one
washer per front upper control
arm bolt.
Remove maximum of 1 washer
per rear upper control arm bolt. .
Z06 - Remove maximum of 1
washer per front upper control
arm bolt.
Do not remove washers from
rear upper control arm bolts.
. Grand Sport - Do not remove
washers from front upper control
arm bolts.
Do not remove washers from
rear upper control arm bolts.
Proceed by adjusting the lower
control arm cam bolts until
alignment is within specifications.
Alignment values are targets. See
your dealer for tolerances.
Front (per corner)
. Caster: +7.0 degrees
. Camber: -2.0 degrees
. Toe: 0.05 degrees toe in
Rear (per corner)
. Caster: 0 degrees
. Camber: -2.0 degrees
. Toe: 0.05 degrees toe in
Thrust Angle: 0 degrees Rear Axle Fluid
Caution
During a first time track or racing
event, high rear axle
temperatures can occur. Damage
could be caused to the rear axle
and would not be covered by the
vehicle warranty. Do not drive as
long or as fast the first time the
vehicle is driven on the track or
raced.
Axles must have 885 km (500 mi)
before being used in track driving.
The rear axle fluid temperatures
may be higher than when driving in
severe conditions. Drain and refill
with new fluid after the first racing or
competitive driving event, and then
after every 24 hours of racing or
competitive driving. See
Recommended Fluids and
Lubricants 0316.
Page 235 of 360
Chevrolet Corvette Owner Manual (GMNA-Localizing-U.S./Canada/Mexico-
9956103) - 2017 - crc - 4/28/16
234 Vehicle Care
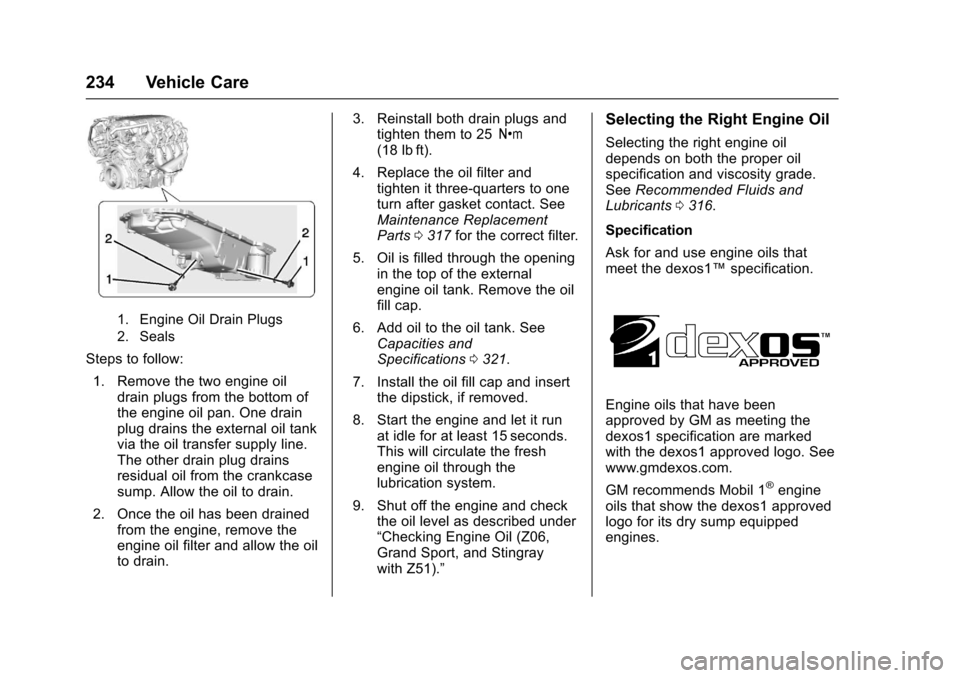
1. Engine Oil Drain Plugs
2. Seals
Steps to follow:1. Remove the two engine oil drain plugs from the bottom of
the engine oil pan. One drain
plug drains the external oil tank
via the oil transfer supply line.
The other drain plug drains
residual oil from the crankcase
sump. Allow the oil to drain.
2. Once the oil has been drained from the engine, remove the
engine oil filter and allow the oil
to drain. 3. Reinstall both drain plugs and
tighten them to 25 Y
(18 lb ft).
4. Replace the oil filter and tighten it three-quarters to one
turn after gasket contact. See
Maintenance Replacement
Parts 0317 for the correct filter.
5. Oil is filled through the opening in the top of the external
engine oil tank. Remove the oil
fill cap.
6. Add oil to the oil tank. See Capacities and
Specifications 0321.
7. Install the oil fill cap and insert the dipstick, if removed.
8. Start the engine and let it run at idle for at least 15 seconds.
This will circulate the fresh
engine oil through the
lubrication system.
9. Shut off the engine and check the oil level as described under
“Checking Engine Oil (Z06,
Grand Sport, and Stingray
with Z51).”
Selecting the Right Engine Oil
Selecting the right engine oil
depends on both the proper oil
specification and viscosity grade.
See Recommended Fluids and
Lubricants 0316.
Specification
Ask for and use engine oils that
meet the dexos1™ specification.
Engine oils that have been
approved by GM as meeting the
dexos1 specification are marked
with the dexos1 approved logo. See
www.gmdexos.com.
GM recommends Mobil 1
®engine
oils that show the dexos1 approved
logo for its dry sump equipped
engines.
Page 238 of 360
Chevrolet Corvette Owner Manual (GMNA-Localizing-U.S./Canada/Mexico-
9956103) - 2017 - crc - 4/28/16
Vehicle Care 237
service manual, seeService
Publications Ordering
Information 0333.
Caution
Use of the incorrect automatic
transmission fluid may damage
the vehicle, and the damage may
not be covered by the vehicle
warranty. Always use the
automatic transmission fluid listed
in Recommended Fluids and
Lubricants 0316.
Change the fluid and filter at the
intervals listed in Maintenance
Schedule 0307, and be sure to use
the fluid listed in Recommended
Fluids and Lubricants 0316.
Manual Transmission
Fluid
It is not necessary to check the
manual transmission fluid level.
A transmission fluid leak is the only
reason for fluid loss. If a leak
occurs, take the vehicle to the
dealer and have it repaired as soon as possible. See
Recommended
Fluids and Lubricants 0316 for the
proper fluid to use.
Hydraulic Clutch
It is not necessary to regularly
check clutch fluid unless you
suspect there is a leak in the
system. Adding fluid will not correct
a leak. A fluid loss in this system
could indicate a problem. Have the
system inspected and repaired.
The fluid will darken over time. See
Maintenance Schedule 0307 for
when to replace the fluid.
When to Check and What
to Use
The hydraulic clutch fluid reservoir
cap has this symbol on it. See
Engine Compartment Overview
0 225 for reservoir location. Refer to
Recommended Fluids and
Lubricants 0316 for the proper fluid
to use. The fluid requires changing.
See Maintenance Schedule 0307.
How to Check and Add Fluid
Visually check the clutch fluid
reservoir to make sure the fluid level
is at the MIN (minimum) line on the
side of the reservoir. The hydraulic
clutch fluid system should be closed
and sealed.
Do not remove the cap to check the
fluid level or to top off the fluid level.
Remove the cap only when
necessary to add the proper fluid
until the level reaches the MIN line.
Engine Air Cleaner/Filter
See Engine Compartment Overview
0 225 for the location of the engine
air cleaner/filter.
Caution
If water is sprayed and enters the
engine air cleaner/filter intake and
housing, the engine could be
(Continued)
Page 243 of 360
Chevrolet Corvette Owner Manual (GMNA-Localizing-U.S./Canada/Mexico-
9956103) - 2017 - crc - 4/28/16
242 Vehicle Care
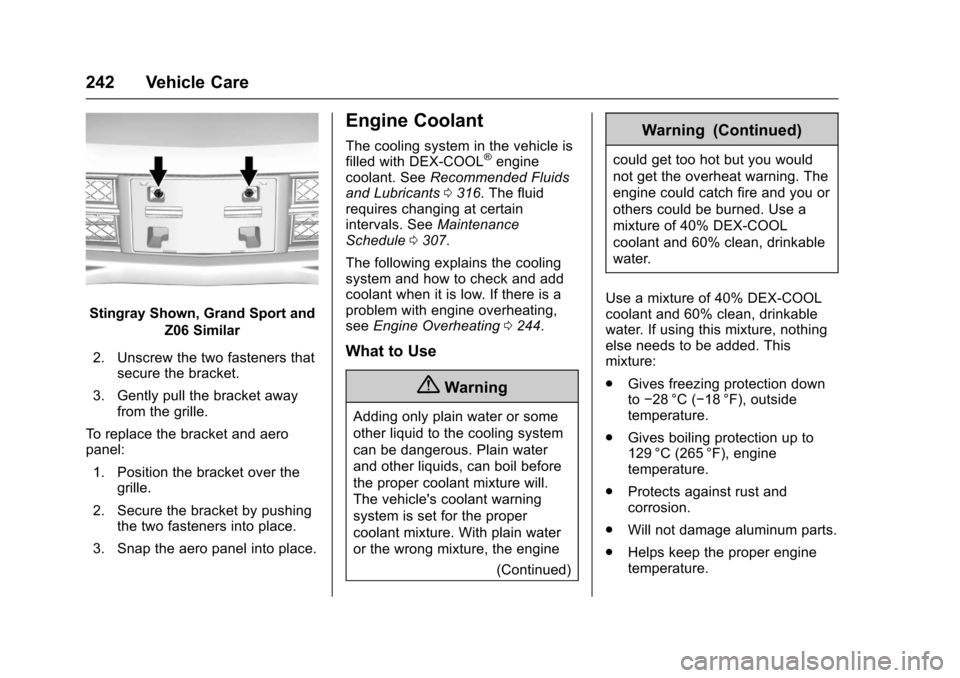
Stingray Shown, Grand Sport andZ06 Similar
2. Unscrew the two fasteners that secure the bracket.
3. Gently pull the bracket away from the grille.
To replace the bracket and aero
panel: 1. Position the bracket over the grille.
2. Secure the bracket by pushing the two fasteners into place.
3. Snap the aero panel into place.
Engine Coolant
The cooling system in the vehicle is
filled with DEX-COOL®engine
coolant. See Recommended Fluids
and Lubricants 0316. The fluid
requires changing at certain
intervals. See Maintenance
Schedule 0307.
The following explains the cooling
system and how to check and add
coolant when it is low. If there is a
problem with engine overheating,
see Engine Overheating 0244.
What to Use
{Warning
Adding only plain water or some
other liquid to the cooling system
can be dangerous. Plain water
and other liquids, can boil before
the proper coolant mixture will.
The vehicle's coolant warning
system is set for the proper
coolant mixture. With plain water
or the wrong mixture, the engine
(Continued)
Warning (Continued)
could get too hot but you would
not get the overheat warning. The
engine could catch fire and you or
others could be burned. Use a
mixture of 40% DEX-COOL
coolant and 60% clean, drinkable
water.
Use a mixture of 40% DEX-COOL
coolant and 60% clean, drinkable
water. If using this mixture, nothing
else needs to be added. This
mixture:
. Gives freezing protection down
to−28 °C (−18 °F), outside
temperature.
. Gives boiling protection up to
129 °C (265 °F), engine
temperature.
. Protects against rust and
corrosion.
. Will not damage aluminum parts.
. Helps keep the proper engine
temperature.
Page 244 of 360
Chevrolet Corvette Owner Manual (GMNA-Localizing-U.S./Canada/Mexico-
9956103) - 2017 - crc - 4/28/16
Vehicle Care 243
Caution
If improper coolant mixture,
inhibitors, or additives are used in
the vehicle cooling system, the
engine could overheat and be
damaged. Too much water in the
mixture can freeze and crack
engine cooling parts. The repairs
would not be covered by the
vehicle warranty. Use only the
proper mixture of engine coolant
for the cooling system. See
Recommended Fluids and
Lubricants0316.
Never dispose of engine coolant by
putting it in the trash, pouring it on
the ground, or into sewers, streams,
or bodies of water. Have the coolant
changed by an authorized service
center, familiar with legal
requirements regarding used
coolant disposal. This will help
protect the environment and your
health. If ambient temperatures are
anticipated below
−28 °C (−18 °F),
make sure a proper mixture ratio of
50% DEX-COOL coolant and 50%
clean, drinkable water is used.
Checking Coolant
The vehicle must be on a level
surface when checking the coolant
level.
Check to see if coolant is visible in
the coolant surge tank. If the coolant
inside the coolant surge tank is
boiling, do not do anything else until
it cools down. If coolant is visible
but the coolant level is not at or
above the cold fill line, add a
mixture of 40% DEX-COOL coolant
and 60% clean, drinkable water at
the coolant recovery tank, but be
sure the cooling system is cool
before this is done. See Engine
Overheating 0244.
The engine coolant surge tank is
toward the rear of the engine
compartment on the passenger side
of the vehicle. See Engine
Compartment Overview 0225.
When the engine is cold, the coolant
level should be at the cold fill line on
the coolant surge tank.
When the engine is hot, the level
could be higher than the cold fill
line. If the coolant is below the cold
fill line when the engine is hot, there
could be a leak in the cooling
system.
If the coolant is low, add the coolant
or take the vehicle to your dealer for
service.
How to Add Coolant to the
Coolant Surge Tank
{Warning
You can be burned if you spill
coolant on hot engine parts.
Coolant contains ethylene glycol
and it will burn if the engine parts
are hot enough. Do not spill
coolant on a hot engine.
Page 249 of 360
Chevrolet Corvette Owner Manual (GMNA-Localizing-U.S./Canada/Mexico-
9956103) - 2017 - crc - 4/28/16
248 Vehicle Care
There are only two reasons why the
brake fluid level in the reservoir may
go down:
.Normal brake lining wear. When
new linings are installed, the
fluid level goes back up.
. A fluid leak in the brake
hydraulic system. Have the
brake hydraulic system fixed.
With a leak, the brakes will not
work well.
Always clean the brake fluid
reservoir cap and the area around
the cap before removing it.
Do not top off the brake fluid.
Adding fluid does not correct a leak.
If fluid is added when the linings are
worn, there will be too much fluid
when new brake linings are
installed. Add or remove fluid, as
necessary, only when work is done
on the brake hydraulic system.{Warning
If too much brake fluid is added, it
can spill on the engine and burn,
if the engine is hot enough. You
or others could be burned, and
the vehicle could be damaged.
Add brake fluid only when work is
done on the brake hydraulic
system.
When the brake fluid falls to a low
level, the brake warning light comes
on. See Brake System Warning
Light 0110.
Brake fluid absorbs water over time
which degrades the effectiveness of
the brake fluid. Replace brake fluid
at the specified intervals to prevent
increased stopping distance. See
Maintenance Schedule 0307.
What to Add
Use only GM approved DOT 3
brake fluid from a clean, sealed
container. See Recommended
Fluids and Lubricants 0316.
{Warning
The wrong or contaminated brake
fluid could result in damage to the
brake system. This could result in
the loss of braking leading to a
possible injury. Always use the
proper GM approved brake fluid.
Caution
If brake fluid is spilled on the
vehicle's painted surfaces, the
paint finish can be damaged.
Immediately wash off any painted
surface.
Battery - North America
The original equipment battery is
maintenance free. Do not remove
the cap and do not add fluid.
Refer to the replacement number on
the original battery label when a
new battery is needed.
Page 251 of 360
Chevrolet Corvette Owner Manual (GMNA-Localizing-U.S./Canada/Mexico-
9956103) - 2017 - crc - 4/28/16
250 Vehicle Care
Rear Axle
When to Check Lubricant
It is not necessary to regularly
check rear axle fluid unless a leak is
suspected or an unusual noise is
heard. A fluid loss could indicate a
problem. Have it inspected and
repaired.
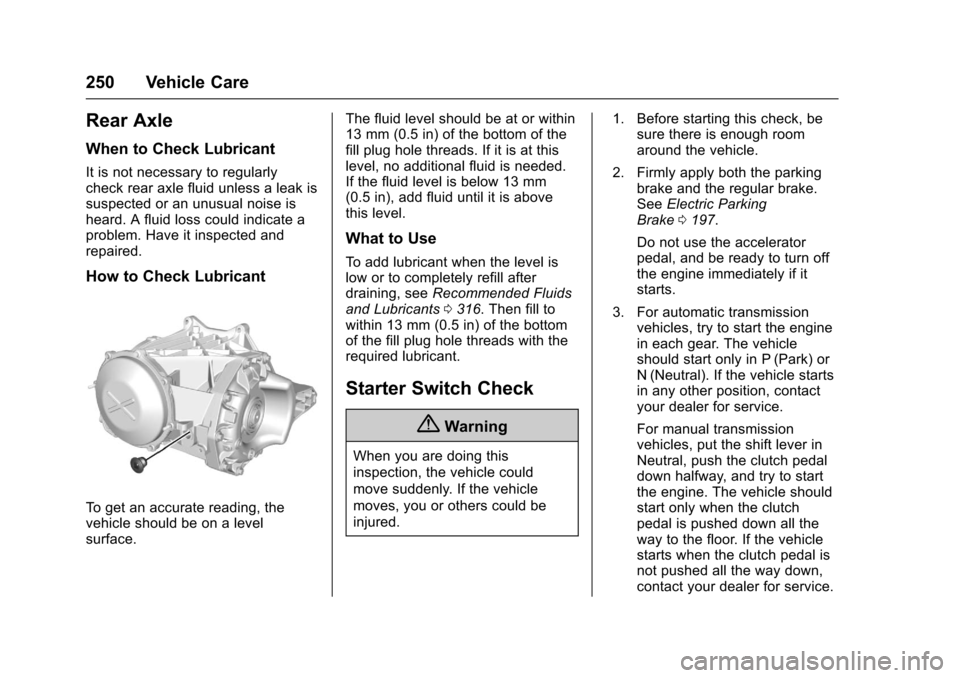
How to Check Lubricant
To get an accurate reading, the
vehicle should be on a level
surface.The fluid level should be at or within
13 mm (0.5 in) of the bottom of the
fill plug hole threads. If it is at this
level, no additional fluid is needed.
If the fluid level is below 13 mm
(0.5 in), add fluid until it is above
this level.
What to Use
To add lubricant when the level is
low or to completely refill after
draining, see
Recommended Fluids
and Lubricants 0316. Then fill to
within 13 mm (0.5 in) of the bottom
of the fill plug hole threads with the
required lubricant.
Starter Switch Check
{Warning
When you are doing this
inspection, the vehicle could
move suddenly. If the vehicle
moves, you or others could be
injured. 1. Before starting this check, be
sure there is enough room
around the vehicle.
2. Firmly apply both the parking brake and the regular brake.
See Electric Parking
Brake 0197.
Do not use the accelerator
pedal, and be ready to turn off
the engine immediately if it
starts.
3. For automatic transmission vehicles, try to start the engine
in each gear. The vehicle
should start only in P (Park) or
N (Neutral). If the vehicle starts
in any other position, contact
your dealer for service.
For manual transmission
vehicles, put the shift lever in
Neutral, push the clutch pedal
down halfway, and try to start
the engine. The vehicle should
start only when the clutch
pedal is pushed down all the
way to the floor. If the vehicle
starts when the clutch pedal is
not pushed all the way down,
contact your dealer for service.
Page 297 of 360

Chevrolet Corvette Owner Manual (GMNA-Localizing-U.S./Canada/Mexico-
9956103) - 2017 - crc - 4/28/16
296 Vehicle Care
Consult your dealer or a
professional towing service if the
disabled vehicle must be towed.
To tow the vehicle behind another
vehicle for recreational purposes,
such as behind a motor home, see
“Recreational Vehicle Towing”
following.
Recreational Vehicle
Towing
Caution
Dolly towing or dinghy towing the
vehicle may cause damage
because of reduced ground
clearance. Always put the vehicle
on a flatbed truck or trailer.
The vehicle was neither designed
nor intended to be towed with any of
its wheels on the ground. If the
vehicle must be towed, see Towing
the Vehicle 0295.
Appearance Care
Exterior Care
Locks
Locks are lubricated at the factory.
Use a de-icing agent only when
absolutely necessary, and have the
locks greased after using. See
Recommended Fluids and
Lubricants 0316.
Washing the Vehicle
To preserve the vehicle's finish,
wash it often and out of direct
sunlight.
Caution
Do not use petroleum-based,
acidic, or abrasive cleaning
agents as they can damage the
vehicle's paint, metal, or plastic
parts. If damage occurs, it would
not be covered by the vehicle
warranty. Approved cleaning
products can be obtained from
(Continued)
Caution (Continued)
your dealer. Follow all
manufacturer directions regarding
correct product usage, necessary
safety precautions, and
appropriate disposal of any
vehicle care product.
Caution
Avoid using high-pressure
washes closer than 30 cm (12 in)
to the surface of the vehicle. Use
of power washers exceeding
8,274 kPa (1,200 psi) can result
in damage or removal of paint
and decals.
Page 300 of 360

Chevrolet Corvette Owner Manual (GMNA-Localizing-U.S./Canada/Mexico-
9956103) - 2017 - crc - 4/28/16
Vehicle Care 299
.Aftermarket appearance caps or
covers while the lamps are
illuminated, due to excessive
heat generated.
Caution
Failure to clean lamps properly
can cause damage to the lamp
cover that would not be covered
by the vehicle warranty.
Caution
Using wax on low gloss black
finish stripes can increase the
gloss level and create a
non-uniform finish. Clean low
gloss stripes with soap and
water only.
Air Intakes
Clear debris from the air intakes,
between the hood and windshield,
when washing the vehicle.
Windshield and Wiper Blades
Clean the outside of the windshield
with glass cleaner.
Clean rubber blades using lint-free
cloth or paper towel soaked with
windshield washer fluid or a mild
detergent. Wash the windshield
thoroughly when cleaning the
blades. Bugs, road grime, sap, and
a buildup of vehicle wash/wax
treatments may cause wiper
streaking.
Replace the wiper blades if they are
worn or damaged. Damage can be
caused by extreme dusty
conditions, sand, salt, heat, sun,
snow, and ice.
Weatherstrips
Apply Dielectric silicone grease on
weatherstrips to make them last
longer, seal better, and not stick or
squeak. Lubricate weatherstrips at
least once a year. Hot, dry climates
require more frequent application.
Black marks from rubber material on
painted surfaces can be removed by rubbing with a clean cloth. See
Recommended Fluids and
Lubricants
0316.
Tires
Use a stiff brush with tire cleaner to
clean the tires.
Caution
Using petroleum-based tire
dressing products on the vehicle
may damage the paint finish and/
or tires. When applying a tire
dressing, always wipe off any
overspray from all painted
surfaces on the vehicle.
Wheels and Trim —Aluminum
or Chrome
Use a soft, clean cloth with mild
soap and water to clean the wheels.
After rinsing thoroughly with clean
water, dry with a soft, clean towel.
A wax may then be applied.