cooling CHEVROLET CORVETTE 2018 Owner's Manual
[x] Cancel search | Manufacturer: CHEVROLET, Model Year: 2018, Model line: CORVETTE, Model: CHEVROLET CORVETTE 2018Pages: 358, PDF Size: 5.46 MB
Page 19 of 358
Chevrolet Corvette Owner Manual (GMNA-Localizing-U.S./Canada/Mexico-
11374030) - 2018 - CRC - 11/8/17
18 In Brief
Climate Controls
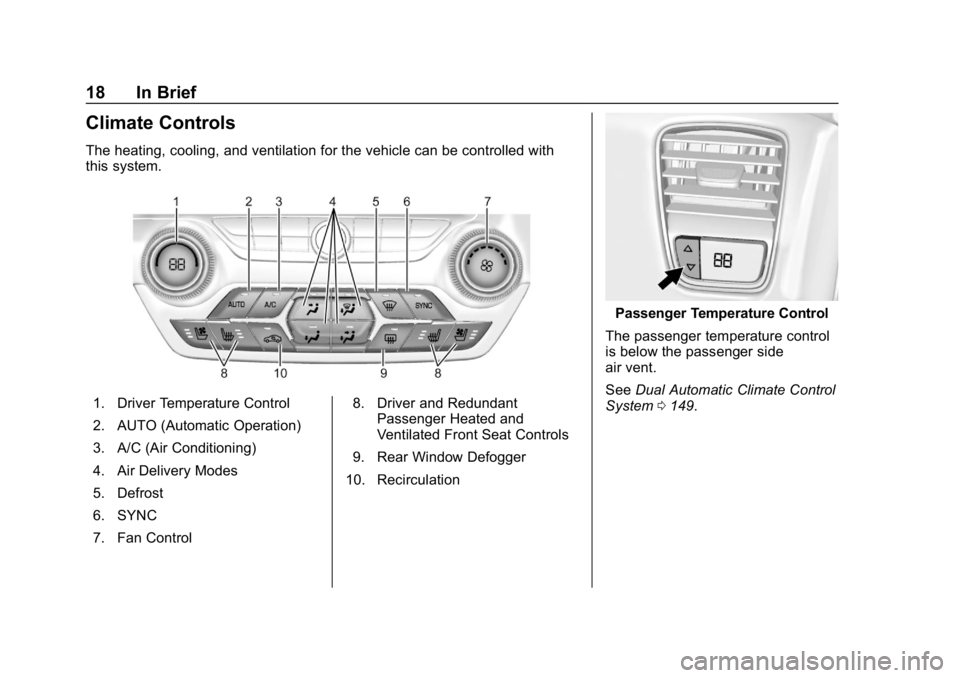
The heating, cooling, and ventilation for the vehicle can be controlled with
this system.
1. Driver Temperature Control
2. AUTO (Automatic Operation)
3. A/C (Air Conditioning)
4. Air Delivery Modes
5. Defrost
6. SYNC
7. Fan Control8. Driver and Redundant
Passenger Heated and
Ventilated Front Seat Controls
9. Rear Window Defogger
10. Recirculation
Passenger Temperature Control
The passenger temperature control
is below the passenger side
air vent.
See Dual Automatic Climate Control
System 0149.
Page 150 of 358
Chevrolet Corvette Owner Manual (GMNA-Localizing-U.S./Canada/Mexico-
11374030) - 2018 - CRC - 11/8/17
Climate Controls 149
Climate Controls
Climate Control Systems
Dual Automatic ClimateControl System . . . . . . . . . . . . . 149
Air Vents
Air Vents . . . . . . . . . . . . . . . . . . . . . 153
Maintenance
Passenger Compartment AirFilter . . . . . . . . . . . . . . . . . . . . . . . . 153
Service . . . . . . . . . . . . . . . . . . . . . . . 154
Climate Control Systems
Dual Automatic Climate Control System
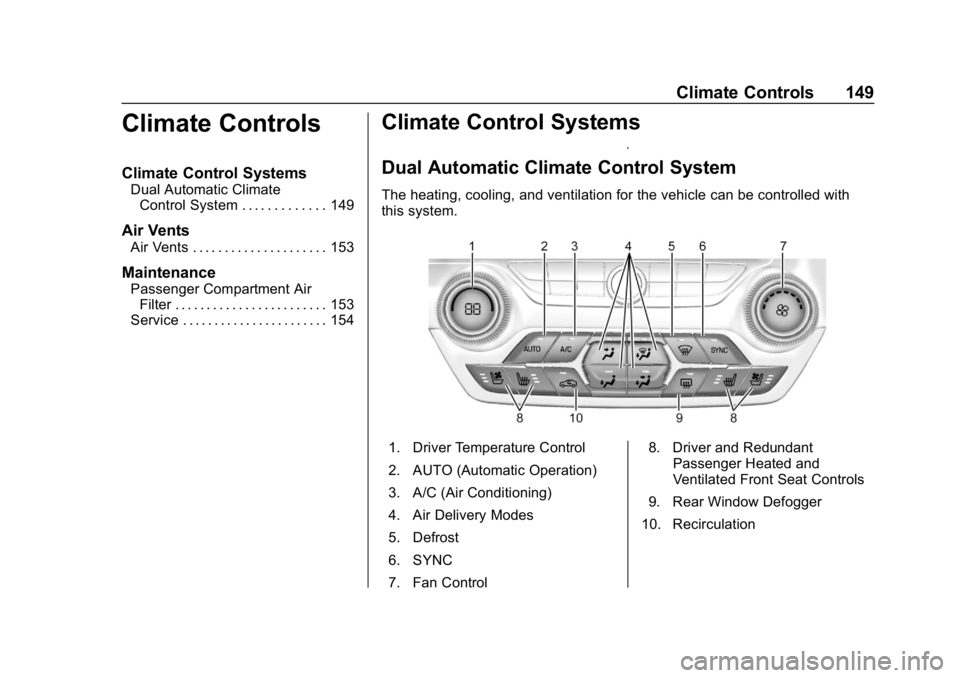
The heating, cooling, and ventilation for the vehicle can be controlled with
this system.
1. Driver Temperature Control
2. AUTO (Automatic Operation)
3. A/C (Air Conditioning)
4. Air Delivery Modes
5. Defrost
6. SYNC
7. Fan Control 8. Driver and Redundant
Passenger Heated and
Ventilated Front Seat Controls
9. Rear Window Defogger
10. Recirculation
Page 152 of 358
Chevrolet Corvette Owner Manual (GMNA-Localizing-U.S./Canada/Mexico-
11374030) - 2018 - CRC - 11/8/17
Climate Controls 151
Changing the mode cancels the
automatic operation and the system
goes into manual mode. Press
AUTO to return to automatic
operation.
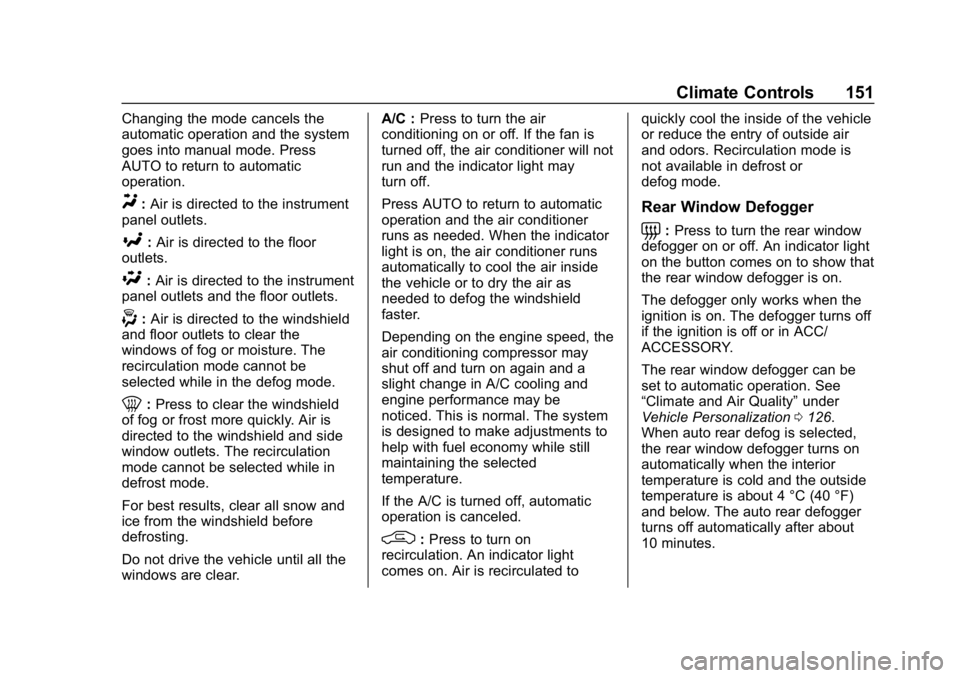
Y:Air is directed to the instrument
panel outlets.
[: Air is directed to the floor
outlets.
\: Air is directed to the instrument
panel outlets and the floor outlets.
-: Air is directed to the windshield
and floor outlets to clear the
windows of fog or moisture. The
recirculation mode cannot be
selected while in the defog mode.
0: Press to clear the windshield
of fog or frost more quickly. Air is
directed to the windshield and side
window outlets. The recirculation
mode cannot be selected while in
defrost mode.
For best results, clear all snow and
ice from the windshield before
defrosting.
Do not drive the vehicle until all the
windows are clear. A/C :
Press to turn the air
conditioning on or off. If the fan is
turned off, the air conditioner will not
run and the indicator light may
turn off.
Press AUTO to return to automatic
operation and the air conditioner
runs as needed. When the indicator
light is on, the air conditioner runs
automatically to cool the air inside
the vehicle or to dry the air as
needed to defog the windshield
faster.
Depending on the engine speed, the
air conditioning compressor may
shut off and turn on again and a
slight change in A/C cooling and
engine performance may be
noticed. This is normal. The system
is designed to make adjustments to
help with fuel economy while still
maintaining the selected
temperature.
If the A/C is turned off, automatic
operation is canceled.
/: Press to turn on
recirculation. An indicator light
comes on. Air is recirculated to quickly cool the inside of the vehicle
or reduce the entry of outside air
and odors. Recirculation mode is
not available in defrost or
defog mode.
Rear Window Defogger
=:
Press to turn the rear window
defogger on or off. An indicator light
on the button comes on to show that
the rear window defogger is on.
The defogger only works when the
ignition is on. The defogger turns off
if the ignition is off or in ACC/
ACCESSORY.
The rear window defogger can be
set to automatic operation. See
“Climate and Air Quality” under
Vehicle Personalization 0126.
When auto rear defog is selected,
the rear window defogger turns on
automatically when the interior
temperature is cold and the outside
temperature is about 4 °C (40 °F)
and below. The auto rear defogger
turns off automatically after about
10 minutes.
Page 163 of 358
Chevrolet Corvette Owner Manual (GMNA-Localizing-U.S./Canada/Mexico-
11374030) - 2018 - CRC - 11/8/17
162 Driving and Operating
Proceed by adjusting the lower
control arm cam bolts until
alignment is within specifications.
Alignment values are targets. See
your dealer for tolerances.
Front (per corner)
.Caster: +7.0 degrees
. Camber: -2.0 degrees
. Toe: 0.05 degrees toe in
Rear (per corner)
. Caster: 0 degrees
. Camber: -2.0 degrees
. Toe: 0.05 degrees toe in
Thrust Angle: 0 degrees
Rear Axle Fluid
Caution
During a first time track or racing
event, high rear axle
temperatures can occur. Damage
could be caused to the rear axle
and would not be covered by the (Continued)
Caution (Continued)
vehicle warranty. Do not drive as
long or as fast the first time the
vehicle is driven on the track or
raced.
Axles must have 885 km (500 mi)
before being used in track driving.
The rear axle fluid temperatures
may be higher than when driving in
severe conditions. Drain and refill
with new fluid after the first racing or
competitive driving event, and then
after every 24 hours of racing or
competitive driving. See
Recommended Fluids and
Lubricants 0313.
General Information
If reduced performance is
experienced during track events or
competitive driving, turning off the
A/C will help to improve engine
performance. Maintain a mixture of 40%
DEX-COOL coolant and 60% clean,
drinkable water to optimize engine
performance.
The front license plate bracket or
aero panel should be removed for
track events and competitive driving
to improve engine performance.
If additional brake cooling is
required, the grille mesh in the lower
corners of the front grille in front of
the brake duct can be removed.
This is not reversible, and a
replacement grille will not be
covered by the vehicle warranty.
If this is done, it is recommended
that the gap between the fascia and
the cooling duct be taped over.
Brake Burnishing
New brake pads must be burnished
before racing or other competitive
driving.
Page 165 of 358
Chevrolet Corvette Owner Manual (GMNA-Localizing-U.S./Canada/Mexico-
11374030) - 2018 - CRC - 11/8/17
164 Driving and Operating
Street High Performance Brake
Burnishing Procedure (Grand
Sport or Z06 with J57 Ceramic
Brakes or Z07 Performance
Package)1. From a stop, accelerate as rapidly as possible without
activating traction control to a
speed of 100 km/h (60 mph).
2. Use enough pedal force to completely stop the vehicle in
four to five seconds. If ABS
activates, braking is too hard.
3. Repeat Steps 1 and 2 –50
times. This should take about
10 minutes.
4. After completing the 50 stops, cool the brakes by driving for
8 km (5 mi) at 100 km/h
(60 mph).
As with all high performance brake
systems, some amount of brake
squeal is normal. Racing/Track Brake Burnishing
Procedure (Grand Sport and Z06
with Z07 Performance Package or
J57 Ceramic Brakes)
This procedure should only be run
on a track and only on dry
pavement.
Caution
Brake pedal fade will occur during
this track burnish procedure and
can cause brake pedal travel and
force to increase. This could
extend stopping distance until the
brakes are fully burnished.
1. Drive a normal first lap, not too aggressively.
2. Laps 2 and 3 should be gradually driven faster and
more aggressively, while
allowing for reduced brake
output and increased stopping
distance due to brake fade. 3. Drive Lap 4 near full speed,
while allowing for reduced
brake output and increased
stopping distance due to
brake fade.
4. Laps 5 and 6 should be cool down laps.
5. Lap 7 should be normal driving or an easy out lap.Front Compartment Air
Deflector Panel
Prior to the track event, when
ambient temperatures are above
27 °C (80 °F), the panel between
the front fascia extension and the
front cradle can be removed to
maximize cooling air flow to the
steering gear power assist motor.
Page 166 of 358
Chevrolet Corvette Owner Manual (GMNA-Localizing-U.S./Canada/Mexico-
11374030) - 2018 - CRC - 11/8/17
Driving and Operating 165
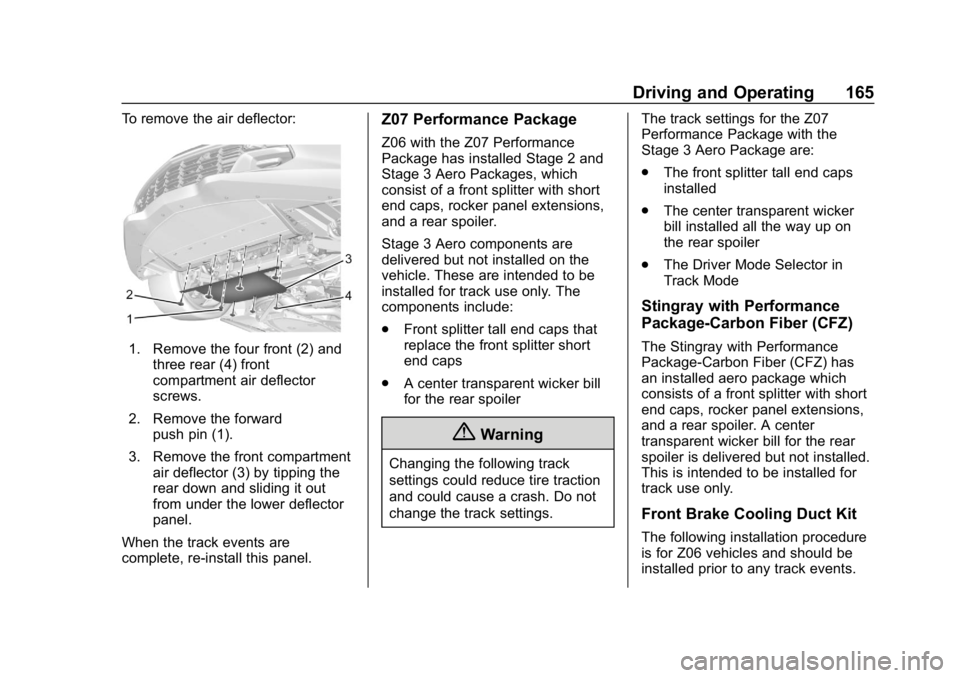
To remove the air deflector:
1. Remove the four front (2) andthree rear (4) front
compartment air deflector
screws.
2. Remove the forward push pin (1).
3. Remove the front compartment air deflector (3) by tipping the
rear down and sliding it out
from under the lower deflector
panel.
When the track events are
complete, re-install this panel.
Z07 Performance Package
Z06 with the Z07 Performance
Package has installed Stage 2 and
Stage 3 Aero Packages, which
consist of a front splitter with short
end caps, rocker panel extensions,
and a rear spoiler.
Stage 3 Aero components are
delivered but not installed on the
vehicle. These are intended to be
installed for track use only. The
components include:
. Front splitter tall end caps that
replace the front splitter short
end caps
. A center transparent wicker bill
for the rear spoiler
{Warning
Changing the following track
settings could reduce tire traction
and could cause a crash. Do not
change the track settings. The track settings for the Z07
Performance Package with the
Stage 3 Aero Package are:
.
The front splitter tall end caps
installed
. The center transparent wicker
bill installed all the way up on
the rear spoiler
. The Driver Mode Selector in
Track Mode
Stingray with Performance
Package-Carbon Fiber (CFZ)
The Stingray with Performance
Package-Carbon Fiber (CFZ) has
an installed aero package which
consists of a front splitter with short
end caps, rocker panel extensions,
and a rear spoiler. A center
transparent wicker bill for the rear
spoiler is delivered but not installed.
This is intended to be installed for
track use only.
Front Brake Cooling Duct Kit
The following installation procedure
is for Z06 vehicles and should be
installed prior to any track events.
Page 167 of 358
Chevrolet Corvette Owner Manual (GMNA-Localizing-U.S./Canada/Mexico-
11374030) - 2018 - CRC - 11/8/17
166 Driving and Operating
The cooling ducts should be
installed prior to any track events.
The cooling ducts improve brake
cooling during track events.
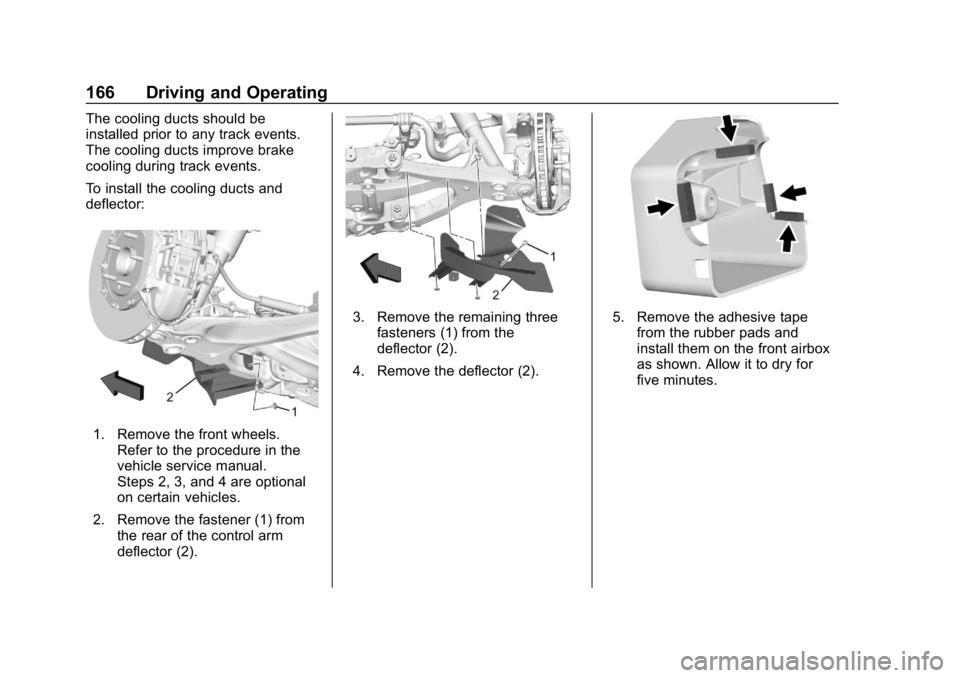
To install the cooling ducts and
deflector:
1. Remove the front wheels.Refer to the procedure in the
vehicle service manual.
Steps 2, 3, and 4 are optional
on certain vehicles.
2. Remove the fastener (1) from the rear of the control arm
deflector (2).
3. Remove the remaining threefasteners (1) from the
deflector (2).
4. Remove the deflector (2).5. Remove the adhesive tape from the rubber pads and
install them on the front airbox
as shown. Allow it to dry for
five minutes.
Page 170 of 358

Chevrolet Corvette Owner Manual (GMNA-Localizing-U.S./Canada/Mexico-
11374030) - 2018 - CRC - 11/8/17
Driving and Operating 169
Wheel Blocker
The following installation procedure
is for Z06 vehicles with the J56
brake package and should be
installed prior to any track events.
The wheel blocker helps improve
the cooling of the brake rotor.
Caution
The wheel blocker is for track use
only. After a track event, remove
the wheel blocker and reinstall
the original splash shield. Failure
to reinstall the original parts may
lead to damage to the wheel
blocker, noise, premature brake
pad and rotor wear, and high
speed wet braking.To install the wheel blocker:
1. Remove the front wheels.
Refer to the procedure in the
vehicle service manual.
2. Remove the brake caliper (1) from the steering knuckle. Do
not disconnect the brake hose.
Refer to the procedure in the
vehicle service manual.
3. Remove the brake rotor retaining fastener (2) and then
remove the brake rotor (3). 4. Remove the two splash shield
fasteners (4).
5. Remove the splash shield (5).
6. Install the wheel blocker (1).
7. Install the three wheel blocker fasteners (2). Torque to 10 Y
(89 lb inch).
Page 172 of 358
Chevrolet Corvette Owner Manual (GMNA-Localizing-U.S./Canada/Mexico-
11374030) - 2018 - CRC - 11/8/17
Driving and Operating 171
wet enough and you are going fast
enough. When the vehicle is
hydroplaning, it has little or no
contact with the road.
There is no hard and fast rule about
hydroplaning. The best advice is to
slow down when the road is wet.
Other Rainy Weather Tips
Besides slowing down, other wet
weather driving tips include:
.Allow extra following distance.
. Pass with caution.
. Keep windshield wiping
equipment in good shape.
. Keep the windshield washer fluid
reservoir filled.
. Have good tires with proper
tread depth. See Tires0257.
. Turn off cruise control.
Hill and Mountain Roads
Driving on steep hills or through
mountains is different than driving
on flat or rolling terrain. Tips include:
.
Keep the vehicle serviced and in
good shape.
. Check all fluid levels and brakes,
tires, cooling system, and
transmission.
. Shift to a lower gear when going
down steep or long hills.
{Warning
Using the brakes to slow the
vehicle on a long downhill slope
can cause brake overheating, can
reduce brake performance, and
could result in a loss of braking.
Shift the transmission to a lower
gear to let the engine assist the
brakes on a steep downhill slope.
{Warning
Coasting downhill in N (Neutral)
or with the ignition off is
dangerous. This can cause
overheating of the brakes and
loss of steering assist. Always
have the engine running and the
vehicle in gear.
. Drive at speeds that keep the
vehicle in its own lane. Do not
swing wide or cross the
center line.
. Be alert on top of hills;
something could be in your lane
(e.g., stalled car, accident).
. Pay attention to special road
signs (e.g., falling rocks area,
winding roads, long grades,
passing or no-passing zones)
and take appropriate action.
Page 216 of 358
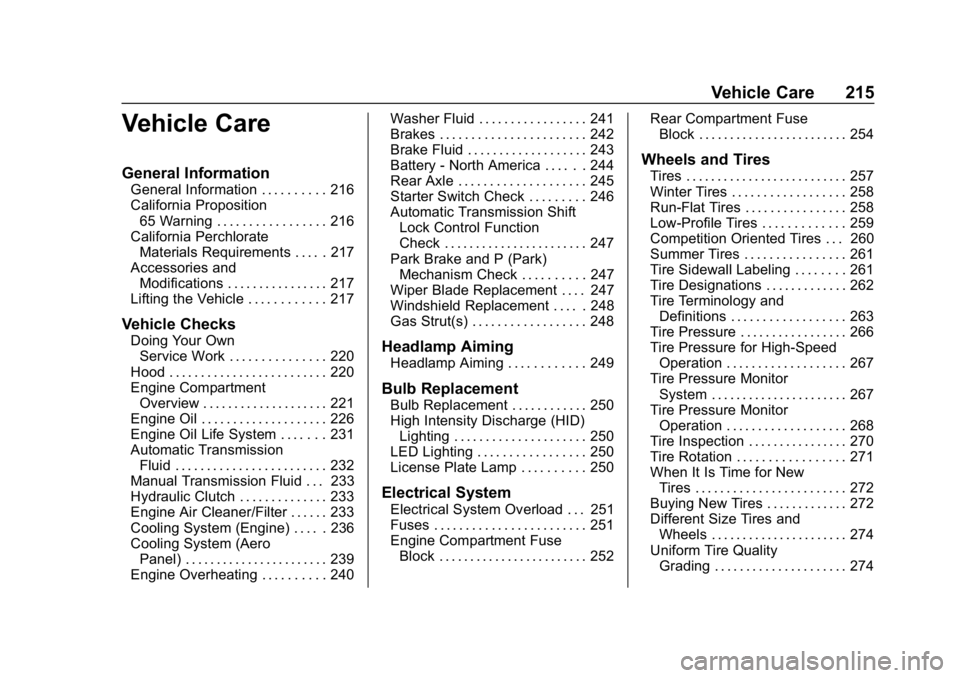
Chevrolet Corvette Owner Manual (GMNA-Localizing-U.S./Canada/Mexico-
11374030) - 2018 - CRC - 11/8/17
Vehicle Care 215
Vehicle Care
General Information
General Information . . . . . . . . . . 216
California Proposition65 Warning . . . . . . . . . . . . . . . . . 216
California Perchlorate Materials Requirements . . . . . 217
Accessories and Modifications . . . . . . . . . . . . . . . . 217
Lifting the Vehicle . . . . . . . . . . . . 217
Vehicle Checks
Doing Your Own Service Work . . . . . . . . . . . . . . . 220
Hood . . . . . . . . . . . . . . . . . . . . . . . . . 220
Engine Compartment Overview . . . . . . . . . . . . . . . . . . . . 221
Engine Oil . . . . . . . . . . . . . . . . . . . . 226
Engine Oil Life System . . . . . . . 231
Automatic Transmission Fluid . . . . . . . . . . . . . . . . . . . . . . . . 232
Manual Transmission Fluid . . . 233
Hydraulic Clutch . . . . . . . . . . . . . . 233
Engine Air Cleaner/Filter . . . . . . 233
Cooling System (Engine) . . . . . 236
Cooling System (Aero Panel) . . . . . . . . . . . . . . . . . . . . . . . 239
Engine Overheating . . . . . . . . . . 240 Washer Fluid . . . . . . . . . . . . . . . . . 241
Brakes . . . . . . . . . . . . . . . . . . . . . . . 242
Brake Fluid . . . . . . . . . . . . . . . . . . . 243
Battery - North America . . . . . . 244
Rear Axle . . . . . . . . . . . . . . . . . . . . 245
Starter Switch Check . . . . . . . . . 246
Automatic Transmission Shift
Lock Control Function
Check . . . . . . . . . . . . . . . . . . . . . . . 247
Park Brake and P (Park) Mechanism Check . . . . . . . . . . 247
Wiper Blade Replacement . . . . 247
Windshield Replacement . . . . . 248
Gas Strut(s) . . . . . . . . . . . . . . . . . . 248Headlamp Aiming
Headlamp Aiming . . . . . . . . . . . . 249
Bulb Replacement
Bulb Replacement . . . . . . . . . . . . 250
High Intensity Discharge (HID) Lighting . . . . . . . . . . . . . . . . . . . . . 250
LED Lighting . . . . . . . . . . . . . . . . . 250
License Plate Lamp . . . . . . . . . . 250
Electrical System
Electrical System Overload . . . 251
Fuses . . . . . . . . . . . . . . . . . . . . . . . . 251
Engine Compartment Fuse Block . . . . . . . . . . . . . . . . . . . . . . . . 252 Rear Compartment Fuse
Block . . . . . . . . . . . . . . . . . . . . . . . . 254
Wheels and Tires
Tires . . . . . . . . . . . . . . . . . . . . . . . . . . 257
Winter Tires . . . . . . . . . . . . . . . . . . 258
Run-Flat Tires . . . . . . . . . . . . . . . . 258
Low-Profile Tires . . . . . . . . . . . . . 259
Competition Oriented Tires . . . 260
Summer Tires . . . . . . . . . . . . . . . . 261
Tire Sidewall Labeling . . . . . . . . 261
Tire Designations . . . . . . . . . . . . . 262
Tire Terminology andDefinitions . . . . . . . . . . . . . . . . . . 263
Tire Pressure . . . . . . . . . . . . . . . . . 266
Tire Pressure for High-Speed Operation . . . . . . . . . . . . . . . . . . . 267
Tire Pressure Monitor System . . . . . . . . . . . . . . . . . . . . . . 267
Tire Pressure Monitor Operation . . . . . . . . . . . . . . . . . . . 268
Tire Inspection . . . . . . . . . . . . . . . . 270
Tire Rotation . . . . . . . . . . . . . . . . . 271
When It Is Time for New Tires . . . . . . . . . . . . . . . . . . . . . . . . 272
Buying New Tires . . . . . . . . . . . . . 272
Different Size Tires and Wheels . . . . . . . . . . . . . . . . . . . . . . 274
Uniform Tire Quality Grading . . . . . . . . . . . . . . . . . . . . . 274