height CHEVROLET CORVETTE 2020 Owner's Manual
[x] Cancel search | Manufacturer: CHEVROLET, Model Year: 2020, Model line: CORVETTE, Model: CHEVROLET CORVETTE 2020Pages: 336, PDF Size: 5.21 MB
Page 62 of 336
Chevrolet Corvette Owner Manual (GMNA-Localizing-U.S./Canada/Mexico-
12470550) - 2020 - CRC - 4/23/20
Seats and Restraints 61
Seat Belt Use During
Pregnancy
Seat belts work for everyone,
including pregnant women. Like all
occupants, they are more likely to
be seriously injured if they do not
wear seat belts.
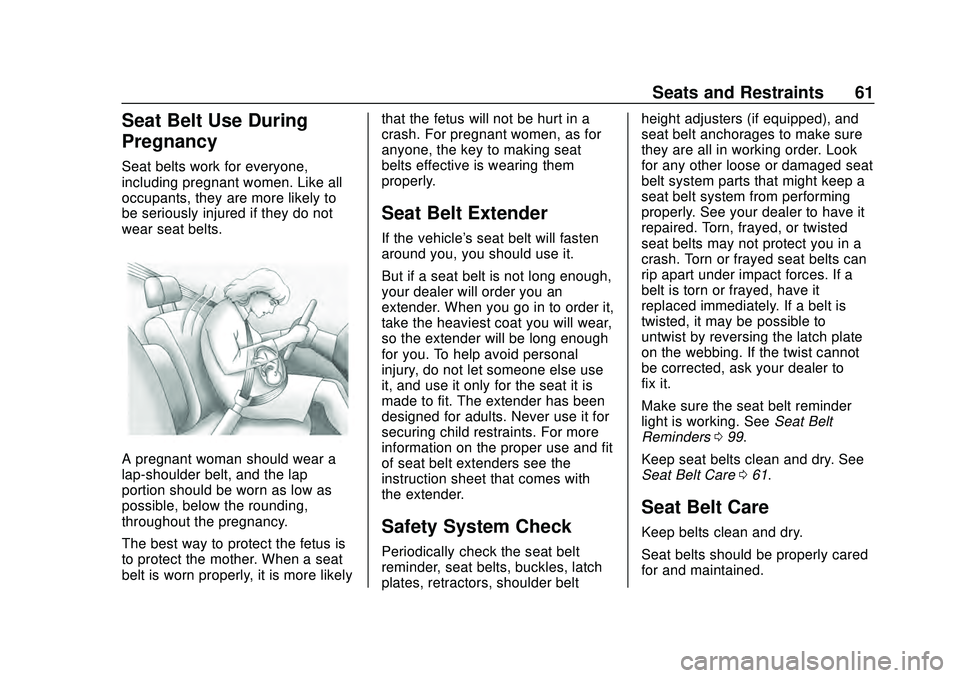
A pregnant woman should wear a
lap-shoulder belt, and the lap
portion should be worn as low as
possible, below the rounding,
throughout the pregnancy.
The best way to protect the fetus is
to protect the mother. When a seat
belt is worn properly, it is more likelythat the fetus will not be hurt in a
crash. For pregnant women, as for
anyone, the key to making seat
belts effective is wearing them
properly.
Seat Belt Extender
If the vehicle's seat belt will fasten
around you, you should use it.
But if a seat belt is not long enough,
your dealer will order you an
extender. When you go in to order it,
take the heaviest coat you will wear,
so the extender will be long enough
for you. To help avoid personal
injury, do not let someone else use
it, and use it only for the seat it is
made to fit. The extender has been
designed for adults. Never use it for
securing child restraints. For more
information on the proper use and fit
of seat belt extenders see the
instruction sheet that comes with
the extender.
Safety System Check
Periodically check the seat belt
reminder, seat belts, buckles, latch
plates, retractors, shoulder beltheight adjusters (if equipped), and
seat belt anchorages to make sure
they are all in working order. Look
for any other loose or damaged seat
belt system parts that might keep a
seat belt system from performing
properly. See your dealer to have it
repaired. Torn, frayed, or twisted
seat belts may not protect you in a
crash. Torn or frayed seat belts can
rip apart under impact forces. If a
belt is torn or frayed, have it
replaced immediately. If a belt is
twisted, it may be possible to
untwist by reversing the latch plate
on the webbing. If the twist cannot
be corrected, ask your dealer to
fix it.
Make sure the seat belt reminder
light is working. See
Seat Belt
Reminders 099.
Keep seat belts clean and dry. See
Seat Belt Care 061.
Seat Belt Care
Keep belts clean and dry.
Seat belts should be properly cared
for and maintained.
Page 73 of 336
Chevrolet Corvette Owner Manual (GMNA-Localizing-U.S./Canada/Mexico-
12470550) - 2020 - CRC - 4/23/20
72 Seats and Restraints
{Warning
Stowing articles under the
passenger seat or between the
passenger seat cushion and
seatback may interfere with the
proper operation of the passenger
sensing system.
Servicing the
Airbag-Equipped Vehicle
Airbags affect how the vehicle
should be serviced. There are parts
of the airbag system in several
places around the vehicle. Your
dealer and the service manual have
information about servicing the
vehicle and the airbag system. To
purchase a service manual, see
Publication Ordering Information
0311.
{Warning
For up to 10 seconds after the
vehicle is turned off and the
battery is disconnected, an airbag
can still inflate during improper
service. You can be injured if you
are close to an airbag when it
inflates. Avoid yellow connectors.
They are probably part of the
airbag system. Be sure to follow
proper service procedures, and
make sure the person performing
work for you is qualified to do so.
Adding Equipment to the
Airbag-Equipped Vehicle
Adding accessories that change the
vehicle's frame, bumper system,
height, front end, or side sheet
metal may keep the airbag system
from working properly.
The operation of the airbag system
can also be affected by changing,
including improperly repairing or
replacing, any parts of the following: .
Airbag system, including airbag
modules, front or side impact
sensors, sensing and diagnostic
module, or airbag wiring
. Front seats, including stitching,
seams or zippers
. Seat belts
. Steering wheel, instrument
panel, ceiling trim, or pillar
garnish trim
. Inner door seals, including
speakers
Your dealer and the service manual
have information about the location
of the airbag modules and sensors,
sensing and diagnostic module, and
airbag wiring along with the proper
replacement procedures.
In addition, the vehicle has a
passenger sensing system for the
front outboard passenger position,
which includes sensors that are part
of the passenger seat. The
passenger sensing system may not
operate properly if the original seat
trim is replaced with non-GM
covers, upholstery or trim, or with
GM covers, upholstery or trim
Page 75 of 336
Chevrolet Corvette Owner Manual (GMNA-Localizing-U.S./Canada/Mexico-
12470550) - 2020 - CRC - 4/23/20
74 Seats and Restraints
Child Restraints
Older Children
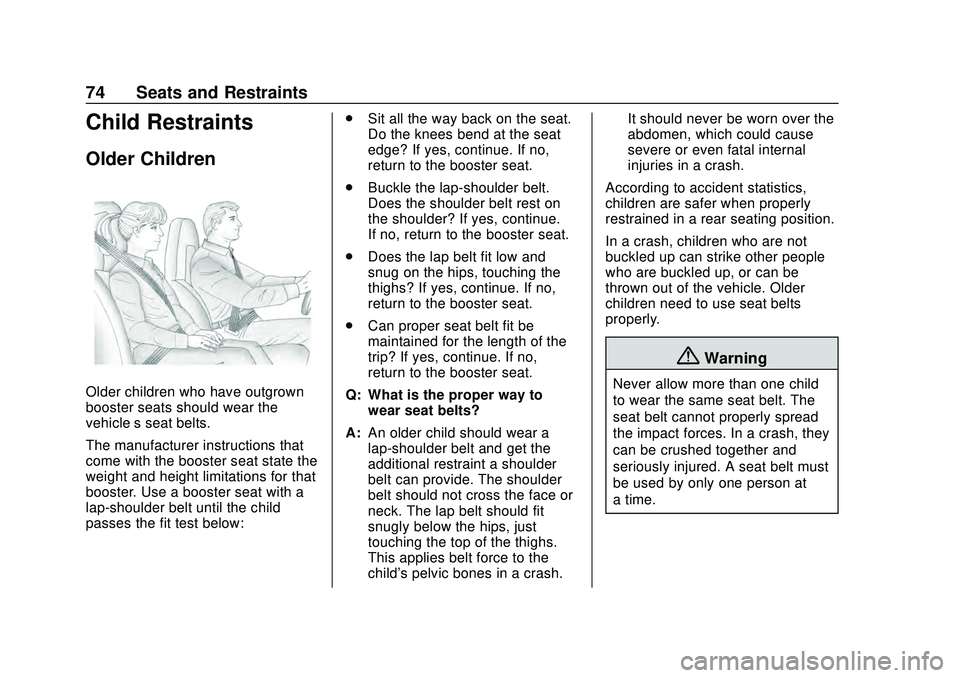
Older children who have outgrown
booster seats should wear the
vehicle’s seat belts.
The manufacturer instructions that
come with the booster seat state the
weight and height limitations for that
booster. Use a booster seat with a
lap-shoulder belt until the child
passes the fit test below:.
Sit all the way back on the seat.
Do the knees bend at the seat
edge? If yes, continue. If no,
return to the booster seat.
. Buckle the lap-shoulder belt.
Does the shoulder belt rest on
the shoulder? If yes, continue.
If no, return to the booster seat.
. Does the lap belt fit low and
snug on the hips, touching the
thighs? If yes, continue. If no,
return to the booster seat.
. Can proper seat belt fit be
maintained for the length of the
trip? If yes, continue. If no,
return to the booster seat.
Q: What is the proper way to wear seat belts?
A: An older child should wear a
lap-shoulder belt and get the
additional restraint a shoulder
belt can provide. The shoulder
belt should not cross the face or
neck. The lap belt should fit
snugly below the hips, just
touching the top of the thighs.
This applies belt force to the
child's pelvic bones in a crash. It should never be worn over the
abdomen, which could cause
severe or even fatal internal
injuries in a crash.
According to accident statistics,
children are safer when properly
restrained in a rear seating position.
In a crash, children who are not
buckled up can strike other people
who are buckled up, or can be
thrown out of the vehicle. Older
children need to use seat belts
properly.
{Warning
Never allow more than one child
to wear the same seat belt. The
seat belt cannot properly spread
the impact forces. In a crash, they
can be crushed together and
seriously injured. A seat belt must
be used by only one person at
a time.
Page 78 of 336
Chevrolet Corvette Owner Manual (GMNA-Localizing-U.S./Canada/Mexico-
12470550) - 2020 - CRC - 4/23/20
Seats and Restraints 77
Child restraints are devices used to
restrain, seat, or position children in
the vehicle and are sometimes
called child seats or car seats.
There are three basic types of
child restraints:
.Forward-facing child restraints
. Rear-facing child restraints
. Belt-positioning booster seats
The proper child restraint for your
child depends on their size, weight,
and age, and also on whether the
child restraint is compatible with the
vehicle in which it will be used.
For each type of child restraint,
there are many different models
available. When purchasing a child
restraint, be sure it is designed to be
used in a motor vehicle. If it is, the
child restraint will have a label
saying that it meets federal motor
vehicle safety standards.
The instruction manual that is
provided with the child restraint
states the weight and height
limitations for that particular child restraint. In addition, there are many
kinds of child restraints available for
children with special needs.
{Warning
To reduce the risk of neck and
head injury in a crash, infants and
toddlers should be secured in a
rear-facing child restraint until age
two, or until they reach the
maximum height and weight limits
of their child restraint.
{Warning
A young child's hip bones are still
so small that the vehicle seat belt
may not remain low on the hip
bones, as it should. Instead, it
may settle up around the child's
abdomen. In a crash, the belt
would apply force on a body area
that is unprotected by any bony
structure. This alone could cause
serious or fatal injuries. To reduce
(Continued)
Warning (Continued)
the risk of serious or fatal injuries
during a crash, young children
should always be secured in an
appropriate child restraint.
Child Restraint Systems
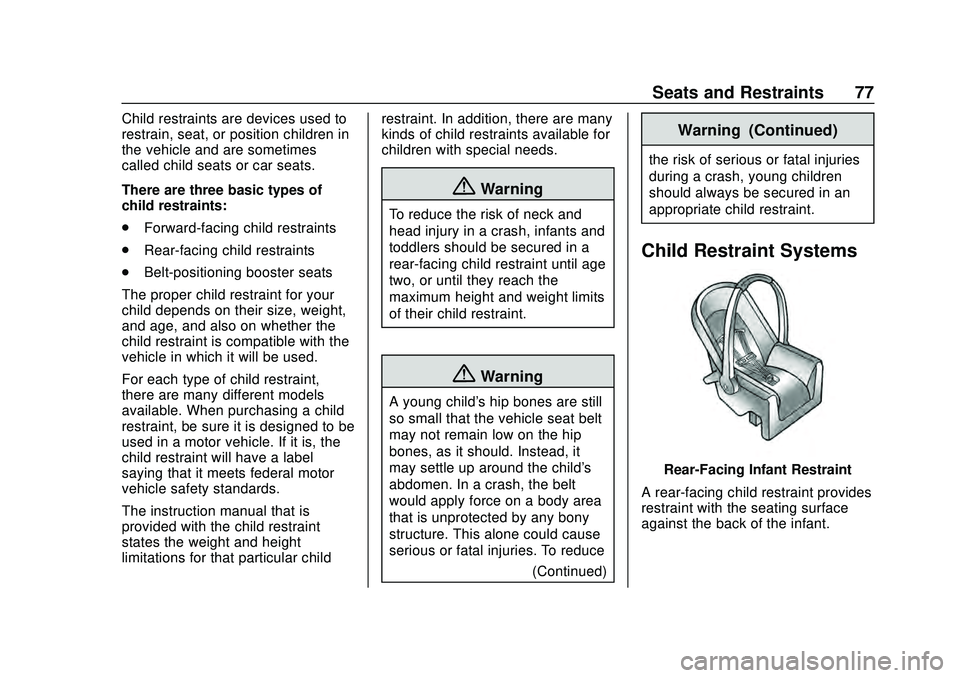
Rear-Facing Infant Restraint
A rear-facing child restraint provides
restraint with the seating surface
against the back of the infant.
Page 115 of 336

Chevrolet Corvette Owner Manual (GMNA-Localizing-U.S./Canada/Mexico-
12470550) - 2020 - CRC - 4/23/20
114 Instruments and Controls
Metric
English
Vehicle Alerts : Alerts can be
dismissed in the instrument cluster.
All alerts are not displayed in
the HUD.
Care of the HUD
Clean the inside of the windshield to
remove any dirt or film that could
reduce the sharpness or clarity of
the HUD image.
Clean the HUD lens with a soft cloth
sprayed with glass cleaner. Wipe
the lens gently, then dry it.
HUD Troubleshooting
Check that:
. Nothing is covering the
HUD lens.
. HUD brightness setting is not
too dim or too bright.
. HUD is adjusted to the proper
height.
. Polarized sunglasses are
not worn.
. Windshield and HUD lens are
clean.
If the HUD image is not correct,
contact your dealer.
The windshield is part of the HUD
system. See Windshield
Replacement 0236.
Vehicle Messages
Messages displayed on the DIC
indicate the status of the vehicle or
some action that may be needed to
correct a condition. Multiple
messages may appear one after
another.
The messages that do not require
immediate action can be
acknowledged and cleared by
pressing
V. The messages that
require immediate action cannot be
cleared until that action is
performed.
All messages should be taken
seriously; clearing the message
does not correct the problem.
If a SERVICE message appears,
see your dealer.
Follow the instructions given in the
messages. The system displays
messages regarding the following
topics:
. Service Messages
. Fluid Levels
. Vehicle Security
Page 121 of 336
Chevrolet Corvette Owner Manual (GMNA-Localizing-U.S./Canada/Mexico-
12470550) - 2020 - CRC - 4/23/20
120 Instruments and Controls
Remote Left in Vehicle Alert
This feature sounds an alert when
the remote key is left in the vehicle.
Touch Off or On.
Remote Removed from Vehicle
Alert
This feature beeps the horn 3 times
when exiting a running vehicle with
the remote key.
Touch Off or On.
Ride Height
Touch and the following may
display:
Location Based Auto Lift
This setting enables the Front Lift to
automatically raise or lower when
the vehicle is near GPS stored
locations. SeeFront Lift System
0 191.
Touch Off or On.
Seating Position
Touch and the following may
display:
. Seat Entry Memory
. Seat Exit Memory
Seat Entry Memory
This feature automatically recalls
the previously stored 1 or 2 button
positions when the ignition is
changed from off to on. See
Memory Seats 050.
Touch Off or On.
Seat Exit Memory
This feature automatically recalls
the previously stored exit button
positions when the ignition is
changed from on to off if the driver
door is open or opened. See
Memory Seats 050.
Touch Off or On.
Teen Driver
See “Teen Driver” under“Settings”
in the infotainment manual.
Valet Mode
This will lock the infotainment
system and steering wheel controls.
It may also limit access to vehicle
storage locations, if equipped.
To enable valet mode:
1. Enter a four-digit code on the keypad.
2. Touch Enter to go to the confirmation screen.
3. Re-enter the four-digit code.
Touch Lock or Unlock to lock or
unlock the system. Touch Back to
go back to the previous menu.
To configure the Performance Data
Recorder (PDR) to automatically
record in Valet mode, see “Settings”
in Performance Data Recorder
(PDR) 0132.
Page 156 of 336
Chevrolet Corvette Owner Manual (GMNA-Localizing-U.S./Canada/Mexico-
12470550) - 2020 - CRC - 4/23/20
Driving and Operating 155
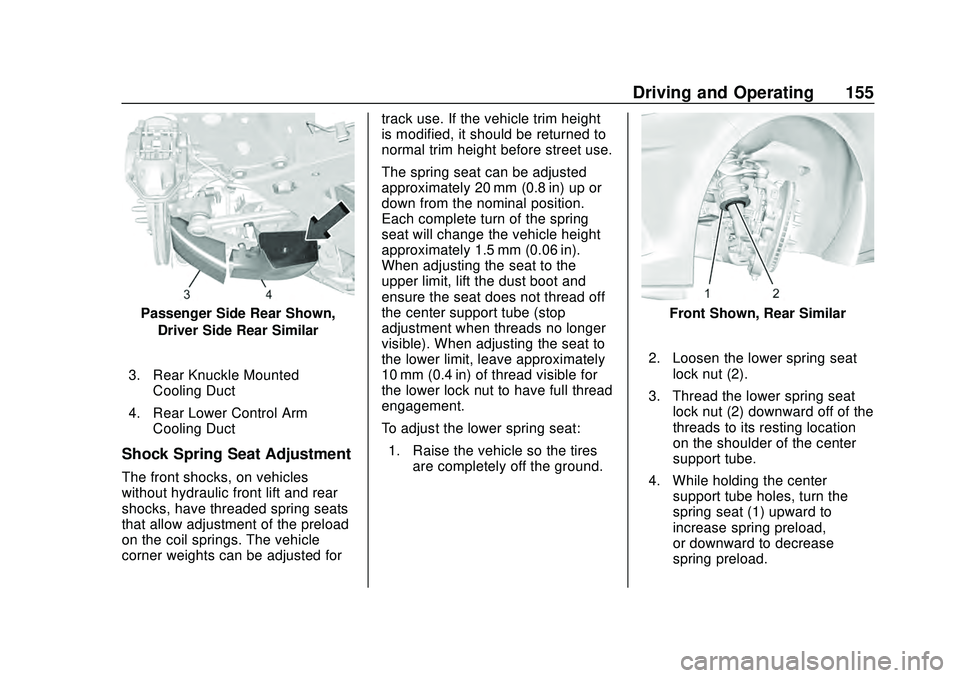
Passenger Side Rear Shown,Driver Side Rear Similar
3. Rear Knuckle Mounted Cooling Duct
4. Rear Lower Control Arm Cooling Duct
Shock Spring Seat Adjustment
The front shocks, on vehicles
without hydraulic front lift and rear
shocks, have threaded spring seats
that allow adjustment of the preload
on the coil springs. The vehicle
corner weights can be adjusted for track use. If the vehicle trim height
is modified, it should be returned to
normal trim height before street use.
The spring seat can be adjusted
approximately 20 mm (0.8 in) up or
down from the nominal position.
Each complete turn of the spring
seat will change the vehicle height
approximately 1.5 mm (0.06 in).
When adjusting the seat to the
upper limit, lift the dust boot and
ensure the seat does not thread off
the center support tube (stop
adjustment when threads no longer
visible). When adjusting the seat to
the lower limit, leave approximately
10 mm (0.4 in) of thread visible for
the lower lock nut to have full thread
engagement.
To adjust the lower spring seat:
1. Raise the vehicle so the tires are completely off the ground.
Front Shown, Rear Similar
2. Loosen the lower spring seat lock nut (2).
3. Thread the lower spring seat lock nut (2) downward off of the
threads to its resting location
on the shoulder of the center
support tube.
4. While holding the center support tube holes, turn the
spring seat (1) upward to
increase spring preload,
or downward to decrease
spring preload.
Page 192 of 336
Chevrolet Corvette Owner Manual (GMNA-Localizing-U.S./Canada/Mexico-
12470550) - 2020 - CRC - 4/23/20
Driving and Operating 191
Brake Response:
This setting adjusts the brake pedal
response. Settings range from a
slower response for more
comfortable driving to the quickest
response for quicker deceleration.
Brake pedal travel decreases and
caliper pressure increases as you
move from Tour to Sport. Track
allows for improved pedal precision
at higher decelerations for high
performance driving.
.Tour, Sport, Track
Display:
This setting adjusts the cluster
display theme (this setting is only
configured through the cluster using
the steering wheel controls).
. Tour, Sport, Track, Weather (and
any informational tiles set-up).
Front Lift System
A two-position lift actuator (one per
damper) with 35 mm (1.5 in) of
stroke will hydraulically raise the
front of the vehicle to provide
approximately 50 mm (2 in) of increased clearance in
approximately three seconds (height
and time will vary by vehicle). The
Front Lift System will allow you to lift
the front of the vehicle to enter a
driveway, driving over curbs, speed
bumps or onto ramps or a trailer.
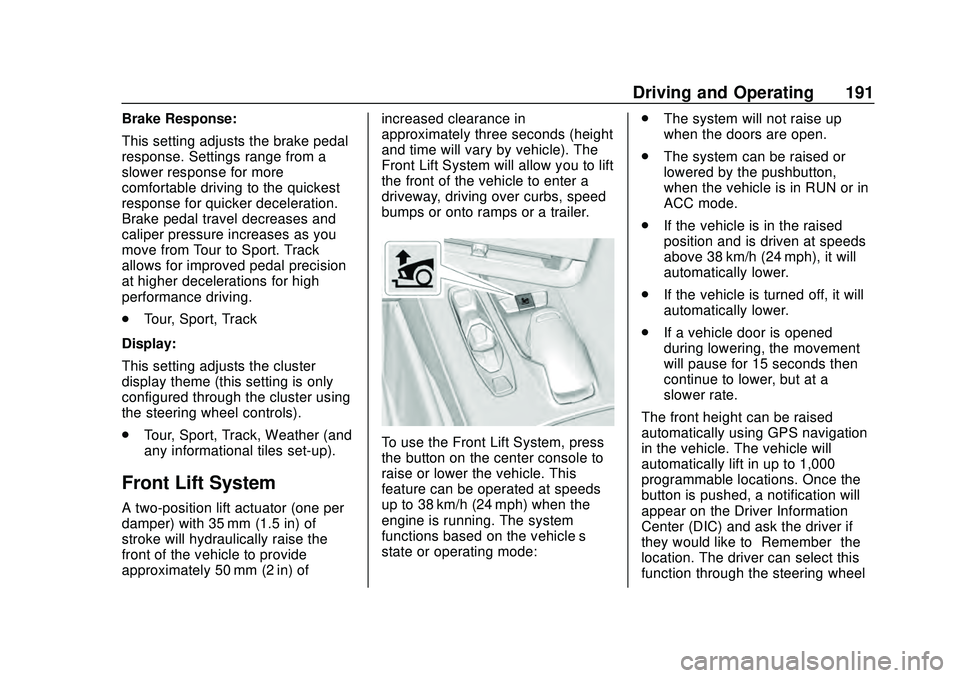
To use the Front Lift System, press
the button on the center console to
raise or lower the vehicle. This
feature can be operated at speeds
up to 38 km/h (24 mph) when the
engine is running. The system
functions based on the vehicle’
s
state or operating mode: .
The system will not raise up
when the doors are open.
. The system can be raised or
lowered by the pushbutton,
when the vehicle is in RUN or in
ACC mode.
. If the vehicle is in the raised
position and is driven at speeds
above 38 km/h (24 mph), it will
automatically lower.
. If the vehicle is turned off, it will
automatically lower.
. If a vehicle door is opened
during lowering, the movement
will pause for 15 seconds then
continue to lower, but at a
slower rate.
The front height can be raised
automatically using GPS navigation
in the vehicle. The vehicle will
automatically lift in up to 1,000
programmable locations. Once the
button is pushed, a notification will
appear on the Driver Information
Center (DIC) and ask the driver if
they would like to “Remember”the
location. The driver can select this
function through the steering wheel
Page 204 of 336

Chevrolet Corvette Owner Manual (GMNA-Localizing-U.S./Canada/Mexico-
12470550) - 2020 - CRC - 4/23/20
Driving and Operating 203
SBZA Detection Zones
The SBZA sensor covers a zone of
approximately one lane over from
both sides of the vehicle, or 3.5 m
(11 ft). The height of the zone is
approximately between 0.5 m (1.5 ft)
and 2 m (6 ft) off the ground. This
zone starts at approximately the
middle of the vehicle and goes back
5 m (16 ft).
How the System Works
The SBZA symbol lights up in the
side mirrors when the system
detects a moving vehicle in the next
lane over that is in the side blind
zone. This indicates it may beunsafe to change lanes. Before
making a lane change, check the
SBZA display, check mirrors, glance
over your shoulder, and use the turn
signals.
Left Side Mirror
DisplayRight Side Mirror Display
When the vehicle is started, both
outside mirror SBZA displays will
briefly come on to indicate the
system is operating. When the
vehicle is in a forward gear, the left-
or right-side mirror display will light
up if a moving vehicle is detected in
that blind zone. If the turn signal is
activated in the same direction of a
detected vehicle, this display will
flash as an extra warning not to
change lanes.
SBZA can be disabled through
vehicle personalization. See
“Collision/Detection Systems” under
Vehicle Personalization 0116. If SBZA is disabled by the driver,
the SBZA mirror displays will not
light up.
When the System Does Not
Seem to Work Properly
SBZA displays may not come on
when passing a vehicle quickly or
for a stopped vehicle. SBZA may
alert to objects attached to the
vehicle, such as a bicycle, or object
extending out to either side of the
vehicle. This is normal system
operation; the vehicle does not need
service.
SBZA may not always alert the
driver to vehicles in the side blind
zone, especially in wet conditions.
The system does not need to be
serviced. The system may light up
due to guardrails, signs, trees,
shrubs, and other non-moving
objects. This is normal system
operation; the vehicle does not need
service.
SBZA may not operate when the
SBZA sensors in the left or right
corners of the rear bumper are
covered with mud, dirt, snow, ice,
Page 212 of 336
Chevrolet Corvette Owner Manual (GMNA-Localizing-U.S./Canada/Mexico-
12470550) - 2020 - CRC - 4/23/20
Vehicle Care 211
California Perchlorate
Materials Requirements
Certain types of automotive
applications, such as airbag
initiators, seat belt pretensioners,
and lithium batteries contained in
electronic keys, may contain
perchlorate materials. Perchlorate
Material–special handling may
apply. See www.dtsc.ca.gov/
hazardouswaste/perchlorate.
Accessories and
Modifications
Adding non-dealer accessories or
making modifications to the vehicle
can affect vehicle performance and
safety, including such things as
airbags, braking, stability, ride and
handling, emissions systems,
aerodynamics, durability, and
electronic systems like antilock
brakes, traction control, and stability
control. These accessories or
modifications could even cause
malfunction or damage not covered
by the vehicle warranty. Damage to suspension components
caused by modifying vehicle height
outside of factory settings will not be
covered by the vehicle warranty.
Damage to vehicle components
resulting from modifications or the
installation or use of non-GM
certified parts, including control
module or software modifications, is
not covered under the terms of the
vehicle warranty and may affect
remaining warranty coverage for
affected parts.
GM Accessories are designed to
complement and function with other
systems on the vehicle. See your
dealer to accessorize the vehicle
using genuine GM Accessories
installed by a dealer technician.
Also, see
Adding Equipment to the
Airbag-Equipped Vehicle 072.
Lifting the Vehicle
{Warning
Lifting a vehicle can cause an
injury. The vehicle can slip off the
jack and roll over you or other
people. You and they could be
badly injured. Find a level place
to lift your vehicle. To help
prevent the vehicle from moving:
1. Set the parking brake firmly.
2. Put the transmission inP (Park).
3. Turn off the engine.
To be even more certain the
vehicle will not move, put blocks
in front of and behind the wheels.
{Warning
Getting under a vehicle when it is
lifted on a jack is dangerous.
If the vehicle slips off the jack, (Continued)