battery CHEVROLET CORVETTE 2021 Owner's Guide
[x] Cancel search | Manufacturer: CHEVROLET, Model Year: 2021, Model line: CORVETTE, Model: CHEVROLET CORVETTE 2021Pages: 338, PDF Size: 6.56 MB
Page 252 of 338
Chevrolet Corvette Owner Manual (GMNA-Localizing-U.S./Canada/Mexico-
14622938) - 2021 - CRC - 2/10/21
Vehicle Care 251
Brake Fluid
The brake master cylinder reservoir is filled
with GM approved DOT 4 brake fluid as
indicated on the reservoir cap. See
Underhood Compartment Overview0234 for
the location of the reservoir.
Checking Brake Fluid
With the vehicle in P (Park) on a level
surface, the brake fluid level should be
between the minimum and maximum marks
on the brake fluid reservoir.
There are only two reasons why the brake
fluid level in the reservoir may go down:
.Normal brake lining wear. When new
linings are installed, the fluid level goes
back up.
.A fluid leak in the brake hydraulic system.
Have the brake hydraulic system fixed.
With a leak, the brakes will not
work well. Always clean the brake fluid reservoir cap
and the area around the cap before
removing it.
Do not top off the brake fluid. Adding fluid
does not correct a leak. If fluid is added
when the linings are worn, there will be too
much fluid when new brake linings are
installed. Add or remove fluid, as necessary,
only when work is done on the brake
hydraulic system.
Caution
If too much brake fluid is added, the
brake fluid can spill and cause vehicle
damage, including damage to electrical
components and surfaces. Add brake fluid
only when work is done on the brake
hydraulic system.
When the brake fluid falls to a low level,
the brake warning light comes on. See Brake
System Warning Light 088.
Brake fluid absorbs water over time which
degrades the effectiveness of the brake fluid.
Replace brake fluid at the specified intervals
to prevent increased stopping distance. See
Maintenance Schedule 0293. What to Add
Use only GM approved DOT 4 brake fluid
from a clean, sealed container. See
Recommended Fluids and Lubricants
0301.
{Warning
The wrong or contaminated brake fluid
could result in damage to the brake
system. This could result in the loss of
braking leading to a possible injury.
Always use the proper GM approved
brake fluid.
Caution
If brake fluid is spilled on the vehicle's
painted surfaces, the paint finish can be
damaged. Immediately wash off any
painted surface.
Battery - North America
The original equipment battery is
maintenance free. Do not remove the cap
and do not add fluid.
Refer to the replacement number on the
original battery label when a new battery is
needed. For battery replacement, see your
dealer.
Page 253 of 338
Chevrolet Corvette Owner Manual (GMNA-Localizing-U.S./Canada/Mexico-
14622938) - 2021 - CRC - 2/10/21
252 Vehicle Care
{Warning
WARNING:Battery posts, terminals, and
related accessories contain lead and lead
compounds, chemicals known to the
State of California to cause cancer and
birth defects or other reproductive harm.
Batteries also contain other chemicals
known to the State of California to cause
cancer. WASH HANDS AFTER HANDLING.
For more information go to
www.P65Warnings.ca.gov/
passenger-vehicle.
See California Proposition 65 Warning 0231
and the back cover.
Vehicle Storage
{Warning
Batteries have acid that can burn you and
gas that can explode. You can be badly
hurt if you are not careful. See Jump
Starting - North America 0278 for tips on
working around a battery without
getting hurt.
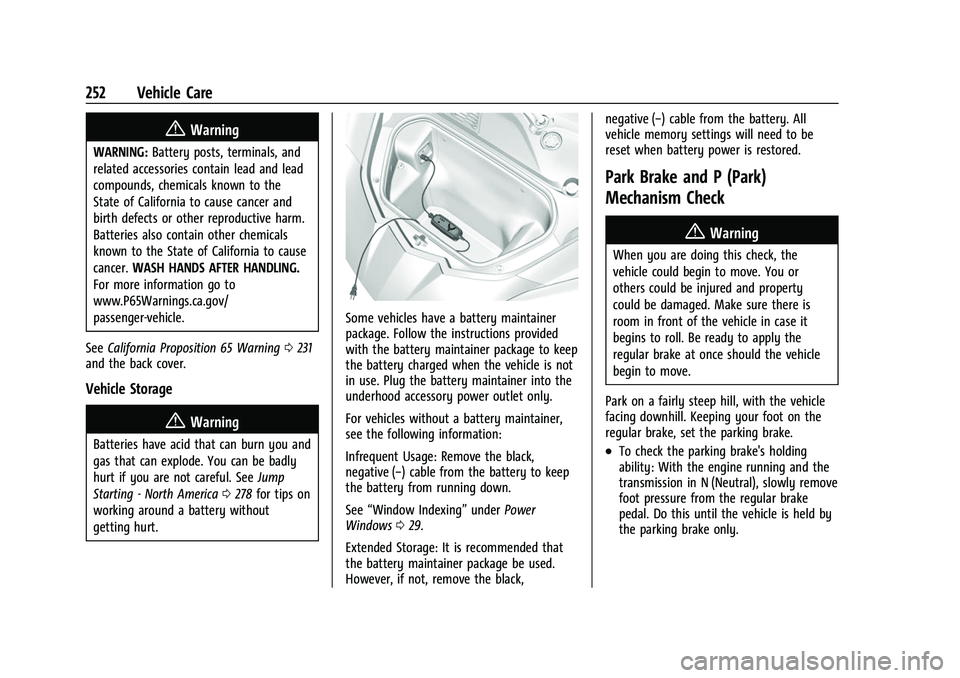
Some vehicles have a battery maintainer
package. Follow the instructions provided
with the battery maintainer package to keep
the battery charged when the vehicle is not
in use. Plug the battery maintainer into the
underhood accessory power outlet only.
For vehicles without a battery maintainer,
see the following information:
Infrequent Usage: Remove the black,
negative (−) cable from the battery to keep
the battery from running down.
See “Window Indexing” underPower
Windows 029.
Extended Storage: It is recommended that
the battery maintainer package be used.
However, if not, remove the black, negative (−) cable from the battery. All
vehicle memory settings will need to be
reset when battery power is restored.
Park Brake and P (Park)
Mechanism Check
{Warning
When you are doing this check, the
vehicle could begin to move. You or
others could be injured and property
could be damaged. Make sure there is
room in front of the vehicle in case it
begins to roll. Be ready to apply the
regular brake at once should the vehicle
begin to move.
Park on a fairly steep hill, with the vehicle
facing downhill. Keeping your foot on the
regular brake, set the parking brake.
.To check the parking brake's holding
ability: With the engine running and the
transmission in N (Neutral), slowly remove
foot pressure from the regular brake
pedal. Do this until the vehicle is held by
the parking brake only.
Page 258 of 338
Chevrolet Corvette Owner Manual (GMNA-Localizing-U.S./Canada/Mexico-
14622938) - 2021 - CRC - 2/10/21
Vehicle Care 257
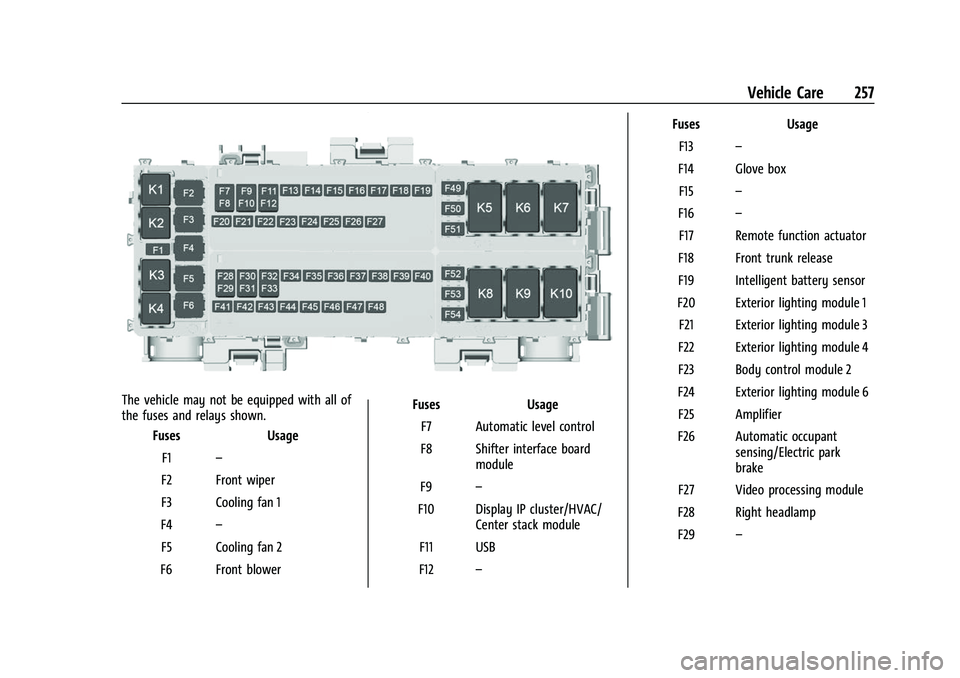
The vehicle may not be equipped with all of
the fuses and relays shown.Fuses Usage
F1 –
F2 Front wiper
F3 Cooling fan 1
F4 –
F5 Cooling fan 2
F6 Front blower Fuses Usage
F7 Automatic level control
F8 Shifter interface board module
F9 –
F10 Display IP cluster/HVAC/ Center stack module
F11 USB
F12 – Fuses Usage
F13 –
F14 Glove box F15 –
F16 –
F17 Remote function actuator
F18 Front trunk release
F19 Intelligent battery sensor
F20 Exterior lighting module 1 F21 Exterior lighting module 3
F22 Exterior lighting module 4
F23 Body control module 2
F24 Exterior lighting module 6 F25 Amplifier
F26 Automatic occupant sensing/Electric park
brake
F27 Video processing module
F28 Right headlamp
F29 –
Page 261 of 338
Chevrolet Corvette Owner Manual (GMNA-Localizing-U.S./Canada/Mexico-
14622938) - 2021 - CRC - 2/10/21
260 Vehicle Care
FusesUsage
10 Engine control module/ Air conditioning
11 –
12 Lithium ion battery module
13 Active fuel management
14 Seat fan 15 –
16 Exterior lighting module 17 Instrument panel cluster/Shifter interface
board/Transmission
control module/
Electronic brake control
module
18 Engine control module
19 –
20 Sensing and diagnostic module/Inside rear view
mirror
21 Exhaust valve solenoid
22 Fuel pump/Fuel tank zone module Fuses
Usage
23 Tonneau left
24 Tonneau right 25 Convertible top right
26 Convertible top left 27 Electronic suspension control
28 –
29 CGM
30 O2 sensor 31 O2 sensor/Engine oil/ Canister purge/Active
fuel management
32 Ignition even
33 Ignition odd
34 Engine control module 1 35 Engine control module/ Mass air flow Sensor/
O2 sensor/Air
conditioning
36 –
37 Canister vent
38 Latch control module Fuses
Usage
39 Right window switch/ Door lock
40 Left window switch/ Door lock
41 –
42 Engine control module 2
43 –
44 Air conditioning clutch 45 –
46 –
47 –
48 –
49 Auxiliary cooling fan right
50 –
51 –
52 –
53 Starter solenoid
54 Auxiliary cooling fan left
Page 273 of 338
Chevrolet Corvette Owner Manual (GMNA-Localizing-U.S./Canada/Mexico-
14622938) - 2021 - CRC - 2/10/21
272 Vehicle Care
briefly press the center of the valve stem.
When the recommended pressure is reached,
the horn sounds once.
If the turn signal lamp does not flash within
15 seconds after starting to inflate the tire,
the tire fill alert has not been activated or is
not working.
If the hazard warning flashers are on, the
tire fill alert visual feedback will not work
properly.
The TPMS will not activate the tire fill alert
properly under the following conditions:
.There is interference from an external
device or transmitter.
.The air pressure from the inflation device
is not sufficient to inflate the tire.
.There is a malfunction in the TPMS.
.There is a malfunction in the horn or turn
signal lamps.
.The identification code of the TPMS
sensor is not registered to the system.
.The battery of the TPMS sensor is low.
If the tire fill alert does not operate due to
TPMS interference, move the vehicle about
1 m (3 ft) back or forward and try again.
If the tire fill alert feature is not working,
use a tire pressure gauge.
TPMS Sensor Matching Process —Auto
Learn Function
Each TPMS sensor has a unique
identification code. The identification code
needs to be matched to a new tire/wheel
position after rotating the tires or replacing
one or more of the TPMS sensors. When a
tire is installed, the vehicle must be
stationary for about 20 minutes before the
system recalculates. The following relearn
process takes up to 10 minutes, driving at a
minimum speed of 20 km/h (12 mph).
A dash (-) or pressure value will display in
the DIC. See Driver Information Center (DIC)
0 92. A warning message displays in the DIC
if a problem occurs during the relearn
process.
Tire Inspection
We recommend that the tires, including
the spare tire, if the vehicle has one, be
inspected for signs of wear or damage
at least once a month.
Replace the tire if:
.The indicators at three or more
places around the tire can be seen.
.There is cord or fabric showing
through the tire's rubber.
.The tread or sidewall is cracked, cut,
or snagged deep enough to show
cord or fabric.
.The tire has a bump, bulge, or split.
.The tire has a puncture, cut, or other
damage that cannot be repaired well
because of the size or location of the
damage.
Tire Rotation
The tires should be rotated every
12 000 km (7,500 mi). See Maintenance
Schedule 0293.
Tires are rotated to achieve uniform
wear for all tires. The first rotation is
the most important.
Anytime unusual wear is noticed, rotate
the tires as soon as possible, check for
proper tire inflation pressure, and check
for damaged tires or wheels. If the
unusual wear continues after the
rotation, check the wheel alignment.
Page 279 of 338
Chevrolet Corvette Owner Manual (GMNA-Localizing-U.S./Canada/Mexico-
14622938) - 2021 - CRC - 2/10/21
278 Vehicle Care
Warning (Continued)
It could fail suddenly and cause a crash.
When replacing wheels, use a new GM
original equipment wheel.
Tire Chains
{Warning
Do not use tire chains. There is not
enough clearance. Tire chains used on a
vehicle without the proper amount of
clearance can cause damage to the
brakes, suspension, or other vehicle parts.
The area damaged by the tire chains
could cause loss of control and a crash.
Use another type of traction device only
if its manufacturer recommends it for the
vehicle's tire size combination and road
conditions. Follow that manufacturer's
instructions. To avoid vehicle damage,
drive slowly and readjust or remove the
traction device if it contacts the vehicle.
Do not spin the wheels. If traction
devices are used, install them on the rear
tires.
If a Tire Goes Flat
It is unusual for a tire to blow out while
driving, especially if the tires are maintained
properly. If air goes out of a tire, it is much
more likely to leak out slowly. SeeTires
0 261 for additional information. But if there
ever is a blowout, here are a few tips about
what to expect and what to do:
If a front tire fails, the flat tire creates a
drag that pulls the vehicle toward that side.
Take your foot off the accelerator pedal and
grip the steering wheel firmly. Steer to
maintain lane position, and then gently
brake to a stop, well off the road,
if possible.
A rear blowout, particularly on a curve, acts
much like a skid and may require the same
correction as used in a skid. Stop pressing
the accelerator pedal and steer to straighten
the vehicle. It may be very bumpy and
noisy. Gently brake to a stop, well off the
road, if possible.
The vehicle has no spare tire, no tire
changing equipment, and no place to store
a tire.
If the vehicle has run-flat tires, there is no
need to stop on the side of the road to
change a flat tire. See Run-Flat Tires0262.{Warning
Special tools and procedures are required
to service a run-flat tire. If these special
tools and procedures are not used, injury
or vehicle damage may occur. Always be
sure the proper tools and procedures, as
described in the service manual, are used.
Jump Starting
Jump Starting - North America
For more information about the vehicle
battery, see Battery - North America 0251.
If the battery has run down, use another
vehicle and some jumper cables to start the
vehicle. Be sure to use the following steps
to do it safely.
{Warning
WARNING: Battery posts, terminals, and
related accessories contain lead and lead
compounds, chemicals known to the
State of California to cause cancer and
birth defects or other reproductive harm.
Batteries also contain other chemicals
known to the State of California to cause (Continued)
Page 280 of 338
Chevrolet Corvette Owner Manual (GMNA-Localizing-U.S./Canada/Mexico-
14622938) - 2021 - CRC - 2/10/21
Vehicle Care 279
Warning (Continued)
cancer.WASH HANDS AFTER HANDLING.
For more information go to
www.P65Warnings.ca.gov/
passenger-vehicle.
See California Proposition 65 Warning 0231
and the back cover.
{Warning
Batteries can hurt you. They can be
dangerous because:
.They contain acid that can burn you.
.They contain gas that can explode or
ignite.
.They contain enough electricity to
burn you.
If you do not follow these steps exactly,
some or all of these things can hurt you.
Caution
Ignoring these steps could result in costly
damage to the vehicle that would not be
covered by the vehicle warranty. Trying
(Continued)
Caution (Continued)
to start the vehicle by pushing or pulling
it will not work, and it could damage the
vehicle.
The battery is under a battery cover and
side extensions/shields in the underhood
compartment.
To access the battery under the hood, the
right hand and left hand sight shields need
to be removed to be able to remove the
second cover assembly to access the battery.
The positive battery terminal is on the
driver side and the negative terminal is on
the passenger side.
Before you connect the cables, here are
some basic things you should know.
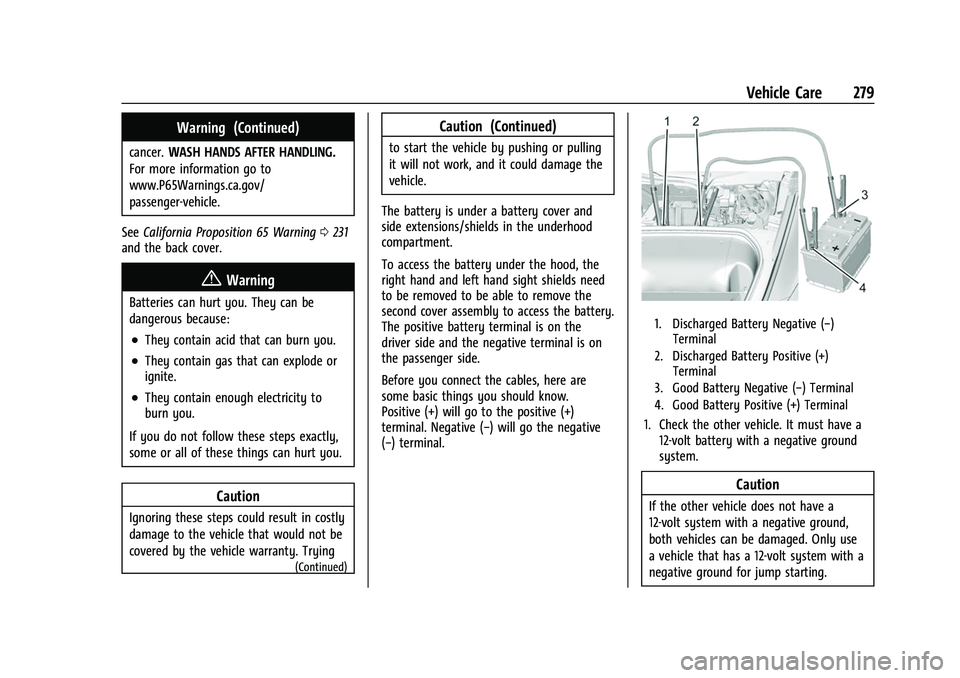
Positive (+) will go to the positive (+)
terminal. Negative (−) will go the negative
(−) terminal.
1. Discharged Battery Negative (−) Terminal
2. Discharged Battery Positive (+) Terminal
3. Good Battery Negative (−) Terminal
4. Good Battery Positive (+) Terminal
1. Check the other vehicle. It must have a 12-volt battery with a negative ground
system.
Caution
If the other vehicle does not have a
12-volt system with a negative ground,
both vehicles can be damaged. Only use
a vehicle that has a 12-volt system with a
negative ground for jump starting.
Page 281 of 338
Chevrolet Corvette Owner Manual (GMNA-Localizing-U.S./Canada/Mexico-
14622938) - 2021 - CRC - 2/10/21
280 Vehicle Care
2. Get the vehicles close enough so thejumper cables can reach, but be sure the
vehicles are not touching each other.
If they are, it could cause a ground
connection you do not want. You would
not be able to start the vehicle, and the
bad grounding could damage the
electrical systems.
To avoid the possibility of the vehicles
rolling, set the parking brake firmly on
both vehicles involved in the jump start
procedure. Put an automatic transmission
in P (Park) or a manual transmission in
Neutral before setting the parking
brakes.
Caution
If any accessories are left on or plugged
in during the jump starting procedure,
they could be damaged. The repairs
would not be covered by the vehicle
warranty. Whenever possible, turn off or
unplug all accessories on either vehicle
when jump starting.
3. Turn off the ignition on both vehicles. Unplug unnecessary accessories plugged
into the cigarette lighter or the accessory
power outlet. Turn off the radio and all lamps that are not needed. This will
avoid sparks and help save both
batteries. And it could save the radio!
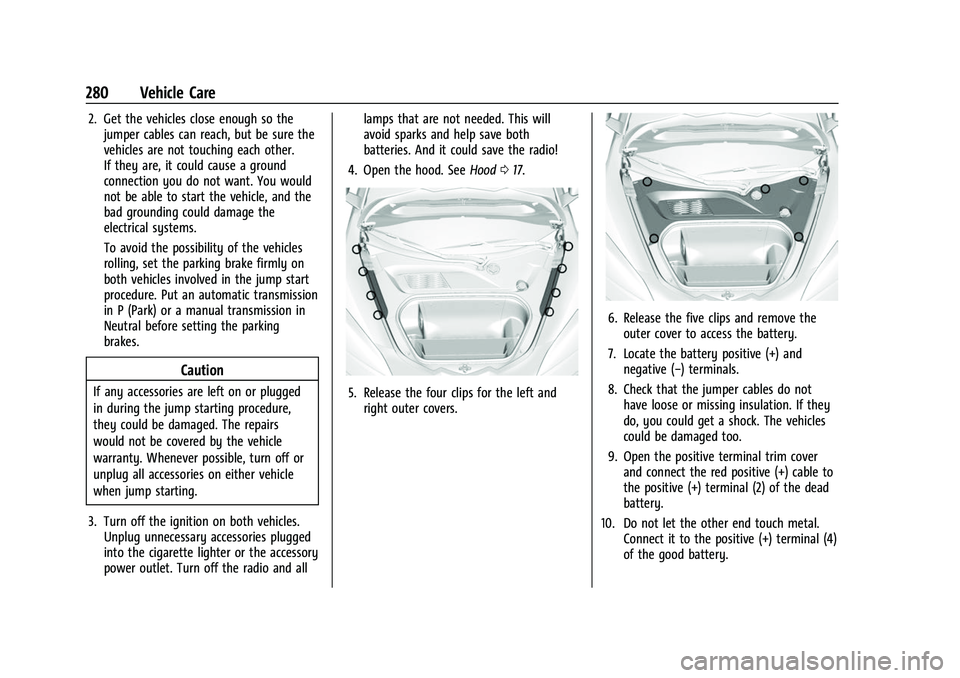
4. Open the hood. See Hood017.5. Release the four clips for the left and
right outer covers.
6. Release the five clips and remove theouter cover to access the battery.
7. Locate the battery positive (+) and negative (−) terminals.
8. Check that the jumper cables do not have loose or missing insulation. If they
do, you could get a shock. The vehicles
could be damaged too.
9. Open the positive terminal trim cover and connect the red positive (+) cable to
the positive (+) terminal (2) of the dead
battery.
10. Do not let the other end touch metal. Connect it to the positive (+) terminal (4)
of the good battery.
Page 282 of 338
Chevrolet Corvette Owner Manual (GMNA-Localizing-U.S./Canada/Mexico-
14622938) - 2021 - CRC - 2/10/21
Vehicle Care 281
11. Now connect the black negative (−) cableto the negative (−) terminal (3) of the
good battery.
Do not let the other end touch anything
until the next step.
12. Connect the other end of the negative (−) cable to the negative (−) terminal (1)
on the dead battery.
13. Now start the vehicle with the good battery and run the engine for a while.
14. Try to start the vehicle that had the dead battery. If it will not start after a
few tries, it probably needs service.
Caution
If the jumper cables are connected or
removed in the wrong order, electrical
shorting may occur and damage the
vehicle. The repairs would not be covered
by the vehicle warranty. Always connect
and remove the jumper cables in the
correct order, making sure that the cables
do not touch each other or other metal.
Jumper Cable Removal
Reverse the sequence exactly when
removing the jumper cables. After starting the disabled vehicle and
removing the jumper cables, allow it to idle
for several minutes.
The power windows may need to be
initialized. See
“Window Indexing” under
Power Windows 029.
Towing the Vehicle
Caution
Incorrectly towing a disabled vehicle may
cause damage. The damage would not be
covered by the vehicle warranty. Do not
lash or hook to suspension components.
Use the proper straps around the tires to
secure the vehicle. Do not drag a locked
wheel/tire. Use tire skates or dollies
under any locked wheel/tire while
loading the vehicle. Do not use a sling
type lift to tow the vehicle. This could
damage the vehicle.
GM recommends a flatbed tow truck to
transport a disabled vehicle. Use ramps to
help reduce approach angles, if necessary.
A towed vehicle should have its drive wheels
off the ground. If the disabled vehicle must
be towed, and is covered by GM and/or OnStar roadside benefits, contact Roadside
Assistance. Otherwise contact a professional
towing service.
If equipped, the Front Lift System can be
raised with the engine off. With the vehicle
in ACC/ACCESSORY and the doors closed,
press and hold the Front Lift System button
for 10 seconds. See
Front Lift System0214.
After the vehicle is loaded, the front can be
lowered by pressing the Front Lift System
button again with the doors closed.
Using the Tow Eye
Caution
Improper use of the tow eye can damage
the vehicle. If equipped, use the tow eye
to load a disabled vehicle onto a flatbed
tow truck from a flat road surface, or to
move the vehicle a short distance. Use
caution and low speeds. The transmission
must be in (N) Neutral when moving the
vehicle.
The vehicle may be equipped with a tow
eye that can be used to pull the vehicle
onto a flatbed car carrier from a flat road
surface. Do not use the tow eye to pull the
vehicle from snow, mud, or sand.
Page 300 of 338
Chevrolet Corvette Owner Manual (GMNA-Localizing-U.S./Canada/Mexico-
14622938) - 2021 - CRC - 2/10/21
Service and Maintenance 299
Battery
The 12-volt battery supplies power to start
the engine and operate any additional
electrical accessories.
.To avoid break-down or failure to start
the vehicle, maintain a battery with full
cranking power.
.Trained dealer technicians have the
diagnostic equipment to test the battery
and ensure that the connections and
cables are corrosion-free.
Belts
.Belts may need replacing if they squeak
or show signs of cracking or splitting.
.Trained dealer technicians have access to
tools and equipment to inspect the belts
and recommend adjustment or
replacement when necessary.
Brakes
Brakes stop the vehicle and are crucial to
safe driving.
.Signs of brake wear may include chirping,
grinding, or squealing noises, or difficulty
stopping.
.Trained dealer technicians have access to
tools and equipment to inspect the brakes
and recommend quality parts engineered
for the vehicle.
Fluids
Proper fluid levels and approved fluids
protect the vehicle’s systems and
components. See Recommended Fluids and
Lubricants 0301 for GM approved fluids.
.Engine oil and windshield washer fluid
levels should be checked at every fuel fill.
.Instrument cluster lights may come on to
indicate that fluids may be low and need
to be filled.
Hoses
Hoses transport fluids and should be
regularly inspected to ensure that there are
no cracks or leaks. With a multi-point
inspection, your dealer can inspect the hoses
and advise if replacement is needed. Lamps
Properly working headlamps, taillamps, and
brake lamps are important to see and be
seen on the road.
.Signs that the headlamps need attention
include dimming, failure to light, cracking,
or damage. The brake lamps need to be
checked periodically to ensure that they
light when braking.
.With a multi-point inspection, your dealer
can check the lamps and note any
concerns.
Shocks and Struts
Shocks and struts help aid in control for a
smoother ride.
.Signs of wear may include steering wheel
vibration, bounce/sway while braking,
longer stopping distance, or uneven
tire wear.
.As part of the multi-point inspection,
trained dealer technicians can visually
inspect the shocks and struts for signs of
leaking, blown seals, or damage, and can
advise when service is needed.