dead battery CHEVROLET CORVETTE 2021 Owner's Manual
[x] Cancel search | Manufacturer: CHEVROLET, Model Year: 2021, Model line: CORVETTE, Model: CHEVROLET CORVETTE 2021Pages: 338, PDF Size: 6.56 MB
Page 196 of 338

Chevrolet Corvette Owner Manual (GMNA-Localizing-U.S./Canada/Mexico-
14622938) - 2021 - CRC - 2/10/21
Driving and Operating 195
Cell phone chargers can interfere with the
operation of the Keyless Access system.
Battery chargers should not be plugged in
when starting or turning off the engine.1. Press the brake pedal, then press ENGINE START/STOP on the instrument panel.
If there is no remote key in the vehicle
or if there is something causing
interference with it, the Driver
Information Center (DIC) will display a
message.
2. When the engine begins cranking, let go of the button and the engine cranks
automatically until it starts.
If the battery in the remote key is weak,
the DIC will display a message. The
vehicle can still be driven.
See “Starting the Vehicle with a Low
Remote Key Battery” underRemote
Keyless Entry (RKE) System Operation 07
. If the remote key battery is dead,
insert it into the cupholder remote key
pocket to enable engine starting.
3. Do not race the engine immediately after starting it. Operate the engine and
transmission gently until the oil warms
up and lubricates all moving parts. 4. If the engine does not start and no DIC
message is displayed, wait 15 seconds
before trying again to let the cranking
motor cool down.
If the engine does not start after five to
10 seconds, especially in very cold
weather (below −18 °C or 0 °F), it could
be flooded with too much gasoline. Try
pushing the accelerator pedal all the way
to the floor while cranking for up to
15 seconds maximum. Wait at least
15 seconds between each try, to allow
the cranking motor to cool down. When
the engine starts, let go of the
accelerator. If the vehicle starts briefly
but then stops again, repeat these steps.
This clears the extra gasoline from the
engine.
Caution
Cranking the engine for long periods of
time, by pressing ENGINE START/STOP
immediately after cranking has ended,
can overheat and damage the cranking
motor, and drain the battery. Wait at
least 15 seconds between each try, to let
the cranking motor cool down.
Stopping the Engine
Shift to P (Park) and press and hold ENGINE
START/STOP on the instrument panel, until
the engine shuts off. If the transmission is
not in P (Park), the engine shuts off and the
vehicle goes into the accessory mode. The
DIC displays SHIFT TO PARK. When shifted to
P (Park) the vehicle turns off.
If the remote key is not detected inside the
vehicle when it is turned off, the DIC
displays a message.
Retained Accessory Power (RAP)
When the ignition is turned from on to off,
the following features (if equipped) will
continue to function for up to 10 minutes,
or until the driver door is opened. These
features will also work when the ignition is
in RUN or ACC/ACCESSORY:
.Infotainment System
.Power Windows (during RAP this
functionality will be lost when any door
is opened)
.Sunroof (during RAP this functionality will
be lost when any door is opened)
.Auxiliary Power Outlet
.Audio System
.OnStar System
Page 281 of 338

Chevrolet Corvette Owner Manual (GMNA-Localizing-U.S./Canada/Mexico-
14622938) - 2021 - CRC - 2/10/21
280 Vehicle Care
2. Get the vehicles close enough so thejumper cables can reach, but be sure the
vehicles are not touching each other.
If they are, it could cause a ground
connection you do not want. You would
not be able to start the vehicle, and the
bad grounding could damage the
electrical systems.
To avoid the possibility of the vehicles
rolling, set the parking brake firmly on
both vehicles involved in the jump start
procedure. Put an automatic transmission
in P (Park) or a manual transmission in
Neutral before setting the parking
brakes.
Caution
If any accessories are left on or plugged
in during the jump starting procedure,
they could be damaged. The repairs
would not be covered by the vehicle
warranty. Whenever possible, turn off or
unplug all accessories on either vehicle
when jump starting.
3. Turn off the ignition on both vehicles. Unplug unnecessary accessories plugged
into the cigarette lighter or the accessory
power outlet. Turn off the radio and all lamps that are not needed. This will
avoid sparks and help save both
batteries. And it could save the radio!
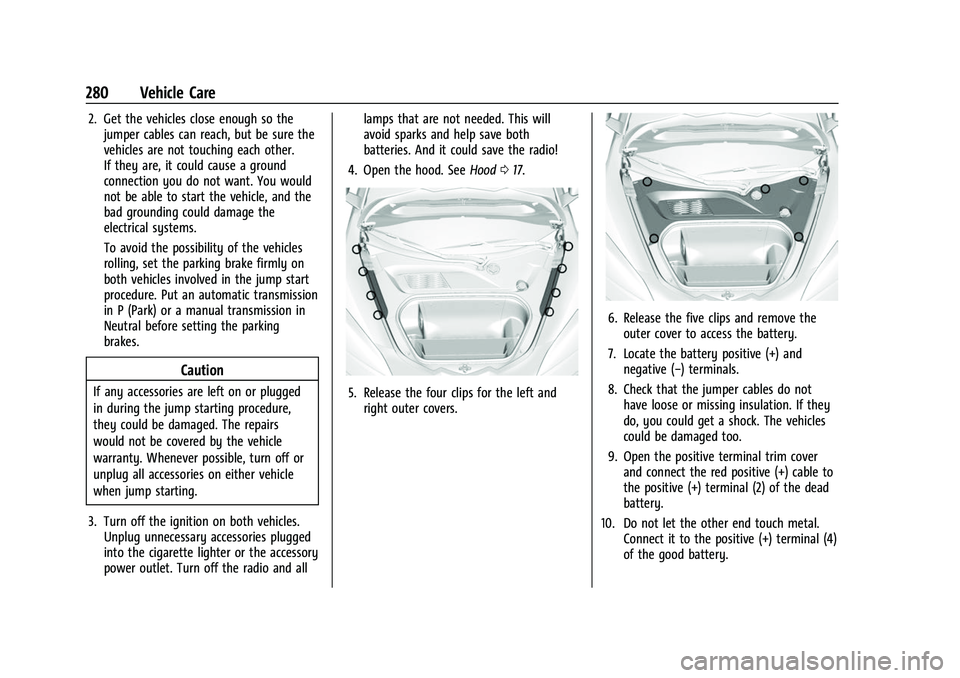
4. Open the hood. See Hood017.5. Release the four clips for the left and
right outer covers.
6. Release the five clips and remove theouter cover to access the battery.
7. Locate the battery positive (+) and negative (−) terminals.
8. Check that the jumper cables do not have loose or missing insulation. If they
do, you could get a shock. The vehicles
could be damaged too.
9. Open the positive terminal trim cover and connect the red positive (+) cable to
the positive (+) terminal (2) of the dead
battery.
10. Do not let the other end touch metal. Connect it to the positive (+) terminal (4)
of the good battery.
Page 282 of 338

Chevrolet Corvette Owner Manual (GMNA-Localizing-U.S./Canada/Mexico-
14622938) - 2021 - CRC - 2/10/21
Vehicle Care 281
11. Now connect the black negative (−) cableto the negative (−) terminal (3) of the
good battery.
Do not let the other end touch anything
until the next step.
12. Connect the other end of the negative (−) cable to the negative (−) terminal (1)
on the dead battery.
13. Now start the vehicle with the good battery and run the engine for a while.
14. Try to start the vehicle that had the dead battery. If it will not start after a
few tries, it probably needs service.
Caution
If the jumper cables are connected or
removed in the wrong order, electrical
shorting may occur and damage the
vehicle. The repairs would not be covered
by the vehicle warranty. Always connect
and remove the jumper cables in the
correct order, making sure that the cables
do not touch each other or other metal.
Jumper Cable Removal
Reverse the sequence exactly when
removing the jumper cables. After starting the disabled vehicle and
removing the jumper cables, allow it to idle
for several minutes.
The power windows may need to be
initialized. See
“Window Indexing” under
Power Windows 029.
Towing the Vehicle
Caution
Incorrectly towing a disabled vehicle may
cause damage. The damage would not be
covered by the vehicle warranty. Do not
lash or hook to suspension components.
Use the proper straps around the tires to
secure the vehicle. Do not drag a locked
wheel/tire. Use tire skates or dollies
under any locked wheel/tire while
loading the vehicle. Do not use a sling
type lift to tow the vehicle. This could
damage the vehicle.
GM recommends a flatbed tow truck to
transport a disabled vehicle. Use ramps to
help reduce approach angles, if necessary.
A towed vehicle should have its drive wheels
off the ground. If the disabled vehicle must
be towed, and is covered by GM and/or OnStar roadside benefits, contact Roadside
Assistance. Otherwise contact a professional
towing service.
If equipped, the Front Lift System can be
raised with the engine off. With the vehicle
in ACC/ACCESSORY and the doors closed,
press and hold the Front Lift System button
for 10 seconds. See
Front Lift System0214.
After the vehicle is loaded, the front can be
lowered by pressing the Front Lift System
button again with the doors closed.
Using the Tow Eye
Caution
Improper use of the tow eye can damage
the vehicle. If equipped, use the tow eye
to load a disabled vehicle onto a flatbed
tow truck from a flat road surface, or to
move the vehicle a short distance. Use
caution and low speeds. The transmission
must be in (N) Neutral when moving the
vehicle.
The vehicle may be equipped with a tow
eye that can be used to pull the vehicle
onto a flatbed car carrier from a flat road
surface. Do not use the tow eye to pull the
vehicle from snow, mud, or sand.
Page 313 of 338

Chevrolet Corvette Owner Manual (GMNA-Localizing-U.S./Canada/Mexico-
14622938) - 2021 - CRC - 2/10/21
312 Customer Information
Services Provided
.Emergency Fuel Delivery:Delivery of
enough fuel for the vehicle to get to the
nearest service station.
.Lock-Out Service: Service to unlock the
vehicle if you are locked out. A remote
unlock may be available if you have
OnStar. For security reasons, the driver
must present identification before this
service is given.
.Emergency Tow from a Public Road or
Highway: Tow to the nearest Chevrolet
dealer for warranty service, or if the
vehicle was in a crash and cannot be
driven. Assistance is not given when the
vehicle is stuck in the sand, mud,
or snow.
.Flat Tire Change: Service to change a flat
tire with the spare tire. The spare tire,
if equipped, must be in good condition
and properly inflated. It is the owner's
responsibility for the repair or
replacement of the tire if it is not covered
by the warranty.
.Battery Jump Start: Service to jump start
a dead battery.
.Trip Interruption Benefits and Assistance:
If your trip is interrupted due to a
warranty event, incidental expenses may be reimbursed within the Powertrain
warranty period. Items considered are
reasonable and customary hotel, meals,
rental car, or a vehicle being delivered
back to the customer, up to 500 miles.
Services Not Included in Roadside
Assistance
.Impound towing caused by violation of
any laws
.Legal fines
.Mounting, dismounting, or changing of
snow tires, chains, or other traction
devices
Service is not provided if a vehicle is in an
area that is not accessible to the service
vehicle or is not a regularly traveled or
maintained public road, which includes ice
and winter roads. Off-road use is not
covered.
Services Specific to Canadian-Purchased
Vehicles
.Fuel Delivery: Reimbursement is up to
7 liters. Propane and other fuels are not
provided through this service.
.Lock-Out Service: Vehicle registration is
required.
.Trip Interruption Benefits and Assistance:
Must be over 150 km from where your
trip was started to qualify.
Pre-authorization, original detailed
receipts, and a copy of the repair orders
are required. Once authorization has been
received, the Roadside Assistance advisor
will help to make arrangements and
explain how to receive payment.
.Alternative Service: If assistance cannot
be provided right away, the Roadside
Assistance advisor may give permission to
get local emergency road service. You will
receive payment, up to $100, after
sending the original receipt to Roadside
Assistance. Mechanical failures may be
covered, however any cost for parts and
labor for repairs not covered by the
warranty are the owner responsibility.
Scheduling Service Appointments
When the vehicle requires warranty service,
contact your dealer and request an
appointment. By scheduling a service
appointment and advising the service
consultant of your transportation needs,
your dealer can help minimize your
inconvenience.