engine overheat CHEVROLET CORVETTE 2021 Owner's Manual
[x] Cancel search | Manufacturer: CHEVROLET, Model Year: 2021, Model line: CORVETTE, Model: CHEVROLET CORVETTE 2021Pages: 338, PDF Size: 6.56 MB
Page 45 of 338
Chevrolet Corvette Owner Manual (GMNA-Localizing-U.S./Canada/Mexico-
14622938) - 2021 - CRC - 2/10/21
44 Seats and Restraints
Heated and Ventilated Front
Seats
{Warning
If temperature change or pain to the skin
cannot be felt, the seat heater may cause
burns. To reduce the risk of burns, use
care when using the seat heater,
especially for long periods of time. Do
not place anything on the seat that
insulates against heat, such as a blanket,
cushion, cover, or similar item. This may
cause the seat heater to overheat. An
overheated seat heater may cause a burn
or may damage the seat.
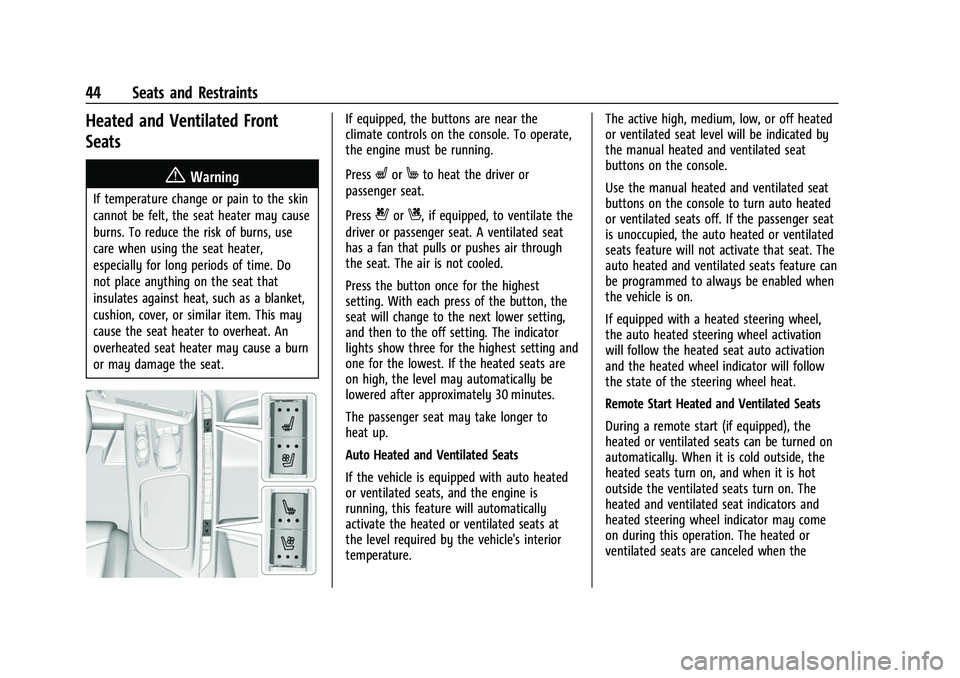
If equipped, the buttons are near the
climate controls on the console. To operate,
the engine must be running.
Press
LorMto heat the driver or
passenger seat.
Press
{orC, if equipped, to ventilate the
driver or passenger seat. A ventilated seat
has a fan that pulls or pushes air through
the seat. The air is not cooled.
Press the button once for the highest
setting. With each press of the button, the
seat will change to the next lower setting,
and then to the off setting. The indicator
lights show three for the highest setting and
one for the lowest. If the heated seats are
on high, the level may automatically be
lowered after approximately 30 minutes.
The passenger seat may take longer to
heat up.
Auto Heated and Ventilated Seats
If the vehicle is equipped with auto heated
or ventilated seats, and the engine is
running, this feature will automatically
activate the heated or ventilated seats at
the level required by the vehicle's interior
temperature. The active high, medium, low, or off heated
or ventilated seat level will be indicated by
the manual heated and ventilated seat
buttons on the console.
Use the manual heated and ventilated seat
buttons on the console to turn auto heated
or ventilated seats off. If the passenger seat
is unoccupied, the auto heated or ventilated
seats feature will not activate that seat. The
auto heated and ventilated seats feature can
be programmed to always be enabled when
the vehicle is on.
If equipped with a heated steering wheel,
the auto heated steering wheel activation
will follow the heated seat auto activation
and the heated wheel indicator will follow
the state of the steering wheel heat.
Remote Start Heated and Ventilated Seats
During a remote start (if equipped), the
heated or ventilated seats can be turned on
automatically. When it is cold outside, the
heated seats turn on, and when it is hot
outside the ventilated seats turn on. The
heated and ventilated seat indicators and
heated steering wheel indicator may come
on during this operation. The heated or
ventilated seats are canceled when the
Page 85 of 338
Chevrolet Corvette Owner Manual (GMNA-Localizing-U.S./Canada/Mexico-
14622938) - 2021 - CRC - 2/10/21
84 Instruments and Controls
.The gauge takes a few seconds to
stabilize after the ignition is turned on,
and goes back to empty when the
ignition is turned off.
Engine Coolant Temperature
Gauge
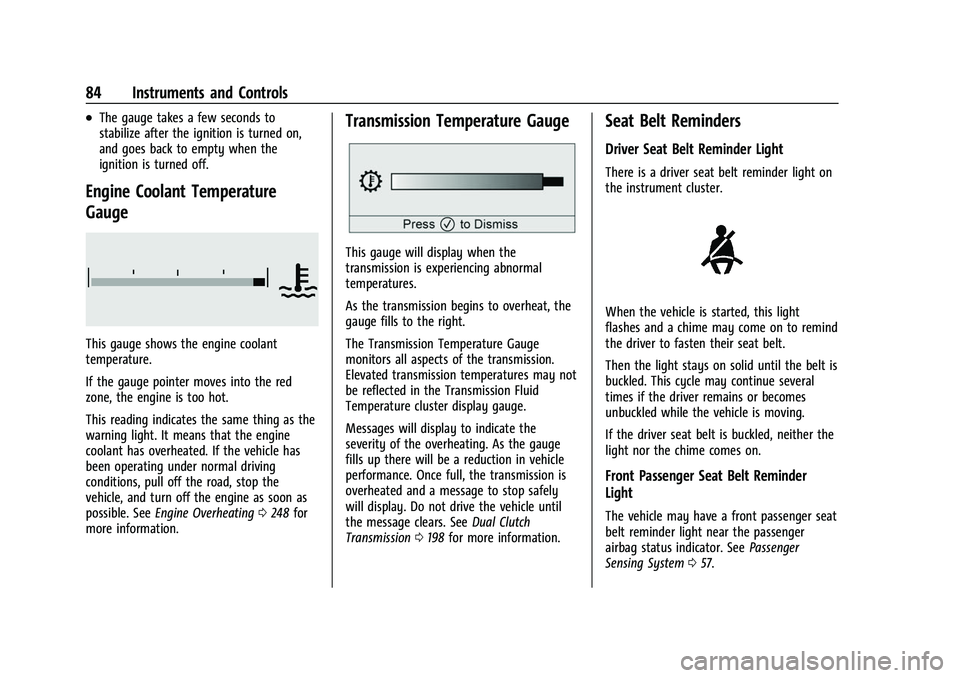
This gauge shows the engine coolant
temperature.
If the gauge pointer moves into the red
zone, the engine is too hot.
This reading indicates the same thing as the
warning light. It means that the engine
coolant has overheated. If the vehicle has
been operating under normal driving
conditions, pull off the road, stop the
vehicle, and turn off the engine as soon as
possible. SeeEngine Overheating 0248 for
more information.
Transmission Temperature Gauge
This gauge will display when the
transmission is experiencing abnormal
temperatures.
As the transmission begins to overheat, the
gauge fills to the right.
The Transmission Temperature Gauge
monitors all aspects of the transmission.
Elevated transmission temperatures may not
be reflected in the Transmission Fluid
Temperature cluster display gauge.
Messages will display to indicate the
severity of the overheating. As the gauge
fills up there will be a reduction in vehicle
performance. Once full, the transmission is
overheated and a message to stop safely
will display. Do not drive the vehicle until
the message clears. See Dual Clutch
Transmission 0198 for more information.
Seat Belt Reminders
Driver Seat Belt Reminder Light
There is a driver seat belt reminder light on
the instrument cluster.
When the vehicle is started, this light
flashes and a chime may come on to remind
the driver to fasten their seat belt.
Then the light stays on solid until the belt is
buckled. This cycle may continue several
times if the driver remains or becomes
unbuckled while the vehicle is moving.
If the driver seat belt is buckled, neither the
light nor the chime comes on.
Front Passenger Seat Belt Reminder
Light
The vehicle may have a front passenger seat
belt reminder light near the passenger
airbag status indicator. See Passenger
Sensing System 057.
Page 184 of 338
Chevrolet Corvette Owner Manual (GMNA-Localizing-U.S./Canada/Mexico-
14622938) - 2021 - CRC - 2/10/21
Driving and Operating 183
effort and travel is increased. When the
message displays, the driver should decrease
brake pedal pressure.
Stage 2 :The Driver Information Center
(DIC) displays a “Brakes Overheated Service
Now” message that the brake fluid
temperature is excessive and is about to
boil. The system increases brake pedal effort
and travel, and will also limit vehicle speed.
The driver should immediately start a cool
down lap if on the track. If this message
displays, take the vehicle to be serviced at
your dealer.
Brake Burnishing
New brake pads must be burnished before
racing or other competitive driving.
Caution
Performing the brake burnish procedure
on a base brake system can result in
brake damage.
Caution
The new vehicle break-in period should be
completed before performing the brake
burnish procedure, otherwise damage
may occur to the powertrain/engine. See
New Vehicle Break-In 0192.
Caution
Brake pedal fade will occur during any
track burnish procedure and can cause
brake pedal travel and force to increase.
This could extend stopping distance until
the brakes are fully burnished.
When this procedure is performed as
instructed, it will not damage the brakes.
The brake pads will smoke and produce an
odor. The braking force and pedal travel
may increase. After the procedure, the brake
pads may appear white at the rotor contact.
Perform this procedure only on dry
pavement, in a safe manner, and in
compliance with all local and state
ordinances/laws regarding motor vehicle
operation. Brake Burnishing Procedure
This brake burnish procedure should only be
run on vehicles with the J55 Z51 factory
equipped brake system.
1. Apply the brakes 25 times starting at 100 km/h (60 mph) to 50 km/h (30 mph)
while decelerating at 0.4 g. This is a
medium brake application. Drive for at
least 1 km (0.6 mi) between applying the
brakes. This first step may be skipped if
there are more than 320 km (200 mi) on
the brake pads.
2. Apply the brakes 25 times starting at 100 km/h (60 mph) to 25 km/h (15 mph)
while decelerating at 0.8 g. This is a hard
brake application without activating the
Antilock Brake System (ABS). Drive for at
least 1 km (0.6 mi) between applications.
Depending on conditions, some increase
in brake pedal travel and brake pedal
force may be experienced.
3. Cool down: Drive at 100 km/h (60 mph) for approximately 15 km (10 mi) without
using the brakes.
4. Apply the brakes 25 times from 100 km/h (60 mph) to 50 km/h (30 mph)
while decelerating at 0.4 g. This is a
medium brake application. Drive for at
least 1 km (0.6 mi) between applications.
Page 188 of 338
Chevrolet Corvette Owner Manual (GMNA-Localizing-U.S./Canada/Mexico-
14622938) - 2021 - CRC - 2/10/21
Driving and Operating 187
Warning (Continued)
vehicle occupants could drown. Do not
ignore police warnings and be very
cautious about trying to drive through
flowing water.
Caution
Driving through deep puddles or standing
water can cause water to come in
through the engine air intake and
damage the engine. If deep puddles or
standing water cannot be avoided,
proceed with caution and do not exceed
8 km/h (5 mph). Do not drive through
water that may come close to or cover
the vehicle’s underbody.
Hydroplaning
Hydroplaning is dangerous. Water can build
up under the vehicle's tires so they actually
ride on the water. This can happen if the
road is wet enough and you are going fast
enough. When the vehicle is hydroplaning, it
has little or no contact with the road.There is no hard and fast rule about
hydroplaning. The best advice is to slow
down when the road is wet.
Other Rainy Weather Tips
Besides slowing down, other wet weather
driving tips include:
.Allow extra following distance.
.Pass with caution.
.Keep windshield wiping equipment in
good shape.
.Keep the windshield washer fluid reservoir
filled.
.Have good tires with proper tread depth.
See
Tires 0261.
.Turn off cruise control.
Hill and Mountain Roads
Driving on steep hills or through mountains
is different than driving on flat or rolling
terrain. Tips include:
.When driving downhill in D (Drive), the
vehicle may automatically downshift to
assist with speed control.
.A lower gear may also be selected to
provide further speed control.
{Warning
Using the brakes to slow the vehicle on a
long downhill slope can cause brake
overheating, can reduce brake
performance, and could result in a loss of
braking. Shift the transmission to a lower
gear to let the engine assist the brakes
on a steep downhill slope.
{Warning
Coasting downhill in N (Neutral) or with
the ignition off is dangerous. This can
cause overheating of the brakes and loss
of steering assist. Always have the engine
running and the vehicle in gear.
.Drive at speeds that keep the vehicle in
its own lane. Do not swing wide or cross
the center line.
.Be alert on top of hills; something could
be in your lane (e.g., stalled car, crash).
.Pay attention to special road signs (e.g.,
falling rocks area, winding roads, long
grades, passing or no-passing zones) and
take appropriate action.
Page 190 of 338
Chevrolet Corvette Owner Manual (GMNA-Localizing-U.S./Canada/Mexico-
14622938) - 2021 - CRC - 2/10/21
Driving and Operating 189
If the Vehicle Is Stuck
Slowly and cautiously spin the wheels to
free the vehicle when stuck in sand, mud,
ice, or snow.
If stuck too severely for the traction system
to free the vehicle, turn the traction system
off and use the rocking method. See
Traction Control/Electronic Stability Control
0206.
{Warning
If the vehicle's tires spin at high speed,
they can explode, and you or others
could be injured. The vehicle can
overheat, causing an engine compartment
fire or other damage. Spin the wheels as
little as possible and avoid going above
56 km/h (35 mph).
Rocking the Vehicle to Get it Out
Turn the steering wheel left and right to
clear the area around the front wheels. Turn
off any traction system. Shift back and forth
between R (Reverse) and a low forward gear,
spinning the wheels as little as possible. To
prevent transmission wear, wait until the
wheels stop spinning before shifting gears.
Release the accelerator pedal while shifting, and press lightly on the accelerator pedal
when the transmission is in gear. Slowly
spinning the wheels in the forward and
reverse directions causes a rocking motion
that could free the vehicle. If that does not
get the vehicle out after a few tries, it may
need to be towed out. If the vehicle does
need to be towed out, see
Towing the
Vehicle 0281.
Vehicle Load Limits
It is very important to know how much
weight the vehicle can carry. This
weight is called the vehicle capacity
weight and includes the weight of all
occupants, cargo, and all
nonfactory-installed options. Two labels
on the vehicle may show how much
weight it may properly carry: the Tire
and Loading Information label and the
Certification label.
{Warning
Do not load the vehicle any heavier
than the Gross Vehicle Weight Rating
(GVWR), or either the maximum
front or rear Gross Axle Weight
(Continued)
Warning (Continued)
Rating (GAWR). This can cause
systems to break and change the
way the vehicle handles. This could
cause loss of control and a crash.
Overloading can also reduce stopping
performance, damage the tires, and
shorten the life of the vehicle.
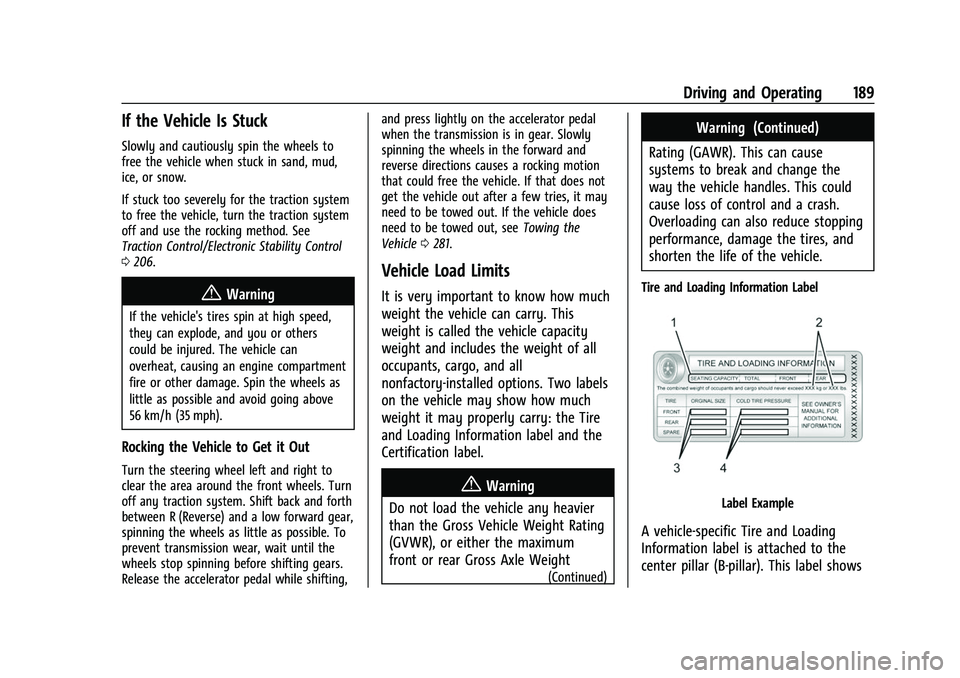
Tire and Loading Information Label
Label Example
A vehicle-specific Tire and Loading
Information label is attached to the
center pillar (B-pillar). This label shows
Page 196 of 338
Chevrolet Corvette Owner Manual (GMNA-Localizing-U.S./Canada/Mexico-
14622938) - 2021 - CRC - 2/10/21
Driving and Operating 195
Cell phone chargers can interfere with the
operation of the Keyless Access system.
Battery chargers should not be plugged in
when starting or turning off the engine.1. Press the brake pedal, then press ENGINE START/STOP on the instrument panel.
If there is no remote key in the vehicle
or if there is something causing
interference with it, the Driver
Information Center (DIC) will display a
message.
2. When the engine begins cranking, let go of the button and the engine cranks
automatically until it starts.
If the battery in the remote key is weak,
the DIC will display a message. The
vehicle can still be driven.
See “Starting the Vehicle with a Low
Remote Key Battery” underRemote
Keyless Entry (RKE) System Operation 07
. If the remote key battery is dead,
insert it into the cupholder remote key
pocket to enable engine starting.
3. Do not race the engine immediately after starting it. Operate the engine and
transmission gently until the oil warms
up and lubricates all moving parts. 4. If the engine does not start and no DIC
message is displayed, wait 15 seconds
before trying again to let the cranking
motor cool down.
If the engine does not start after five to
10 seconds, especially in very cold
weather (below −18 °C or 0 °F), it could
be flooded with too much gasoline. Try
pushing the accelerator pedal all the way
to the floor while cranking for up to
15 seconds maximum. Wait at least
15 seconds between each try, to allow
the cranking motor to cool down. When
the engine starts, let go of the
accelerator. If the vehicle starts briefly
but then stops again, repeat these steps.
This clears the extra gasoline from the
engine.
Caution
Cranking the engine for long periods of
time, by pressing ENGINE START/STOP
immediately after cranking has ended,
can overheat and damage the cranking
motor, and drain the battery. Wait at
least 15 seconds between each try, to let
the cranking motor cool down.
Stopping the Engine
Shift to P (Park) and press and hold ENGINE
START/STOP on the instrument panel, until
the engine shuts off. If the transmission is
not in P (Park), the engine shuts off and the
vehicle goes into the accessory mode. The
DIC displays SHIFT TO PARK. When shifted to
P (Park) the vehicle turns off.
If the remote key is not detected inside the
vehicle when it is turned off, the DIC
displays a message.
Retained Accessory Power (RAP)
When the ignition is turned from on to off,
the following features (if equipped) will
continue to function for up to 10 minutes,
or until the driver door is opened. These
features will also work when the ignition is
in RUN or ACC/ACCESSORY:
.Infotainment System
.Power Windows (during RAP this
functionality will be lost when any door
is opened)
.Sunroof (during RAP this functionality will
be lost when any door is opened)
.Auxiliary Power Outlet
.Audio System
.OnStar System
Page 197 of 338
Chevrolet Corvette Owner Manual (GMNA-Localizing-U.S./Canada/Mexico-
14622938) - 2021 - CRC - 2/10/21
196 Driving and Operating
Shifting Into Park
{Warning
It is dangerous to get out of the vehicle
if the vehicle is not in P (Park) with the
parking brake set. The vehicle can roll.
Do not leave the vehicle when the engine
is running. If you have left the engine
running, the vehicle can move suddenly.
You or others could be injured. To be
sure the vehicle will not move, even
when you are on fairly level ground,
always set the parking brake and shift to
P (Park).
To shift into P (Park): 1. Hold the brake pedal down and set the parking brake. See Electric Parking Brake
0 205.
2. Press the P (Park) switch on the center console. See Dual Clutch Transmission
0 198.
3. Press ENGINE START/STOP to turn the engine off.
If the vehicle is shifted into P (Park) on a
hill, the Electric Parking Brake (EPB) may
apply automatically. The EPB may not release when the EPB switch is used. The
EPB should automatically release when the
vehicle is shifted out of P (Park).Leaving the Vehicle with the Engine
Running
{Warning
It can be dangerous to leave the vehicle
with the engine running. It could
overheat and catch fire.
It is dangerous to get out of the vehicle
if the vehicle is not in P (Park) with the
parking brake firmly set. The vehicle
can roll.
Do not leave the vehicle when the engine
is running. If you have left the engine
running, the vehicle can move suddenly.
You or others could be injured. To be
sure the vehicle will not move, even
when you are on fairly level ground,
always set the parking brake and shift to
P (Park).
If you have to leave the vehicle with the
engine running, be sure the vehicle is in
P (Park) and the parking brake is set before
you leave it.
Shifting out of Park
This vehicle is equipped with an
electronically controlled transmission.
If the vehicle has a battery with low
voltage, try charging or jump starting the
battery. See Jump Starting - North America
0 278.
To shift out of P (Park): 1. Ensure the engine is running.
2. Apply the brake pedal.
3. Press or pull the desired switch on the center console. For N (Neutral) press and
hold the N (Neutral) switch until the N
indicator illuminates red.
The P indicator will turn white and the gear
indicator on the shift switch will turn red
when the vehicle is no longer in P (Park).
If the vehicle cannot shift from P (Park), a
Driver Information Center (DIC) message will
display. See your dealer for service.
Page 207 of 338
Chevrolet Corvette Owner Manual (GMNA-Localizing-U.S./Canada/Mexico-
14622938) - 2021 - CRC - 2/10/21
206 Driving and Operating
Caution
Driving with the parking brake on can
overheat the brake system and cause
premature wear or damage to brake
system parts. Make sure that the parking
brake is fully released and the brake
warning light is off before driving.
Automatic EPB Release
The EPB will automatically release if the
vehicle is running, placed into gear, and an
attempt is made to drive away. Avoid rapid
acceleration when the EPB is applied, to
preserve parking brake lining life.
Brake Assist
Brake Assist detects rapid brake pedal
applications due to emergency braking
situations and provides additional braking to
activate the Antilock Brake System (ABS) if
the brake pedal is not pushed hard enough
to activate ABS normally. Minor noise, brake
pedal pulsation, and/or pedal movement
during this time may occur. Continue to
apply the brake pedal as the driving
situation dictates. Brake Assist disengages
when the brake pedal is released.
Hill Start Assist (HSA)
{Warning
Do not rely on the HSA feature. HSA does
not replace the need to pay attention
and drive safely. You may not hear or
feel alerts or warnings provided by this
system. Failure to use proper care when
driving may result in injury, death,
or vehicle damage. SeeDefensive Driving
0 178.
When the vehicle is stopped on a grade, Hill
Start Assist (HSA) prevents the vehicle from
rolling in an unintended direction during the
transition from brake pedal release to
accelerator pedal apply. The brakes release
when the accelerator pedal is applied. If the
accelerator pedal is not applied within a few
minutes, the Electric Parking Brake will
apply. The brakes may also release under
other conditions. Do not rely on HSA to hold
the vehicle.
HSA is available when the vehicle is facing
uphill in a forward gear, or when facing
downhill in R (Reverse). The vehicle must
come to a complete stop on a grade for HSA
to activate.
Ride Control Systems
Traction Control/Electronic
Stability Control
The vehicle has a Traction Control
System (TCS) and a StabiliTrak/Electronic
Stability Control (ESC) system. These
systems help limit wheel spin and assist the
driver in maintaining control, especially on
slippery road conditions.
TCS activates if it senses that the rear
wheels are spinning too much or are
beginning to lose traction. When this
happens, TCS applies the brakes to the
spinning wheel and reduces engine power
(by closing the throttle and managing
engine spark) to limit wheel spin.
StabiliTrak/ESC activates when the vehicle
senses a difference between the intended
path and the direction the vehicle is actually
traveling. StabiliTrak/ESC selectively applies
braking pressure to any one of the vehicle
wheel brakes to assist the driver in keeping
the vehicle on the intended path.
Page 214 of 338
Chevrolet Corvette Owner Manual (GMNA-Localizing-U.S./Canada/Mexico-
14622938) - 2021 - CRC - 2/10/21
Driving and Operating 213
Driver Influenced Gear Selection:
.Aggressive driving will influence both the
upshift and downshift points in all modes.
.Criteria which have influence are: driving
mode, accelerator, brakes, lateral and
longitudinal loading.
.Changes in gear selection behavior due to
aggressive driving can include:
‐Downshifting early with higher rpm’s
during aggressive braking (i.e. entering
a corner)
‐ Altering upshifts while experiencing
lateral acceleration
‐ Not upshifting when the accelerator is
released to avoid unnecessary shifts if
the accelerator is re-applied
‐ Recognizing sporty driving and
anticipate upcoming corners with the
appropriate gear selection entering and
exiting
.Driver Modes
‐Driver influenced changes are effective
in all driving modes, however the
aggressiveness of the transmission
response will increase between Tour,
Sport, and Track Modes respectively. Active Fuel Management (engine cylinder
shuts off)
.Normal with Dual Clutch Transmission:
The engine uses 8-cylinder mode when
accelerating, but changes to 4-cylinder
mode when coasting.
Active Fuel Management is a preset of
Powertrain and cannot be modified or
changed independently.
Engine Sound
Caution
Using a stealth engine sound setting
during spirited driving will cause the
exhaust system to overheat and damage
the variable exhaust valves. Do not use
this setting when auto-crossing or driving
on high speed tracks.
If available, engine sound settings change
when the variable exhaust valves open.
Steering (Assist Effort)
Adjusts from a lighter steering feel to
reduced assist for more steering feel. Magnetic Ride Control (if equipped)
Adjusts the shock dampening firmness based
on driving conditions to improve comfort
and performance.
Drive Mode Customization
The vehicle is equipped to modify the
following vehicle settings base on vehicle
content. Through the center stack, under
Vehicle Settings, select
“Drive Mode
Customization” to customize and personalize
My Mode and/or Z-Mode.
Engine Sound:
Engine Sound adjusts the volume of engine
noise. Setting range from quietest to loudest
volume as you move from Stealth through
Track.
.Stealth, Tour, Sport, Track
Steering:
This setting adjusts the effort required to
turn the steering wheel. The steering wheel
offers better feedback but requires more
effort as you move from Tour to Track.
.Tour, Sport, Track
Page 231 of 338

Chevrolet Corvette Owner Manual (GMNA-Localizing-U.S./Canada/Mexico-
14622938) - 2021 - CRC - 2/10/21
230 Vehicle Care
Vehicle Care
General Information
General Information . . . . . . . . . . . . . . . . . . . 231
California Proposition 65 Warning . . . . . 231
California Perchlorate MaterialsRequirements . . . . . . . . . . . . . . . . . . . . . . . . 231
Accessories and Modifications . . . . . . . . . 231
Lifting the Vehicle . . . . . . . . . . . . . . . . . . . . . 232
Vehicle Checks
Doing Your Own Service Work . . . . . . . . . 233
Underhood Compartment Overview . . . 234
Engine Compartment Overview . . . . . . . . 235
Engine Oil . . . . . . . . . . . . . . . . . . . . . . . . . . . . . 237
Engine Oil Life System . . . . . . . . . . . . . . . . . 241
Dual Clutch Transmission Fluid . . . . . . . . 241
Dual Clutch Transmission Fluid Life System . . . . . . . . . . . . . . . . . . . . . . . . . . . . . . 242
Engine Air Filter Life System . . . . . . . . . . 242
Engine Air Cleaner/Filter . . . . . . . . . . . . . . . 243
Cooling System . . . . . . . . . . . . . . . . . . . . . . . . 245
Engine Overheating . . . . . . . . . . . . . . . . . . . 248
Washer Fluid . . . . . . . . . . . . . . . . . . . . . . . . . . 249
Brakes . . . . . . . . . . . . . . . . . . . . . . . . . . . . . . . . 249
Brake Fluid . . . . . . . . . . . . . . . . . . . . . . . . . . . . . 251
Battery - North America . . . . . . . . . . . . . . . 251
Park Brake and P (Park) Mechanism Check . . . . . . . . . . . . . . . . . . . . . . . . . . . . . . . . 252
Wiper Blade Replacement . . . . . . . . . . . . . 253 Windshield Replacement . . . . . . . . . . . . . . . 253
Gas Strut(s) . . . . . . . . . . . . . . . . . . . . . . . . . . . 254
Headlamp Aiming
Front Headlamp Aiming . . . . . . . . . . . . . . . 254
Bulb Replacement
LED Lighting . . . . . . . . . . . . . . . . . . . . . . . . . . . 255
Electrical System
Electrical System Overload . . . . . . . . . . . . . 255
Fuses and Circuit Breakers . . . . . . . . . . . . . 255
Instrument Panel Fuse Block . . . . . . . . . . 256
Rear Compartment Fuse Block . . . . . . . . . 258
Wheels and Tires
Tires . . . . . . . . . . . . . . . . . . . . . . . . . . . . . . . . . . . 261
All-Season Tires . . . . . . . . . . . . . . . . . . . . . . . 262
Winter Tires . . . . . . . . . . . . . . . . . . . . . . . . . . . 262
Run-Flat Tires . . . . . . . . . . . . . . . . . . . . . . . . . . 262
Low-Profile Tires . . . . . . . . . . . . . . . . . . . . . . . 263
Summer Tires . . . . . . . . . . . . . . . . . . . . . . . . . 263
Tire Sidewall Labeling . . . . . . . . . . . . . . . . . 263
Tire Designations . . . . . . . . . . . . . . . . . . . . . . 264
Tire Terminology and Definitions . . . . . . 265
Tire Pressure . . . . . . . . . . . . . . . . . . . . . . . . . . 267
Tire Pressure for High-Speed
Operation . . . . . . . . . . . . . . . . . . . . . . . . . . . 268
Tire Pressure Monitor System . . . . . . . . . 269
Tire Pressure Monitor Operation . . . . . . 270
Tire Inspection . . . . . . . . . . . . . . . . . . . . . . . . . 272
Tire Rotation . . . . . . . . . . . . . . . . . . . . . . . . . . 272 When It Is Time for New Tires . . . . . . . . 273
Buying New Tires . . . . . . . . . . . . . . . . . . . . . 274
Different Size Tires and Wheels . . . . . . . . 275
Uniform Tire Quality Grading . . . . . . . . . . 275
Wheel Alignment and Tire Balance . . . . 277
Wheel Replacement . . . . . . . . . . . . . . . . . . . 277
Tire Chains . . . . . . . . . . . . . . . . . . . . . . . . . . . . 278
If a Tire Goes Flat . . . . . . . . . . . . . . . . . . . . . 278
Jump Starting
Jump Starting - North America . . . . . . . . 278
Towing the Vehicle
Towing the Vehicle . . . . . . . . . . . . . . . . . . . . 281
Recreational Vehicle Towing . . . . . . . . . . . 283
Appearance Care
Exterior Care . . . . . . . . . . . . . . . . . . . . . . . . . . 283
Interior Care . . . . . . . . . . . . . . . . . . . . . . . . . . 288
Floor Mats . . . . . . . . . . . . . . . . . . . . . . . . . . . . 290