stop start CHEVROLET CORVETTE 2022 User Guide
[x] Cancel search | Manufacturer: CHEVROLET, Model Year: 2022, Model line: CORVETTE, Model: CHEVROLET CORVETTE 2022Pages: 338, PDF Size: 7.6 MB
Page 92 of 338
Chevrolet Corvette Owner Manual (GMNA-Localizing-U.S./Canada/Mexico-
15342622) - 2022 - CRC - 5/4/21
Instruments and Controls 91
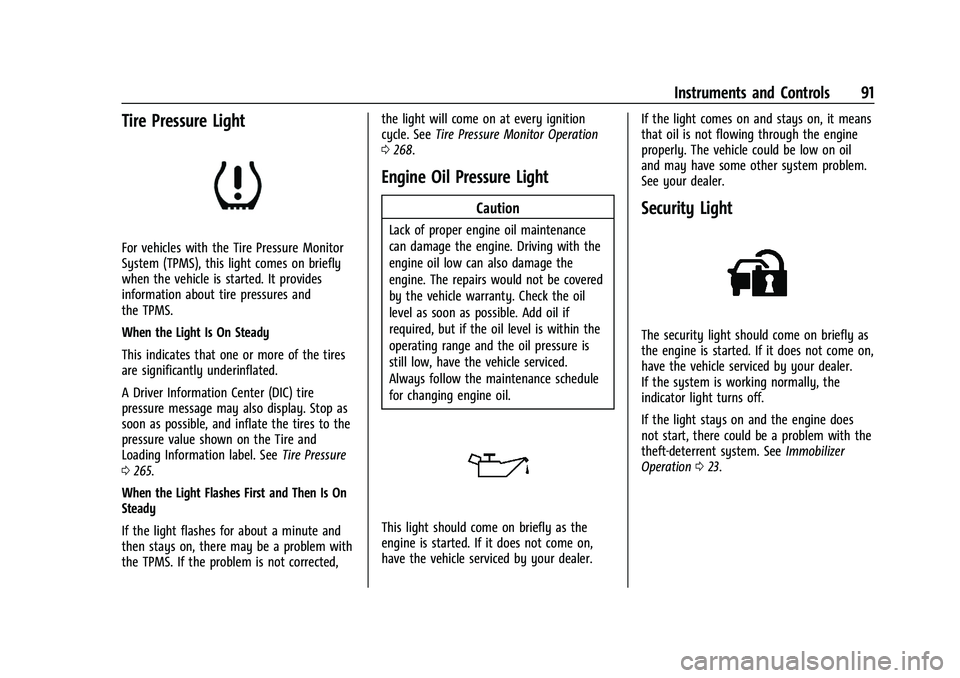
Tire Pressure Light
For vehicles with the Tire Pressure Monitor
System (TPMS), this light comes on briefly
when the vehicle is started. It provides
information about tire pressures and
the TPMS.
When the Light Is On Steady
This indicates that one or more of the tires
are significantly underinflated.
A Driver Information Center (DIC) tire
pressure message may also display. Stop as
soon as possible, and inflate the tires to the
pressure value shown on the Tire and
Loading Information label. SeeTire Pressure
0 265.
When the Light Flashes First and Then Is On
Steady
If the light flashes for about a minute and
then stays on, there may be a problem with
the TPMS. If the problem is not corrected, the light will come on at every ignition
cycle. See
Tire Pressure Monitor Operation
0 268.
Engine Oil Pressure Light
Caution
Lack of proper engine oil maintenance
can damage the engine. Driving with the
engine oil low can also damage the
engine. The repairs would not be covered
by the vehicle warranty. Check the oil
level as soon as possible. Add oil if
required, but if the oil level is within the
operating range and the oil pressure is
still low, have the vehicle serviced.
Always follow the maintenance schedule
for changing engine oil.
This light should come on briefly as the
engine is started. If it does not come on,
have the vehicle serviced by your dealer. If the light comes on and stays on, it means
that oil is not flowing through the engine
properly. The vehicle could be low on oil
and may have some other system problem.
See your dealer.
Security Light
The security light should come on briefly as
the engine is started. If it does not come on,
have the vehicle serviced by your dealer.
If the system is working normally, the
indicator light turns off.
If the light stays on and the engine does
not start, there could be a problem with the
theft-deterrent system. See
Immobilizer
Operation 023.
Page 95 of 338
Chevrolet Corvette Owner Manual (GMNA-Localizing-U.S./Canada/Mexico-
15342622) - 2022 - CRC - 5/4/21
94 Instruments and Controls
Fuel Economy :Displays the average fuel
economy, the best fuel economy over the
selected distance, and a bar graph showing
instantaneous fuel economy. Pressing the
thumbwheel will open a menu to change
the selected distance or reset the current
values.
Timer/Fuel Used : This display can be used
as a timer. To start/stop the timer, press the
thumbwheel while this display is active and
then select the start/stop the timer. The
display will show the amount of time that
has passed since the timer was last reset. To
reset the timer to zero, press the
thumbwheel to access the menu while this
display is active.
Fuel Used displays the approximate liters (L)
or gallons (gal) of fuel that have been used
since last reset. The fuel used can be reset
by pressing the thumbwheel and selecting
Reset Fuel Used in the menu.
Economy Trend : Shows the instantaneous
fuel economy and current gas mileage.
Speed Limit : Displays sign information,
which comes from a roadway database in
the on-board navigation. Engine Hours/Lifetime Revs :
Displays the
total number of hours the engine has run.
It also shows total engine revolutions
divided by 10,000.
Head-Up Display (HUD)
{Warning
If the HUD image is too bright, or too
high in your field of view, it may take
you more time to see things you need to
see when it is dark outside. Be sure to
keep the HUD image dim and placed low
in your field of view.
If equipped with HUD, some information
concerning the operation of the vehicle is
projected onto the windshield.
The HUD information appears as an image
focused out toward the front of the vehicle.
Caution
If you try to use the HUD image as a
parking aid, you may misjudge the
distance and damage your vehicle. Do not
use the HUD image as a parking aid. The HUD information can be displayed in
various languages. The speedometer reading
and other numerical values can be displayed
in either English or metric units.
The language selection is changed through
the radio and the units of measurement is
changed through the instrument cluster. See
Vehicle Personalization
098 and “Settings”
under Instrument Cluster 080.
The HUD may display different alerts and
information for vehicles equipped with these
features:
.Speedometer
.Tachometer
.Manual Paddle Shift Gear Indicator
These displays on the HUD are for use
when using the manual paddle shift
controls to shift the transmission. See
“Manual Paddle Shift” inDual Clutch
Transmission 0195.
.G-Force Gauge
.Upcoming Maneuver from On-Board
Navigation
.Upcoming Maneuver from OnStar
.Incoming Call
Page 125 of 338
Chevrolet Corvette Owner Manual (GMNA-Localizing-U.S./Canada/Mexico-
15342622) - 2022 - CRC - 5/4/21
124 Infotainment System
Manage Bluetooth Devices
From the Home Page:1. Touch Audio.
2. Touch Devices to add or delete devices.
When touching Bluetooth, the radio may
not be able to launch the audio player on
the connected device to start playing. When
the vehicle is not moving, use the mobile
device to begin playback.
All devices launch audio differently. When
selecting Bluetooth as a source, the radio
may show as paused on the display. Touch
pon the display to begin playback.
Browse functionality will be provided where
supported by the Bluetooth device. This
media content will not be part of the
MyMedia source mode.
Some smartphones support sending
Bluetooth music information to display on
the radio. When the radio receives this
information, it will check to see if any is
available and display it. For more
information about supported Bluetooth
features, see my.chevrolet.com/learn.
Navigation
Using the Navigation System
If equipped, launch the Nav application by
touching the Nav icon on the Home Page or
on the shortcut tray near the bottom of the
infotainment display.
When the Nav application is launched for
the first time, a product walkthrough is
available. Use of the feature requires the
Terms and Conditions and the Privacy
statement to be confirmed. If available and
signed into a profile, it is also suggested to
enable and confirm Predictive Navigation.
Predictive Navigation (If Equipped)
If Predictive Navigation is available and
confirmed, this feature learns preferences by
remembering where the vehicle has been.
It uses the locations and navigation history
to personalize routes and results.
Predictive Navigation may learn elements
such as:
.Personalized routes based on preferred
streets.
.Search results that provide best matches
at the top of the list.
.Predictive traffic.
.Local map content updating.
Predictive Navigation can also be enabled or
disabled at a later time by touching
A
(Options). While in Options, touch Settings,
then Map and Navigation Settings, and then
Predictive Navigation. See Settings0151.
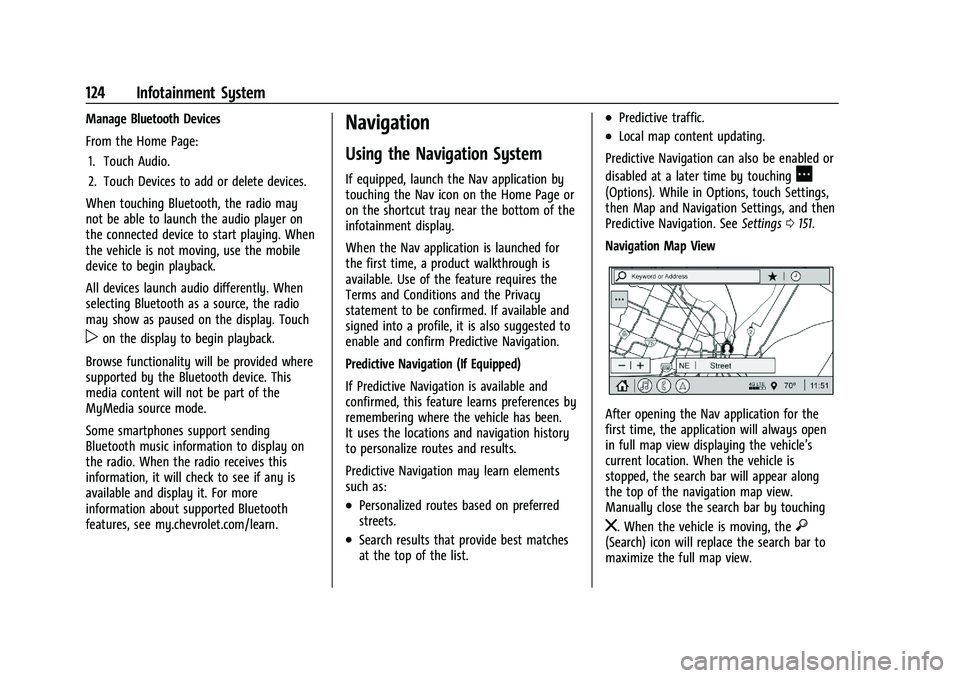
Navigation Map View
After opening the Nav application for the
first time, the application will always open
in full map view displaying the vehicle’s
current location. When the vehicle is
stopped, the search bar will appear along
the top of the navigation map view.
Manually close the search bar by touching
z. When the vehicle is moving, the}(Search) icon will replace the search bar to
maximize the full map view.
Page 135 of 338
Chevrolet Corvette Owner Manual (GMNA-Localizing-U.S./Canada/Mexico-
15342622) - 2022 - CRC - 5/4/21
134 Infotainment System
For more information if the GPS is not
functioning properly, seeProblems with
Route Guidance 0134 and
If the System Needs Service 0134.
Vehicle Positioning
At times, the position of the vehicle on the
map could be inaccurate due to one or more
of the following reasons:
.The road system has changed.
.The vehicle is driving on slippery road
surfaces such as sand, gravel, or snow.
.The vehicle is traveling on winding roads
or long, straight roads.
.The vehicle is approaching a tall building
or a large vehicle.
.The surface streets run parallel to a
freeway.
.The vehicle has been transferred by a
vehicle carrier or a ferry.
.The current position calibration is set
incorrectly.
.The vehicle is traveling at high speed.
.The vehicle changes directions more than
once, or the vehicle is turning on a turn
table in a parking lot.
.The vehicle is entering and/or exiting a
parking lot, garage, or a lot with a roof.
.The GPS signal is not received.
.A roof carrier is installed on the vehicle.
.Tire chains are installed on the vehicle.
.The tires are replaced or worn.
.The tire pressure for the tires is incorrect.
.This is the first navigation use after the
map data is updated.
.The 12-volt battery has been disconnected
for several days.
.The vehicle is driving in heavy traffic
where driving is at low speeds, and the
vehicle is stopped and started repeatedly.
Problems with Route Guidance
Inappropriate route guidance can occur
under one or more of the following
conditions:
.The turn was not made on the road
indicated.
.Route guidance might not be available
when using automatic rerouting for the
next right or left turn.
.The route might not be changed when
using automatic rerouting.
.There is no route guidance when turning
at an intersection.
.Plural names of places might be
announced occasionally.
.It could take a long time to operate
automatic rerouting during high-speed
driving.
.Automatic rerouting might display a route
returning to the set waypoint if heading
for a destination without passing through
a set waypoint.
.The route prohibits the entry of a vehicle
due to a regulation by time or season or
any other regulation which may be given.
.Some routes might not be searched.
.The route to the destination might not be
shown if there are new roads, if roads
have recently changed, or if certain roads
are not listed in the map data. See Maps
0 127.
To recalibrate the vehicle's position on the
map, park with the vehicle running for two
to five minutes, until the vehicle position
updates. Make sure the vehicle is parked in
a location that is safe and has a clear view
of the sky and away from large
obstructions.
If the System Needs Service
If the navigation system needs service, see
your dealer.
Page 142 of 338
Chevrolet Corvette Owner Manual (GMNA-Localizing-U.S./Canada/Mexico-
15342622) - 2022 - CRC - 5/4/21
Infotainment System 141
microphone located behind the rear view
mirror. The PDR video and data is stored on
a removable SD card located in the SD card
reader in the glove box. The video (MP4)
can be played back in the vehicle or the SD
card can be removed and played in a PC or
on a mobile device or the file can be viewed
and analyzed within Toolbox. See Toolbox
later in this section.
The recorded data is not stored anywhere
else and is only accessible from the SD card.
To optimize PDR performance, it is
recommended that the SD card is formatted
on a regular basis. Back up all recordings on
the SD card prior to formatting. Formatting
the SD card will delete all saved recordings.
If a system error code is seen on the
display, such as "System Error Code ####",
please check the health of the SD card.
It may need to be reformatted or replaced.
If the issue persists, please see your dealer.
To begin, insert an exFAT formatted SD card,
Class 10 required, 16 GB or larger
recommended, into the glove box SD card
reader.Touch the PDR icon to access the PDR menu.
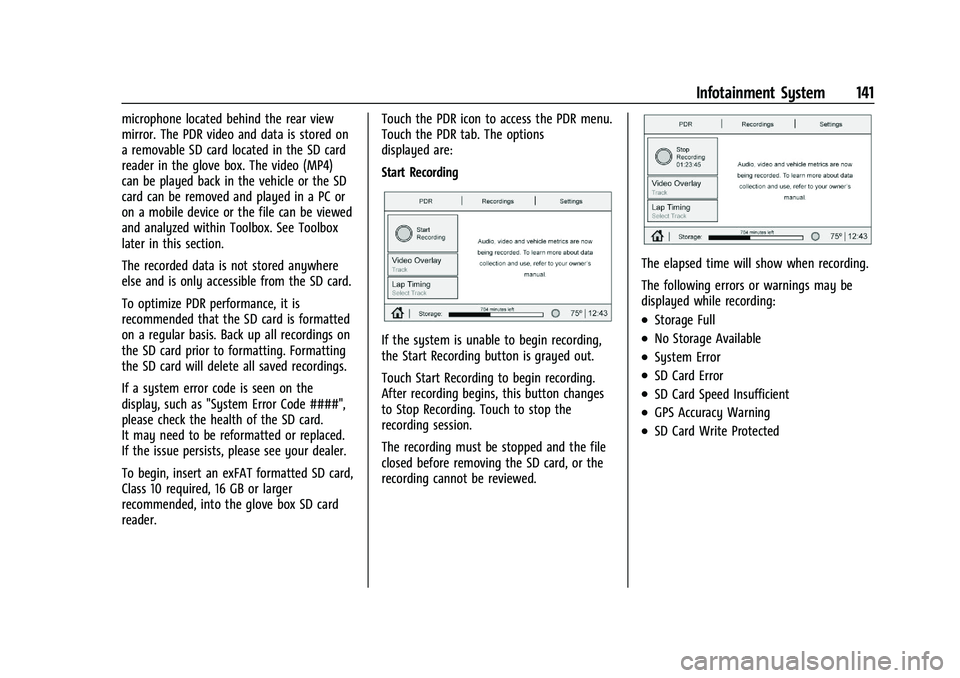
Touch the PDR tab. The options
displayed are:
Start Recording
If the system is unable to begin recording,
the Start Recording button is grayed out.
Touch Start Recording to begin recording.
After recording begins, this button changes
to Stop Recording. Touch to stop the
recording session.
The recording must be stopped and the file
closed before removing the SD card, or the
recording cannot be reviewed.
The elapsed time will show when recording.
The following errors or warnings may be
displayed while recording:
.Storage Full
.No Storage Available
.System Error
.SD Card Error
.SD Card Speed Insufficient
.GPS Accuracy Warning
.SD Card Write Protected
Page 145 of 338
Chevrolet Corvette Owner Manual (GMNA-Localizing-U.S./Canada/Mexico-
15342622) - 2022 - CRC - 5/4/21
144 Infotainment System
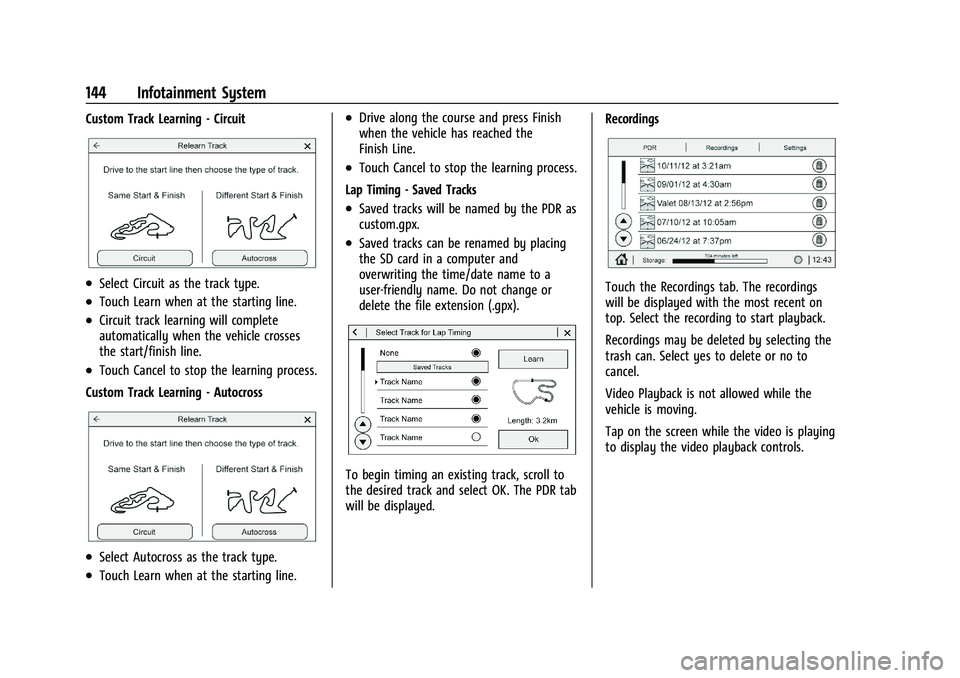
Custom Track Learning - Circuit
.Select Circuit as the track type.
.Touch Learn when at the starting line.
.Circuit track learning will complete
automatically when the vehicle crosses
the start/finish line.
.Touch Cancel to stop the learning process.
Custom Track Learning - Autocross
.Select Autocross as the track type.
.Touch Learn when at the starting line.
.Drive along the course and press Finish
when the vehicle has reached the
Finish Line.
.Touch Cancel to stop the learning process.
Lap Timing - Saved Tracks
.Saved tracks will be named by the PDR as
custom.gpx.
.Saved tracks can be renamed by placing
the SD card in a computer and
overwriting the time/date name to a
user-friendly name. Do not change or
delete the file extension (.gpx).
To begin timing an existing track, scroll to
the desired track and select OK. The PDR tab
will be displayed. Recordings
Touch the Recordings tab. The recordings
will be displayed with the most recent on
top. Select the recording to start playback.
Recordings may be deleted by selecting the
trash can. Select yes to delete or no to
cancel.
Video Playback is not allowed while the
vehicle is moving.
Tap on the screen while the video is playing
to display the video playback controls.
Page 159 of 338
Chevrolet Corvette Owner Manual (GMNA-Localizing-U.S./Canada/Mexico-
15342622) - 2022 - CRC - 5/4/21
158 Infotainment System
2. Create a Personal Identification Number(PIN) by choosing a four-digit PIN.
Re-enter the PIN to confirm. To change
the PIN, touch Change PIN.
The PIN is required to:
.Register or unregister keys.
.Change Teen Driver settings.
.Change or clear the Teen Driver PIN.
.Access or delete Report Card data.
Register keys to activate Teen Driver and
assign restrictions to the key:
Any vehicle key can be registered, up to a
maximum of eight keys. Label the key to
tell it apart from the other keys.
For a pushbutton start system: 1. Start the engine.
2. For automatic transmissions, the vehicle must be in P (Park). For manual
transmissions, the vehicle must be
stopped with the parking brake set.
3. From the Settings menu, touch Vehicle and then Teen Driver.
4. Enter the PIN. 5. Place the remote key you wish to
register in the transmitter pocket. The
key does not need to be the one that
started the vehicle. See Remote Keyless
Entry (RKE) System Operation 07for
transmitter pocket location.
6. From the Teen Driver menu, touch Setup Keys..If the remote key has not previously
been registered, the option to add
the key displays. Touch Setup and a
confirmation message displays. Teen
Driver restrictions will be applied
whenever this key is used to operate
the vehicle.
.If the remote key has already been
registered, the option to remove the
key displays. If Remove is touched,
the remote key is no longer
registered. A confirmation message
displays, and Teen Driver restrictions
will not be applied if this remote key
is used to operate the vehicle.
In vehicles with a pushbutton start system,
if a Teen Driver and a non-Teen Driver key
are both present at start up, the vehicle will
recognize the non-Teen Driver key to start
the vehicle. The Teen Driver settings will not
be active. Manage Settings
Buckle To Drive :
When turned ON, Buckle
to Drive prevents the driver from shifting
out of P (Park) for a period of time if driver
seat belt, and on some vehicles, the
passenger seat belt, is not buckled. See
Buckle To Drive 046 and
Vehicle Personalization 098.
Audio Volume Limit : Allows the audio
volume limit to be turned on or off. Touch
Set Audio Volume Limit to choose the
maximum allowable audio volume level.
Set Audio Volume Limit : Allows a
maximum radio volume to be set. Use the
arrows to choose the maximum allowable
level for the audio volume.
Teen Driver Speed Limiter : Limits the
maximum speed of the vehicle. When the
speed limiter is turned on and the vehicle is
started with a Teen Driver key, the DIC
displays a message that the top speed is
limited.
On certain vehicles, when the Speed Limiter
is turned ON, the vehicle’s maximum
acceleration will be limited. The DIC will
display a message that the acceleration is
limited.
Page 175 of 338
Chevrolet Corvette Owner Manual (GMNA-Localizing-U.S./Canada/Mexico-
15342622) - 2022 - CRC - 5/4/21
174 Driving and Operating
Driving Information
Driving for Better Fuel Economy
Driving habits can affect fuel mileage. Here
are some driving tips to get the best fuel
economy possible:
.Set the climate controls to the desired
temperature after the engine is started,
or turn them off when not required.
.Avoid fast starts and accelerate smoothly.
.Brake gradually and avoid abrupt stops.
.Avoid idling the engine for long periods
of time.
.When road and weather conditions are
appropriate, use cruise control.
.Always follow posted speed limits or
drive more slowly when conditions
require.
.Keep vehicle tires properly inflated.
.Combine several trips into a single trip.
.Replace the vehicle's tires with the same
TPC Spec number molded into the tire's
sidewall near the size.
.Follow recommended scheduled
maintenance.
.Using Tour mode rather than Sport or
Track modes, will result in better Active
Fuel Management operation. SeeActive
Fuel Management 0194.
.For recommended shift speeds, see Dual
Clutch Transmission 0195.
Premium Fuel
Use the recommended fuel. See
Recommended Fuel 0224.
Distracted Driving
Distraction comes in many forms and can
take your focus from the task of driving.
Exercise good judgment and do not let other
activities divert your attention away from
the road. Many local governments have
enacted laws regarding driver distraction.
Become familiar with the local laws in
your area.
To avoid distracted driving, keep your eyes
on the road, keep your hands on the
steering wheel, and focus your attention on
driving.
.Do not use a phone in demanding driving
situations. Use a hands-free method to
place or receive necessary phone calls.
.Watch the road. Do not read, take notes,
or look up information on phones or
other electronic devices.
.Designate a front seat passenger to
handle potential distractions.
.Become familiar with vehicle features
before driving, such as programming
favorite radio stations and adjusting
climate control and seat settings. Program
all trip information into any navigation
device prior to driving.
.Wait until the vehicle is parked to
retrieve items that have fallen to the
floor.
.Stop or park the vehicle to tend to
children.
.Keep pets in an appropriate carrier or
restraint.
.Avoid stressful conversations while
driving, whether with a passenger or on a
cell phone.
{Warning
Taking your eyes off the road too long or
too often could cause a crash resulting in
injury or death. Focus your attention on
driving.
Page 178 of 338
Chevrolet Corvette Owner Manual (GMNA-Localizing-U.S./Canada/Mexico-
15342622) - 2022 - CRC - 5/4/21
Driving and Operating 177
The vehicle's right wheels can drop off the
edge of a road onto the shoulder while
driving. Follow these tips:1. Ease off the accelerator and then, if there is nothing in the way, steer the
vehicle so that it straddles the edge of
the pavement.
2. Turn the steering wheel about one-eighth of a turn, until the right front
tire contacts the pavement edge.
3. Turn the steering wheel to go straight down the roadway.
Loss of Control
Skidding
There are three types of skids that
correspond to the vehicle's three control
systems:
.Braking Skid —wheels are not rolling.
.Steering or Cornering Skid —too much
speed or steering in a curve causes tires
to slip and lose cornering force.
.Acceleration Skid —too much throttle
causes the driving wheels to spin. Defensive drivers avoid most skids by taking
reasonable care suited to existing conditions,
and by not overdriving those conditions. But
skids are always possible.
If the vehicle starts to slide, follow these
suggestions:
.Ease your foot off the accelerator pedal
and steer the way you want the vehicle
to go. The vehicle may straighten out. Be
ready for a second skid if it occurs.
.Slow down and adjust your driving
according to weather conditions. Stopping
distance can be longer and vehicle control
can be affected when traction is reduced
by water, snow, ice, gravel, or other
material on the road. Learn to recognize
warning clues
—such as enough water,
ice, or packed snow on the road to make
a mirrored surface —and slow down
when you have any doubt.
.Try to avoid sudden steering, acceleration,
or braking, including reducing vehicle
speed by shifting to a lower gear. Any
sudden changes could cause the tires to
slide.
Remember: Antilock brakes help avoid only
the braking skid.
Track Events and Competitive
Driving
Vehicles without Z51 package should not be
used for track events and competitive
driving.
{Danger
High-performance features are intended
for use only on closed tracks by
experienced and qualified drivers and
should not be used on public roads.
High-speed driving, aggressive cornering,
hard braking, and other high-performance
driving can be dangerous. Improper driver
inputs for the conditions may result in
loss of control of the vehicle, which could
injure or kill you or others. Always drive
safely.
Participating in track events or other
competitive driving without following the
instructions provided may affect the vehicle
warranty. See the warranty manual before
using the vehicle for racing or other
competitive driving. See Competitive Driving
Mode 0213.
Page 181 of 338
Chevrolet Corvette Owner Manual (GMNA-Localizing-U.S./Canada/Mexico-
15342622) - 2022 - CRC - 5/4/21
180 Driving and Operating
to be replaced, use GM-approved brake pads.
If this is not done, the brake fade warning
system may not function properly.
Stage 1 :The Driver Information Center (DIC)
displays a “Reduce Braking to Avoid
Overheating” message and brake pedal
effort and travel is increased. When the
message displays, the driver should decrease
brake pedal pressure.
Stage 2 : The Driver Information Center
(DIC) displays a “Brakes Overheated Service
Now” message that the brake fluid
temperature is excessive and is about to
boil. The system increases brake pedal effort
and travel, and will also limit vehicle speed.
The driver should immediately start a cool
down lap if on the track. If this message
displays, take the vehicle to be serviced at
your dealer.
Brake Burnishing
New brake pads must be burnished before
racing or other competitive driving.
Caution
Performing the brake burnish procedure
on a base brake system can result in
brake damage.
Caution
The new vehicle break-in period should be
completed before performing the brake
burnish procedure, otherwise damage
may occur to the powertrain/engine. See
New Vehicle Break-In 0189.
Caution
Brake pedal fade will occur during any
track burnish procedure and can cause
brake pedal travel and force to increase.
This could extend stopping distance until
the brakes are fully burnished.
When this procedure is performed as
instructed, it will not damage the brakes.
The brake pads will smoke and produce an
odor. The braking force and pedal travel
may increase. After the procedure, the brake
pads may appear white at the rotor contact.
Perform this procedure only on dry
pavement, in a safe manner, and in
compliance with all local and state
ordinances/laws regarding motor vehicle
operation. Brake Burnishing Procedure
This brake burnish procedure should only be
run on vehicles with the J55 Z51 factory
equipped brake system.
1. Using the G-Force Gauge in the HUD display, apply the brakes 25 times
starting at 100 km/h (60 mph) to
50 km/h (30 mph) while decelerating at
0.4 g. See Head-Up Display (HUD) 094.
This is a medium brake application. Drive
for at least 1 km (0.6 mi) between
applying the brakes. This first step may
be skipped if there are more than
320 km (200 mi) on the brake pads.
2. Apply the brakes 25 times starting at 100 km/h (60 mph) to 25 km/h (15 mph)
while decelerating at 0.8 g. This is a hard
brake application without activating the
Antilock Brake System (ABS). Drive for at
least 1 km (0.6 mi) between applications.
Depending on conditions, some increase
in brake pedal travel and brake pedal
force may be experienced.
3. Cool down: Drive at 100 km/h (60 mph) for approximately 15 km (10 mi) without
using the brakes.