parking brake CHEVROLET CORVETTE 2022 Owners Manual
[x] Cancel search | Manufacturer: CHEVROLET, Model Year: 2022, Model line: CORVETTE, Model: CHEVROLET CORVETTE 2022Pages: 338, PDF Size: 7.6 MB
Page 6 of 338
Chevrolet Corvette Owner Manual (GMNA-Localizing-U.S./Canada/Mexico-
15342622) - 2022 - CRC - 5/12/21
Introduction 5
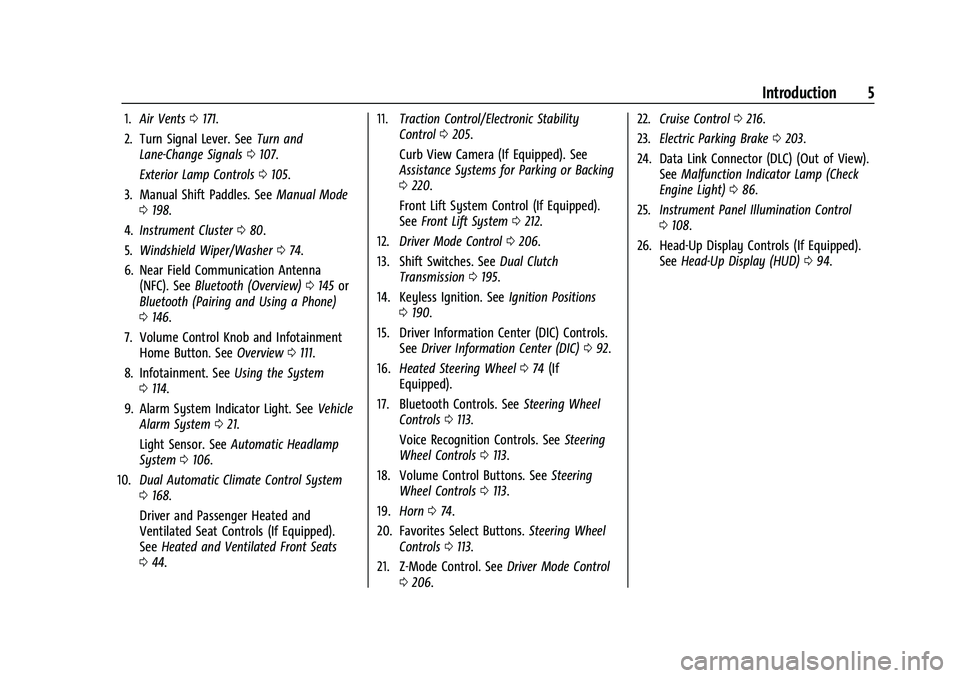
1.Air Vents 0171.
2. Turn Signal Lever. See Turn and
Lane-Change Signals 0107.
Exterior Lamp Controls 0105.
3. Manual Shift Paddles. See Manual Mode
0 198.
4. Instrument Cluster 080.
5. Windshield Wiper/Washer 074.
6. Near Field Communication Antenna (NFC). See Bluetooth (Overview) 0145 or
Bluetooth (Pairing and Using a Phone)
0 146.
7. Volume Control Knob and Infotainment Home Button. See Overview0111.
8. Infotainment. See Using the System
0 114.
9. Alarm System Indicator Light. See Vehicle
Alarm System 021.
Light Sensor. See Automatic Headlamp
System 0106.
10. Dual Automatic Climate Control System
0168.
Driver and Passenger Heated and
Ventilated Seat Controls (If Equipped).
See Heated and Ventilated Front Seats
0 44. 11.
Traction Control/Electronic Stability
Control 0205.
Curb View Camera (If Equipped). See
Assistance Systems for Parking or Backing
0 220.
Front Lift System Control (If Equipped).
See Front Lift System 0212.
12. Driver Mode Control 0206.
13. Shift Switches. See Dual Clutch
Transmission 0195.
14. Keyless Ignition. See Ignition Positions
0 190.
15. Driver Information Center (DIC) Controls. SeeDriver Information Center (DIC) 092.
16. Heated Steering Wheel 074 (If
Equipped).
17. Bluetooth Controls. See Steering Wheel
Controls 0113.
Voice Recognition Controls. See Steering
Wheel Controls 0113.
18. Volume Control Buttons. See Steering
Wheel Controls 0113.
19. Horn 074.
20. Favorites Select Buttons. Steering Wheel
Controls 0113.
21. Z-Mode Control. See Driver Mode Control
0 206. 22.
Cruise Control 0216.
23. Electric Parking Brake 0203.
24. Data Link Connector (DLC) (Out of View). SeeMalfunction Indicator Lamp (Check
Engine Light) 086.
25. Instrument Panel Illumination Control
0108.
26. Head-Up Display Controls (If Equipped). SeeHead-Up Display (HUD) 094.
Page 14 of 338
Chevrolet Corvette Owner Manual (GMNA-Localizing-U.S./Canada/Mexico-
15342622) - 2022 - CRC - 5/4/21
Keys, Doors, and Windows 13
2. The engine will shut off after 15 minutesor after the remainder of the 30 minute
total running time is used, unless you
stop the remote start before engine
running has completed or the ignition is
turned on.
3. Press the brake pedal and turn the ignition on to drive the vehicle.
Total Engine Run Time
Remote start can be used for up to
30 minutes of total engine run time.
After two remote starts of 15 minutes,
or multiple shorter time starts totaling
30 minutes have been used, the vehicle's
ignition must be turned on and then off
before the remote start can be used again.
Canceling a Remote Start
To cancel a remote start, do any of the
following:
.PressS. The parking lamps will turn off.
.Turn on the hazard warning flashers.
.Turn the vehicle on and then back off. Conditions in Which Remote Start Will
Not Work
The remote start will not operate if any of
the following occur:
.The ignition is in any mode other
than off.
.A remote key is in the vehicle.
.The hatch/trunk is not closed.
.The convertible top is not fully open or
closed.
.The tonneau cover is not closed.
.The hazard warning flashers are on.
.There is an emission control system
malfunction.
.The engine coolant temperature is
too high.
.The oil pressure is low.
.The 30 minutes of engine run time have
been used.
.The vehicle is not in P (Park).
Door Locks
{Warning
Unlocked doors can be dangerous.
.Passengers, especially children, can
easily open the doors and fall out of a
moving vehicle. The doors can be
unlocked and opened while the vehicle
is moving. The chance of being thrown
out of the vehicle in a crash is
increased if the doors are not locked.
So, all passengers should wear seat
belts properly and the doors should be
locked whenever the vehicle is driven.
.Young children who get into unlocked
vehicles may be unable to get out.
A child can be overcome by extreme
heat and can suffer permanent injuries
or even death from heat stroke.
Always lock the vehicle whenever
leaving it.
.Outsiders can easily enter through an
unlocked door when you slow down
or stop the vehicle. Locking the doors
can help prevent this from happening.
To lock or unlock a door from the outside,
press
HorIon the remote key.
Page 32 of 338
Chevrolet Corvette Owner Manual (GMNA-Localizing-U.S./Canada/Mexico-
15342622) - 2022 - CRC - 5/4/21
Keys, Doors, and Windows 31
Caution
If a roof panel is dropped or rested on its
edges, the roof panel, paint, and/or
weatherstripping may be damaged.
Always place the roof panel in the
stowage receivers after removing it from
the vehicle.
Caution
Use care when storing and removing the
roof panel. The roof panel pins and
vehicle finish could be damaged if the
roof contacts the rear of the vehicle.
Removing the Roof Panel
{Warning
Do not remove a roof panel while the
vehicle is moving. The panel could fall
into the vehicle and strike an occupant
and cause you to lose control. It could
also fly off and strike another vehicle.
Remove the roof panel only when the
vehicle is parked.
It may be necessary to have help removing
the roof panel. To remove:
1. Shift transmission into P (Park).
2. Turn the ignition off and set the parking brake.
3. Lower both sun visors.
4. Open the rear hatch/trunk and remove any items that may interfere with proper
storage of the roof panel.
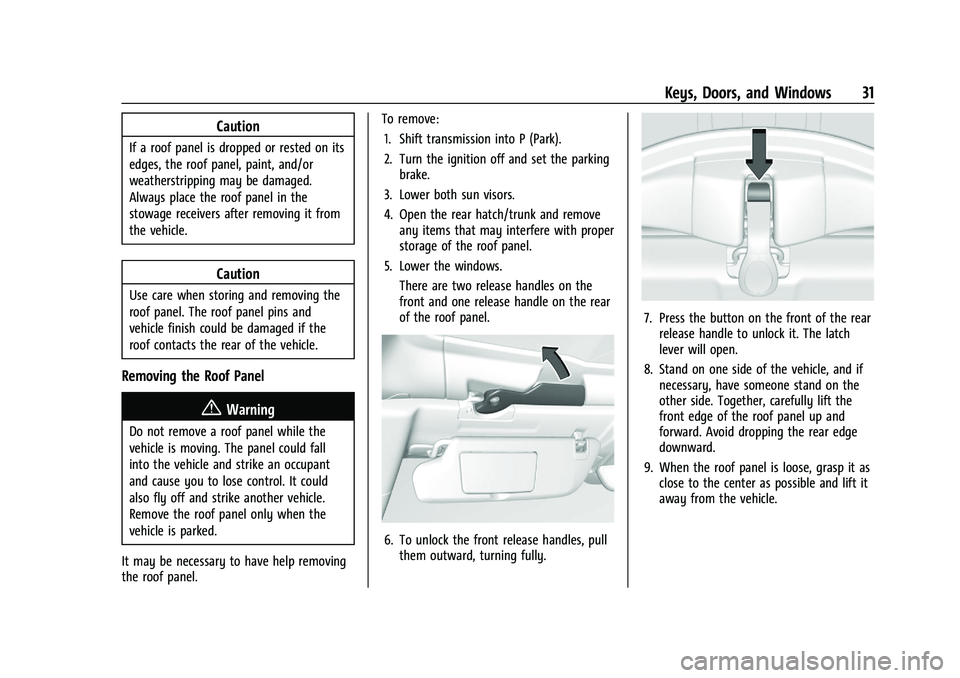
5. Lower the windows. There are two release handles on the
front and one release handle on the rear
of the roof panel.
6. To unlock the front release handles, pullthem outward, turning fully.
7. Press the button on the front of the rearrelease handle to unlock it. The latch
lever will open.
8. Stand on one side of the vehicle, and if necessary, have someone stand on the
other side. Together, carefully lift the
front edge of the roof panel up and
forward. Avoid dropping the rear edge
downward.
9. When the roof panel is loose, grasp it as close to the center as possible and lift it
away from the vehicle.
Page 34 of 338
Chevrolet Corvette Owner Manual (GMNA-Localizing-U.S./Canada/Mexico-
15342622) - 2022 - CRC - 5/4/21
Keys, Doors, and Windows 33
Installing the Roof Panel
{Warning
An improperly attached roof panel may
fall into or fly off the vehicle. You or
others could be injured. After installing
the roof panel, always check that it is
firmly attached by pushing up on the
underside of the panel. Check now and
then to be sure the roof panel is firmly
in place.
Caution
Installing the roof with the release
handles in the closed position could cause
damage to the interior trim. Always
move handles to the open position when
installing the roof.
It is easier if two people install the roof
panel.
To install: 1. Shift transmission into P (Park).
2. Turn the ignition off and set the parking brake. 3. Grasp the roof panel and pull toward the
rear of the vehicle until it separates from
the upper receivers, being careful not to
hit the sides of the trunk. Carefully lift
the roof panel out of the trunk.
4. Carefully place the roof panel over the top of the vehicle.
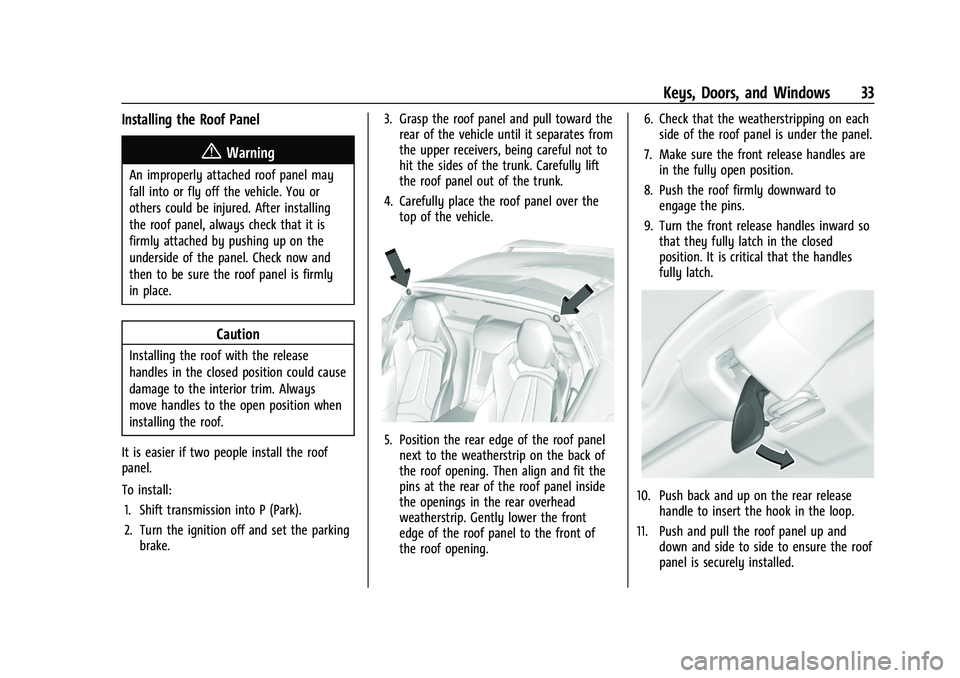
5. Position the rear edge of the roof panelnext to the weatherstrip on the back of
the roof opening. Then align and fit the
pins at the rear of the roof panel inside
the openings in the rear overhead
weatherstrip. Gently lower the front
edge of the roof panel to the front of
the roof opening. 6. Check that the weatherstripping on each
side of the roof panel is under the panel.
7. Make sure the front release handles are in the fully open position.
8. Push the roof firmly downward to engage the pins.
9. Turn the front release handles inward so that they fully latch in the closed
position. It is critical that the handles
fully latch.
10. Push back and up on the rear release handle to insert the hook in the loop.
11. Push and pull the roof panel up and down and side to side to ensure the roof
panel is securely installed.
Page 74 of 338
Chevrolet Corvette Owner Manual (GMNA-Localizing-U.S./Canada/Mexico-
15342622) - 2022 - CRC - 5/4/21
Instruments and Controls 73
Instruments and Controls
Controls
Steering Wheel Adjustment . . . . . . . . . . . . 74
Steering Wheel Controls . . . . . . . . . . . . . . . . 74
Heated Steering Wheel . . . . . . . . . . . . . . . . . 74
Horn . . . . . . . . . . . . . . . . . . . . . . . . . . . . . . . . . . . 74
Windshield Wiper/Washer . . . . . . . . . . . . . . 74
Compass . . . . . . . . . . . . . . . . . . . . . . . . . . . . . . . . 75
Clock . . . . . . . . . . . . . . . . . . . . . . . . . . . . . . . . . . . 75
Power Outlets . . . . . . . . . . . . . . . . . . . . . . . . . . 76
Wireless Charging . . . . . . . . . . . . . . . . . . . . . . 77
Warning Lights, Gauges, and Indicators
Warning Lights, Gauges, andIndicators . . . . . . . . . . . . . . . . . . . . . . . . . . . . . 79
Instrument Cluster . . . . . . . . . . . . . . . . . . . . . 80
Speedometer . . . . . . . . . . . . . . . . . . . . . . . . . . . 83
Odometer . . . . . . . . . . . . . . . . . . . . . . . . . . . . . . 83
Trip Odometer . . . . . . . . . . . . . . . . . . . . . . . . . . 83
Tachometer . . . . . . . . . . . . . . . . . . . . . . . . . . . . 83
Fuel Gauge . . . . . . . . . . . . . . . . . . . . . . . . . . . . . 83
Engine Coolant Temperature Gauge . . . . 84
Transmission Temperature Gauge . . . . . . 84
Seat Belt Reminders . . . . . . . . . . . . . . . . . . . . 84
Airbag Readiness Light . . . . . . . . . . . . . . . . . 85
Passenger Airbag Status Indicator . . . . . . 85
Charging System Light . . . . . . . . . . . . . . . . . 86
Malfunction Indicator Lamp (Check Engine Light) . . . . . . . . . . . . . . . . . . . . . . . . . 86 Front Lift System Light . . . . . . . . . . . . . . . . . 88
Brake System Warning Light . . . . . . . . . . . 88
Electric Parking Brake Light . . . . . . . . . . . . . 89
Service Electric Parking Brake Light . . . . . 89
Antilock Brake System (ABS) Warning
Light . . . . . . . . . . . . . . . . . . . . . . . . . . . . . . . . . 89
Performance Shifting Light . . . . . . . . . . . . . 89
Traction Off Light . . . . . . . . . . . . . . . . . . . . . . 90
Traction Control System (TCS)/Electronic Stability Control Light . . . . . . . . . . . . . . . . 90
Electronic Stability Control (ESC) Off Light . . . . . . . . . . . . . . . . . . . . . . . . . . . . . . . . . 90
Tire Pressure Light . . . . . . . . . . . . . . . . . . . . . . 91
Engine Oil Pressure Light . . . . . . . . . . . . . . . 91
Security Light . . . . . . . . . . . . . . . . . . . . . . . . . . . 91
High-Beam On Light . . . . . . . . . . . . . . . . . . . . 92
Lamps On Reminder . . . . . . . . . . . . . . . . . . . . 92
Cruise Control Light . . . . . . . . . . . . . . . . . . . . 92
Door Ajar Light . . . . . . . . . . . . . . . . . . . . . . . . . 92
Information Displays
Driver Information Center (DIC) . . . . . . . . . 92
Head-Up Display (HUD) . . . . . . . . . . . . . . . . 94
Vehicle Messages
Vehicle Messages . . . . . . . . . . . . . . . . . . . . . . . 97
Engine Power Messages . . . . . . . . . . . . . . . . 98
Vehicle Speed Messages . . . . . . . . . . . . . . . . 98
Vehicle Personalization
Vehicle Personalization . . . . . . . . . . . . . . . . . 98
Universal Remote System
Universal Remote System . . . . . . . . . . . . . 102
Universal Remote System Programming . . . . . . . . . . . . . . . . . . . . . . . . 102
Universal Remote System Operation . . . . . . . . . . . . . . . . . . . . . . . . . . . 104
Page 90 of 338
Chevrolet Corvette Owner Manual (GMNA-Localizing-U.S./Canada/Mexico-
15342622) - 2022 - CRC - 5/4/21
Instruments and Controls 89
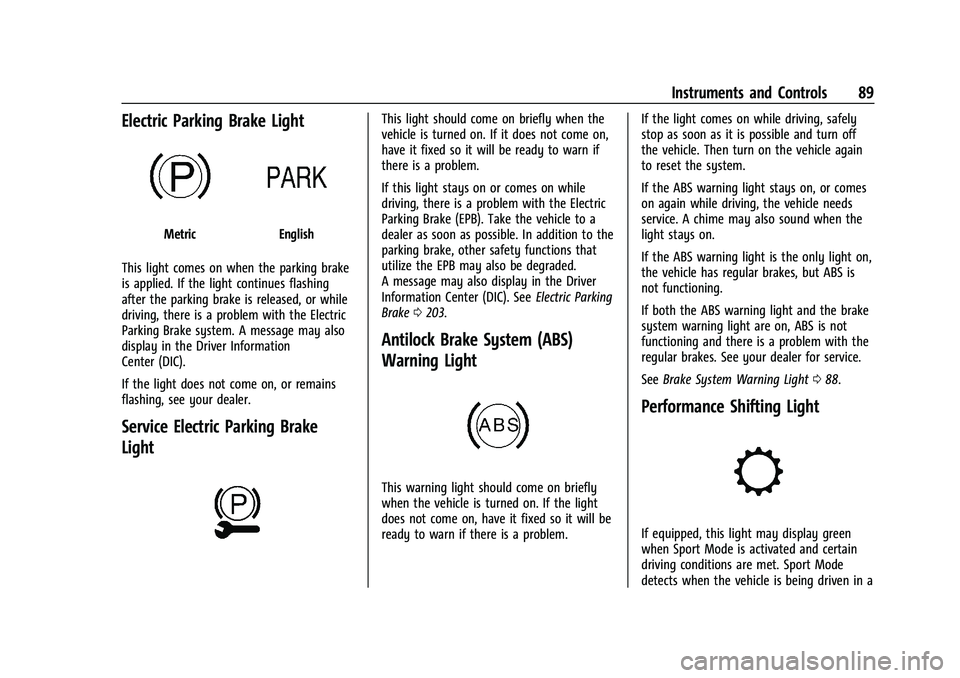
Electric Parking Brake Light
MetricEnglish
This light comes on when the parking brake
is applied. If the light continues flashing
after the parking brake is released, or while
driving, there is a problem with the Electric
Parking Brake system. A message may also
display in the Driver Information
Center (DIC).
If the light does not come on, or remains
flashing, see your dealer.
Service Electric Parking Brake
Light
This light should come on briefly when the
vehicle is turned on. If it does not come on,
have it fixed so it will be ready to warn if
there is a problem.
If this light stays on or comes on while
driving, there is a problem with the Electric
Parking Brake (EPB). Take the vehicle to a
dealer as soon as possible. In addition to the
parking brake, other safety functions that
utilize the EPB may also be degraded.
A message may also display in the Driver
Information Center (DIC). See Electric Parking
Brake 0203.
Antilock Brake System (ABS)
Warning Light
This warning light should come on briefly
when the vehicle is turned on. If the light
does not come on, have it fixed so it will be
ready to warn if there is a problem. If the light comes on while driving, safely
stop as soon as it is possible and turn off
the vehicle. Then turn on the vehicle again
to reset the system.
If the ABS warning light stays on, or comes
on again while driving, the vehicle needs
service. A chime may also sound when the
light stays on.
If the ABS warning light is the only light on,
the vehicle has regular brakes, but ABS is
not functioning.
If both the ABS warning light and the brake
system warning light are on, ABS is not
functioning and there is a problem with the
regular brakes. See your dealer for service.
See
Brake System Warning Light 088.
Performance Shifting Light
If equipped, this light may display green
when Sport Mode is activated and certain
driving conditions are met. Sport Mode
detects when the vehicle is being driven in a
Page 159 of 338
Chevrolet Corvette Owner Manual (GMNA-Localizing-U.S./Canada/Mexico-
15342622) - 2022 - CRC - 5/4/21
158 Infotainment System
2. Create a Personal Identification Number(PIN) by choosing a four-digit PIN.
Re-enter the PIN to confirm. To change
the PIN, touch Change PIN.
The PIN is required to:
.Register or unregister keys.
.Change Teen Driver settings.
.Change or clear the Teen Driver PIN.
.Access or delete Report Card data.
Register keys to activate Teen Driver and
assign restrictions to the key:
Any vehicle key can be registered, up to a
maximum of eight keys. Label the key to
tell it apart from the other keys.
For a pushbutton start system: 1. Start the engine.
2. For automatic transmissions, the vehicle must be in P (Park). For manual
transmissions, the vehicle must be
stopped with the parking brake set.
3. From the Settings menu, touch Vehicle and then Teen Driver.
4. Enter the PIN. 5. Place the remote key you wish to
register in the transmitter pocket. The
key does not need to be the one that
started the vehicle. See Remote Keyless
Entry (RKE) System Operation 07for
transmitter pocket location.
6. From the Teen Driver menu, touch Setup Keys..If the remote key has not previously
been registered, the option to add
the key displays. Touch Setup and a
confirmation message displays. Teen
Driver restrictions will be applied
whenever this key is used to operate
the vehicle.
.If the remote key has already been
registered, the option to remove the
key displays. If Remove is touched,
the remote key is no longer
registered. A confirmation message
displays, and Teen Driver restrictions
will not be applied if this remote key
is used to operate the vehicle.
In vehicles with a pushbutton start system,
if a Teen Driver and a non-Teen Driver key
are both present at start up, the vehicle will
recognize the non-Teen Driver key to start
the vehicle. The Teen Driver settings will not
be active. Manage Settings
Buckle To Drive :
When turned ON, Buckle
to Drive prevents the driver from shifting
out of P (Park) for a period of time if driver
seat belt, and on some vehicles, the
passenger seat belt, is not buckled. See
Buckle To Drive 046 and
Vehicle Personalization 098.
Audio Volume Limit : Allows the audio
volume limit to be turned on or off. Touch
Set Audio Volume Limit to choose the
maximum allowable audio volume level.
Set Audio Volume Limit : Allows a
maximum radio volume to be set. Use the
arrows to choose the maximum allowable
level for the audio volume.
Teen Driver Speed Limiter : Limits the
maximum speed of the vehicle. When the
speed limiter is turned on and the vehicle is
started with a Teen Driver key, the DIC
displays a message that the top speed is
limited.
On certain vehicles, when the Speed Limiter
is turned ON, the vehicle’s maximum
acceleration will be limited. The DIC will
display a message that the acceleration is
limited.
Page 174 of 338
Chevrolet Corvette Owner Manual (GMNA-Localizing-U.S./Canada/Mexico-
15342622) - 2022 - CRC - 5/4/21
Driving and Operating 173
Driving and Operating
Driving Information
Driving for Better Fuel Economy . . . . . . . 174
Distracted Driving . . . . . . . . . . . . . . . . . . . . . 174
Defensive Driving . . . . . . . . . . . . . . . . . . . . . . 175
Impaired Driving . . . . . . . . . . . . . . . . . . . . . . . 175
Control of a Vehicle . . . . . . . . . . . . . . . . . . . . 175
Braking . . . . . . . . . . . . . . . . . . . . . . . . . . . . . . . . 175
Steering . . . . . . . . . . . . . . . . . . . . . . . . . . . . . . . 175
Off-Road Recovery . . . . . . . . . . . . . . . . . . . . . 176
Loss of Control . . . . . . . . . . . . . . . . . . . . . . . . . 177
Track Events and CompetitiveDriving . . . . . . . . . . . . . . . . . . . . . . . . . . . . . . . 177
Driving on Wet Roads . . . . . . . . . . . . . . . . . 183
Hill and Mountain Roads . . . . . . . . . . . . . . 184
Winter Driving . . . . . . . . . . . . . . . . . . . . . . . . . 185
If the Vehicle Is Stuck . . . . . . . . . . . . . . . . . 186
Vehicle Load Limits . . . . . . . . . . . . . . . . . . . . 186
Starting and Operating
New Vehicle Break-In . . . . . . . . . . . . . . . . . . 189
Front Air Dam (and Splitter) . . . . . . . . . . . 190
Composite Materials . . . . . . . . . . . . . . . . . . 190
Ignition Positions . . . . . . . . . . . . . . . . . . . . . . 190
Starting the Engine . . . . . . . . . . . . . . . . . . . . 192
Retained Accessory Power (RAP) . . . . . . . 193
Shifting Into Park . . . . . . . . . . . . . . . . . . . . . . 193
Shifting out of Park . . . . . . . . . . . . . . . . . . . 194
Parking over Things That Burn . . . . . . . . 194 Active Fuel Management . . . . . . . . . . . . . . 194
Extended Parking . . . . . . . . . . . . . . . . . . . . . . 194
Engine Exhaust
Engine Exhaust . . . . . . . . . . . . . . . . . . . . . . . . 195
Running the Vehicle While Parked . . . . . 195
Dual Clutch Transmission
Dual Clutch Transmission . . . . . . . . . . . . . . 195
Manual Mode . . . . . . . . . . . . . . . . . . . . . . . . . 198
Brakes
Electric Brake Boost . . . . . . . . . . . . . . . . . . . 202
Antilock Brake System (ABS) . . . . . . . . . . 202
Electric Parking Brake . . . . . . . . . . . . . . . . . 203
Brake Assist . . . . . . . . . . . . . . . . . . . . . . . . . . . 204
Hill Start Assist (HSA) . . . . . . . . . . . . . . . . . 204
Ride Control Systems
Traction Control/Electronic Stability
Control . . . . . . . . . . . . . . . . . . . . . . . . . . . . . . 205
Hill Rollback Control . . . . . . . . . . . . . . . . . . 206
Driver Mode Control . . . . . . . . . . . . . . . . . . 206
Front Lift System . . . . . . . . . . . . . . . . . . . . . . 212
Competitive Driving Mode . . . . . . . . . . . . . 213
Limited-Slip Differential (Without Z51) . . . . . . . . . . . . . . . . . . . . . . . . 216
Limited-Slip Differential (With Z51) . . . . . 216
Cruise Control
Cruise Control . . . . . . . . . . . . . . . . . . . . . . . . . 216
Driver Assistance Systems
Driver Assistance Systems . . . . . . . . . . . . . 218
Assistance Systems for Parking or Backing . . . . . . . . . . . . . . . . . . . . . . . . . . . . . . 220
Rear Vision Camera (RVC) . . . . . . . . . . . . . 220
Curb View Camera . . . . . . . . . . . . . . . . . . . . . 221
Park Assist . . . . . . . . . . . . . . . . . . . . . . . . . . . . . 222
Rear Cross Traffic Alert (RCTA) System . . . . . . . . . . . . . . . . . . . . . . . . . . . . . . 222
Side Blind Zone Alert (SBZA) . . . . . . . . . . . 222
Fuel
Top Tier Fuel . . . . . . . . . . . . . . . . . . . . . . . . . . 224
Recommended Fuel . . . . . . . . . . . . . . . . . . . . 224
Prohibited Fuels . . . . . . . . . . . . . . . . . . . . . . . 224
Fuels in Foreign Countries . . . . . . . . . . . . . 225
Fuel Additives . . . . . . . . . . . . . . . . . . . . . . . . . 225
Filling the Tank . . . . . . . . . . . . . . . . . . . . . . . . 225
Filling a Portable Fuel Container . . . . . . . 226
Trailer Towing
General Towing Information . . . . . . . . . . . 227
Conversions and Add-Ons
Add-On Electrical Equipment . . . . . . . . . . . 227
Page 176 of 338
Chevrolet Corvette Owner Manual (GMNA-Localizing-U.S./Canada/Mexico-
15342622) - 2022 - CRC - 5/4/21
Driving and Operating 175
Refer to the infotainment section for more
information on using that system and the
navigation system, if equipped, including
pairing and using a cell phone.
Defensive Driving
Defensive driving means“always expect the
unexpected.” The first step in driving
defensively is to wear the seat belt. See
Seat Belts 045.
.Assume that other road users
(pedestrians, bicyclists, and other drivers)
are going to be careless and make
mistakes. Anticipate what they may do
and be ready.
.Allow enough following distance between
you and the driver in front of you.
.Focus on the task of driving.
Impaired Driving
Death and injury associated with impaired
driving is a global tragedy.
{Warning
Drinking alcohol or taking drugs and then
driving is very dangerous. Your reflexes,
perceptions, attentiveness, and judgment
(Continued)
Warning (Continued)
can be affected by even a small amount
of alcohol or drugs. You can have a
serious—or even fatal —collision if you
drive after drinking or taking drugs.
Do not drive while under the influence of
alcohol or drugs, or ride with a driver
who has been drinking or is impaired by
drugs. Find alternate transportation
home; or if you are with a group,
designate a driver who will remain sober.
Control of a Vehicle
Braking, steering, and accelerating are
important factors in helping to control a
vehicle while driving.
Braking
Braking action involves perception time and
reaction time. Deciding to push the brake
pedal is perception time. Actually doing it is
reaction time.
Average driver reaction time is about
three-quarters of a second. In that time, a
vehicle moving at 100 km/h (60 mph) travels
20 m (66 ft), which could be a lot of
distance in an emergency. Helpful braking tips to keep in mind include:
.Keep enough distance between you and
the vehicle in front of you.
.Avoid needless heavy braking.
.Keep pace with traffic.
If the engine ever stops or a brake fault
occurs, the brakes may lose power assist.
More effort will be required to stop the
vehicle. It may take longer to stop.
Steering
Caution
To avoid damage to the steering system,
do not drive over curbs, parking barriers,
or similar objects at speeds greater than
3 km/h (1 mph). Use care when driving
over other objects such as lane dividers
and speed bumps. Damage caused by
misuse of the vehicle is not covered by
the vehicle warranty.
Page 192 of 338
Chevrolet Corvette Owner Manual (GMNA-Localizing-U.S./Canada/Mexico-
15342622) - 2022 - CRC - 5/4/21
Driving and Operating 191
Stopping the Engine/OFF (No Indicator
Lights) :When the vehicle is stopped, press
ENGINE START/STOP once to turn the
engine off.
If the vehicle is in P (Park), the ignition will
turn off, and Retained Accessory Power (RAP)
will remain active. See Retained Accessory
Power (RAP) 0193.
If the vehicle is in R (Reverse), D (Drive),
or M (Manual Mode), the vehicle will shift
to P (Park), the ignition will turn off, and
RAP will remain active.
If the vehicle is in N (Neutral), the ignition
will return to ACC/ACCESSORY and display
the message SHIFT TO PARK in the Driver
Information Center (DIC). When the vehicle
is shifted into P (Park), the ignition will
turn off.
Do not turn the engine off when the vehicle
is moving. This will cause a loss of power
assist in the brake and steering systems and
disable the airbags.
If the vehicle must be turned off in an
emergency: 1. Brake using a firm and steady pressure. Do not pump the brakes repeatedly. This
may deplete power assist, requiring
increased brake pedal force. 2. Shift into N (Neutral). This can be done
while the vehicle is moving. After
shifting into N (Neutral), firmly apply the
brakes and steer the vehicle to a safe
location.
3. Come to a complete stop. Shift into P (Park).
4. Set the parking brake. See Electric
Parking Brake 0203. Press ENGINE
START/STOP to turn the vehicle off.
{Warning
Turning off the vehicle while moving may
cause loss of power assist in the brake
and steering systems and disable the
airbags. While driving, only shut the
vehicle off in an emergency.
If the vehicle cannot be pulled over and
must be turned off while driving, press and
hold ENGINE START/STOP for more than
two seconds, or press twice within
five seconds.
ACC/ACCESSORY (Amber Indicator Light) :
This mode allows the use of some electrical
accessories when the engine is off. With the ignition off, pressing the button
one time without the brake pedal applied
will place the ignition in ACC/ACCESSORY.
The ignition will switch from ACC/
ACCESSORY to off after five minutes to
prevent battery rundown.
ON/RUN/START (Green Indicator Light) :
This
mode is for driving and starting. With the
ignition off and the brake pedal applied,
pressing the button once will place the
ignition in ON/RUN/START. Once engine
cranking begins, release the button. Engine
cranking will continue until the engine
starts. See Starting the Engine 0192. The
ignition will then remain in ON/RUN.
Service Mode
This power mode is available for service and
diagnostics, and to verify the proper
operation of the malfunction indicator lamp
as may be required for emission inspection
purposes. With the vehicle off and the brake
pedal not applied, pressing and holding
ENGINE START/STOP for more than
five seconds will place the vehicle in Service
Mode. The instruments and audio systems
will operate as they do in ON/RUN, but the
vehicle will not be able to be driven. The