maintenance CHEVROLET CORVETTE 2023 Owner's Manual
[x] Cancel search | Manufacturer: CHEVROLET, Model Year: 2023, Model line: CORVETTE, Model: CHEVROLET CORVETTE 2023Pages: 351, PDF Size: 6.28 MB
Page 251 of 351
Chevrolet Corvette Owner Manual (GMNA-Localizing-U.S./Canada/Mexico-
16287457) - 2023 - CRC - 3/10/22
250 Vehicle Care
When to Replace the Dual Clutch
Transmission Fluid Filter
This vehicle has a computer that indicates
when to change the transmission external
canister fluid filter. This is based on the
number of miles driven as outlined in the
Service and Maintenance section. For the
fluid filter life system to work properly, the
system must be reset every time the filter is
replaced. When the system has calculated
that the external canister filter is near the
mileage interval, a REPLACE TRANSMISSION
OIL FILTER SOON message comes on. Replace
the external canister filter before the
indicator reaches 0%.
Failure to replace the transmission filter at
required intervals could lead to suboptimal
transmission performance. Your dealer has
trained service technicians who will replace
the external canister filter and reset the
system. If the system is ever reset
accidentally, the filter should be replaced
according to the service intervals indicated
in the Service and Maintenance section until
the next filter change. If the next filter
change is the first, follow the service
interval until the second filter change,
resetting the filter life system at each filter
change.
How to Reset the Dual Clutch
Transmission Fluid and Filter Life System
Reset the respective system whenever the
transmission fluid or external canister filter
is replaced so that the system can calculate
the next service interval.
To reset:1. Place the vehicle in P (Park).
2. Select Transmission Fluid Life or Transmission Oil Filter Life on the DIC
menu. See Driver Information Center
(DIC) 092.
3. Press the thumbwheel to move to the Reset submenu. Select Reset
Transmission Fluid or Reset Transmission
Oil Filter. A confirmation page will be
displayed, press the thumbwheel again
to confirm the reset.
4. When the Transmission Fluid/Filter Life System is successfully reset, 100%
remaining life will be displayed.
Engine Air Filter Life System
If equipped, this feature provides the engine
air filter’s remaining life and best timing for
a change. The timing to change an engine
air filter depends on driving and
environmental conditions.
When to Change Engine Air Filter
When the Driver Information Center (DIC)
displays a message to replace the engine air
filter at the next oil change, follow this
timing.
When the DIC displays a message to replace
the engine air filter soon, replace the engine
air filter at the earliest convenience.
The system must be reset after the engine
air filter is changed.
If the DIC displays a message to check the
engine air filter system, see your dealer.
How to Reset Engine Air Filter Life
System
Reset the system whenever the engine air
filter is replaced so that the system can
calculate the next engine air filter change.
To reset:
1. Place the vehicle in P (Park).
2. Display the Air Filter Life on the DIC. See Driver Information Center (DIC) 092.
3. Press the thumbwheel on the steering wheel to move to the Reset/Disable
display area. Select Reset and press the
thumbwheel for several seconds.
4. Press the thumbwheel to confirm reset.
Page 252 of 351
Chevrolet Corvette Owner Manual (GMNA-Localizing-U.S./Canada/Mexico-
16287457) - 2023 - CRC - 3/10/22
Vehicle Care 251
Engine Air Cleaner/Filter
SeeEngine Compartment Overview 0235 for
the location of the engine air cleaner/filter.
Caution
If water is sprayed and enters the engine
air cleaner/filter intake and housing, the
engine could be damaged. The repairs
would not be covered by the vehicle
warranty.
When to Inspect the Engine Air Cleaner/Filter
For intervals on changing and inspecting the
engine air cleaner/filter, see Maintenance
Schedule 0306.
How to Inspect/Replace the Engine Air
Cleaner/Filter
Do not start the engine or have the engine
running with the engine air cleaner/filter
housing open. Before removing the engine
air cleaner/filter, make sure that the engine
air cleaner/filter housing and nearby
components are free of dirt and debris. Do
not clean the engine air cleaner/filter or
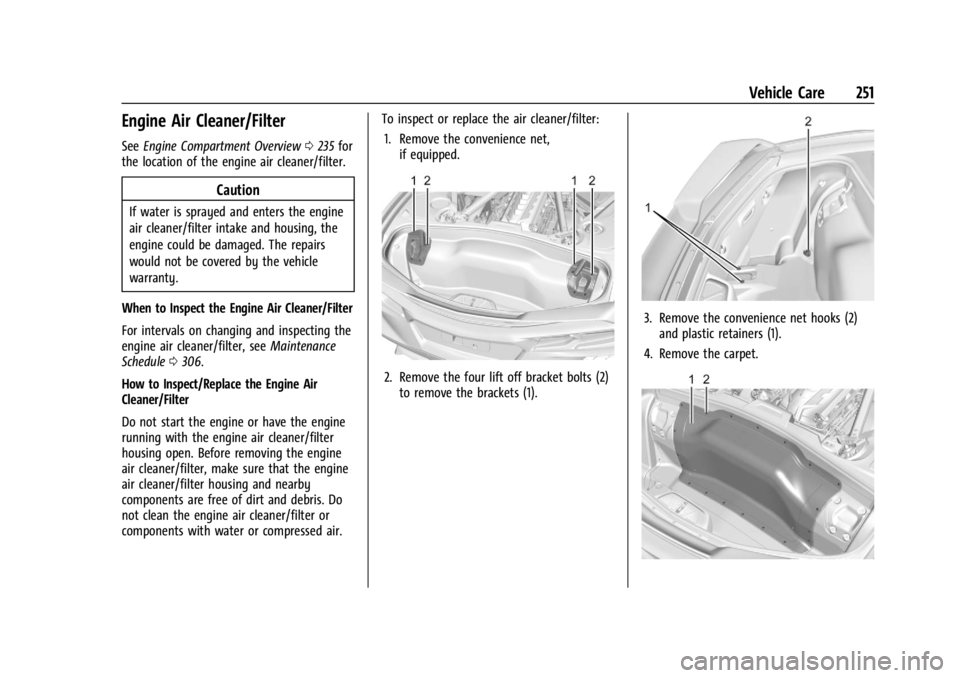
components with water or compressed air. To inspect or replace the air cleaner/filter:
1. Remove the convenience net, if equipped.
2. Remove the four lift off bracket bolts (2)to remove the brackets (1).
3. Remove the convenience net hooks (2)and plastic retainers (1).
4. Remove the carpet.
Page 254 of 351
Chevrolet Corvette Owner Manual (GMNA-Localizing-U.S./Canada/Mexico-
16287457) - 2023 - CRC - 3/10/22
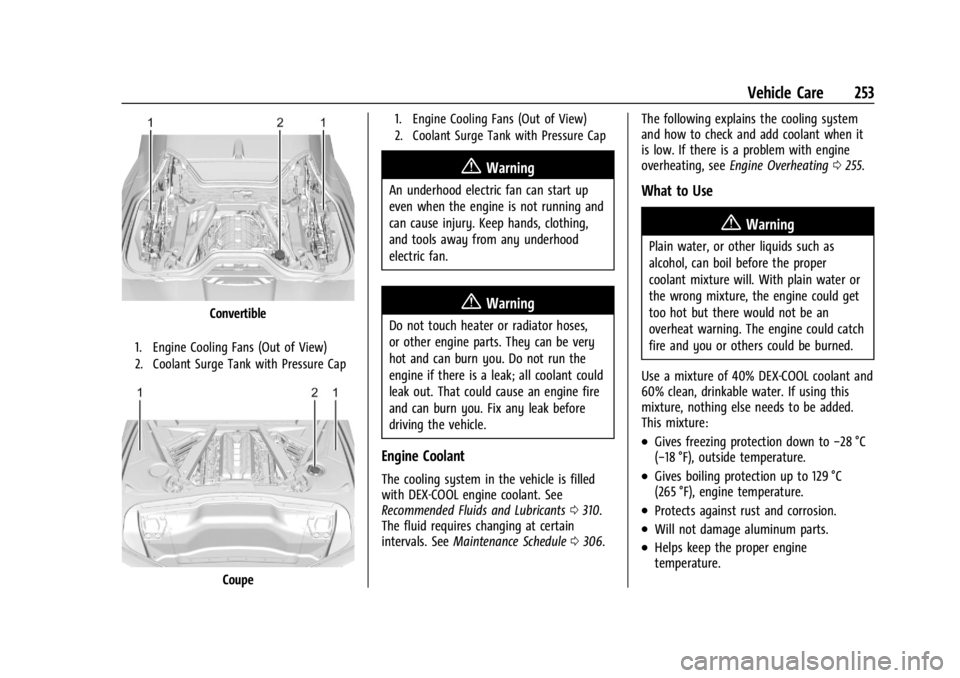
Vehicle Care 253
Convertible
1. Engine Cooling Fans (Out of View)
2. Coolant Surge Tank with Pressure Cap
Coupe
1. Engine Cooling Fans (Out of View)
2. Coolant Surge Tank with Pressure Cap
{Warning
An underhood electric fan can start up
even when the engine is not running and
can cause injury. Keep hands, clothing,
and tools away from any underhood
electric fan.
{Warning
Do not touch heater or radiator hoses,
or other engine parts. They can be very
hot and can burn you. Do not run the
engine if there is a leak; all coolant could
leak out. That could cause an engine fire
and can burn you. Fix any leak before
driving the vehicle.
Engine Coolant
The cooling system in the vehicle is filled
with DEX-COOL engine coolant. See
Recommended Fluids and Lubricants0310.
The fluid requires changing at certain
intervals. See Maintenance Schedule 0306. The following explains the cooling system
and how to check and add coolant when it
is low. If there is a problem with engine
overheating, see
Engine Overheating 0255.
What to Use
{Warning
Plain water, or other liquids such as
alcohol, can boil before the proper
coolant mixture will. With plain water or
the wrong mixture, the engine could get
too hot but there would not be an
overheat warning. The engine could catch
fire and you or others could be burned.
Use a mixture of 40% DEX-COOL coolant and
60% clean, drinkable water. If using this
mixture, nothing else needs to be added.
This mixture:
.Gives freezing protection down to −28 °C
(−18 °F), outside temperature.
.Gives boiling protection up to 129 °C
(265 °F), engine temperature.
.Protects against rust and corrosion.
.Will not damage aluminum parts.
.Helps keep the proper engine
temperature.
Page 259 of 351
Chevrolet Corvette Owner Manual (GMNA-Localizing-U.S./Canada/Mexico-
16287457) - 2023 - CRC - 3/10/22
258 Vehicle Care
To help reduce squeal, the brake pads are
treated with an anti-squeal paste that may
need to be reapplied periodically as part of
normal vehicle maintenance. The anti-squeal
paste will dissipate over time. Also, the use
of wheel cleaners or power washers directly
on the brake calipers may remove the
anti-squeal paste from the brake pads.
It may be necessary to reapply the
anti-squeal paste if it is removed during
cleaning.
If brake squeal is excessive, the anti-squeal
paste should be reapplied. The anti-squeal
paste should always be reapplied whenever
the brake pads are removed or replaced. See
your dealer for service.
Brake Pedal Travel
See your dealer if the brake pedal does not
return to normal height, or if there is a
rapid increase in pedal travel. This could be
a sign that brake service may be required.
Replacing Brake System Parts
Always replace brake system parts with
new, approved replacement parts. If this is
not done, the brakes may not work
properly. The braking performance canchange in many ways if the wrong brake
parts are installed or if parts are improperly
installed.
The Brake Fade Warning Assist system is
designed for use with the factory-installed
brake pads or GM-approved replacement
pads. If the brake pads on the vehicle need
to be replaced, use GM-approved brake pads.
If this is not done, the brake fade warning
system may not function properly.
High Performance Brake Lining Car Wash
and Extended Parking Care
If equipped with high performance brake
components, binding or clunking may be
noticeable after extended parking or in cold
weather when the brakes have been wet,
such as when driving in the rain or after a
car wash. The clunking is normal for brakes
with high performance brake linings and
does not affect the operation of the brakes.
When driving, normal braking will allow for
the brakes to feel smooth and the clunking
to go away. If the vehicle is washed before
overnight parking or long term storage,
drive it and apply the brakes several times
to thoroughly dry the brakes
Brake Rotor Wear (Z06/Z07 with J57
Carbon Ceramic Rotors)
Vehicles with J57 have carbon ceramic brake
rotors. The rotors should be visually
inspected whenever the brake pads are
replaced. Carbon ceramic brake rotors also
need to be weighed before brake pads are
replaced to confirm that the rotor mass is
greater than the wear-out mass printed on
the rotor. The rotor can be reused if the
weight of the rotor is above the mass limit.
Carbon ceramic brake rotors inspection and
weighing methods can be found in the
service manual.
Z51/Z06 Cast Iron Rotor System Brake
Burnish Procedure for Corrosion Cleanup
Corrosion spotting and grooving on the
brake rotor surface may appear after the
vehicle sits for an extended period of time,
especially in high humidity. This corrosion
may result in brake pulsation and noise. To
help restore optimal braking performance
and reduce noise, complete the following
procedure:
Page 262 of 351
Chevrolet Corvette Owner Manual (GMNA-Localizing-U.S./Canada/Mexico-
16287457) - 2023 - CRC - 3/10/22
Vehicle Care 261
Always clean the brake fluid reservoir cap
and the area around the cap before
removing it.
Do not top off the brake fluid. Adding fluid
does not correct a leak. If fluid is added
when the linings are worn, there will be too
much fluid when new brake linings are
installed. Add or remove fluid, as necessary,
only when work is done on the brake
hydraulic system.
Caution
If too much brake fluid is added, the
brake fluid can spill and cause vehicle
damage, including damage to electrical
components and surfaces. Add brake fluid
only when work is done on the brake
hydraulic system.
When the brake fluid falls to a low level,
the brake warning light comes on. See Brake
System Warning Light 087.
Brake fluid absorbs water over time which
degrades the effectiveness of the brake fluid.
Replace brake fluid at the specified intervals
to prevent increased stopping distance. See
Maintenance Schedule 0306. What to Add
Use only GM approved DOT 4 brake fluid
from a clean, sealed container. See
Recommended Fluids and Lubricants
0310.
{Warning
The wrong or contaminated brake fluid
could result in damage to the brake
system. This could result in the loss of
braking leading to a possible injury.
Always use the proper GM approved
brake fluid.
Caution
If brake fluid is spilled on the vehicle's
painted surfaces, the paint finish can be
damaged. Immediately wash off any
painted surface.
Battery - North America
The original equipment battery is
maintenance free. Do not remove the cap
and do not add fluid.
Refer to the replacement number on the
original battery label when a new battery is
needed. For battery replacement, see your
dealer.
{Warning
WARNING: Battery posts, terminals and
related accessories can expose you to
chemicals including lead and lead
compounds, which are known to the
State of California to cause cancer and
birth defects or other reproductive harm.
Wash hands after handling. For more
information go to
www.P65Warnings.ca.gov.
See California Proposition 65 Warning 01.
Vehicle Storage
{Warning
Batteries have acid that can burn you and
gas that can explode. You can be badly
hurt if you are not careful. Always wear
eye protection. See Jump Starting - North
America 0290 for tips on working
around a battery without getting hurt.
Page 263 of 351
Chevrolet Corvette Owner Manual (GMNA-Localizing-U.S./Canada/Mexico-
16287457) - 2023 - CRC - 3/10/22
262 Vehicle Care
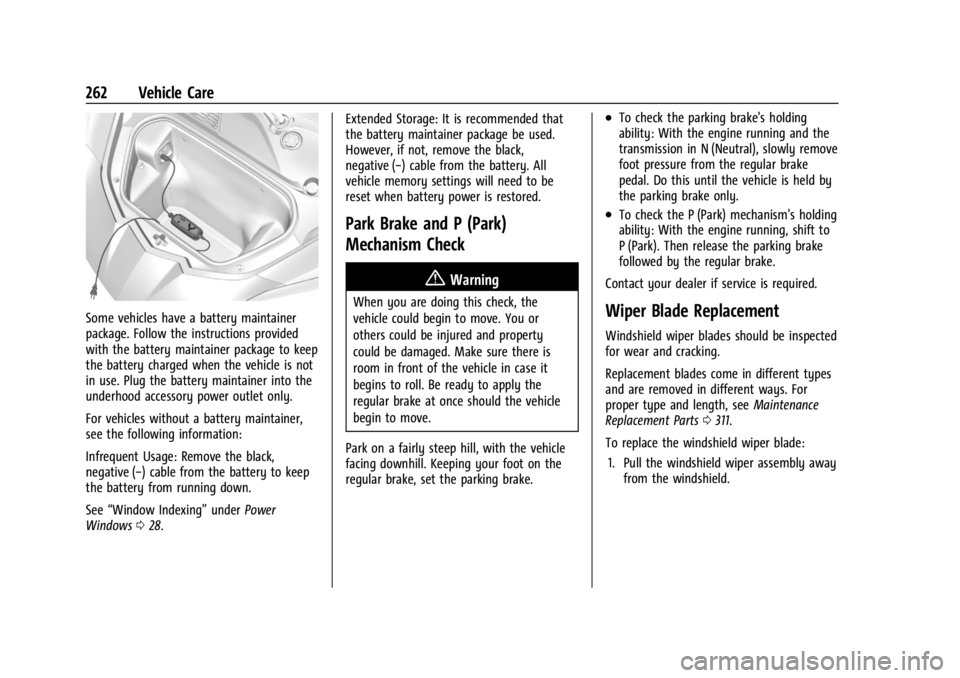
Some vehicles have a battery maintainer
package. Follow the instructions provided
with the battery maintainer package to keep
the battery charged when the vehicle is not
in use. Plug the battery maintainer into the
underhood accessory power outlet only.
For vehicles without a battery maintainer,
see the following information:
Infrequent Usage: Remove the black,
negative (−) cable from the battery to keep
the battery from running down.
See“Window Indexing” underPower
Windows 028. Extended Storage: It is recommended that
the battery maintainer package be used.
However, if not, remove the black,
negative (−) cable from the battery. All
vehicle memory settings will need to be
reset when battery power is restored.
Park Brake and P (Park)
Mechanism Check
{Warning
When you are doing this check, the
vehicle could begin to move. You or
others could be injured and property
could be damaged. Make sure there is
room in front of the vehicle in case it
begins to roll. Be ready to apply the
regular brake at once should the vehicle
begin to move.
Park on a fairly steep hill, with the vehicle
facing downhill. Keeping your foot on the
regular brake, set the parking brake.
.To check the parking brake's holding
ability: With the engine running and the
transmission in N (Neutral), slowly remove
foot pressure from the regular brake
pedal. Do this until the vehicle is held by
the parking brake only.
.To check the P (Park) mechanism's holding
ability: With the engine running, shift to
P (Park). Then release the parking brake
followed by the regular brake.
Contact your dealer if service is required.
Wiper Blade Replacement
Windshield wiper blades should be inspected
for wear and cracking.
Replacement blades come in different types
and are removed in different ways. For
proper type and length, see Maintenance
Replacement Parts 0311.
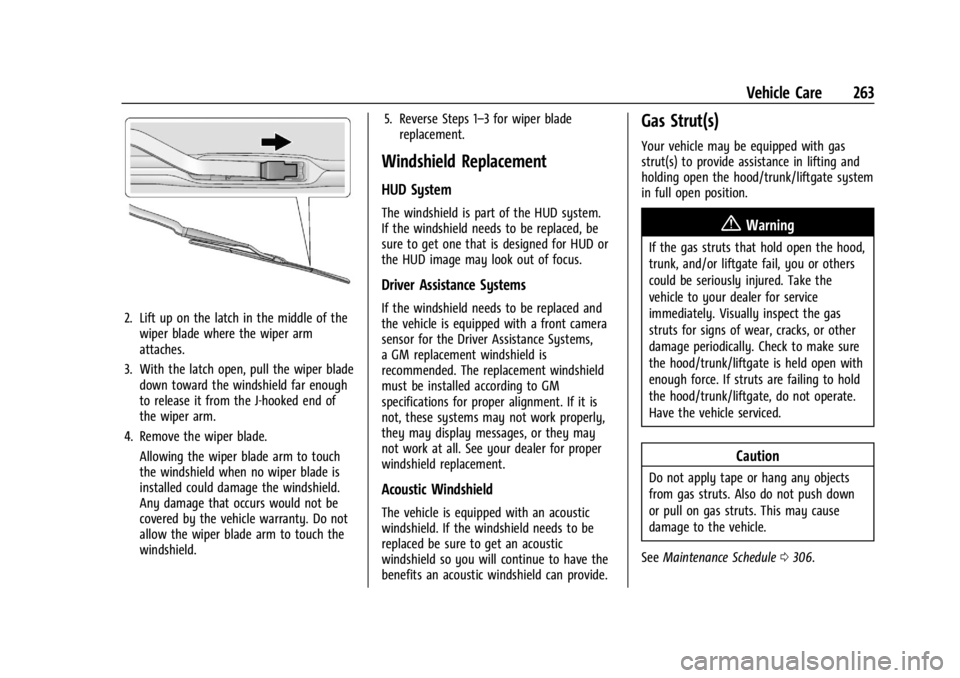
To replace the windshield wiper blade: 1. Pull the windshield wiper assembly away from the windshield.
Page 264 of 351
Chevrolet Corvette Owner Manual (GMNA-Localizing-U.S./Canada/Mexico-
16287457) - 2023 - CRC - 3/10/22
Vehicle Care 263
2. Lift up on the latch in the middle of thewiper blade where the wiper arm
attaches.
3. With the latch open, pull the wiper blade down toward the windshield far enough
to release it from the J-hooked end of
the wiper arm.
4. Remove the wiper blade. Allowing the wiper blade arm to touch
the windshield when no wiper blade is
installed could damage the windshield.
Any damage that occurs would not be
covered by the vehicle warranty. Do not
allow the wiper blade arm to touch the
windshield. 5. Reverse Steps 1–3 for wiper blade
replacement.
Windshield Replacement
HUD System
The windshield is part of the HUD system.
If the windshield needs to be replaced, be
sure to get one that is designed for HUD or
the HUD image may look out of focus.
Driver Assistance Systems
If the windshield needs to be replaced and
the vehicle is equipped with a front camera
sensor for the Driver Assistance Systems,
a GM replacement windshield is
recommended. The replacement windshield
must be installed according to GM
specifications for proper alignment. If it is
not, these systems may not work properly,
they may display messages, or they may
not work at all. See your dealer for proper
windshield replacement.
Acoustic Windshield
The vehicle is equipped with an acoustic
windshield. If the windshield needs to be
replaced be sure to get an acoustic
windshield so you will continue to have the
benefits an acoustic windshield can provide.
Gas Strut(s)
Your vehicle may be equipped with gas
strut(s) to provide assistance in lifting and
holding open the hood/trunk/liftgate system
in full open position.
{Warning
If the gas struts that hold open the hood,
trunk, and/or liftgate fail, you or others
could be seriously injured. Take the
vehicle to your dealer for service
immediately. Visually inspect the gas
struts for signs of wear, cracks, or other
damage periodically. Check to make sure
the hood/trunk/liftgate is held open with
enough force. If struts are failing to hold
the hood/trunk/liftgate, do not operate.
Have the vehicle serviced.
Caution
Do not apply tape or hang any objects
from gas struts. Also do not push down
or pull on gas struts. This may cause
damage to the vehicle.
See Maintenance Schedule 0306.
Page 281 of 351
Chevrolet Corvette Owner Manual (GMNA-Localizing-U.S./Canada/Mexico-
16287457) - 2023 - CRC - 3/10/22
280 Vehicle Care
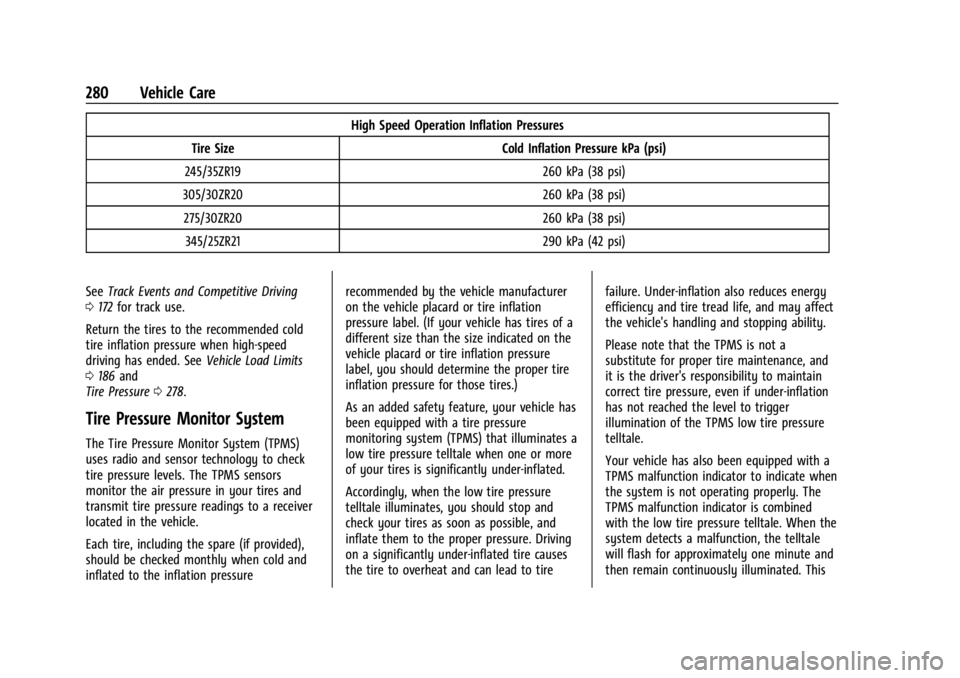
High Speed Operation Inflation Pressures
Tire Size Cold Inflation Pressure kPa (psi)
245/35ZR19 260 kPa (38 psi)
305/30ZR20 260 kPa (38 psi) 275/30ZR20 260 kPa (38 psi) 345/25ZR21 290 kPa (42 psi)
See Track Events and Competitive Driving
0 172 for track use.
Return the tires to the recommended cold
tire inflation pressure when high-speed
driving has ended. See Vehicle Load Limits
0 186 and
Tire Pressure 0278.
Tire Pressure Monitor System
The Tire Pressure Monitor System (TPMS)
uses radio and sensor technology to check
tire pressure levels. The TPMS sensors
monitor the air pressure in your tires and
transmit tire pressure readings to a receiver
located in the vehicle.
Each tire, including the spare (if provided),
should be checked monthly when cold and
inflated to the inflation pressure recommended by the vehicle manufacturer
on the vehicle placard or tire inflation
pressure label. (If your vehicle has tires of a
different size than the size indicated on the
vehicle placard or tire inflation pressure
label, you should determine the proper tire
inflation pressure for those tires.)
As an added safety feature, your vehicle has
been equipped with a tire pressure
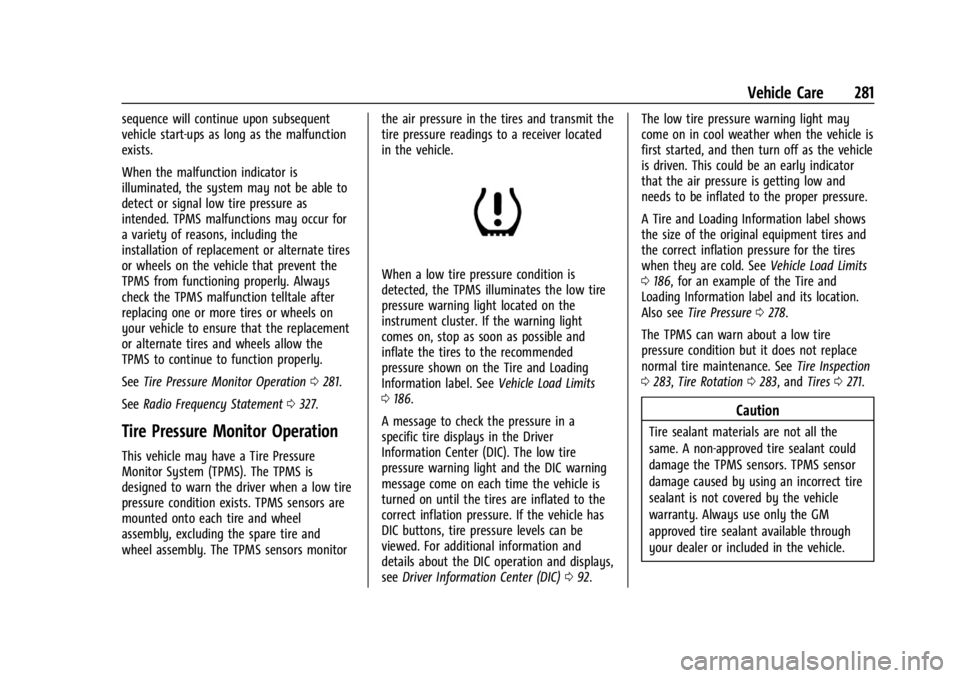
monitoring system (TPMS) that illuminates a
low tire pressure telltale when one or more
of your tires is significantly under-inflated.
Accordingly, when the low tire pressure
telltale illuminates, you should stop and
check your tires as soon as possible, and
inflate them to the proper pressure. Driving
on a significantly under-inflated tire causes
the tire to overheat and can lead to tire
failure. Under-inflation also reduces energy
efficiency and tire tread life, and may affect
the vehicle's handling and stopping ability.
Please note that the TPMS is not a
substitute for proper tire maintenance, and
it is the driver's responsibility to maintain
correct tire pressure, even if under-inflation
has not reached the level to trigger
illumination of the TPMS low tire pressure
telltale.
Your vehicle has also been equipped with a
TPMS malfunction indicator to indicate when
the system is not operating properly. The
TPMS malfunction indicator is combined
with the low tire pressure telltale. When the
system detects a malfunction, the telltale
will flash for approximately one minute and
then remain continuously illuminated. This
Page 282 of 351
Chevrolet Corvette Owner Manual (GMNA-Localizing-U.S./Canada/Mexico-
16287457) - 2023 - CRC - 3/10/22
Vehicle Care 281
sequence will continue upon subsequent
vehicle start-ups as long as the malfunction
exists.
When the malfunction indicator is
illuminated, the system may not be able to
detect or signal low tire pressure as
intended. TPMS malfunctions may occur for
a variety of reasons, including the
installation of replacement or alternate tires
or wheels on the vehicle that prevent the
TPMS from functioning properly. Always
check the TPMS malfunction telltale after
replacing one or more tires or wheels on
your vehicle to ensure that the replacement
or alternate tires and wheels allow the
TPMS to continue to function properly.
SeeTire Pressure Monitor Operation 0281.
See Radio Frequency Statement 0327.
Tire Pressure Monitor Operation
This vehicle may have a Tire Pressure
Monitor System (TPMS). The TPMS is
designed to warn the driver when a low tire
pressure condition exists. TPMS sensors are
mounted onto each tire and wheel
assembly, excluding the spare tire and
wheel assembly. The TPMS sensors monitor the air pressure in the tires and transmit the
tire pressure readings to a receiver located
in the vehicle.
When a low tire pressure condition is
detected, the TPMS illuminates the low tire
pressure warning light located on the
instrument cluster. If the warning light
comes on, stop as soon as possible and
inflate the tires to the recommended
pressure shown on the Tire and Loading
Information label. See
Vehicle Load Limits
0 186.
A message to check the pressure in a
specific tire displays in the Driver
Information Center (DIC). The low tire
pressure warning light and the DIC warning
message come on each time the vehicle is
turned on until the tires are inflated to the
correct inflation pressure. If the vehicle has
DIC buttons, tire pressure levels can be
viewed. For additional information and
details about the DIC operation and displays,
see Driver Information Center (DIC) 092. The low tire pressure warning light may
come on in cool weather when the vehicle is
first started, and then turn off as the vehicle
is driven. This could be an early indicator
that the air pressure is getting low and
needs to be inflated to the proper pressure.
A Tire and Loading Information label shows
the size of the original equipment tires and
the correct inflation pressure for the tires
when they are cold. See
Vehicle Load Limits
0 186, for an example of the Tire and
Loading Information label and its location.
Also see Tire Pressure 0278.
The TPMS can warn about a low tire
pressure condition but it does not replace
normal tire maintenance. See Tire Inspection
0 283, Tire Rotation 0283, and Tires0271.
Caution
Tire sealant materials are not all the
same. A non-approved tire sealant could
damage the TPMS sensors. TPMS sensor
damage caused by using an incorrect tire
sealant is not covered by the vehicle
warranty. Always use only the GM
approved tire sealant available through
your dealer or included in the vehicle.
Page 284 of 351
Chevrolet Corvette Owner Manual (GMNA-Localizing-U.S./Canada/Mexico-
16287457) - 2023 - CRC - 3/10/22
Vehicle Care 283
while the turn signal lamp is still flashing,
briefly press the center of the valve stem.
When the recommended pressure is reached,
the horn sounds once.
If the turn signal lamp does not flash within
15 seconds after starting to inflate the tire,
the tire fill alert has not been activated or is
not working.
If the hazard warning flashers are on, the
tire fill alert visual feedback will not work
properly.
The TPMS will not activate the tire fill alert
properly under the following conditions:
.There is interference from an external
device or transmitter.
.The air pressure from the inflation device
is not sufficient to inflate the tire.
.There is a malfunction in the TPMS.
.There is a malfunction in the horn or turn
signal lamps.
.The identification code of the TPMS
sensor is not registered to the system.
.The battery of the TPMS sensor is low.If the tire fill alert does not operate due to
TPMS interference, move the vehicle about
1 m (3 ft) back or forward and try again.
If the tire fill alert feature is not working,
use a tire pressure gauge.
TPMS Sensor Matching Process
—Auto
Learn Function
Each TPMS sensor has a unique
identification code. The identification code
needs to be matched to a new tire/wheel
position after rotating the tires or replacing
one or more of the TPMS sensors. When a
tire is installed, the vehicle must be
stationary for about 20 minutes before the
system recalculates. The following relearn
process takes up to 10 minutes, driving at a
minimum speed of 20 km/h (12 mph).
A dash (-) or pressure value will display in
the DIC. See Driver Information Center (DIC)
0 92. A warning message displays in the DIC
if a problem occurs during the relearn
process.
Tire Inspection
We recommend that the tires, including
the spare tire, if the vehicle has one, be
inspected for signs of wear or damage
at least once a month. Replace the tire if:
.The indicators at three or more
places around the tire can be seen.
.There is cord or fabric showing
through the tire's rubber.
.The tread or sidewall is cracked, cut,
or snagged deep enough to show
cord or fabric.
.The tire has a bump, bulge, or split.
.The tire has a puncture, cut, or other
damage that cannot be repaired well
because of the size or location of the
damage.
Tire Rotation
Tires should be rotated according to the
interval listed in the maintenance
schedule. See
Maintenance Schedule
0 306.
Tires are rotated to achieve uniform
wear for all tires. The first rotation is
the most important.
Anytime unusual wear is noticed, rotate
the tires as soon as possible, check for
proper tire inflation pressure, and check