CHEVROLET CORVETTE 2024 Owners Manual
Manufacturer: CHEVROLET, Model Year: 2024, Model line: CORVETTE, Model: CHEVROLET CORVETTE 2024Pages: 362, PDF Size: 6.62 MB
Page 271 of 362
Chevrolet Corvette Owner Manual (GMNA-Localizing-U.S./Canada/Mexico-
17272984) - 2024 - CRC - 2/20/23
270 Vehicle Care
Wiper Blade Replacement
Windshield wiper blades should be inspected
for wear and cracking.
Replacement blades come in different types
and are removed in different ways. For
proper type and length, seeMaintenance
Replacement Parts 0321.
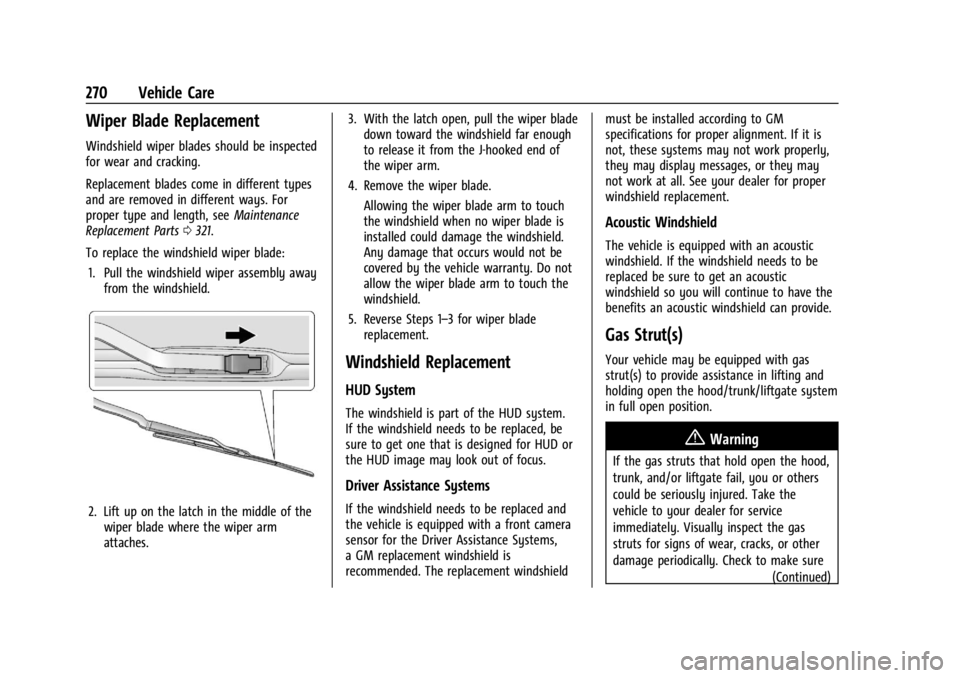
To replace the windshield wiper blade: 1. Pull the windshield wiper assembly away from the windshield.
2. Lift up on the latch in the middle of thewiper blade where the wiper arm
attaches. 3. With the latch open, pull the wiper blade
down toward the windshield far enough
to release it from the J-hooked end of
the wiper arm.
4. Remove the wiper blade.
Allowing the wiper blade arm to touch
the windshield when no wiper blade is
installed could damage the windshield.
Any damage that occurs would not be
covered by the vehicle warranty. Do not
allow the wiper blade arm to touch the
windshield.
5. Reverse Steps 1–3 for wiper blade replacement.
Windshield Replacement
HUD System
The windshield is part of the HUD system.
If the windshield needs to be replaced, be
sure to get one that is designed for HUD or
the HUD image may look out of focus.
Driver Assistance Systems
If the windshield needs to be replaced and
the vehicle is equipped with a front camera
sensor for the Driver Assistance Systems,
a GM replacement windshield is
recommended. The replacement windshield must be installed according to GM
specifications for proper alignment. If it is
not, these systems may not work properly,
they may display messages, or they may
not work at all. See your dealer for proper
windshield replacement.
Acoustic Windshield
The vehicle is equipped with an acoustic
windshield. If the windshield needs to be
replaced be sure to get an acoustic
windshield so you will continue to have the
benefits an acoustic windshield can provide.
Gas Strut(s)
Your vehicle may be equipped with gas
strut(s) to provide assistance in lifting and
holding open the hood/trunk/liftgate system
in full open position.
{Warning
If the gas struts that hold open the hood,
trunk, and/or liftgate fail, you or others
could be seriously injured. Take the
vehicle to your dealer for service
immediately. Visually inspect the gas
struts for signs of wear, cracks, or other
damage periodically. Check to make sure
(Continued)
Page 272 of 362

Chevrolet Corvette Owner Manual (GMNA-Localizing-U.S./Canada/Mexico-
17272984) - 2024 - CRC - 2/20/23
Vehicle Care 271
Warning (Continued)
the hood/trunk/liftgate is held open with
enough force. If struts are failing to hold
the hood/trunk/liftgate, do not operate.
Have the vehicle serviced.
Caution
Do not apply tape or hang any objects
from gas struts. Also do not push down
or pull on gas struts. This may cause
damage to the vehicle.
See Maintenance Schedule 0316.
Hood
Trunk
Liftgate
Headlamp Aiming
Front Headlamp Aiming
Headlamp aim has been preset and should
need no further adjustment.
If the vehicle is damaged in a crash, the
headlamp aim may be affected.
If adjustment to the headlamps is necessary,
see your dealer.
Bulb Replacement
LED Lighting
This vehicle has all LED lamps. For
replacement of any LED lighting assembly,
contact your dealer.
Page 273 of 362
Chevrolet Corvette Owner Manual (GMNA-Localizing-U.S./Canada/Mexico-
17272984) - 2024 - CRC - 2/20/23
272 Vehicle Care
Electrical System
Electrical System Overload
The vehicle has fuses to protect against an
electrical system overload.
When the current electrical load is too
heavy, the circuit breaker opens and closes,
protecting the circuit until the current load
returns to normal or the problem is fixed.
This greatly reduces the chance of circuit
overload and fire caused by electrical
problems.
Fuses protect the wires that provide the
power to the devices in your vehicle.
If there is a problem on the road and a fuse
needs to be replaced, the same amperage
fuse can be borrowed. Choose some feature
of the vehicle that is not needed to use and
replace it as soon as possible.
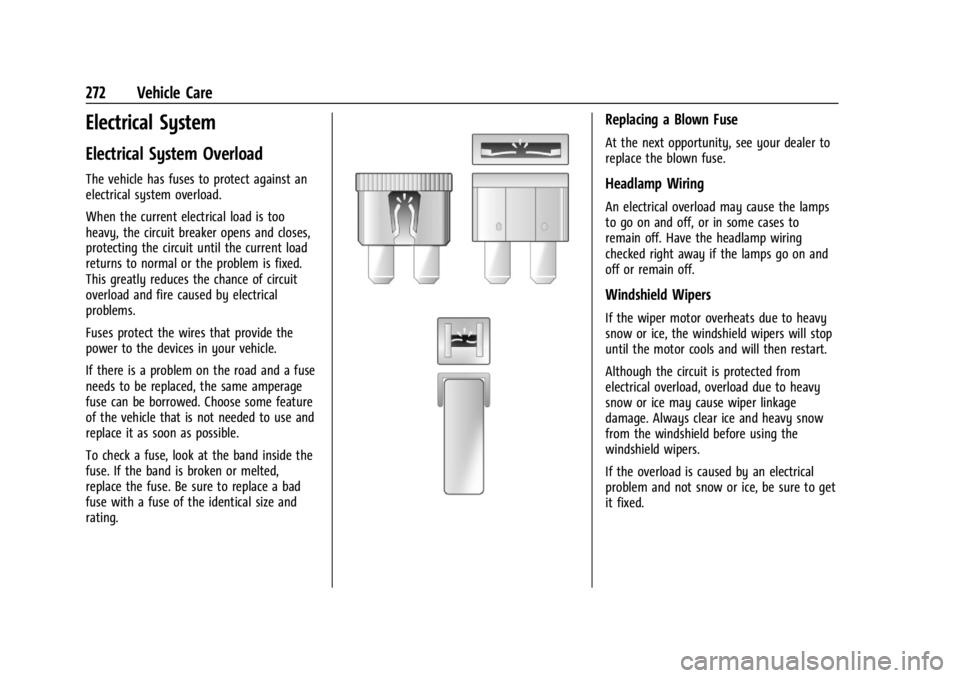
To check a fuse, look at the band inside the
fuse. If the band is broken or melted,
replace the fuse. Be sure to replace a bad
fuse with a fuse of the identical size and
rating.
Replacing a Blown Fuse
At the next opportunity, see your dealer to
replace the blown fuse.
Headlamp Wiring
An electrical overload may cause the lamps
to go on and off, or in some cases to
remain off. Have the headlamp wiring
checked right away if the lamps go on and
off or remain off.
Windshield Wipers
If the wiper motor overheats due to heavy
snow or ice, the windshield wipers will stop
until the motor cools and will then restart.
Although the circuit is protected from
electrical overload, overload due to heavy
snow or ice may cause wiper linkage
damage. Always clear ice and heavy snow
from the windshield before using the
windshield wipers.
If the overload is caused by an electrical
problem and not snow or ice, be sure to get
it fixed.
Page 274 of 362
Chevrolet Corvette Owner Manual (GMNA-Localizing-U.S./Canada/Mexico-
17272984) - 2024 - CRC - 2/20/23
Vehicle Care 273
Fuses and Circuit Breakers
The wiring circuits in the vehicle are
protected from short circuits by a
combination of fuses and circuit breakers.
This greatly reduces the chance of damage
caused by electrical problems.
{Danger
Fuses and circuit breakers are marked
with their ampere rating. Do not exceed
the specified amperage rating when
replacing fuses and circuit breakers. Use
of an oversized fuse or circuit breaker can
result in a vehicle fire. You and others
could be seriously injured or killed.
{Warning
Installation or use of fuses that do not
meet GM’s original fuse specifications is
dangerous. The fuses could fail, and result
in a fire. You or others could be injured
or killed, and the vehicle could be
damaged.
See Accessories and Modifications 0232 and
General Information 0232.
To check or replace a blown fuse, see
Electrical System Overload 0272.
Instrument Panel Fuse Block
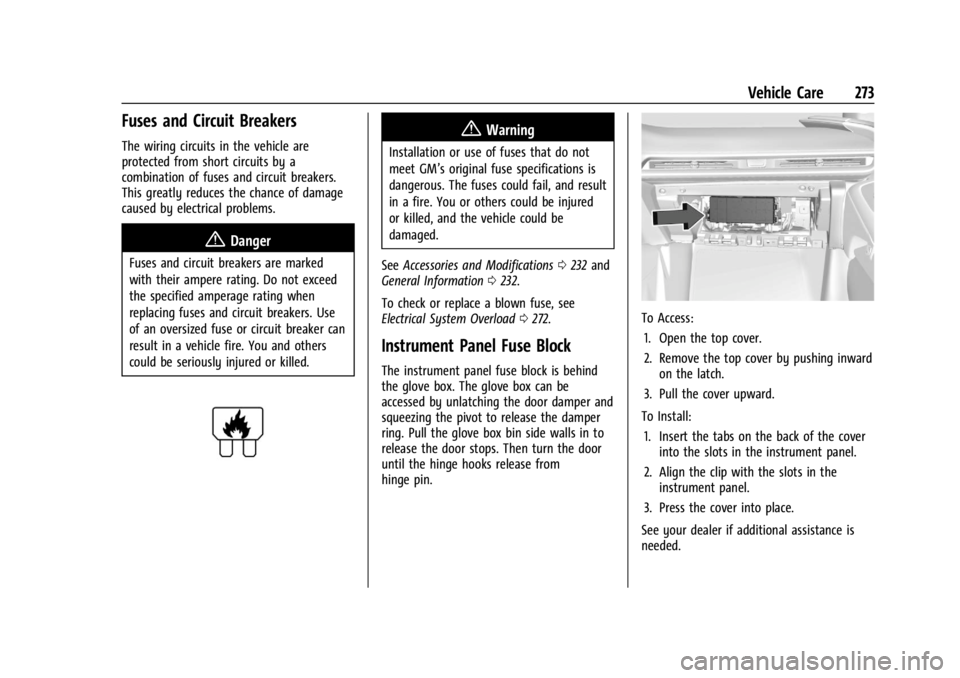
The instrument panel fuse block is behind
the glove box. The glove box can be
accessed by unlatching the door damper and
squeezing the pivot to release the damper
ring. Pull the glove box bin side walls in to
release the door stops. Then turn the door
until the hinge hooks release from
hinge pin.
To Access:
1. Open the top cover.
2. Remove the top cover by pushing inward on the latch.
3. Pull the cover upward.
To Install: 1. Insert the tabs on the back of the cover into the slots in the instrument panel.
2. Align the clip with the slots in the instrument panel.
3. Press the cover into place.
See your dealer if additional assistance is
needed.
Page 275 of 362

Chevrolet Corvette Owner Manual (GMNA-Localizing-U.S./Canada/Mexico-
17272984) - 2024 - CRC - 2/20/23
274 Vehicle Care
The vehicle may not be equipped with all of
the fuses and relays shown.Fuses Usage
F1 –
F2 Front Wiper
F3 Cooling Fan 1
F4 – Fuses Usage
F5 Cooling Fan 2
F6 Front Blower F7 Automatic Level Control
F8 Shifter Interface Board Module Fuses
Usage
F9 Display IP Cluster/HVAC/ Center Stack Module
F10 Traction Power Inverter Module Battery 1
F11 USB
F12 Traction Power Inverter Module Battery 2
F13 Transmission Oil Pump Motor
F14 Glove Box F15 –
F16 –
Electrical Park Brake/
Automatic Occupant
Sensing (E-Ray)
F17 Remote Function Actuator
F18 Front Trunk Release
F19 Intelligent Battery Sensor
F20 Exterior Lighting Module 1
Page 276 of 362
Chevrolet Corvette Owner Manual (GMNA-Localizing-U.S./Canada/Mexico-
17272984) - 2024 - CRC - 2/20/23
Vehicle Care 275
FusesUsage
F21 Exterior Lighting Module 3
F22 Exterior Lighting Module 4
F23 Body Control Module 2
F24 Exterior Lighting Module 6
F25 Amplifier
F26 Automatic Occupant Sensing/Electric Park
Brake
F27 Video Processing Module
F28 Right Headlamp
F29 Clutch Actuator
F30 Sensing and Diagnostic Module/Automatic
Occupant Sensing
F31 Body Control Module 1
F32 Driver Monitor System Fuses
Usage
F33 Data Link Connection/ Wireless Charging Module
F34 Telematics/Head Up Display
F35 Horn
F36 –
Shift Interface
Board (E-Ray)
F37 –
Body Control
Module 1 (E-Ray)
F38 Front Wash Pump
F39 Rear Auxiliary Power Outlet
F40 Performance Data Recorder/Center Stack
Module
F41 Integrated Chassis Control Module Fuses
Usage
F42 Theft Deterrent
F43 Left Headlamp
F44 Exterior Lighting Module 2
F45 Power Steering Column Module
F46 Body Control Module 3 F47 Exterior Lighting Module 5
F48 Exterior Lighting Module 7
F49 Body Control Module 4 F50 Front Auxiliary Power Outlet
F51 –
F52 Steering Wheel Control Switch
F53 Heated Steering Wheel
F54 –
Steering Wheel (E-Ray)
Page 277 of 362
Chevrolet Corvette Owner Manual (GMNA-Localizing-U.S./Canada/Mexico-
17272984) - 2024 - CRC - 2/20/23
276 Vehicle Care
RelaysUsage
K1 –
K2 Glove Box Relay
K3 Horn Relay
K4 Front Wash Relay K5 Retained Accessory Power/Accessory Relay
K6 Front Trunk Release Relay 1
K7 –
K8 –
K9 Front Trunk Release Relay 2
K10 Wiper RelayRear Compartment Fuse Block
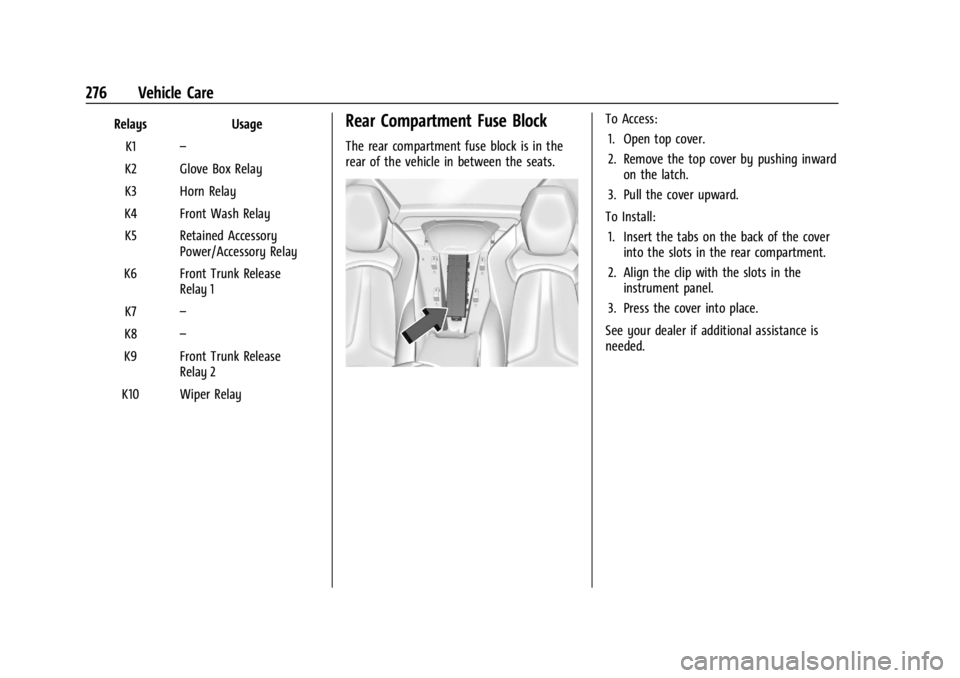
The rear compartment fuse block is in the
rear of the vehicle in between the seats.
To Access: 1. Open top cover.
2. Remove the top cover by pushing inward on the latch.
3. Pull the cover upward.
To Install: 1. Insert the tabs on the back of the cover into the slots in the rear compartment.
2. Align the clip with the slots in the instrument panel.
3. Press the cover into place.
See your dealer if additional assistance is
needed.
Page 278 of 362
Chevrolet Corvette Owner Manual (GMNA-Localizing-U.S./Canada/Mexico-
17272984) - 2024 - CRC - 2/20/23
Vehicle Care 277
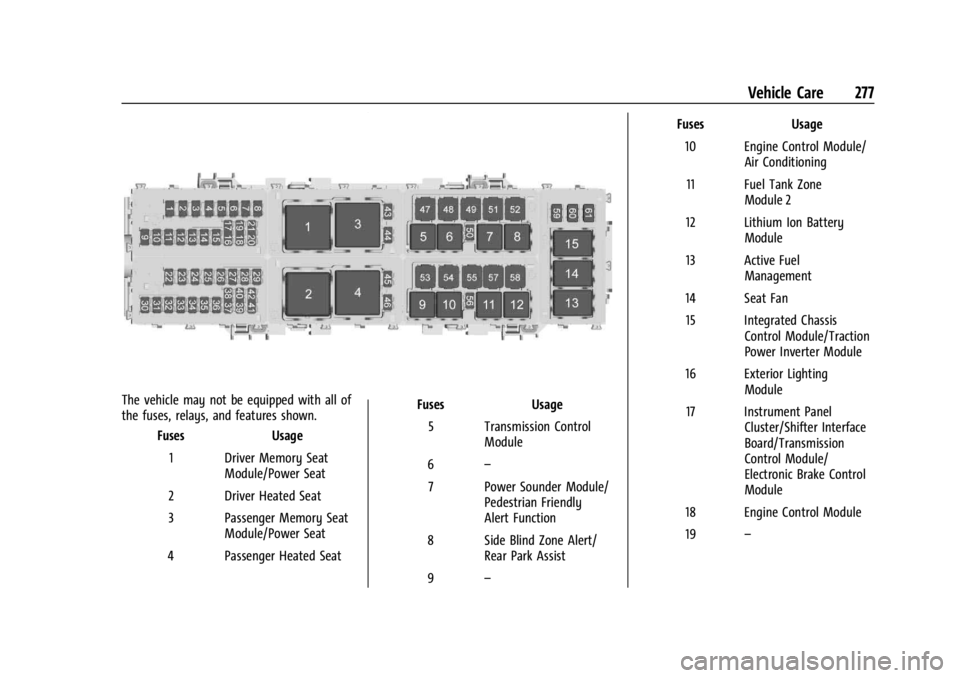
The vehicle may not be equipped with all of
the fuses, relays, and features shown.Fuses Usage
1 Driver Memory Seat Module/Power Seat
2 Driver Heated Seat
3 Passenger Memory Seat Module/Power Seat
4 Passenger Heated Seat Fuses
Usage
5 Transmission Control Module
6 –
7 Power Sounder Module/ Pedestrian Friendly
Alert Function
8 Side Blind Zone Alert/ Rear Park Assist
9 – Fuses
Usage
10 Engine Control Module/ Air Conditioning
11 Fuel Tank Zone Module 2
12 Lithium Ion Battery Module
13 Active Fuel Management
14 Seat Fan 15 Integrated Chassis Control Module/Traction
Power Inverter Module
16 Exterior Lighting Module
17 Instrument Panel Cluster/Shifter Interface
Board/Transmission
Control Module/
Electronic Brake Control
Module
18 Engine Control Module
19 –
Page 279 of 362

Chevrolet Corvette Owner Manual (GMNA-Localizing-U.S./Canada/Mexico-
17272984) - 2024 - CRC - 2/20/23
278 Vehicle Care
FusesUsage
20 Sensing and Diagnostic Module/Inside Rear
View Mirror
21 Exhaust Valve Solenoid
22 Fuel Pump/Fuel Tank Zone Module 1
23 Tonneau Left
24 Tonneau Right 25 Convertible Top Right
26 Convertible Top Left 27 Electronic Suspension Control
28 Scavenge Coolant Pump Motor
29 CGM
30 O2 Sensor 31 O2 Sensor/Engine Oil/ Canister Purge/Active
Fuel Management
32 Ignition Even
33 Ignition Odd
34 Engine Control Module 1 Fuses
Usage
35 Engine Control Module/ Mass Air Flow Sensor/
O2 Sensor/Air
Conditioning
36 Power Front Closure Module/Front Camera
Module
37 Canister Vent
38 Latch Control Module
39 Right Window Switch/ Door Lock
40 Left Window Switch/ Door Lock
41 Pedestrian Friendly Alert Module/High
Voltage System Lock
Out Switch
42 Engine Control Module 2
43 Charged Air Cooler
44 Air Conditioning Compressor
45 Transmission Control Module
46 – Fuses
Usage
47 DC/DC Battery 1
48 DC/DC Battery 2
49 Auxiliary Cooling Fan Right
50 Virtual Key Back up Module
51 Starter Pinion
52 Auxiliary Pump
53 Starter Solenoid
54 Auxiliary Cooling Fan Left
55 Automatic Leveling Control
56 Energy Storage Coolant Pump/Power Electronics
Coolant Pump
57 Rear Window Defogger
58 –
59 Left/Right Window
60 Passenger Power Seat 61 Driver Power Seat
Page 280 of 362
Chevrolet Corvette Owner Manual (GMNA-Localizing-U.S./Canada/Mexico-
17272984) - 2024 - CRC - 2/20/23
Vehicle Care 279
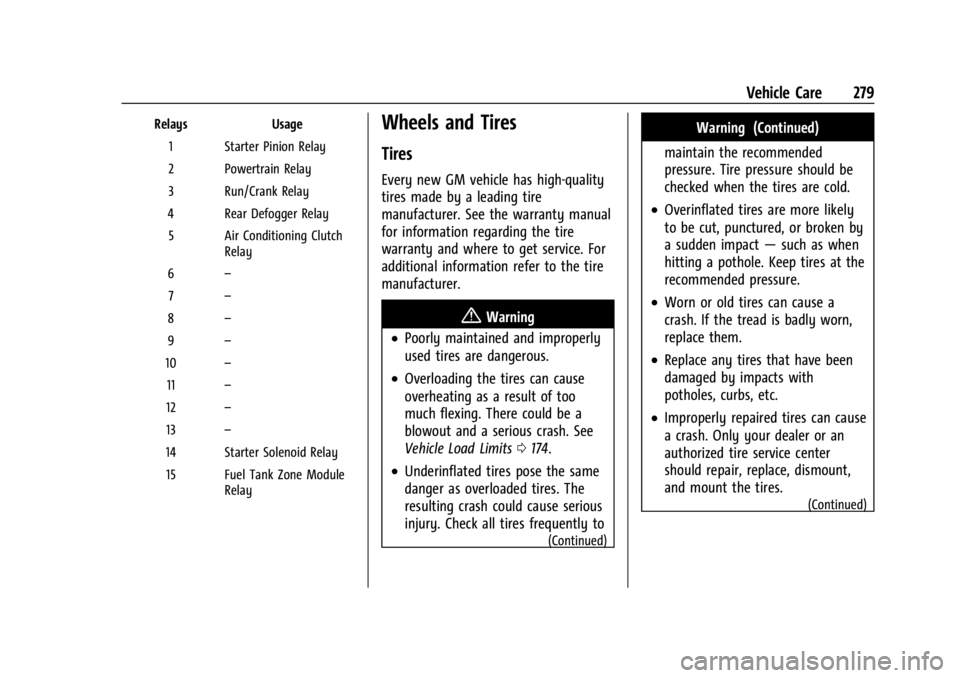
RelaysUsage
1 Starter Pinion Relay
2 Powertrain Relay
3 Run/Crank Relay
4 Rear Defogger Relay 5 Air Conditioning Clutch Relay
6 –
7 –
8 –
9 –
10 –
11 –
12 –
13 –
14 Starter Solenoid Relay 15 Fuel Tank Zone Module RelayWheels and Tires
Tires
Every new GM vehicle has high-quality
tires made by a leading tire
manufacturer. See the warranty manual
for information regarding the tire
warranty and where to get service. For
additional information refer to the tire
manufacturer.
{Warning
.Poorly maintained and improperly
used tires are dangerous.
.Overloading the tires can cause
overheating as a result of too
much flexing. There could be a
blowout and a serious crash. See
Vehicle Load Limits 0174.
.Underinflated tires pose the same
danger as overloaded tires. The
resulting crash could cause serious
injury. Check all tires frequently to
(Continued)
Warning (Continued)
maintain the recommended
pressure. Tire pressure should be
checked when the tires are cold.
.Overinflated tires are more likely
to be cut, punctured, or broken by
a sudden impact —such as when
hitting a pothole. Keep tires at the
recommended pressure.
.Worn or old tires can cause a
crash. If the tread is badly worn,
replace them.
.Replace any tires that have been
damaged by impacts with
potholes, curbs, etc.
.Improperly repaired tires can cause
a crash. Only your dealer or an
authorized tire service center
should repair, replace, dismount,
and mount the tires.
(Continued)