CHEVROLET CORVETTE 2024 Service Manual
Manufacturer: CHEVROLET, Model Year: 2024, Model line: CORVETTE, Model: CHEVROLET CORVETTE 2024Pages: 362, PDF Size: 6.62 MB
Page 41 of 362
Chevrolet Corvette Owner Manual (GMNA-Localizing-U.S./Canada/Mexico-
17272984) - 2024 - CRC - 2/20/23
40 Seats and Restraints
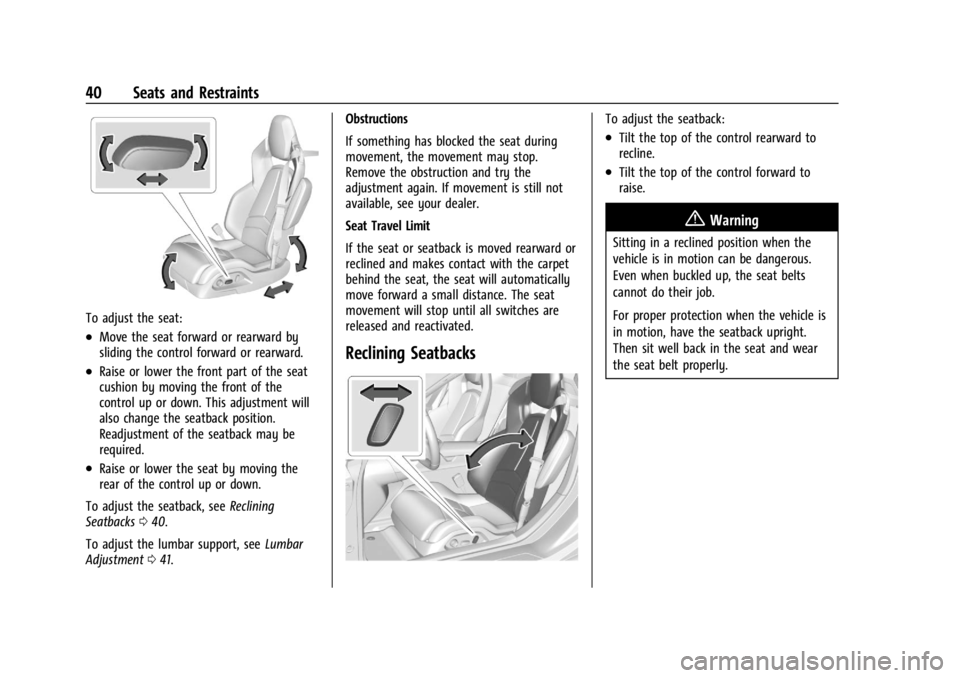
To adjust the seat:
.Move the seat forward or rearward by
sliding the control forward or rearward.
.Raise or lower the front part of the seat
cushion by moving the front of the
control up or down. This adjustment will
also change the seatback position.
Readjustment of the seatback may be
required.
.Raise or lower the seat by moving the
rear of the control up or down.
To adjust the seatback, see Reclining
Seatbacks 040.
To adjust the lumbar support, see Lumbar
Adjustment 041. Obstructions
If something has blocked the seat during
movement, the movement may stop.
Remove the obstruction and try the
adjustment again. If movement is still not
available, see your dealer.
Seat Travel Limit
If the seat or seatback is moved rearward or
reclined and makes contact with the carpet
behind the seat, the seat will automatically
move forward a small distance. The seat
movement will stop until all switches are
released and reactivated.
Reclining Seatbacks
To adjust the seatback:
.Tilt the top of the control rearward to
recline.
.Tilt the top of the control forward to
raise.
{Warning
Sitting in a reclined position when the
vehicle is in motion can be dangerous.
Even when buckled up, the seat belts
cannot do their job.
For proper protection when the vehicle is
in motion, have the seatback upright.
Then sit well back in the seat and wear
the seat belt properly.
Page 42 of 362
Chevrolet Corvette Owner Manual (GMNA-Localizing-U.S./Canada/Mexico-
17272984) - 2024 - CRC - 2/20/23
Seats and Restraints 41
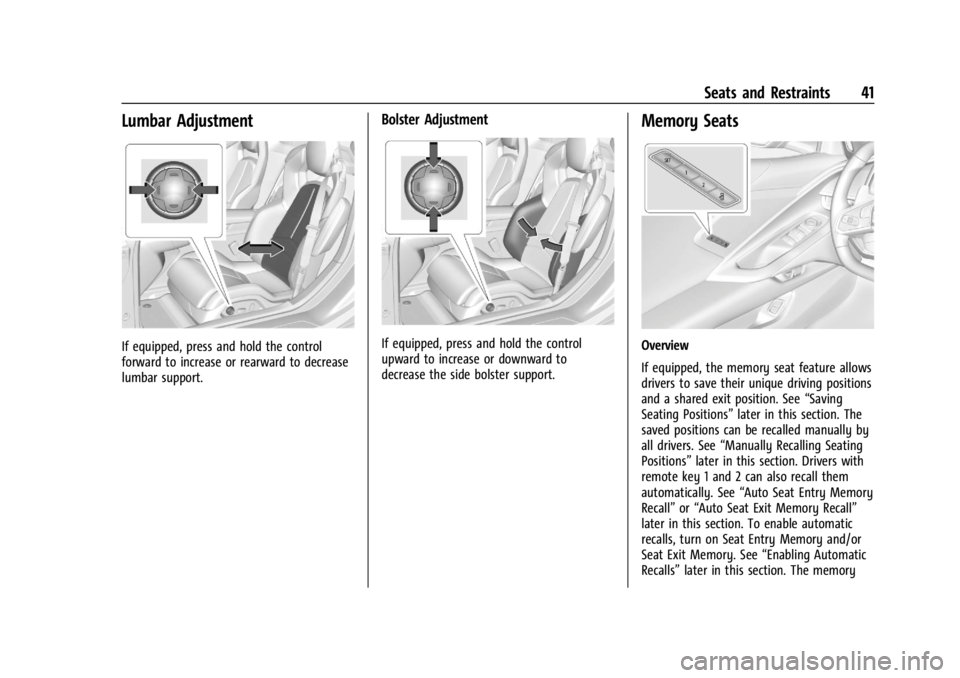
Lumbar Adjustment
If equipped, press and hold the control
forward to increase or rearward to decrease
lumbar support.
Bolster Adjustment
If equipped, press and hold the control
upward to increase or downward to
decrease the side bolster support.
Memory Seats
Overview
If equipped, the memory seat feature allows
drivers to save their unique driving positions
and a shared exit position. See“Saving
Seating Positions” later in this section. The
saved positions can be recalled manually by
all drivers. See “Manually Recalling Seating
Positions” later in this section. Drivers with
remote key 1 and 2 can also recall them
automatically. See “Auto Seat Entry Memory
Recall” or“Auto Seat Exit Memory Recall”
later in this section. To enable automatic
recalls, turn on Seat Entry Memory and/or
Seat Exit Memory. See “Enabling Automatic
Recalls” later in this section. The memory
Page 43 of 362
Chevrolet Corvette Owner Manual (GMNA-Localizing-U.S./Canada/Mexico-
17272984) - 2024 - CRC - 2/20/23
42 Seats and Restraints
recalls may be cancelled at any time during
the recall. See“Cancel Memory Seating
Recalls” later in this section.
Identifying Driver Number
The vehicle identifies the current driver by
their remote key number 1–8. The current
remote key number may be identified by
Driver Information Center (DIC) welcome
message, “You are driver x for memory
recalls.” This message is displayed the first
few times the vehicle is turned on when a
different remote key is used. For Seat Entry
Memory to work properly, save positions to
the 1 or 2 memory button matching the
driver number of this welcome message.
To aid in identifying remote key IDs, it is
recommended to only carry one remote key
when entering the vehicle. Perform the
following if the welcome message is not
displayed:
1. Move all remote keys away from the vehicle.
2. Start the vehicle with another remote key. A DIC welcome message should
display indicating the driver number of
the other remote key. Turn the vehicle
off and remove the other remote key
from the vehicle. 3. Start the vehicle with the initial remote
key. The DIC welcome message should
display the driver number of the initial
remote key.
Saving Seating Positions
Read these instructions completely before
saving memory positions.
To save preferred driving positions to
1 and 2: 1. Turn the vehicle on. A DIC welcome message may indicate the driver number
of the current remote key. See
“Identifying Driver Number” previously in
this section.
2. Adjust all available memory features to the desired driving position.
3. Press and release SET; a beep will sound.
4. Immediately upon releasing SET, press and hold memory button 1 or 2 matching
the current Driver’s remote key number
until two beeps sound. If too much time
passes between releasing SET and
pressing 1 or 2, the two beeps will not
sound indicating memory position were
not saved. Repeat Steps 3 and 4 to try
again. 5. Repeat Steps 1–4 for the other remote
key 1 or 2 using the other 1 or 2 memory
button.
It is recommended to save the preferred
driving positions to both 1 and 2 if you are
the only driver.
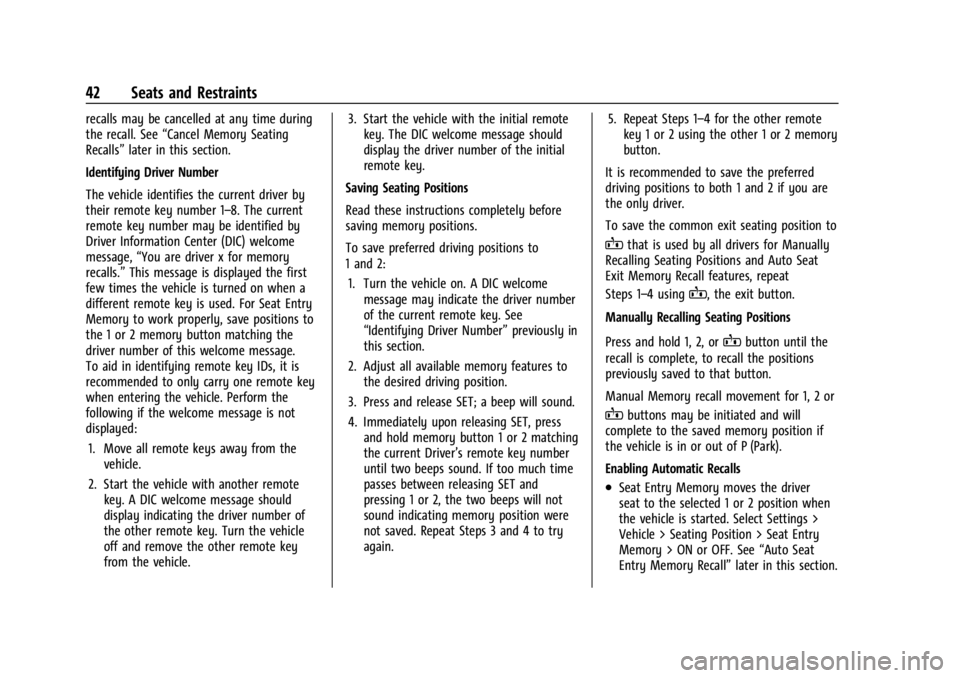
To save the common exit seating position to
Bthat is used by all drivers for Manually
Recalling Seating Positions and Auto Seat
Exit Memory Recall features, repeat
Steps 1–4 using
B, the exit button.
Manually Recalling Seating Positions
Press and hold 1, 2, or
Bbutton until the
recall is complete, to recall the positions
previously saved to that button.
Manual Memory recall movement for 1, 2 or
Bbuttons may be initiated and will
complete to the saved memory position if
the vehicle is in or out of P (Park).
Enabling Automatic Recalls
.Seat Entry Memory moves the driver
seat to the selected 1 or 2 position when
the vehicle is started. Select Settings >
Vehicle > Seating Position > Seat Entry
Memory > ON or OFF. See “Auto Seat
Entry Memory Recall” later in this section.
Page 44 of 362

Chevrolet Corvette Owner Manual (GMNA-Localizing-U.S./Canada/Mexico-
17272984) - 2024 - CRC - 2/20/23
Seats and Restraints 43
.Seat Exit Memory moves the driver seat
to the preferred exit position of the
B
button when the vehicle is turned off and
the door is opened. Select Settings >
Vehicle > Seating Position > Seat Exit
Memory > Select ON or OFF. See“Auto
Seat Exit Memory Recall” later in this
section.
Auto Seat Entry Memory Recall
Seat Entry Memory will automatically begin
movement to the seating positions of the 1
or 2 button corresponding to the driver’s
remote key number 1 or 2 detected by the
vehicle when:
.The vehicle is turned ON.
.Seating positions have been previously
saved to the same 1 or 2 button. See
“Saving Seating Positions” previously in
this section.
.Seat Entry Memory is enabled. See
“Enabling Automatic Recalls” previously in
this section.
.The vehicle is in P (Park).
Seat Entry Memory Recall will continue if
the vehicle is shifted out of P (Park) prior to
reaching the saved memory position. If the saved memory seat position does not
automatically recall, verify the recall is
enabled. See
“Enabling Automatic Recalls”
previously in this section.
If the memory seat recalls to the wrong
position, the driver’s remote key number 1
or 2 may not match the memory button
number positions they were saved to. Try
the other remote key or try saving the
positions to the other 1 or 2 memory
button. See “Saving Seating Positions”
previously in this section.
Automatic Seat Entry Memory recalls are
only available for driver’s remote key
numbers 1 and 2. Remote keys 3–8 will not
provide Seat Entry Memory recalls.
Auto Seat Exit Memory Recall
Seat Exit Memory will begin movement to
the seating position of the
B
button when:
.The vehicle is turned off and the driver
door is open or opened within a
short time.
.A seating position has been previously
been saved to the
Bmemory button.
See “Saving Seating Positions” previously
in this section.
.Seat Exit Memory is enabled. See
“Enabling Automatic Recalls” previously in
this section.
.The vehicle is in P (Park).
Seat Exit Memory recall will continue if the
vehicle is shifted out of P (Park) prior to
reaching the saved memory position.
Seat Exit Memory is not linked to the
driver’s remote key. The seating position
saved to
Bis used for all drivers.
Cancel Memory Seating Recalls
.During any memory recall:
Press a power seat control
Press SET memory button
.During Manual memory recall:
Release 1, 2, or
Bmemory button
.During Auto Seat Entry Memory Recall:
Turn vehicle off
Press SET, 1, 2, or
Bmemory buttons
.During Auto Seat Exit Memory Recall:
Press SET, 1, 2, or
Bmemory buttons
Page 45 of 362
Chevrolet Corvette Owner Manual (GMNA-Localizing-U.S./Canada/Mexico-
17272984) - 2024 - CRC - 2/20/23
44 Seats and Restraints
Obstructions
If something has blocked the seat while
recalling a memory position, the recall may
stop. Remove the obstruction and try the
recall again. If the memory position still
does not recall, see your dealer.
Heated and Ventilated Front
Seats
{Warning
If temperature change or pain to the skin
cannot be felt, the seat heater may cause
burns. To reduce the risk of burns, use
care when using the seat heater,
especially for long periods of time. Do
not place anything on the seat that
insulates against heat, such as a blanket,
cushion, cover, or similar item. This may
cause the seat heater to overheat. An
overheated seat heater may cause a burn
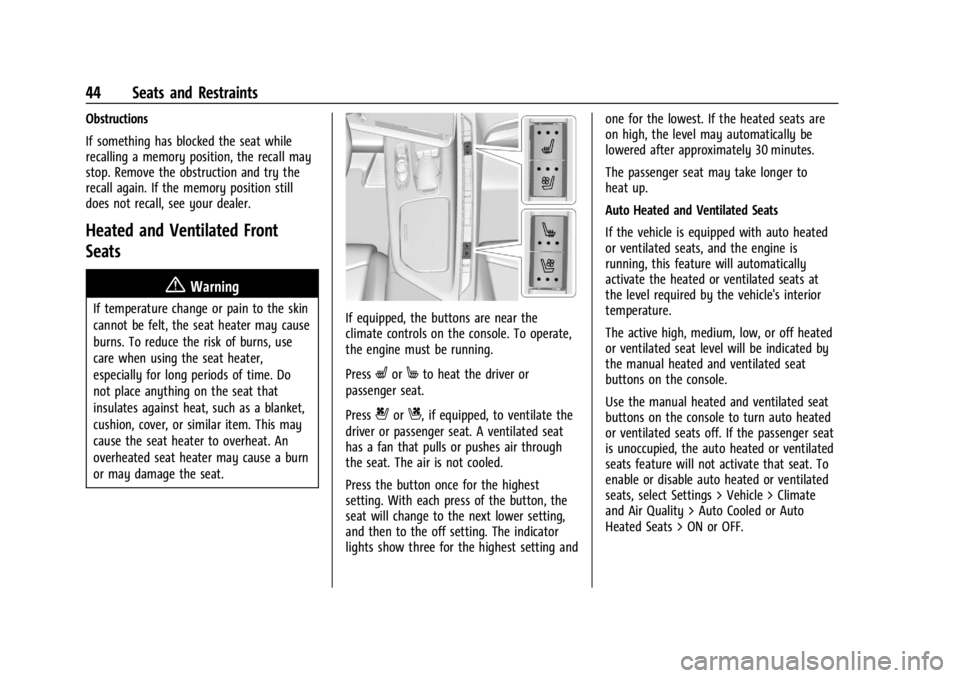
or may damage the seat.If equipped, the buttons are near the
climate controls on the console. To operate,
the engine must be running.
Press
LorMto heat the driver or
passenger seat.
Press
{orC, if equipped, to ventilate the
driver or passenger seat. A ventilated seat
has a fan that pulls or pushes air through
the seat. The air is not cooled.
Press the button once for the highest
setting. With each press of the button, the
seat will change to the next lower setting,
and then to the off setting. The indicator
lights show three for the highest setting and one for the lowest. If the heated seats are
on high, the level may automatically be
lowered after approximately 30 minutes.
The passenger seat may take longer to
heat up.
Auto Heated and Ventilated Seats
If the vehicle is equipped with auto heated
or ventilated seats, and the engine is
running, this feature will automatically
activate the heated or ventilated seats at
the level required by the vehicle's interior
temperature.
The active high, medium, low, or off heated
or ventilated seat level will be indicated by
the manual heated and ventilated seat
buttons on the console.
Use the manual heated and ventilated seat
buttons on the console to turn auto heated
or ventilated seats off. If the passenger seat
is unoccupied, the auto heated or ventilated
seats feature will not activate that seat. To
enable or disable auto heated or ventilated
seats, select Settings > Vehicle > Climate
and Air Quality > Auto Cooled or Auto
Heated Seats > ON or OFF.
Page 46 of 362
Chevrolet Corvette Owner Manual (GMNA-Localizing-U.S./Canada/Mexico-
17272984) - 2024 - CRC - 2/20/23
Seats and Restraints 45
If equipped with a heated steering wheel,
the auto heated steering wheel activation
will follow the heated seat auto activation
and the heated wheel indicator will follow
the state of the steering wheel heat.
Remote Start Heated and Ventilated Seats
During a remote start (if equipped), the
heated or ventilated seats can be turned on
automatically. When it is cold outside, the
heated seats turn on, and when it is hot
outside the ventilated seats turn on. The
heated and ventilated seat indicators and
heated steering wheel indicator may come
on during this operation. The heated or
ventilated seats are canceled when the
vehicle is turned on. Press the heated or
ventilated seat button to use the heated or
ventilated seats after the vehicle is started.
The temperature performance of an
unoccupied seat may be reduced. This is
normal.
To enable or disable remote start heated or
ventilated seats, select Settings > Vehicle >
Remote Lock, Unlock, and Start > Remote
Start Auto Heat Seats or Remote Start Auto
Cool Seats > ON or OFF. SeeRemote Vehicle
Start 012.Seat Belts
This section describes how to use seat belts
properly, and some things not to do.
{Warning
Do not let anyone ride where a seat belt
cannot be worn properly. In a crash,
if you or your passenger(s) are not
wearing seat belts, injuries can be much
worse than if you are wearing seat belts.
You can be seriously injured or killed by
hitting things inside the vehicle harder or
by being ejected from the vehicle. In
addition, anyone who is not buckled up
can strike other passengers in the vehicle.
It is extremely dangerous to ride in a
cargo area, inside or outside of a vehicle.
In a collision, passengers riding in these
areas are more likely to be seriously
injured or killed. Do not allow passengers
to ride in any area of the vehicle that is
not equipped with seats and seat belts.
Always wear a seat belt, and check that
all passenger(s) are restrained
properly too. This vehicle has indicators as a reminder to
buckle the seat belts. See
Seat Belt
Reminders 088.
Why Seat Belts Work
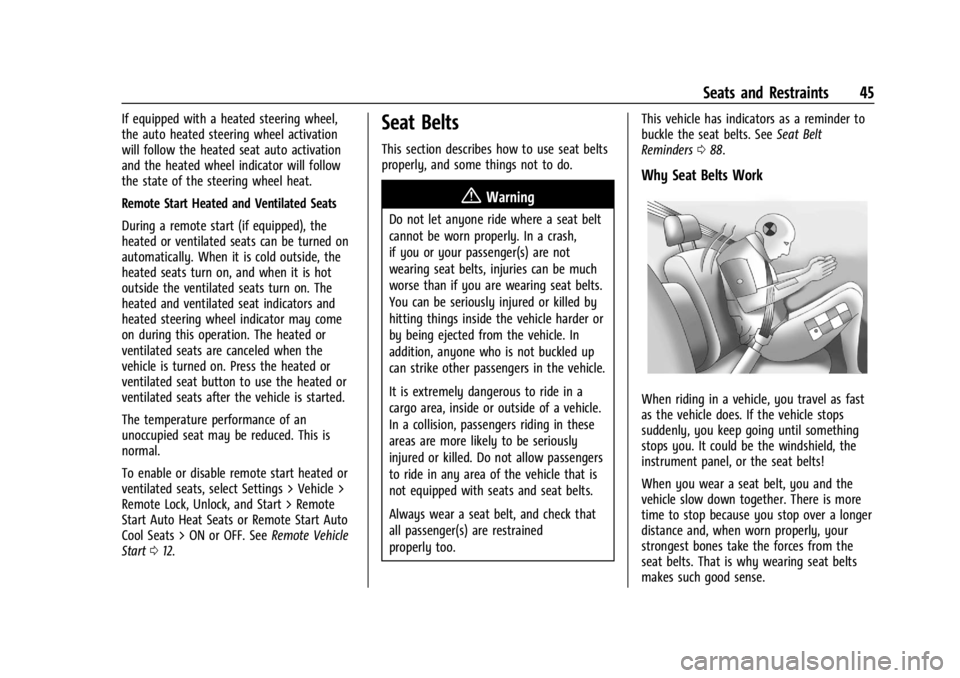
When riding in a vehicle, you travel as fast
as the vehicle does. If the vehicle stops
suddenly, you keep going until something
stops you. It could be the windshield, the
instrument panel, or the seat belts!
When you wear a seat belt, you and the
vehicle slow down together. There is more
time to stop because you stop over a longer
distance and, when worn properly, your
strongest bones take the forces from the
seat belts. That is why wearing seat belts
makes such good sense.
Page 47 of 362
Chevrolet Corvette Owner Manual (GMNA-Localizing-U.S./Canada/Mexico-
17272984) - 2024 - CRC - 2/20/23
46 Seats and Restraints
Questions and Answers About Seat Belts
Q: Will I be trapped in the vehicle after acrash if I am wearing a seat belt?
A: You could be— whether you are
wearing a seat belt or not. Your chance
of being conscious during and after a
crash, so you canunbuckle and get out,
is much greater if you are belted.
Q: If my vehicle has airbags, why should I have to wear seat belts?
A: Airbags are supplemental systems only.
They work withseat belts —not instead
of them. Whether or not an airbag is
provided, all occupants still have to
buckle up to get the most protection.
Also, in nearly all states and in all
Canadian provinces, the law requires
wearing seat belts.
Buckle To Drive
If equipped, this feature delays the vehicle
from shifting out of P (Park) when the driver
seat belt is not buckled. The Buckle to Drive
feature must be turned ON in the
infotainment system to work. To turn the
Buckle to Drive feature on or off, select
Settings > Vehicle > Buckle to Drive. See
Teen Driver 0144, if equipped. If the vehicle is on and the brake pedal is
pressed with the vehicle in P (Park) but the
driver seat belt is not buckled, a message
displays in the Driver Information
Center (DIC) and the vehicle will be delayed
from shifting out of P (Park). Buckle the
driver seat belt to clear the message and
shift out of P (Park). Shifting from P (Park)
will be delayed once for each time the
vehicle is started.
For some fleet vehicles, the feature is
always ON and cannot be turned OFF in the
infotainment system. The vehicle will be
delayed from shifting from P (Park) each
time the driver attempts to do so while the
driver seat belt is not buckled. Turning the
vehicle off then on will not change this
condition.
On some models, Buckle to Drive may also
delay shifting out of P (Park) if a front
passenger seat belt is unbuckled. A message
displays in the DIC. Buckle the front
passenger seat belt to shift out of P (Park).
This feature may delay the vehicle from
shifting out of P (Park) if an object, such as
a briefcase, handbag, grocery bag, laptop,
or other electronic device, is on the front
passenger seat. If this happens, remove the
object from the seat or buckle the seat belt
to shift out of P (Park).
If the driver, or on some vehicles, the
present front passenger remains unbuckled,
the DIC message will turn off after several
seconds and the vehicle can be shifted out
of P (Park). See
“Seat Belts”and“Child
Restraints” in the Index for information
about the importance of proper
restraint use.
If the driver seat belt or the front passenger
seat belt is unbuckled when driving, the seat
belt reminder chime and light(s) will come
on. See Seat Belt Reminders 088. This
feature may not function properly if the
airbag readiness light is on. See Airbag
Readiness Light 088.
How to Wear Seat Belts Properly
Follow these rules for everyone's protection.
There are additional things to know about
seat belts and children, including smaller
children and infants. If a child will be riding
in the vehicle, see Older Children062 or
Infants and Young Children 063. Review
and follow the rules for children in addition
to the following rules.
Page 48 of 362
Chevrolet Corvette Owner Manual (GMNA-Localizing-U.S./Canada/Mexico-
17272984) - 2024 - CRC - 2/20/23
Seats and Restraints 47
It is very important for all occupants to
buckle up. Statistics show that unbelted
people are hurt more often in crashes than
those who are wearing seat belts.
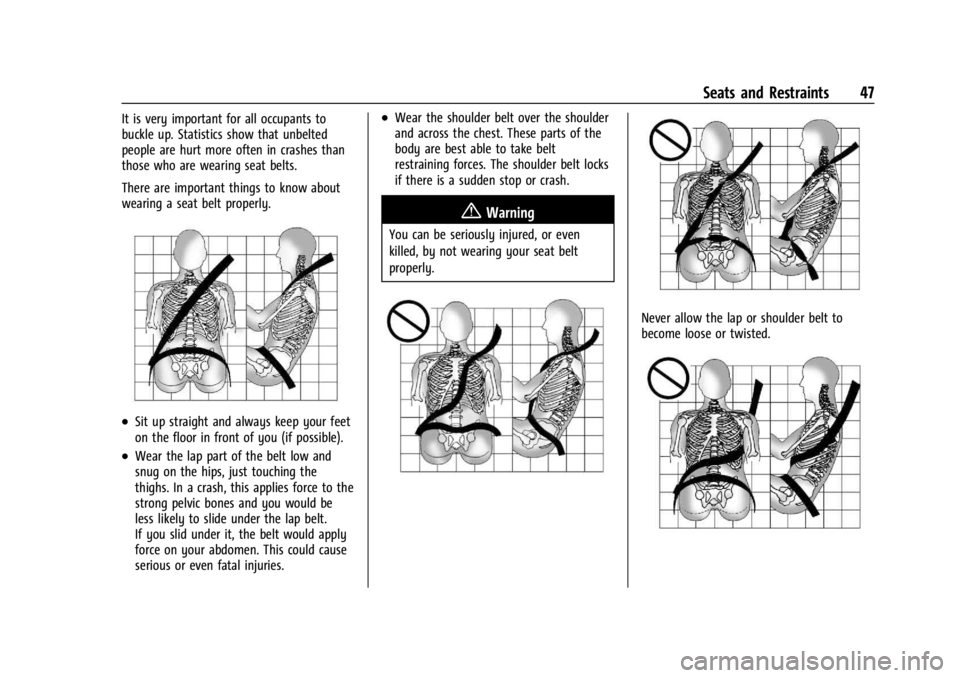
There are important things to know about
wearing a seat belt properly.
.Sit up straight and always keep your feet
on the floor in front of you (if possible).
.Wear the lap part of the belt low and
snug on the hips, just touching the
thighs. In a crash, this applies force to the
strong pelvic bones and you would be
less likely to slide under the lap belt.
If you slid under it, the belt would apply
force on your abdomen. This could cause
serious or even fatal injuries.
.Wear the shoulder belt over the shoulder
and across the chest. These parts of the
body are best able to take belt
restraining forces. The shoulder belt locks
if there is a sudden stop or crash.
{Warning
You can be seriously injured, or even
killed, by not wearing your seat belt
properly.
Never allow the lap or shoulder belt to
become loose or twisted.
Page 49 of 362
Chevrolet Corvette Owner Manual (GMNA-Localizing-U.S./Canada/Mexico-
17272984) - 2024 - CRC - 2/20/23
48 Seats and Restraints
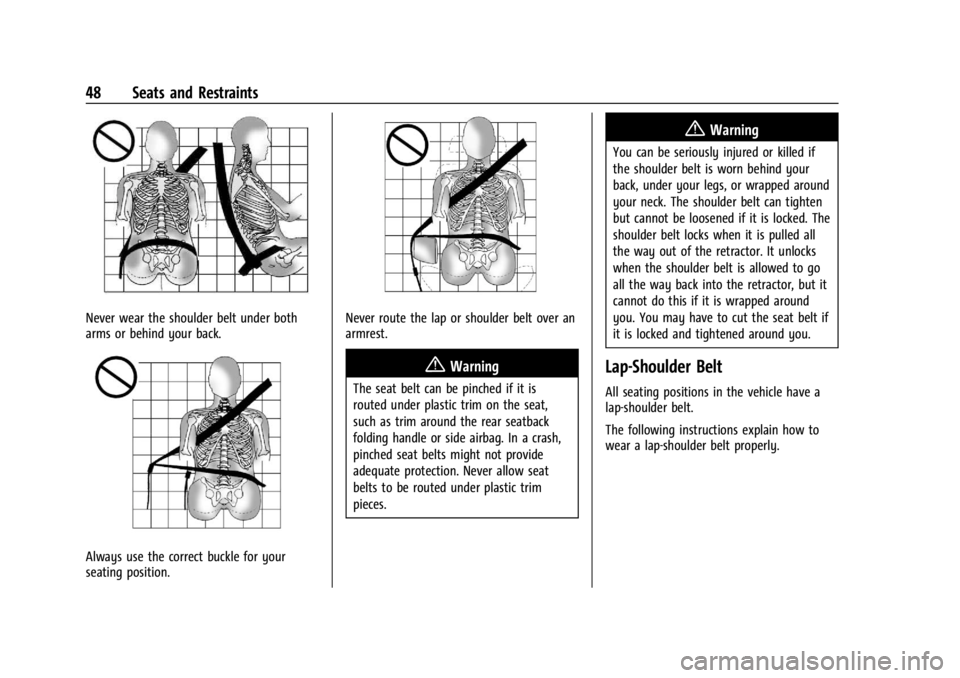
Never wear the shoulder belt under both
arms or behind your back.
Always use the correct buckle for your
seating position.
Never route the lap or shoulder belt over an
armrest.
{Warning
The seat belt can be pinched if it is
routed under plastic trim on the seat,
such as trim around the rear seatback
folding handle or side airbag. In a crash,
pinched seat belts might not provide
adequate protection. Never allow seat
belts to be routed under plastic trim
pieces.
{Warning
You can be seriously injured or killed if
the shoulder belt is worn behind your
back, under your legs, or wrapped around
your neck. The shoulder belt can tighten
but cannot be loosened if it is locked. The
shoulder belt locks when it is pulled all
the way out of the retractor. It unlocks
when the shoulder belt is allowed to go
all the way back into the retractor, but it
cannot do this if it is wrapped around
you. You may have to cut the seat belt if
it is locked and tightened around you.
Lap-Shoulder Belt
All seating positions in the vehicle have a
lap-shoulder belt.
The following instructions explain how to
wear a lap-shoulder belt properly.
Page 50 of 362
Chevrolet Corvette Owner Manual (GMNA-Localizing-U.S./Canada/Mexico-
17272984) - 2024 - CRC - 2/20/23
Seats and Restraints 49
GT1 Seat
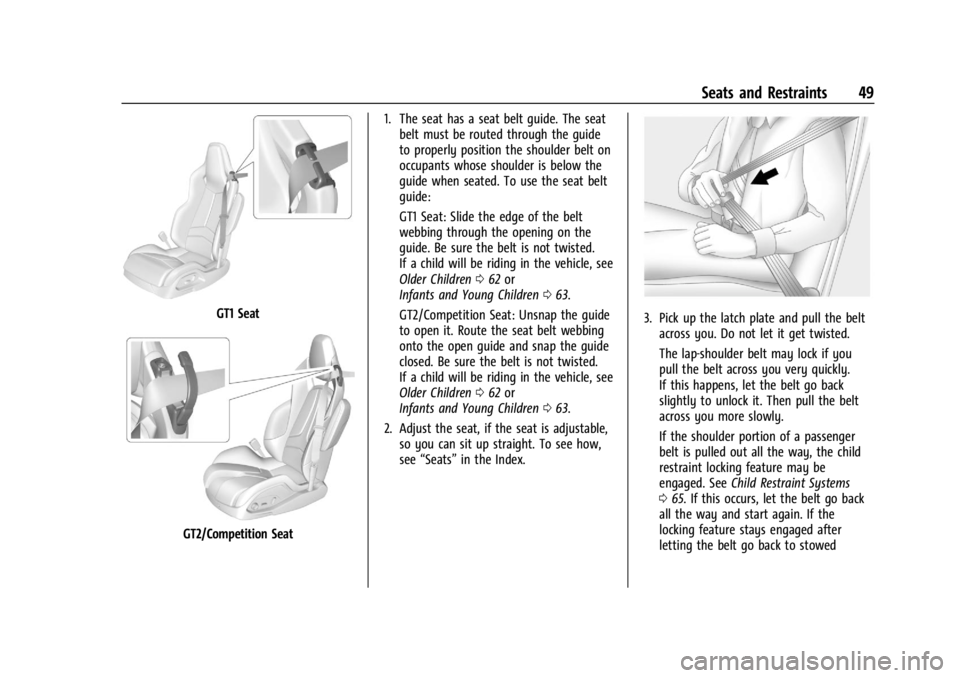
GT2/Competition Seat1. The seat has a seat belt guide. The seat
belt must be routed through the guide
to properly position the shoulder belt on
occupants whose shoulder is below the
guide when seated. To use the seat belt
guide:
GT1 Seat: Slide the edge of the belt
webbing through the opening on the
guide. Be sure the belt is not twisted.
If a child will be riding in the vehicle, see
Older Children 062 or
Infants and Young Children 063.
GT2/Competition Seat: Unsnap the guide
to open it. Route the seat belt webbing
onto the open guide and snap the guide
closed. Be sure the belt is not twisted.
If a child will be riding in the vehicle, see
Older Children 062 or
Infants and Young Children 063.
2. Adjust the seat, if the seat is adjustable, so you can sit up straight. To see how,
see “Seats” in the Index.
3. Pick up the latch plate and pull the belt
across you. Do not let it get twisted.
The lap-shoulder belt may lock if you
pull the belt across you very quickly.
If this happens, let the belt go back
slightly to unlock it. Then pull the belt
across you more slowly.
If the shoulder portion of a passenger
belt is pulled out all the way, the child
restraint locking feature may be
engaged. See Child Restraint Systems
0 65. If this occurs, let the belt go back
all the way and start again. If the
locking feature stays engaged after
letting the belt go back to stowed