brake pad CHEVROLET CORVETTE 2024 Owners Manual
[x] Cancel search | Manufacturer: CHEVROLET, Model Year: 2024, Model line: CORVETTE, Model: CHEVROLET CORVETTE 2024Pages: 362, PDF Size: 6.62 MB
Page 6 of 362

Chevrolet Corvette Owner Manual (GMNA-Localizing-U.S./Canada/Mexico-
17272984) - 2024 - CRC - 2/20/23
Introduction 5
1.Air Vents 0153.
2. Turn Signal Lever. See Turn and
Lane-Change Signals 0112.
Exterior Lamp Controls 0109.
3. Manual Shift Paddles. See Manual Mode
0 187.
4. Instrument Cluster 081.
5. Windshield Wiper/Washer 075.
6. Volume Control Knob and Infotainment Home Button. See Overview0117.
7. Infotainment Display. See Using the
System 0120.
8. Alarm System Indicator Light. See Vehicle
Alarm System 022.
Light Sensor. See Automatic Headlamp
System 0111.
9. Dual Automatic Climate Control System
0150.
Driver and Passenger Heated and
Ventilated Seat Controls (If Equipped).
See Heated and Ventilated Front Seats
0 44. 10.
Traction Control/Electronic Stability
Control 0194.
Curb View Camera (If Equipped). See
Assistance Systems for Parking or Backing
0 215.
Front Lift System Control (If Equipped).
See Front Lift System 0205.
11. Driver Mode Control 0196.
12. Shift Switches. See Dual Clutch
Transmission 0184.
13. Hybrid Battery Charging (Charge+). See Driver Mode Control 0196.
Auto Stop Disable Switch. See Stop/Start
System 0180.
14. Keyless Ignition. See Ignition Positions
0 178.
15. Driver Information Center (DIC) Controls. SeeDriver Information Center (DIC) 099.
16. Heated Steering Wheel 075 (If
Equipped).
17. Bluetooth Controls. See Steering Wheel
Controls 0119.
Voice Recognition Controls. See Steering
Wheel Controls 0119. 18. Volume Control Buttons. See
Steering
Wheel Controls 0119.
19. Horn 075.
20. Favorites Select Buttons. Steering Wheel
Controls 0119.
21. Z-Mode Control. See Driver Mode Control
0 196.
Forward Collision Alert (FCA) System
0 218.
22. Cruise Control 0212.
23. Electric Parking Brake 0192.
24. Data Link Connector (DLC) (Out of View). SeeMalfunction Indicator Lamp (Check
Engine Light) 090.
25. Instrument Panel Illumination Control
0113.
26. Head-Up Display Controls (If Equipped). SeeHead-Up Display (HUD) 0102.
Page 163 of 362
Chevrolet Corvette Owner Manual (GMNA-Localizing-U.S./Canada/Mexico-
17272984) - 2024 - CRC - 2/20/23
162 Driving and Operating
Brakes
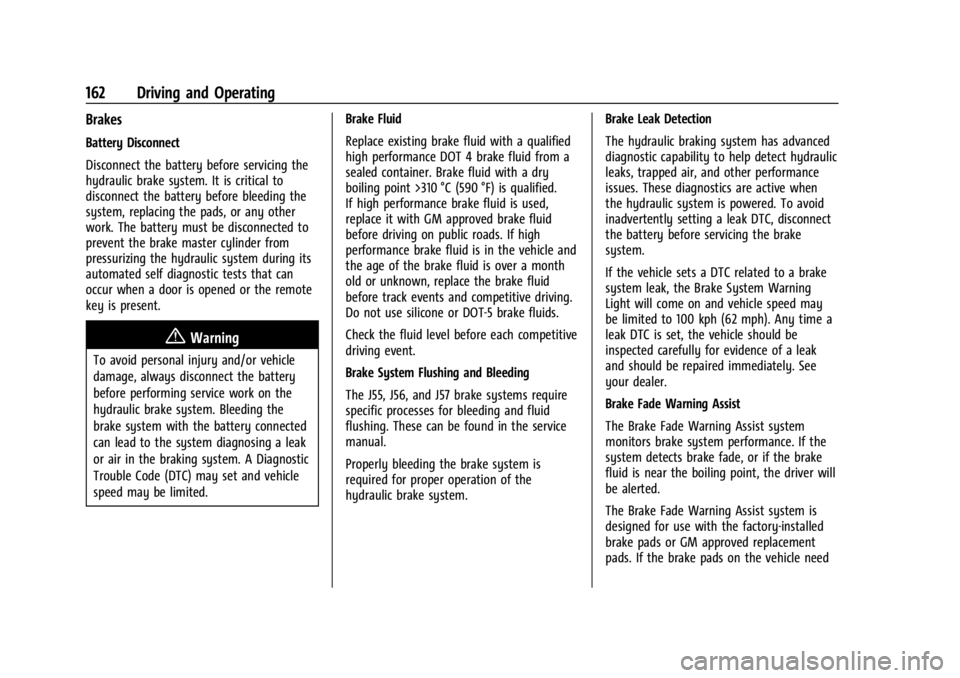
Battery Disconnect
Disconnect the battery before servicing the
hydraulic brake system. It is critical to
disconnect the battery before bleeding the
system, replacing the pads, or any other
work. The battery must be disconnected to
prevent the brake master cylinder from
pressurizing the hydraulic system during its
automated self diagnostic tests that can
occur when a door is opened or the remote
key is present.
{Warning
To avoid personal injury and/or vehicle
damage, always disconnect the battery
before performing service work on the
hydraulic brake system. Bleeding the
brake system with the battery connected
can lead to the system diagnosing a leak
or air in the braking system. A Diagnostic
Trouble Code (DTC) may set and vehicle
speed may be limited.Brake Fluid
Replace existing brake fluid with a qualified
high performance DOT 4 brake fluid from a
sealed container. Brake fluid with a dry
boiling point >310 °C (590 °F) is qualified.
If high performance brake fluid is used,
replace it with GM approved brake fluid
before driving on public roads. If high
performance brake fluid is in the vehicle and
the age of the brake fluid is over a month
old or unknown, replace the brake fluid
before track events and competitive driving.
Do not use silicone or DOT-5 brake fluids.
Check the fluid level before each competitive
driving event.
Brake System Flushing and Bleeding
The J55, J56, and J57 brake systems require
specific processes for bleeding and fluid
flushing. These can be found in the service
manual.
Properly bleeding the brake system is
required for proper operation of the
hydraulic brake system. Brake Leak Detection
The hydraulic braking system has advanced
diagnostic capability to help detect hydraulic
leaks, trapped air, and other performance
issues. These diagnostics are active when
the hydraulic system is powered. To avoid
inadvertently setting a leak DTC, disconnect
the battery before servicing the brake
system.
If the vehicle sets a DTC related to a brake
system leak, the Brake System Warning
Light will come on and vehicle speed may
be limited to 100 kph (62 mph). Any time a
leak DTC is set, the vehicle should be
inspected carefully for evidence of a leak
and should be repaired immediately. See
your dealer.
Brake Fade Warning Assist
The Brake Fade Warning Assist system
monitors brake system performance. If the
system detects brake fade, or if the brake
fluid is near the boiling point, the driver will
be alerted.
The Brake Fade Warning Assist system is
designed for use with the factory-installed
brake pads or GM approved replacement
pads. If the brake pads on the vehicle need
Page 164 of 362
Chevrolet Corvette Owner Manual (GMNA-Localizing-U.S./Canada/Mexico-
17272984) - 2024 - CRC - 2/20/23
Driving and Operating 163
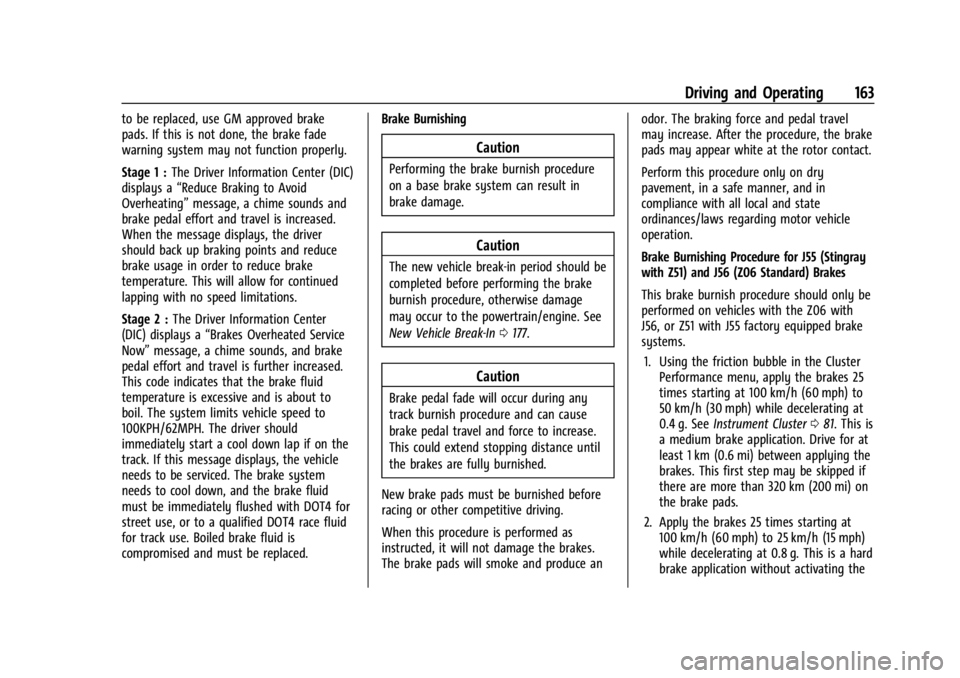
to be replaced, use GM approved brake
pads. If this is not done, the brake fade
warning system may not function properly.
Stage 1 :The Driver Information Center (DIC)
displays a “Reduce Braking to Avoid
Overheating” message, a chime sounds and
brake pedal effort and travel is increased.
When the message displays, the driver
should back up braking points and reduce
brake usage in order to reduce brake
temperature. This will allow for continued
lapping with no speed limitations.
Stage 2 : The Driver Information Center
(DIC) displays a “Brakes Overheated Service
Now” message, a chime sounds, and brake
pedal effort and travel is further increased.
This code indicates that the brake fluid
temperature is excessive and is about to
boil. The system limits vehicle speed to
100KPH/62MPH. The driver should
immediately start a cool down lap if on the
track. If this message displays, the vehicle
needs to be serviced. The brake system
needs to cool down, and the brake fluid
must be immediately flushed with DOT4 for
street use, or to a qualified DOT4 race fluid
for track use. Boiled brake fluid is
compromised and must be replaced. Brake Burnishing
Caution
Performing the brake burnish procedure
on a base brake system can result in
brake damage.
Caution
The new vehicle break-in period should be
completed before performing the brake
burnish procedure, otherwise damage
may occur to the powertrain/engine. See
New Vehicle Break-In
0177.
Caution
Brake pedal fade will occur during any
track burnish procedure and can cause
brake pedal travel and force to increase.
This could extend stopping distance until
the brakes are fully burnished.
New brake pads must be burnished before
racing or other competitive driving.
When this procedure is performed as
instructed, it will not damage the brakes.
The brake pads will smoke and produce an odor. The braking force and pedal travel
may increase. After the procedure, the brake
pads may appear white at the rotor contact.
Perform this procedure only on dry
pavement, in a safe manner, and in
compliance with all local and state
ordinances/laws regarding motor vehicle
operation.
Brake Burnishing Procedure for J55 (Stingray
with Z51) and J56 (Z06 Standard) Brakes
This brake burnish procedure should only be
performed on vehicles with the Z06 with
J56, or Z51 with J55 factory equipped brake
systems.
1. Using the friction bubble in the Cluster Performance menu, apply the brakes 25
times starting at 100 km/h (60 mph) to
50 km/h (30 mph) while decelerating at
0.4 g. See Instrument Cluster 081. This is
a medium brake application. Drive for at
least 1 km (0.6 mi) between applying the
brakes. This first step may be skipped if
there are more than 320 km (200 mi) on
the brake pads.
2. Apply the brakes 25 times starting at 100 km/h (60 mph) to 25 km/h (15 mph)
while decelerating at 0.8 g. This is a hard
brake application without activating the
Page 165 of 362
Chevrolet Corvette Owner Manual (GMNA-Localizing-U.S./Canada/Mexico-
17272984) - 2024 - CRC - 2/20/23
164 Driving and Operating
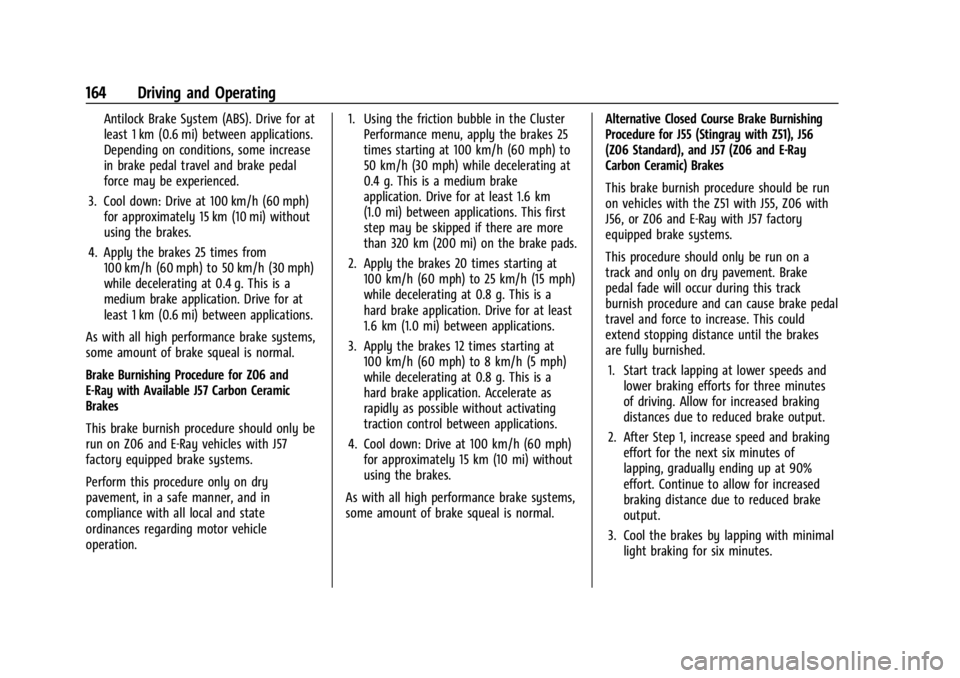
Antilock Brake System (ABS). Drive for at
least 1 km (0.6 mi) between applications.
Depending on conditions, some increase
in brake pedal travel and brake pedal
force may be experienced.
3. Cool down: Drive at 100 km/h (60 mph) for approximately 15 km (10 mi) without
using the brakes.
4. Apply the brakes 25 times from 100 km/h (60 mph) to 50 km/h (30 mph)
while decelerating at 0.4 g. This is a
medium brake application. Drive for at
least 1 km (0.6 mi) between applications.
As with all high performance brake systems,
some amount of brake squeal is normal.
Brake Burnishing Procedure for Z06 and
E-Ray with Available J57 Carbon Ceramic
Brakes
This brake burnish procedure should only be
run on Z06 and E-Ray vehicles with J57
factory equipped brake systems.
Perform this procedure only on dry
pavement, in a safe manner, and in
compliance with all local and state
ordinances regarding motor vehicle
operation. 1. Using the friction bubble in the Cluster
Performance menu, apply the brakes 25
times starting at 100 km/h (60 mph) to
50 km/h (30 mph) while decelerating at
0.4 g. This is a medium brake
application. Drive for at least 1.6 km
(1.0 mi) between applications. This first
step may be skipped if there are more
than 320 km (200 mi) on the brake pads.
2. Apply the brakes 20 times starting at 100 km/h (60 mph) to 25 km/h (15 mph)
while decelerating at 0.8 g. This is a
hard brake application. Drive for at least
1.6 km (1.0 mi) between applications.
3. Apply the brakes 12 times starting at 100 km/h (60 mph) to 8 km/h (5 mph)
while decelerating at 0.8 g. This is a
hard brake application. Accelerate as
rapidly as possible without activating
traction control between applications.
4. Cool down: Drive at 100 km/h (60 mph) for approximately 15 km (10 mi) without
using the brakes.
As with all high performance brake systems,
some amount of brake squeal is normal. Alternative Closed Course Brake Burnishing
Procedure for J55 (Stingray with Z51), J56
(Z06 Standard), and J57 (Z06 and E-Ray
Carbon Ceramic) Brakes
This brake burnish procedure should be run
on vehicles with the Z51 with J55, Z06 with
J56, or Z06 and E-Ray with J57 factory
equipped brake systems.
This procedure should only be run on a
track and only on dry pavement. Brake
pedal fade will occur during this track
burnish procedure and can cause brake pedal
travel and force to increase. This could
extend stopping distance until the brakes
are fully burnished.
1. Start track lapping at lower speeds and lower braking efforts for three minutes
of driving. Allow for increased braking
distances due to reduced brake output.
2. After Step 1, increase speed and braking effort for the next six minutes of
lapping, gradually ending up at 90%
effort. Continue to allow for increased
braking distance due to reduced brake
output.
3. Cool the brakes by lapping with minimal light braking for six minutes.
Page 185 of 362
Chevrolet Corvette Owner Manual (GMNA-Localizing-U.S./Canada/Mexico-
17272984) - 2024 - CRC - 2/20/23
184 Driving and Operating
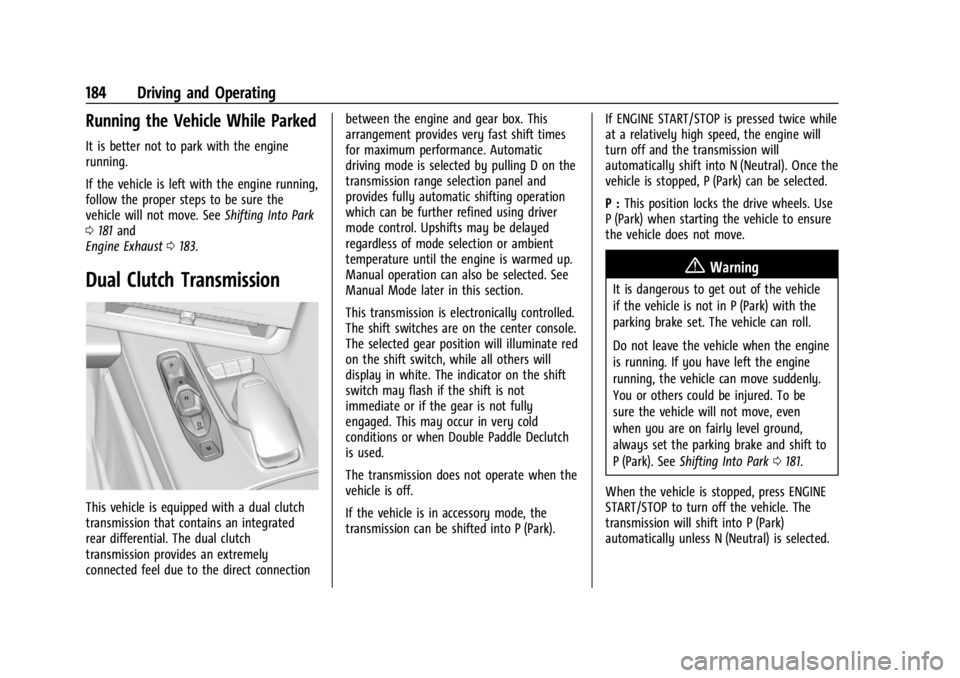
Running the Vehicle While Parked
It is better not to park with the engine
running.
If the vehicle is left with the engine running,
follow the proper steps to be sure the
vehicle will not move. SeeShifting Into Park
0 181 and
Engine Exhaust 0183.
Dual Clutch Transmission
This vehicle is equipped with a dual clutch
transmission that contains an integrated
rear differential. The dual clutch
transmission provides an extremely
connected feel due to the direct connection between the engine and gear box. This
arrangement provides very fast shift times
for maximum performance. Automatic
driving mode is selected by pulling D on the
transmission range selection panel and
provides fully automatic shifting operation
which can be further refined using driver
mode control. Upshifts may be delayed
regardless of mode selection or ambient
temperature until the engine is warmed up.
Manual operation can also be selected. See
Manual Mode later in this section.
This transmission is electronically controlled.
The shift switches are on the center console.
The selected gear position will illuminate red
on the shift switch, while all others will
display in white. The indicator on the shift
switch may flash if the shift is not
immediate or if the gear is not fully
engaged. This may occur in very cold
conditions or when Double Paddle Declutch
is used.
The transmission does not operate when the
vehicle is off.
If the vehicle is in accessory mode, the
transmission can be shifted into P (Park).
If ENGINE START/STOP is pressed twice while
at a relatively high speed, the engine will
turn off and the transmission will
automatically shift into N (Neutral). Once the
vehicle is stopped, P (Park) can be selected.
P :
This position locks the drive wheels. Use
P (Park) when starting the vehicle to ensure
the vehicle does not move.
{Warning
It is dangerous to get out of the vehicle
if the vehicle is not in P (Park) with the
parking brake set. The vehicle can roll.
Do not leave the vehicle when the engine
is running. If you have left the engine
running, the vehicle can move suddenly.
You or others could be injured. To be
sure the vehicle will not move, even
when you are on fairly level ground,
always set the parking brake and shift to
P (Park). See Shifting Into Park 0181.
When the vehicle is stopped, press ENGINE
START/STOP to turn off the vehicle. The
transmission will shift into P (Park)
automatically unless N (Neutral) is selected.
Page 187 of 362
Chevrolet Corvette Owner Manual (GMNA-Localizing-U.S./Canada/Mexico-
17272984) - 2024 - CRC - 2/20/23
186 Driving and Operating
2. Apply the brake pedal.
3. Shift to N (Neutral).
4. Turn off the engine and release thebrake pedal.
5. The indicator should continue to show N. If it does not, start the engine and
repeat Steps 2–4.
6. The vehicle will now remain in N (Neutral).
Driver Leaves Vehicle : To place the vehicle
in N (Neutral) with the engine off and the
vehicle unoccupied:
1. Ensure the vehicle is on level ground, the engine is running and the vehicle is in
P (Park).
2. Apply the brake pedal.
3. Open the door.
4. Shift to N (Neutral).
5. Turn off the engine and release the brake pedal.
6. The indicator should continue to show N. If it does not, start the engine and
repeat Steps 2–5.
7. Exit the vehicle and close the door.
8. The vehicle may automatically shift to P (Park) upon re-entry.Caution
A transmission hot message may display
if the transmission fluid is too hot.
Driving under this condition can damage
the vehicle. Stop and idle the engine to
cool the transmission fluid. This message
clears when the transmission fluid has
cooled sufficiently.
D : This position is for normal driving.
If more power is needed for passing, press
the accelerator pedal.
If the vehicle is shifted into D (Drive) while
the speed is too high, the transmission will
get ready to engage D (Drive). Reduce the
vehicle speed, then the transmission will
engage D (Drive).
To shift into D (Drive):
1. Bring the vehicle to a complete stop.
2. Pull the D (Drive) switch on the center console.
To shift out of D (Drive): 1. Bring the vehicle to a complete stop.
2. Shift to the desired gear. Downshifting the transmission in slippery
road conditions could result in skidding. See
“Skidding”
underLoss of Control 0159.
The transmission can be shifted like a
manual transmission using the paddle shift
controls while in D (Drive). See Manual
Mode 0187.
Caution
Spinning the tires or holding the vehicle
in one place on a hill using only the
accelerator pedal may damage the
transmission. The repair will not be
covered by the vehicle warranty. If the
vehicle is stuck, do not spin the tires.
When stopping on a hill, use the brakes
to hold the vehicle in place.
Page 192 of 362
Chevrolet Corvette Owner Manual (GMNA-Localizing-U.S./Canada/Mexico-
17272984) - 2024 - CRC - 2/20/23
Driving and Operating 191
Standard Exit :Engine power is reapplied to
the wheels gently to support normal vehicle
operation on public roads. This occurs when
paddles are released under any of the these
conditions:
.Accelerator pedal is fully released
.Vehicle speed is above 10 km/h (6 mph)
.Vehicle is in R (Reverse)
.Paddles are released separately
If the vehicle was in Temporary Manual
Paddle Shift mode before entering Double
Paddle Declutch, the vehicle will return to
D (Drive) with automatic shifting upon
exiting Double Paddle Declutch.
Rapid Exit : This is intended for use at a
closed course race track and not on public
roads. Engine power is reapplied to the
wheels quickly to support spirited driving.
The rate of launch is dependent on how
much the accelerator pedal is pressed when
the paddles are released. The further the
accelerator pedal is pressed, the greater the
rate of launch. Tire spin may occur if the
Traction Control System (TCS) is turned off
while performing a Rapid Exit. Rapid Exit
launch occurs when all of the following
conditions are met:
.Vehicle speed is below 10 km/h (6 mph)
.Vehicle is in D (Drive) or
M (Manual Mode)
.Both paddles are released at the
same time
With the accelerator fully pressed and the
engine at the rev limiter, peak performance
only occurs if the paddles are released
within a short period of time after reaching
the rev limit (i.e., a few seconds).
Manual Launch : While the vehicle is in
Double Paddle Declutch, Manual Launch can
be activated to gain more precise control
over the engine speed to prepare for a
Standard or Rapid Exit. To activate this
feature, first enter Double Paddle Declutch,
then release and repull either the + paddle
or −paddle while keeping the opposite
paddle held. The Performance Transmission
Active Light will illuminate in the gauge
cluster to indicate that Manual Launch has
been activated. See Performance
Transmission Active 093. When Manual
Launch is active, the engine will respond
differently when the accelerator pedal is
pressed compared to normal Double Paddle
Declutch. The accelerator pedal must be
pressed further to increase the engine rpm
and a lower engine rpm limit will be
applied. This feature also provides faster engine response during a Rapid Exit if any
of the Performance Traction Management
(PTM) modes or Electronic Stability Control
(ESC) Off has been selected. To exit Manual
Launch, release both the + paddle and
−
paddle. The vehicle will also exit Double
Paddle Declutch and the engine will
reconnect to the wheels. A Standard Exit or
Rapid Exit will be performed based on the
same conditions listed previously.
{Warning
When exiting Double Paddle Declutch, the
vehicle may move rapidly. You could lose
control and cause a crash with nearby
people or objects. Be ready to release the
accelerator pedal or apply the brakes
immediately if the vehicle moves too
quickly. Do not use the Double Paddle
Declutch when people or objects are near.
Drive Systems
All-Wheel Drive
If equipped with E-Ray, advanced electric
All-Wheel Drive (eAWD) delivers power to all
four wheels and adjusts automatically to the
driving conditions. The eAWD system
continuously varies the drive power to the
Page 214 of 362
Chevrolet Corvette Owner Manual (GMNA-Localizing-U.S./Canada/Mexico-
17272984) - 2024 - CRC - 2/20/23
Driving and Operating 213
Resuming a Set Speed
If cruise control is engaged at a set speed
and then the brakes are applied or
*is
pressed, cruise control is disengaged without
erasing the set speed from memory.
Once the vehicle reaches a speed of
40 km/h (25 mph) or more, briefly press the
thumbwheel up to +RES and release it to
engage cruise control at the previous set
speed.
Increasing Speed While Using Cruise Control
If cruise control is already engaged:
.Accelerate to the desired cruise speed
using the accelerator pedal. When the
desired higher cruise speed is reached,
briefly press the thumbwheel down to
SET– and release it, and then remove
your foot from the accelerator pedal. The
vehicle will now cruise at the higher set
speed.
.Press and hold the thumbwheel up to
+RES until the desired speed is reached,
then release it.
.To increase the vehicle speed in small
increments, briefly press the thumbwheel
up to +RES and release it. For each press,
the vehicle speed increases by about
1 km/h (1 mph). The speedometer reading can be displayed
in either English or metric units. See
Settings
0 142. The increment value used depends on
the units displayed.
Reducing Speed While Using Cruise Control
If cruise control is already engaged:
.Press and hold the thumbwheel down to
SET– until the desired lower speed is
reached, then release it.
.To decrease the vehicle speed in small
increments, briefly press the thumbwheel
down to SET– and release it. For each
press, the vehicle speed decreases by
about 1 km/h (1 mph).
Passing Another Vehicle While Using Cruise
Control
To pass another vehicle while cruise control
is engaged, use the accelerator pedal to
increase the vehicle speed. When you
remove your foot from the accelerator
pedal, the vehicle will slow down to the
previously set speed. While pressing the
accelerator pedal or shortly following the
release to override cruise control, briefly
pressing and releasing the thumbwheel
down to SET– will result in the cruise speed
being set to the current vehicle speed. Using Cruise Control on Hills
How well cruise control works on a hill
depends on the vehicle speed, load, and the
steepness of the hill. When going up a steep
hill, you may need to apply the accelerator
pedal to maintain the cruise speed. When
going downhill, you may need to brake or
shift to a lower gear to keep the vehicle
speed down. If the brake pedal is applied,
cruise control will disengage.
Cruise Control in Manual Paddle Shift Gear
Selection
When the vehicle is in M (Manual Mode)
and the manual paddle shift controls are not
being used, cruise control operates in the
same manner as D (Drive).
When the vehicle is in M (Manual Mode)
and the manual paddle shift controls are
being used, cruise control operates as
follows:
.If cruise control is engaged and a gear is
selected with the manual paddle shift
controls, the vehicle speed is maintained
in the driver selected gear and will not
automatically upshift or downshift the
transmission while the driver gear
selection is active.
Page 215 of 362
Chevrolet Corvette Owner Manual (GMNA-Localizing-U.S./Canada/Mexico-
17272984) - 2024 - CRC - 2/20/23
214 Driving and Operating
.If driving in hilly terrain, cruise control
may not be able to maintain vehicle
speed if an upshift or downshift is not
selected by the driver. While driving on
hilly terrain and cruise control is engaged
with a manual paddle shift gear selection,
the driver must select the proper gear for
the terrain or shift into D (Drive) for fully
automatic transmission operation. See
Manual Mode0187.
Ending Cruise Control
There are four ways to end cruise control:
.Lightly apply the brake pedal.
.Press*.
.Press1.
.Shift the transmission to N (Neutral).
Erasing Speed Memory
The cruise control set speed is erased from
memory if
1is pressed or when the vehicle
is turned off.
Advanced Driver Assistance
Systems
This vehicle may have features that work
together to help avoid crashes or reduce
crash damage while driving, backing, and
parking. Read this entire section before
using these systems.
{Warning
Do not rely on the Driver Assistance
Systems. These systems do not replace
the need for paying attention and driving
safely. You may not hear or see alerts or
warnings provided by these systems.
Failure to use proper care when driving
may result in injury, death, or vehicle
damage. See Defensive Driving 0157.
Under many conditions, these systems
will not:
.Detect children, pedestrians, bicyclists,
or animals.
.Detect vehicles or objects outside the
area monitored by the system.
.Work at all driving speeds. (Continued)
Warning (Continued)
.Warn you or provide you with enough
time to avoid a crash.
.Work under poor visibility or bad
weather conditions.
.Work if the detection sensor is not
cleaned or is covered by ice, snow,
mud, or dirt.
.Work if the detection sensor is
covered up, such as with a sticker,
magnet, or metal plate.
.Work if the area surrounding the
detection sensor is damaged or not
properly repaired.
Complete attention is always required
while driving, and you should be ready to
take action and apply the brakes and/or
steer the vehicle to avoid crashes.
Audible Alert
Some driver assistance features alert the
driver of obstacles by beeping. To view
available settings for this feature, touch the
Settings icon on the infotainment home
page. Select “Vehicle”to display the list of
available options and select “Comfort and
Convenience”.
Page 232 of 362
Chevrolet Corvette Owner Manual (GMNA-Localizing-U.S./Canada/Mexico-
17272984) - 2024 - CRC - 2/20/23
Vehicle Care 231
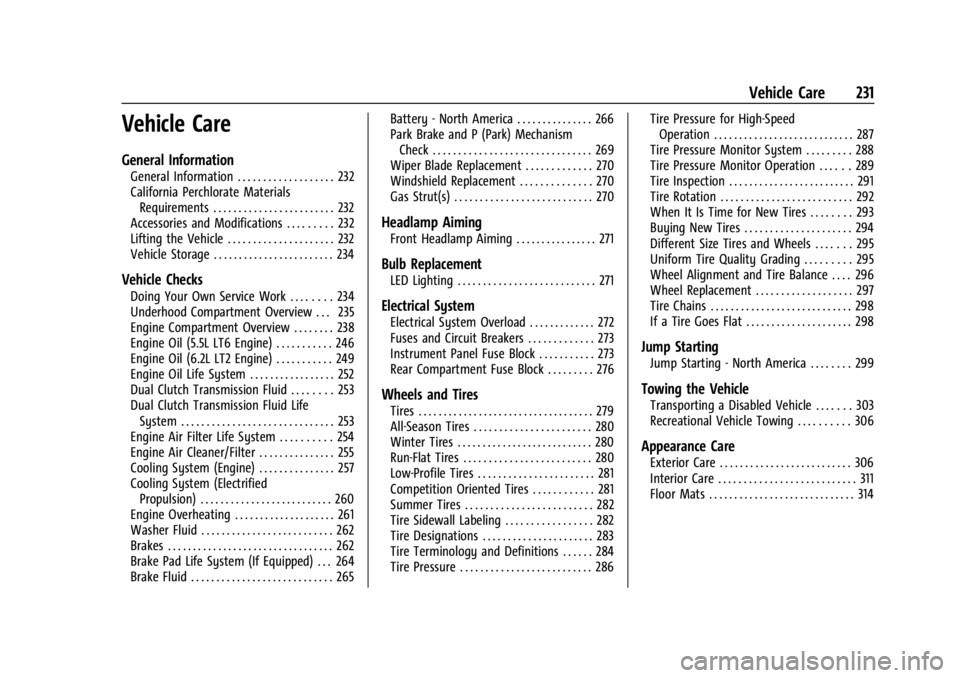
Vehicle Care
General Information
General Information . . . . . . . . . . . . . . . . . . . 232
California Perchlorate MaterialsRequirements . . . . . . . . . . . . . . . . . . . . . . . . 232
Accessories and Modifications . . . . . . . . . 232
Lifting the Vehicle . . . . . . . . . . . . . . . . . . . . . 232
Vehicle Storage . . . . . . . . . . . . . . . . . . . . . . . . 234
Vehicle Checks
Doing Your Own Service Work . . . . . . . . 234
Underhood Compartment Overview . . . 235
Engine Compartment Overview . . . . . . . . 238
Engine Oil (5.5L LT6 Engine) . . . . . . . . . . . 246
Engine Oil (6.2L LT2 Engine) . . . . . . . . . . . 249
Engine Oil Life System . . . . . . . . . . . . . . . . . 252
Dual Clutch Transmission Fluid . . . . . . . . 253
Dual Clutch Transmission Fluid Life System . . . . . . . . . . . . . . . . . . . . . . . . . . . . . . 253
Engine Air Filter Life System . . . . . . . . . . 254
Engine Air Cleaner/Filter . . . . . . . . . . . . . . . 255
Cooling System (Engine) . . . . . . . . . . . . . . . 257
Cooling System (Electrified Propulsion) . . . . . . . . . . . . . . . . . . . . . . . . . . 260
Engine Overheating . . . . . . . . . . . . . . . . . . . . 261
Washer Fluid . . . . . . . . . . . . . . . . . . . . . . . . . . 262
Brakes . . . . . . . . . . . . . . . . . . . . . . . . . . . . . . . . . 262
Brake Pad Life System (If Equipped) . . . 264
Brake Fluid . . . . . . . . . . . . . . . . . . . . . . . . . . . . 265 Battery - North America . . . . . . . . . . . . . . . 266
Park Brake and P (Park) Mechanism
Check . . . . . . . . . . . . . . . . . . . . . . . . . . . . . . . 269
Wiper Blade Replacement . . . . . . . . . . . . . 270
Windshield Replacement . . . . . . . . . . . . . . 270
Gas Strut(s) . . . . . . . . . . . . . . . . . . . . . . . . . . . 270
Headlamp Aiming
Front Headlamp Aiming . . . . . . . . . . . . . . . . 271
Bulb Replacement
LED Lighting . . . . . . . . . . . . . . . . . . . . . . . . . . . 271
Electrical System
Electrical System Overload . . . . . . . . . . . . . 272
Fuses and Circuit Breakers . . . . . . . . . . . . . 273
Instrument Panel Fuse Block . . . . . . . . . . . 273
Rear Compartment Fuse Block . . . . . . . . . 276
Wheels and Tires
Tires . . . . . . . . . . . . . . . . . . . . . . . . . . . . . . . . . . . 279
All-Season Tires . . . . . . . . . . . . . . . . . . . . . . . 280
Winter Tires . . . . . . . . . . . . . . . . . . . . . . . . . . . 280
Run-Flat Tires . . . . . . . . . . . . . . . . . . . . . . . . . 280
Low-Profile Tires . . . . . . . . . . . . . . . . . . . . . . . 281
Competition Oriented Tires . . . . . . . . . . . . 281
Summer Tires . . . . . . . . . . . . . . . . . . . . . . . . . 282
Tire Sidewall Labeling . . . . . . . . . . . . . . . . . 282
Tire Designations . . . . . . . . . . . . . . . . . . . . . . 283
Tire Terminology and Definitions . . . . . . 284
Tire Pressure . . . . . . . . . . . . . . . . . . . . . . . . . . 286 Tire Pressure for High-Speed
Operation . . . . . . . . . . . . . . . . . . . . . . . . . . . . 287
Tire Pressure Monitor System . . . . . . . . . 288
Tire Pressure Monitor Operation . . . . . . 289
Tire Inspection . . . . . . . . . . . . . . . . . . . . . . . . . 291
Tire Rotation . . . . . . . . . . . . . . . . . . . . . . . . . . 292
When It Is Time for New Tires . . . . . . . . 293
Buying New Tires . . . . . . . . . . . . . . . . . . . . . 294
Different Size Tires and Wheels . . . . . . . 295
Uniform Tire Quality Grading . . . . . . . . . 295
Wheel Alignment and Tire Balance . . . . 296
Wheel Replacement . . . . . . . . . . . . . . . . . . . 297
Tire Chains . . . . . . . . . . . . . . . . . . . . . . . . . . . . 298
If a Tire Goes Flat . . . . . . . . . . . . . . . . . . . . . 298
Jump Starting
Jump Starting - North America . . . . . . . . 299
Towing the Vehicle
Transporting a Disabled Vehicle . . . . . . . 303
Recreational Vehicle Towing . . . . . . . . . . 306
Appearance Care
Exterior Care . . . . . . . . . . . . . . . . . . . . . . . . . . 306
Interior Care . . . . . . . . . . . . . . . . . . . . . . . . . . . 311
Floor Mats . . . . . . . . . . . . . . . . . . . . . . . . . . . . . 314