air condition CHEVROLET CORVETTE C6 2012 Owner's Guide
[x] Cancel search | Manufacturer: CHEVROLET, Model Year: 2012, Model line: CORVETTE C6, Model: CHEVROLET CORVETTE C6 2012Pages: 432, PDF Size: 5.73 MB
Page 328 of 432
Black plate (52,1)Chevrolet Corvette Owner Manual - 2012
10-52 Vehicle Care
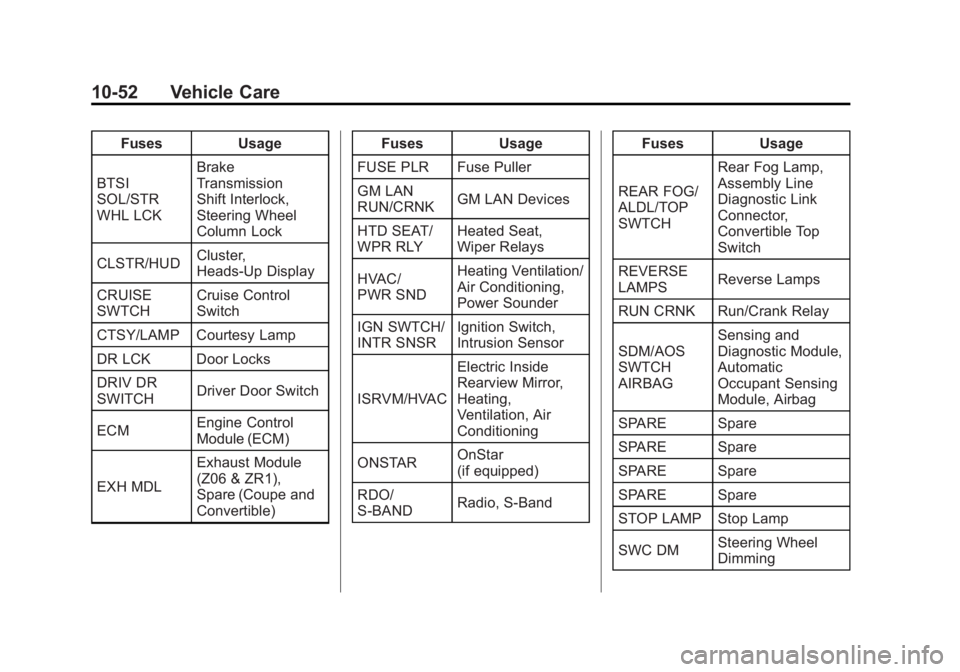
FusesUsage
BTSI
SOL/STR
WHL LCK Brake
Transmission
Shift Interlock,
Steering Wheel
Column Lock
CLSTR/HUD Cluster,
Heads-Up Display
CRUISE
SWTCH Cruise Control
Switch
CTSY/LAMP Courtesy Lamp
DR LCK Door Locks
DRIV DR
SWITCH Driver Door Switch
ECM Engine Control
Module (ECM)
EXH MDL Exhaust Module
(Z06 & ZR1),
Spare (Coupe and
Convertible) Fuses
Usage
FUSE PLR Fuse Puller
GM LAN
RUN/CRNK GM LAN Devices
HTD SEAT/
WPR RLY Heated Seat,
Wiper Relays
HVAC/
PWR SND Heating Ventilation/
Air Conditioning,
Power Sounder
IGN SWTCH/
INTR SNSR Ignition Switch,
Intrusion Sensor
ISRVM/HVAC Electric Inside
Rearview Mirror,
Heating,
Ventilation, Air
Conditioning
ONSTAR OnStar
(if equipped)
RDO/
S-BAND Radio, S-Band Fuses
Usage
REAR FOG/
ALDL/TOP
SWTCH Rear Fog Lamp,
Assembly Line
Diagnostic Link
Connector,
Convertible Top
Switch
REVERSE
LAMPS Reverse Lamps
RUN CRNK Run/Crank Relay
SDM/AOS
SWTCH
AIRBAG Sensing and
Diagnostic Module,
Automatic
Occupant Sensing
Module, Airbag
SPARE Spare
SPARE Spare
SPARE Spare
SPARE Spare
STOP LAMP Stop Lamp
SWC DM Steering Wheel
Dimming
Page 332 of 432
Black plate (56,1)Chevrolet Corvette Owner Manual - 2012
10-56 Vehicle Care
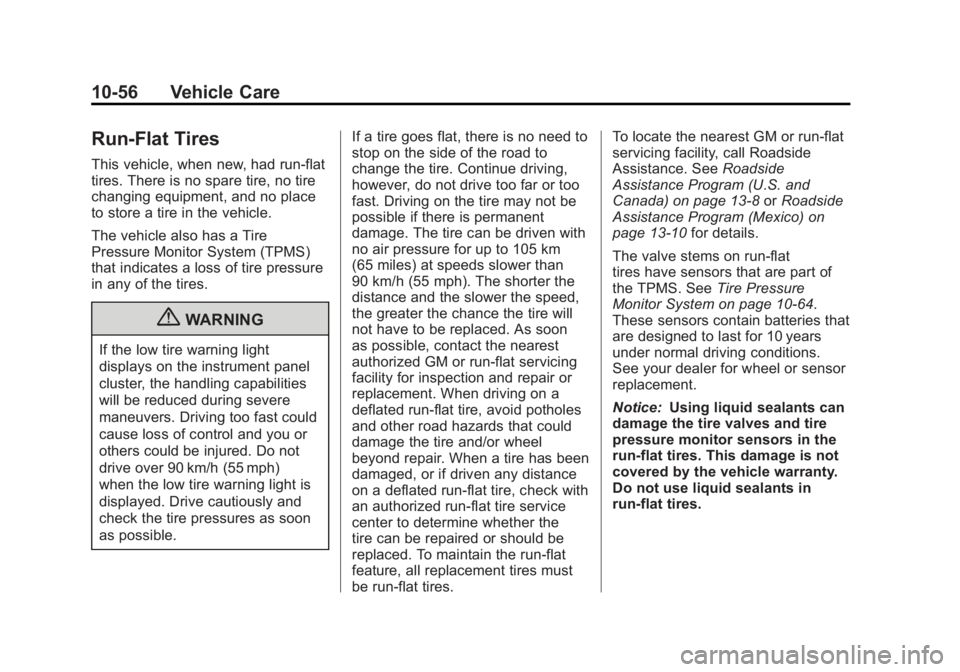
Run-Flat Tires
This vehicle, when new, had run-flat
tires. There is no spare tire, no tire
changing equipment, and no place
to store a tire in the vehicle.
The vehicle also has a Tire
Pressure Monitor System (TPMS)
that indicates a loss of tire pressure
in any of the tires.
{WARNING
If the low tire warning light
displays on the instrument panel
cluster, the handling capabilities
will be reduced during severe
maneuvers. Driving too fast could
cause loss of control and you or
others could be injured. Do not
drive over 90 km/h (55 mph)
when the low tire warning light is
displayed. Drive cautiously and
check the tire pressures as soon
as possible.If a tire goes flat, there is no need to
stop on the side of the road to
change the tire. Continue driving,
however, do not drive too far or too
fast. Driving on the tire may not be
possible if there is permanent
damage. The tire can be driven with
no air pressure for up to 105 km
(65 miles) at speeds slower than
90 km/h (55 mph). The shorter the
distance and the slower the speed,
the greater the chance the tire will
not have to be replaced. As soon
as possible, contact the nearest
authorized GM or run-flat servicing
facility for inspection and repair or
replacement. When driving on a
deflated run-flat tire, avoid potholes
and other road hazards that could
damage the tire and/or wheel
beyond repair. When a tire has been
damaged, or if driven any distance
on a deflated run-flat tire, check with
an authorized run-flat tire service
center to determine whether the
tire can be repaired or should be
replaced. To maintain the run-flat
feature, all replacement tires must
be run-flat tires. To locate the nearest GM or run-flat
servicing facility, call Roadside
Assistance. See
Roadside
Assistance Program (U.S. and
Canada) on page 13‑8 orRoadside
Assistance Program (Mexico) on
page 13‑10 for details.
The valve stems on run-flat
tires have sensors that are part of
the TPMS. See Tire Pressure
Monitor System on page 10‑64.
These sensors contain batteries that
are designed to last for 10 years
under normal driving conditions.
See your dealer for wheel or sensor
replacement.
Notice: Using liquid sealants can
damage the tire valves and tire
pressure monitor sensors in the
run-flat tires. This damage is not
covered by the vehicle warranty.
Do not use liquid sealants in
run-flat tires.
Page 335 of 432
Black plate (59,1)Chevrolet Corvette Owner Manual - 2012
Vehicle Care 10-59
Tire Designations
Tire Size
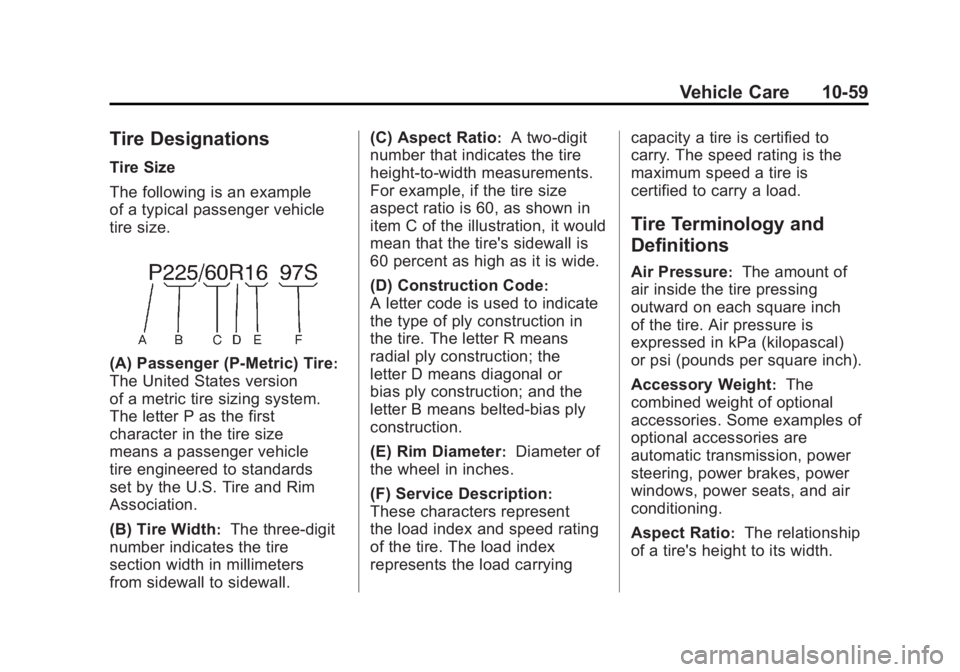
The following is an example
of a typical passenger vehicle
tire size.
(A) Passenger (P‐Metric) Tire:
The United States version
of a metric tire sizing system.
The letter P as the first
character in the tire size
means a passenger vehicle
tire engineered to standards
set by the U.S. Tire and Rim
Association.
(B) Tire Width
:The three‐digit
number indicates the tire
section width in millimeters
from sidewall to sidewall. (C) Aspect Ratio
:A two‐digit
number that indicates the tire
height‐to‐width measurements.
For example, if the tire size
aspect ratio is 60, as shown in
item C of the illustration, it would
mean that the tire's sidewall is
60 percent as high as it is wide.
(D) Construction Code
:
A letter code is used to indicate
the type of ply construction in
the tire. The letter R means
radial ply construction; the
letter D means diagonal or
bias ply construction; and the
letter B means belted‐bias ply
construction.
(E) Rim Diameter
:Diameter of
the wheel in inches.
(F) Service Description
:
These characters represent
the load index and speed rating
of the tire. The load index
represents the load carrying capacity a tire is certified to
carry. The speed rating is the
maximum speed a tire is
certified to carry a load.
Tire Terminology and
Definitions
Air Pressure:The amount of
air inside the tire pressing
outward on each square inch
of the tire. Air pressure is
expressed in kPa (kilopascal)
or psi (pounds per square inch).
Accessory Weight
:The
combined weight of optional
accessories. Some examples of
optional accessories are
automatic transmission, power
steering, power brakes, power
windows, power seats, and air
conditioning.
Aspect Ratio
:The relationship
of a tire's height to its width.
Page 340 of 432
Black plate (64,1)Chevrolet Corvette Owner Manual - 2012
10-64 Vehicle Care
Tire Pressure for
High-Speed Operation
{WARNING
Driving at high speeds, 160 km/h
(100 mph) or higher, puts an
additional strain on tires.
Sustained high-speed driving
causes excessive heat buildup
and can cause sudden tire failure.
You could have a crash and you
or others could be killed. Some
high-speed rated tires require
inflation pressure adjustment for
high-speed operation. When
speed limits and road conditions
are such that a vehicle can be
driven at high speeds, make sure
the tires are rated for high-speed
operation, in excellent condition,
and set to the correct cold tire
inflation pressure for the
vehicle load.The tires require inflation pressure
adjustment when driving the vehicle
at speeds of 282 km/h (175 mph) or
higher, where it is legal. Set the cold
inflation pressure to the maximum
inflation pressure shown on the
tire sidewall, or 265 kPa (38 psi),
whichever is lower. See the
example following. Return the tires
to the recommended cold tire
inflation pressure when high-speed
driving has ended. See
Vehicle
Load Limits on page 9‑14.
Example:
The maximum load and inflation
pressure molded on the tire
sidewall, in small letters,
near the rim flange. It will read
something like this: Maximum load
690 kg (1521 lbs) 300 kPa (44 psi)
Max. Press.
For this example, set the inflation
pressure for high‐speed driving at
265 kPa (38 psi). Racing or other competitive driving
may affect the warranty coverage of
the vehicle. See the warranty
booklet for more information.Tire Pressure Monitor
System
The Tire Pressure Monitor System
(TPMS) uses radio and sensor
technology to check tire pressure
levels. The TPMS sensors monitor
the air pressure in your tires and
transmit tire pressure readings to a
receiver located in the vehicle.
Each tire, including the spare
(if provided), should be checked
monthly when cold and inflated to
the inflation pressure recommended
by the vehicle manufacturer on the
vehicle placard or tire inflation
pressure label. (If your vehicle has
tires of a different size than the size
indicated on the vehicle placard or
tire inflation pressure label, you
should determine the proper tire
inflation pressure for those tires.)
Page 342 of 432
Black plate (66,1)Chevrolet Corvette Owner Manual - 2012
10-66 Vehicle Care
Tire Pressure Monitor
Operation
This vehicle may have a Tire
Pressure Monitor System (TPMS).
The TPMS is designed to warn the
driver when a low tire pressure
condition exists. TPMS sensors
are mounted onto each tire and
wheel assembly on your vehicle.
The TPMS sensors monitor the air
pressure in the tires and transmits
the tire pressure readings to a
receiver located in the vehicle.
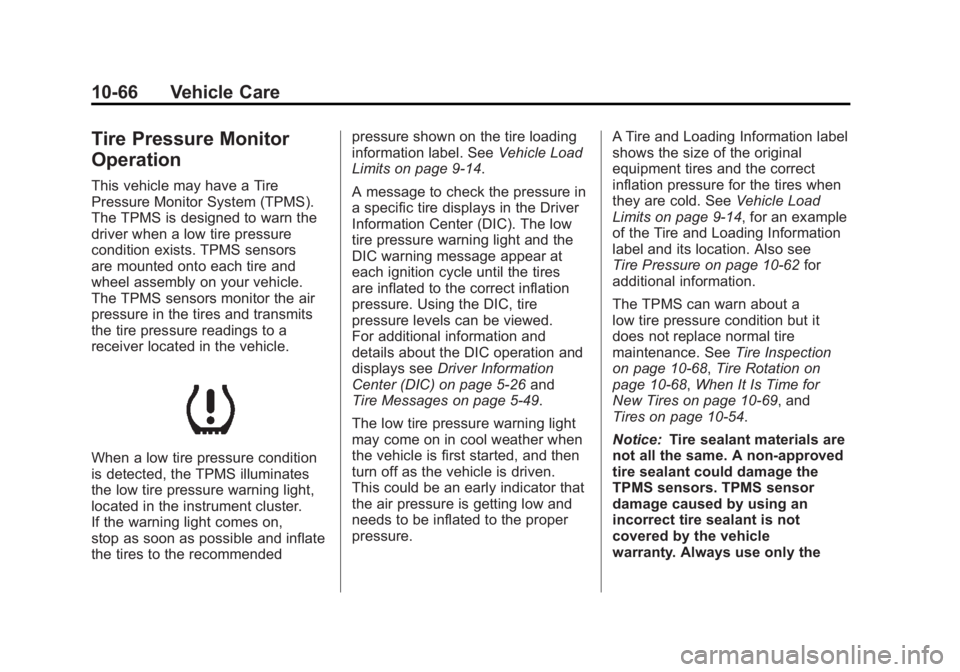
When a low tire pressure condition
is detected, the TPMS illuminates
the low tire pressure warning light,
located in the instrument cluster.
If the warning light comes on,
stop as soon as possible and inflate
the tires to the recommendedpressure shown on the tire loading
information label. See
Vehicle Load
Limits on page 9‑14.
A message to check the pressure in
a specific tire displays in the Driver
Information Center (DIC). The low
tire pressure warning light and the
DIC warning message appear at
each ignition cycle until the tires
are inflated to the correct inflation
pressure. Using the DIC, tire
pressure levels can be viewed.
For additional information and
details about the DIC operation and
displays see Driver Information
Center (DIC) on page 5‑26 and
Tire Messages on page 5‑49.
The low tire pressure warning light
may come on in cool weather when
the vehicle is first started, and then
turn off as the vehicle is driven.
This could be an early indicator that
the air pressure is getting low and
needs to be inflated to the proper
pressure. A Tire and Loading Information label
shows the size of the original
equipment tires and the correct
inflation pressure for the tires when
they are cold. See
Vehicle Load
Limits on page 9‑14, for an example
of the Tire and Loading Information
label and its location. Also see
Tire Pressure on page 10‑62 for
additional information.
The TPMS can warn about a
low tire pressure condition but it
does not replace normal tire
maintenance. See Tire Inspection
on page 10‑68, Tire Rotation on
page 10‑68, When It Is Time for
New Tires on page 10‑69, and
Tires on page 10‑54.
Notice: Tire sealant materials are
not all the same. A non-approved
tire sealant could damage the
TPMS sensors. TPMS sensor
damage caused by using an
incorrect tire sealant is not
covered by the vehicle
warranty. Always use only the
Page 350 of 432
Black plate (74,1)Chevrolet Corvette Owner Manual - 2012
10-74 Vehicle Care
Temperature–A, B, C
The temperature grades are A
(the highest), B, and C,
representing the tire's resistance
to the generation of heat and its
ability to dissipate heat when
tested under controlled
conditions on a specified indoor
laboratory test wheel. Sustained
high temperature can cause
the material of the tire to
degenerate and reduce tire life,
and excessive temperature can
lead to sudden tire failure.
The grade C corresponds to a
level of performance which all
passenger car tires must meet
under the Federal Motor Safety
Standard No. 109. Grades B
and A represent higher levels of performance on the laboratory
test wheel than the minimum
required by law. Warning: The
temperature grade for this tire
is established for a tire that is
properly inflated and not
overloaded. Excessive speed,
underinflation, or excessive
loading, either separately or in
combination, can cause heat
buildup and possible tire failure.
Wheel Alignment and Tire
Balance
The tires and wheels were aligned
and balanced at the factory to
provide the longest tire life and best
overall performance. Adjustments to
wheel alignment and tire balancing
will not be necessary on a regular basis. However, check the
alignment if there is unusual tire
wear or if the vehicle is pulling to
one side or the other. If the vehicle
vibrates when driving on a smooth
road, the tires and wheels might
need to be rebalanced. See your
dealer for proper diagnosis.
Wheel Replacement
Replace any wheel that is bent,
cracked, or badly rusted or
corroded. If wheel nuts keep coming
loose, the wheel, wheel bolts, and
wheel nuts should be replaced.
If the wheel leaks air, replace it.
Some aluminum wheels can be
repaired. See your dealer if any of
these conditions exist.
Your dealer will know the kind of
wheel that is needed.
Page 352 of 432
Black plate (76,1)Chevrolet Corvette Owner Manual - 2012
10-76 Vehicle Care
Tightening Wheel Lug Nuts
{WARNING
Never use oil or grease on studs
or the threads of the wheel nuts.
The wheel nuts might come loose
and the wheel could fall off,
causing a crash.
{WARNING
Incorrect wheel nuts or improperly
tightened wheel nuts can cause
the wheel to become loose and
even come off. This could lead
to a crash. Be sure to use the
correct wheel nuts. If you have to
replace them, be sure to get
new GM original equipment
wheel nuts.Notice:
Improperly tightened
wheel nuts can lead to brake
pulsation and rotor damage.
To avoid expensive brake repairs,
evenly tighten the wheel nuts in
the proper sequence and to the
proper torque specification.
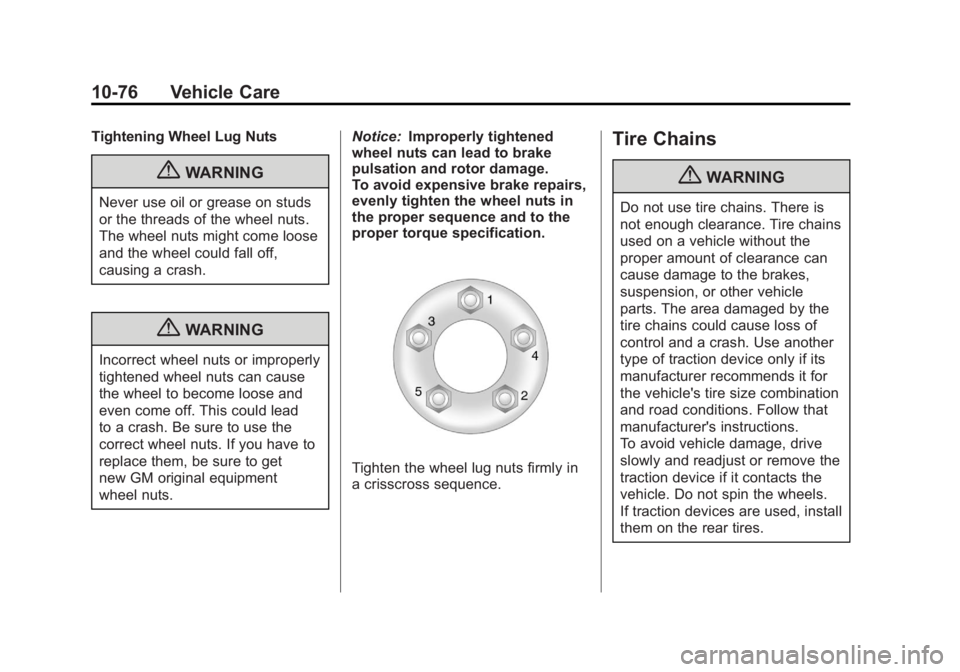
Tighten the wheel lug nuts firmly in
a crisscross sequence.
Tire Chains
{WARNING
Do not use tire chains. There is
not enough clearance. Tire chains
used on a vehicle without the
proper amount of clearance can
cause damage to the brakes,
suspension, or other vehicle
parts. The area damaged by the
tire chains could cause loss of
control and a crash. Use another
type of traction device only if its
manufacturer recommends it for
the vehicle's tire size combination
and road conditions. Follow that
manufacturer's instructions.
To avoid vehicle damage, drive
slowly and readjust or remove the
traction device if it contacts the
vehicle. Do not spin the wheels.
If traction devices are used, install
them on the rear tires.
Page 361 of 432
Black plate (85,1)Chevrolet Corvette Owner Manual - 2012
Vehicle Care 10-85
Tires
Use a stiff brush with tire cleaner to
clean the tires.
Notice:Using petroleum-based
tire dressing products on the
vehicle may damage the paint
finish and/or tires. When applying
a tire dressing, always wipe off
any overspray from all painted
surfaces on the vehicle.
Wheels and Trim —Aluminum
or Chrome
Use a soft, clean cloth with mild
soap and water to clean the wheels.
After rinsing thoroughly with clean
water, dry with a soft, clean towel.
A wax may then be applied.
Keep the wheels clean using a soft,
clean cloth with mild soap and
water. Rinse with clean water.
After rinsing thoroughly, dry with a
soft, clean towel. A wax may then
be applied. Notice:
Chrome wheels and other
chrome trim may be damaged if
the vehicle is not washed after
driving on roads that have been
sprayed with magnesium,
calcium, or sodium chloride.
These chlorides are used on
roads for conditions such as
ice and dust. Always wash the
chrome with soap and water after
exposure.
Notice: To avoid surface
damage, do not use strong soaps,
chemicals, abrasive polishes,
cleaners, brushes, or cleaners
that contain acid on aluminum or
chrome-plated wheels. Use only
approved cleaners. Also, never
drive a vehicle with aluminum or
chrome-plated wheels through an
automatic car wash that uses
silicone carbide tire cleaning
brushes. Damage could occur
and the repairs would not be
covered by the vehicle warranty.
Steering, Suspension, and
Chassis Components
Visually inspect front and rear
suspension and steering system for
damaged, loose, or missing parts or
signs of wear. Inspect the power
steering for proper hook-up, binding,
leaks, cracks, chafing, etc. Visually
check constant velocity joints,
rubber boots, and axle seals for
leaks.
Body Component Lubrication
Lubricate all key lock cylinders,
hood hinges, liftgate hinges, and
steel fuel door hinge unless the
components are plastic. Applying
silicone grease on weatherstrips
with a clean cloth will make them
last longer, seal better, and not stick
or squeak.
Page 364 of 432
Black plate (88,1)Chevrolet Corvette Owner Manual - 2012
10-88 Vehicle Care
To clean:
1. Saturate a clean lint-freecolorfast cloth with water or club
soda. Microfiber cloth is
recommended to prevent lint
transfer to the fabric or carpet.
2. Remove excess moisture by gently wringing until water does
not drip from the cleaning cloth.
3. Start on the outside edge of the soil and gently rub toward the
center. Rotate the cleaning cloth
to a clean area frequently to
prevent forcing the soil in to the
fabric.
4. Continue gently rubbing the soiled area until there is no
longer any color transfer from
the soil to the cleaning cloth.
5. If the soil is not completely removed, use a mild soap
solution followed by only club
soda or plain water. If the soil is not completely
removed, it may be necessary
to use a commercial upholstery
cleaner or spot lifter. Test a small
hidden area for colorfastness
before using a commercial
upholstery cleaner or spot lifter.
If ring formation occurs, clean the
entire fabric or carpet.
Following the cleaning process, a
paper towel can be used to blot
excess moisture.
Instrument Panel, Leather,
Vinyl, & Other Plastic Surfaces
Use a soft microfiber cloth
dampened with water to remove
dust and loose dirt. For a more
thorough cleaning, use a soft
microfiber cloth dampened with a
mild soap solution.
Notice:
Soaking or saturating
leather, especially perforated
leather, as well as other interior
surfaces, may cause permanent
damage. Wipe excess moisture from these surfaces after
cleaning and allow them to dry
naturally. Never use heat, steam,
spot lifters or spot removers.
Do not use cleaners that contain
silicone or wax-based products.
Cleaners containing these
solvents can permanently
change the appearance and feel
of leather or soft trim and are not
recommended.
Do not use cleaners that increase
gloss, especially on the instrument
panel. Reflected glare can decrease
visibility through the windshield
under certain conditions.
Notice:
Use of air fresheners may
cause permanent damage to
plastics and painted surfaces.
If an air freshener comes in
contact with any plastic or
painted surface in the vehicle,
blot immediately and clean with a
soft cloth dampened with a mild
soap solution. Damage caused
by air fresheners would not be
covered by the vehicle warranty.
Page 367 of 432
Black plate (1,1)Chevrolet Corvette Owner Manual - 2012
Service and Maintenance 11-1
Service and
Maintenance
General Information
General Information . . . . . . . . . . 11-1
Maintenance Schedule
Maintenance Schedule . . . . . . . 11-3
Special Application Services
Special ApplicationServices . . . . . . . . . . . . . . . . . . . . 11-8
Additional Maintenance
and Care
Additional Maintenanceand Care . . . . . . . . . . . . . . . . . . . 11-8
Recommended Fluids,
Lubricants, and Parts
Recommended Fluids andLubricants . . . . . . . . . . . . . . . . . 11-12
Maintenance Replacement Parts . . . . . . . . . . . . . . . . . . . . . . 11-14
Maintenance Records
Maintenance Records . . . . . . 11-15
General Information
Your vehicle is an important
investment. This section describes
the required maintenance for the
vehicle. Follow this schedule to
help protect against major repair
expenses resulting from neglect or
inadequate maintenance. It may
also help to maintain the value of
the vehicle if it is sold. It is the
responsibility of the owner to have
all required maintenance performed.
Your dealer has trained technicians
who can perform required
maintenance using genuine
replacement parts. They have
up‐to‐date tools and equipment
for fast and accurate diagnostics.
Many dealers have extended
evening and Saturday hours,
courtesy transportation, and online
scheduling to assist with service
needs. Your dealer recognizes the
importance of providing
competitively priced maintenance
and repair services. With trained
technicians, the dealer is the place
for routine maintenance such as oil
changes and tire rotations and
additional maintenance items like
tires, brakes, batteries, and wiper
blades.
Notice:
Damage caused by
improper maintenance can lead to
costly repairs and may not be
covered by the vehicle warranty.
Maintenance intervals, checks,
inspections, recommended fluids,
and lubricants are important to
keep the vehicle in good working
condition.
The Required Services are the
responsibility of the vehicle owner.
It is recommended to have your
dealer perform these services
every 12 000 km/7,500 mi.