display CHEVROLET CORVETTE C6 2012 Repair Manual
[x] Cancel search | Manufacturer: CHEVROLET, Model Year: 2012, Model line: CORVETTE C6, Model: CHEVROLET CORVETTE C6 2012Pages: 432, PDF Size: 5.73 MB
Page 185 of 432
Black plate (3,1)Chevrolet Corvette Owner Manual - 2012
Lighting 6-3
outside. During that delay, the
instrument panel cluster may not be
as bright as usual. Make sure the
instrument panel brightness knob
is in the full bright position. See
Instrument Panel Illumination
Control on page 6‑6for more
information.
If it is dark enough outside and
the exterior lamp control is off,
a HEADLAMPS SUGGESTED
message will display on the Driver
Information Center (DIC). See Lamp
Messages on page 5‑43.
Turning the exterior lamp control
to off a second time, or turning on
the headlamps will remove the
HEADLAMPS SUGGESTED
message in the DIC. If the parking
lamps or the fog lamps were turned
on instead, the HEADLAMPS
SUGGESTED message will
continue to be displayed.
The regular headlamp system
should be turned on when needed. To turn off the DRL, turn the exterior
lamp control to the off position or
shift into P (Park). The DRL will
stay off until the control is toggled
again or the vehicle is shifted out
of P (Park).
This procedure applies only to
vehicles first sold in the United
States.
Twilight Sentinel
Twilight Sentinel®is an automatic
headlamp system. When activated,
this feature turns your headlamps
and parking lamps on and off by
sensing how dark it is outside.
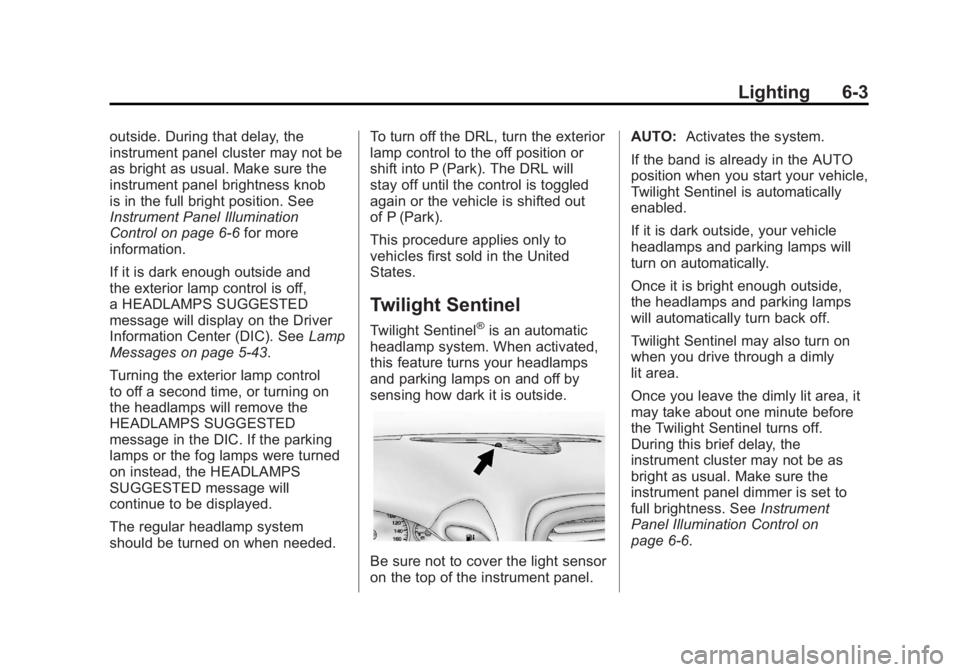
Be sure not to cover the light sensor
on the top of the instrument panel. AUTO:
Activates the system.
If the band is already in the AUTO
position when you start your vehicle,
Twilight Sentinel is automatically
enabled.
If it is dark outside, your vehicle
headlamps and parking lamps will
turn on automatically.
Once it is bright enough outside,
the headlamps and parking lamps
will automatically turn back off.
Twilight Sentinel may also turn on
when you drive through a dimly
lit area.
Once you leave the dimly lit area, it
may take about one minute before
the Twilight Sentinel turns off.
During this brief delay, the
instrument cluster may not be as
bright as usual. Make sure the
instrument panel dimmer is set to
full brightness. See Instrument
Panel Illumination Control on
page 6‑6.
Page 192 of 432
Black plate (2,1)Chevrolet Corvette Owner Manual - 2012
7-2 Infotainment System
SeeRetained Accessory Power
(RAP) on page 9‑24 for more
information.
Navigation/Radio System
For vehicles with a navigation radio
system, see the separate Navigation
System Manual.
Theft-Deterrent Feature
TheftLock®is designed to
discourage theft of the vehicle's
radio by learning a portion of the
Vehicle Identification Number (VIN).
The radio does not operate and
LOCKED displays if the radio is
stolen or moved to a different
vehicle.
When the when the ignition is in the
off position, a blinking red light on
the upper left side of the radio
indicates that TheftLock
®is armed.
Operation
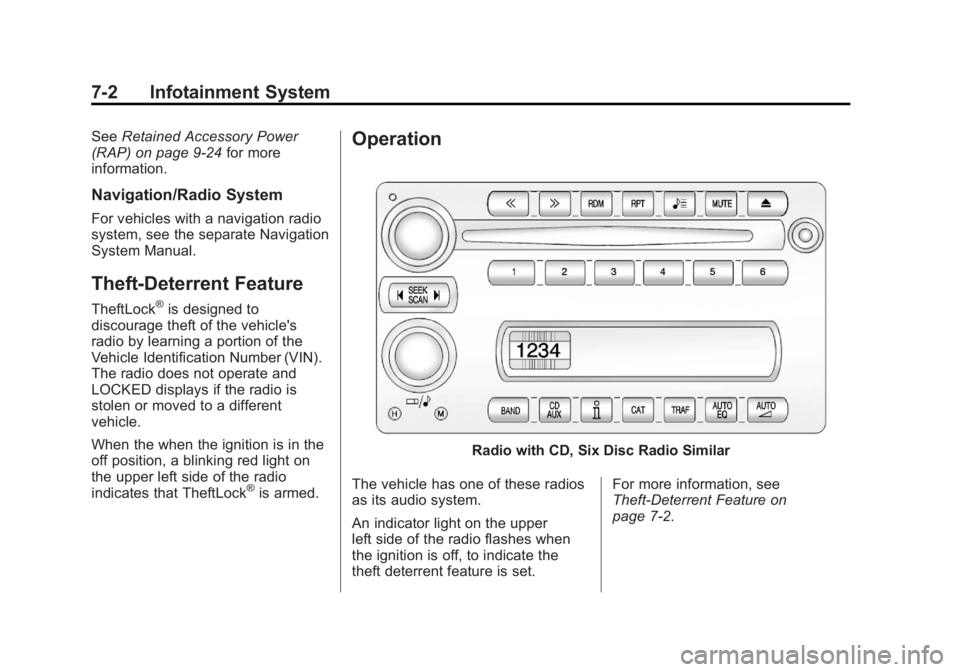
Radio with CD, Six Disc Radio Similar
The vehicle has one of these radios
as its audio system.
An indicator light on the upper
left side of the radio flashes when
the ignition is off, to indicate the
theft deterrent feature is set. For more information, see
Theft-Deterrent Feature on
page 7‑2.
Page 193 of 432

Black plate (3,1)Chevrolet Corvette Owner Manual - 2012
Infotainment System 7-3
Playing the Radio
Top Knob (Power/Volume):
Press to turn the system on and off.
Turn to increase or decrease the
volume.
MUTE:Press to silence the
system. Press again to turn the
sound on.
This button is not available on the
Six-Disc CD Radio.
V(Information): Press until the
desired display is shown, then hold
for two seconds until the radio
beeps once to change the default
display. The selected display is
now the default.
For RDS:
Press
Vto change the display.
The display options are station
name, RDS station frequency,
PTY, and the name of the program
(if available).
Audio Settings
Press and holdO/ewhen no
tone or speaker control is displayed
to adjust all tone and speaker
controls to the middle position.
AUDIO SETTINGS CENTERED
displays.
Adjusting the Tone
(Bass/Treble)
O/e(Bass/Treble): To adjust
the bass or treble:
Press and release
O/euntil
BASS or TREBLE displays.
.Turn theO/eknob to
increase or to decrease the
level.
.Press and hold theO/eknob
until the level changes to the
middle position.
Adjusting the Speakers
(Balance/Fade)
O/e(Balance/Fade): To adjust
the Balance:
Press and release
O/euntil
BALANCE displays.
.Turn theO/eknob to move
the sound toward the right or the
left speakers.
.Press and hold theO/eknob
until the level changes to the
middle position.
To adjust the Fade:
Press and release
O/euntil
FADE displays
.Turn theO/eknob to move
the sound toward the front or the
rear speakers.
.Press and hold theO/eknob
until the level changes to the
middle position.
Page 194 of 432
Black plate (4,1)Chevrolet Corvette Owner Manual - 2012
7-4 Infotainment System
AUTO EQ (Automatic
Equalization):The radio saves
separate AUTO EQ settings for
each preset and source.
For vehicles without the Bose sound
system:
.Press AUTO EQ to select
equalization settings designed
for CLASSICAL, POP, ROCK,
JAZZ, TALK, and COUNTRY.
.Selecting CUSTOM or changing
bass or treble, returns the EQ to
the manual bass and treble
settings.
For vehicles with the Bose sound
system:
.Press AUTO EQ to select
equalization settings from EQ1
through EQ6.
.Selecting CUSTOM or changing
bass or treble, returns the EQ to
the manual bass and treble
settings. AUTO
n(Automatic Volume):
Automatic volume automatically
adjusts the audio system to make
up for road and wind noise, by
increasing the volume as vehicle
speed increases.
For vehicles without the Bose sound
system:
1. Set the volume at the desired level.
2. Press AUTO
nto select
AUTO VOLUME MIN (minimum),
AUTO VOLUME MED (medium),
or AUTO VOLUME MAX
(maximum). Each higher setting
provides more volume
compensation at faster vehicle
speeds.
3. Press AUTO
nuntil AUTO
VOLUME OFF displays to turn
automatic volume off. For vehicles with the Bose sound
system:
Vehicles with the Bose sound
system include Bose AudioPilot®
noise compensation technology.
AudioPilot continuously adjusts the
audio system equalization to
compensate for background noise.
This feature is most effective at
lower radio volume settings where
background noise can affect how
well the audio is heard. At higher
volume settings, there may be little
or no adjustments by AudioPilot. For
additional information on AudioPilot,
visit bose.com/audiopilot.
To use AudioPilot:
1. Set the volume at the desired
level.
2. Press AUTOnuntil AUTO
VOLUME ON displays.
3. Press AUTO
nuntil AUTO
VOLUME OFF displays to turn
off AudioPilot.
Page 195 of 432
Black plate (5,1)Chevrolet Corvette Owner Manual - 2012
Infotainment System 7-5
Radio Messages
CAL ERR (Calibration Error):
Displays if the radio is no longer
configured properly for the vehicle.
The vehicle must be returned to
your dealer for service.
LOC (Locked):Displays when the
TheftLock system has locked up.
The vehicle must be returned to
your dealer for service.
If any error occurs repeatedly or
cannot be corrected, contact your
dealer.
Radio
AM-FM Radio
Radio Data System (RDS)
RDS features are available for use
only on FM stations that broadcast
RDS information. The station name
or call letters display while the radio
is tuned to an RDS station.
This system relies upon receiving
specific information from these
stations and works only when the
information is available. In rare
cases, a radio station can broadcast
incorrect information that causes the
radio features to work improperly.
If this happens, contact the radio
station. With RDS, the radio can:
.Seek to stations broadcasting
the selected type of
programming.
.Receive announcements
concerning local and national
emergencies.
.Display messages from radio
stations.
.Seek to stations with traffic
announcements.
.Provide the time of day.
.Provide a program type (PTY)
for current programming.
.Provide the name of the program
being broadcast.
Page 196 of 432
Black plate (6,1)Chevrolet Corvette Owner Manual - 2012
7-6 Infotainment System
RDS Messages
ALERT!:Alert warns of local
or national emergencies.
When an alert announcement
comes on the current radio
station, ALERT! displays.
The announcement is heard,
even if the volume is low or a CD
is playing. If a CD is playing, play
stops during the announcement.
Alert announcements cannot be
turned off.
ALERT! is not affected by tests of
the emergency broadcast system.
This feature is not supported by all
RDS stations.
4(Information): If the current
station has a message, INFO
displays. Press to see the
message. The message can display
the artist, song title, call in phone
numbers, etc.
If the entire message is not
displayed, parts of the message
appears every three seconds. To scroll through the message,
press and release . A new group of
words displays after every press of
the button. Once the complete
message has displayed, INFO
disappears from the display until
another new message is received.
The last message can be displayed
by pressing this button. The last
message is displayed until a new
message is received or the radio is
tuned to a different station.
NO INFO displays when a message
is not available from a station.
TRAF (Traffic):
TA (traffic) displays
when the station broadcasts traffic
announcements.
Press TRAF and the radio seeks to
a station that broadcasts traffic
announcements. When a station is
found, the radio stops seeking and
TA displays. NO TRAFFIC INFO
displays if a station that broadcasts
traffic announcements cannot be
found. Press TRAF to turn off the traffic
announcements if TA is on the
display.
The radio plays the traffic
announcement even if the volume
is low. The radio interrupts the play
of a CD if the last tuned station
broadcasts traffic announcements.
Finding a Station
BAND:
Press to switch between
FM1, FM2, or AM.
O/e(Tune): Turn to select radio
stations.
tSEEKu: Press to go to the
previous or to the next station and
stay there.
The radio only stops at stations with
a strong signal.
tSCANu: Press and holdt
orufor two seconds until
FREQUENCY SCAN displays.
The radio goes to a station, plays
for a few seconds, then goes on to
the next station. Press
toru
again to stop scanning.
Page 197 of 432

Black plate (7,1)Chevrolet Corvette Owner Manual - 2012
Infotainment System 7-7
To scan preset stations:
Press and hold
torufor
four seconds until PRESET SCAN
displays. The radio goes to the next
preset station, plays for a few
seconds, then goes to the next
preset station. Press
toruagain
or press one of the pushbuttons to
stop scanning presets.
The radio only scans stations with a
strong signal.
1–6 (Preset Pushbuttons):
Press to play stations that are
programmed to the radio preset
pushbuttons.
Storing Radio Stations
Drivers are encouraged to store
radio station while the vehicle is
parked. See Defensive Driving on
page 9‑3. Tune to stored radio
stations using the presets, favorites
button, and steering wheel controls,
if the vehicle has this feature. Up to 30 stations (six FM1, six FM2,
six AM, six M1, and six XM2), and
equalization settings for each
station can be programmed on the
six numbered pushbuttons. To set
presets:
1. Turn the radio on.
2. Press BAND to select FM1,
FM2, AM, XM1, or XM2.
3. Tune in the desired station.
4. Press AUTO EQ to select the equalization.
5. Press and hold one of the six numbered pushbuttons until the
radio beeps once.
6. Repeat the steps for each pushbutton.
Satellite Radio
XM™ Satellite Radio Service
XM is a satellite radio service
based in the 48 contiguous United
States and 10 Canadian provinces.
XM Satellite Radio has a wide
variety of programming and
commercial-free music, coast to
coast, and in digital-quality sound.
A service fee is required to receive
the XM service. If XM Service needs
to be reactivated, the radio will
display "No Subscription Please
Renew" on channel XM1.
For more information, contact
XM at www.xmradio.com or
1-800-929-2100 in the U.S.,
and www.xmradio.ca or
1-877-438-9677 in Canada.
Page 198 of 432
Black plate (8,1)Chevrolet Corvette Owner Manual - 2012
7-8 Infotainment System
Finding an XM Channel
BAND:Press to switch between
FM1, FM2, AM, XM1, or XM2.
O/e(Tune): Turn to manually
select an XM channel.
tSEEKu: Press to go to the
previous or to the next XM channel.
tSCANu: Press and holdt
orufor two seconds until
FREQUENCY SCAN displays.
The radio goes to a channel, plays
for a few seconds, then goes on
to the next station. Press
toru
again to stop scanning.
To scan preset stations:
Press and hold
torufor
four seconds until PRESET
SCAN displays. The radio goes
to the next preset station,
plays for a few seconds, then
goes to the next preset station. Press
toruagain or press one of
the pushbuttons to stop scanning
presets.
1–6 (Preset Pushbuttons):
Press to play channels that are
programmed to the radio preset
pushbuttons.
Finding a Category (CAT)
Station
To select an XM station by category:
1. Press the CAT button. The last selected category displays.
2. Turn the
O/eknob to select
a category.
3. Press
toruto go to a
category's station. SEEKING
CATEGORY displays.
4. To go to another station within that category, press the CAT
button to display the category,
then press
toruto go to
another station. If the radio cannot find the desired
category, NONE displays and the
radio returns to the last station
tuned.
SCAN:
To scan the stations within
a category:
1. Press CAT. The last selected
category displays.
2. Turn the
O/eknob to select
a category.
3. Press and hold
toruuntil
a beep sounds and SCAN
CATEGORY displays. The radio
begins scanning the stations in
the category.
4. Press
toruto stop scanning.
Page 201 of 432
Black plate (11,1)Chevrolet Corvette Owner Manual - 2012
Infotainment System 7-11
when making or receiving phone
calls, charging the phone's battery,
or simply having the phone on.
This interference causes an
increased level of static while
listening to the radio. If static is
received while listening to the
radio, unplug the cellular phone
and turn it off.
Diversity Antenna System
The AM-FM antenna is a hidden
self‐tuning system. It optimizes the
AM and FM signals relative to
the vehicle's position and radio
station source. No maintenance or
adjustments are needed.
Satellite Radio Antenna
For vehicles with XM Satellite Radio
Service, the antenna is located on
the roof or on the trunk lid of the
vehicle. Keep the antenna clear
of obstructions for clear radio
reception.
Audio Players
CD Player
Care of the CD Player
Do not add labels to a CD; it could
get caught in the CD player. Use a
marking pen to write on the top of
the CD if a description is needed.
Do not use CD lens cleaners, they
could damage the CD player.
Notice:If a label is added to a
CD, more than one CD is inserted
into the slot at a time, or an
attempt is made to play scratched
or damaged CDs, the CD player
could be damaged. While using
the CD player, use only CDs in
good condition without any label,
load one CD at a time, and keep
the CD player and the loading slot
free of foreign materials, liquids,
and debris.
If an error displays, see “CD
Messages” later in this section.
Care of CDs
Store CDs in their original cases or
other protective cases and away
from direct sunlight and dust.
The CD player scans the bottom of
the disc. If the bottom of a CD is
damaged it may not play properly or
at all. Do not touch the bottom of a
CD while handling it. Pick up CDs
by grasping the outer edges or the
edge of the hole and the outer edge.
If the surface of a CD is dirty, take a
soft, lint‐free cloth or dampen a
clean, soft cloth in a mild, neutral
detergent solution mixed with water,
and clean it. Make sure the wiping
process starts from the center to
the edge.
Using the CD Player
The CD player can play smaller
8 cm (3 in) single CDs with an
adapter ring.
Page 202 of 432
Black plate (12,1)Chevrolet Corvette Owner Manual - 2012
7-12 Infotainment System
A CD in the player stays in the
player when the ignition is turned
off. When the ignition or radio is
turned on, the CD starts to play
where it stopped, if it was the last
selected audio source.
Loading a CD
Insert the CD partway into the slot,
label side up, until the player pulls
the CD in. The CD begins playing
automatically.
The CD symbol displays when a CD
is inserted, and the track number
displays when each new track starts
to play.
M(Load):Press to load CD into
the CD player.
To insert CD:
1. Press
M.
2. Load a CD and insert the CD partway into the slot, label side
up when INSERT CD displays.
The player pulls the CD in.
Playing a CD
O/e(Tune): Turn to go to the
next or previous track.
{(Reverse): Press and hold to
reverse within the current track.
|(Fast Forward): Press and hold
to fast forward through the current
track.
tSEEKu: Press the left arrow
to go to the start of the current track
if more than eight seconds have
played. Press the right arrow to go
to the start of the next track. If either
arrow is held or pressed more than
once, the player continues moving
backward or forward through
the CD.
tSCANu: To scan one CD,
press and hold either arrow for
more than two seconds until SCAN
displays and a beep sounds.
The radio goes to the next track,
plays for 10 seconds, then goes to
the next track. Press either arrow
again to stop scanning. AUTO EQ (Automatic
Equalization):
Press to select the
equalization setting while playing a
CD. The equalization is stored
when a CD is played. For more
information on AUTO EQ, see
“AUTO EQ” listed previously in this
section.
BAND: Press to listen to the radio
when a CD is playing. The inactive
CD remains inside the radio for
future listening.
CD AUX (Auxiliary): Press to play
a CD when listening to the radio.
CD displays when a CD is in the
player. If your system has a remote
playback device, pressing this
button a second time allows the
remote device to play.
X(Eject): Press to eject a CD
from the CD Radio.
CD Radio: Press
Xto eject a CD.
RPT (Repeat): Press to hear a
track or an entire CD over again.