tow CHEVROLET CORVETTE C7 2018 Owners Manual
[x] Cancel search | Manufacturer: CHEVROLET, Model Year: 2018, Model line: CORVETTE C7, Model: CHEVROLET CORVETTE C7 2018Pages: 353, PDF Size: 6.48 MB
Page 16 of 353
Chevrolet Corvette Owner Manual (GMNA-Localizing-U.S./Canada/Mexico-
11374030) - 2018 - crc - 3/29/17
In Brief 15
2. Press the control pad to adjustthe mirror.
3. Return the switch to the center to deselect the mirror.
See Power Mirrors 043.
If the vehicle has the memory
feature, a preferred mirror position
can be stored. See Memory Seats
0 58.
To fold, pull the mirror toward the
vehicle. Push the mirror outward to
return it to the original position.
Interior Mirror
Adjustment
Adjust the rearview mirror to clearly
view the area behind the vehicle.
Manual Rearview Mirror
To avoid glare of the headlamps
from behind, push the tab forward
for daytime and pull it rearward for
nighttime use. Automatic Dimming Rearview
Mirror
If equipped, the mirror automatically
reduces the glare of the headlamps
from behind. The dimming feature
comes on when the vehicle is
started.
See
Automatic Dimming Rearview
Mirror 044.
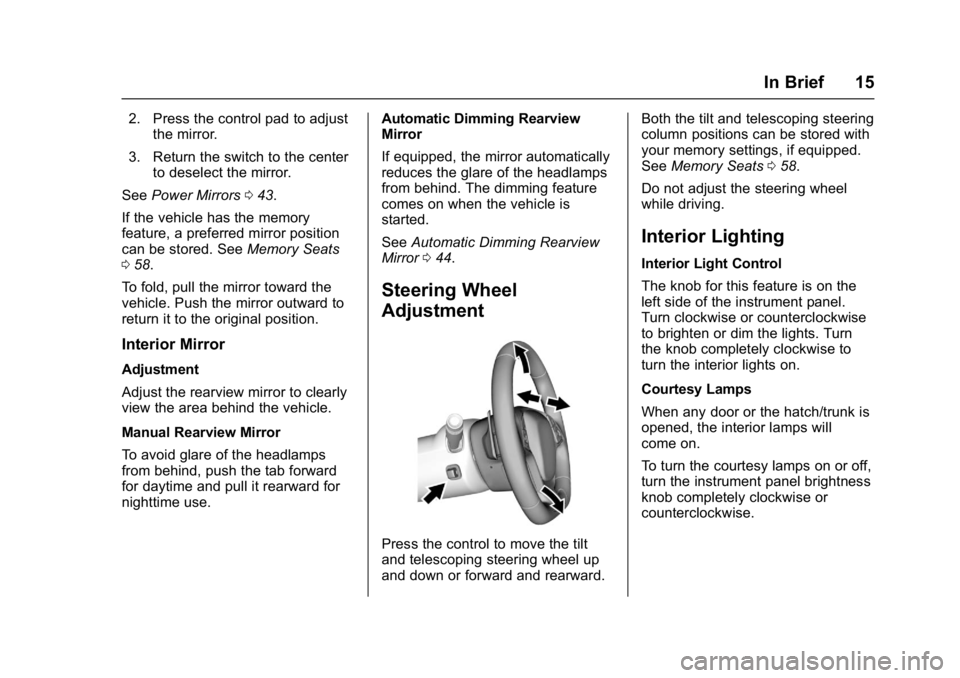
Steering Wheel
Adjustment
Press the control to move the tilt
and telescoping steering wheel up
and down or forward and rearward. Both the tilt and telescoping steering
column positions can be stored with
your memory settings, if equipped.
See
Memory Seats 058.
Do not adjust the steering wheel
while driving.
Interior Lighting
Interior Light Control
The knob for this feature is on the
left side of the instrument panel.
Turn clockwise or counterclockwise
to brighten or dim the lights. Turn
the knob completely clockwise to
turn the interior lights on.
Courtesy Lamps
When any door or the hatch/trunk is
opened, the interior lamps will
come on.
To turn the courtesy lamps on or off,
turn the instrument panel brightness
knob completely clockwise or
counterclockwise.
Page 18 of 353
Chevrolet Corvette Owner Manual (GMNA-Localizing-U.S./Canada/Mexico-
11374030) - 2018 - crc - 3/29/17
In Brief 17
INT :Move the lever up to INT for
intermittent wipes, then turn the
x
INT band up for more frequent
wipes or down for less frequent
wipes.
OFF : Use to turn the wipers off.
1X : For a single wipe, briefly move
the lever down. For several wipes,
hold the lever down.
n L: Pull the lever toward you to
spray windshield washer fluid and
activate the wipers.
See Windshield Wiper/Washer 095.
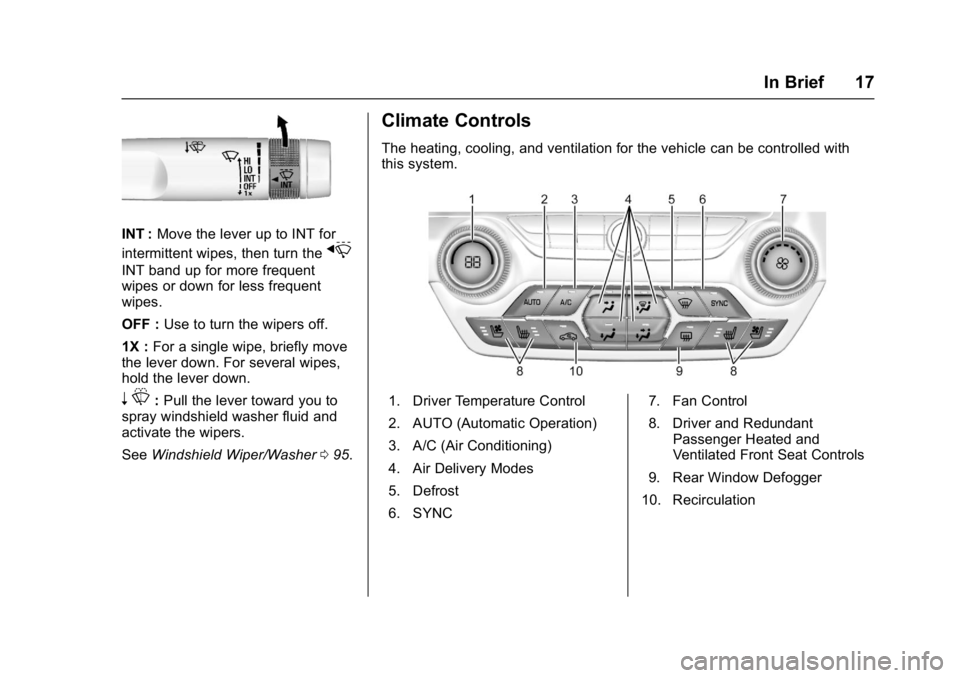
Climate Controls
The heating, cooling, and ventilation for the vehicle can be controlled with
this system.
1. Driver Temperature Control
2. AUTO (Automatic Operation)
3. A/C (Air Conditioning)
4. Air Delivery Modes
5. Defrost
6. SYNC 7. Fan Control
8. Driver and Redundant
Passenger Heated and
Ventilated Front Seat Controls
9. Rear Window Defogger
10. Recirculation
Page 44 of 353
Chevrolet Corvette Owner Manual (GMNA-Localizing-U.S./Canada/Mexico-
11374030) - 2018 - crc - 4/4/17
Keys, Doors, and Windows 43
Exterior Mirrors
Convex Mirrors
{Warning
A convex mirror can make things,
like other vehicles, look farther
away than they really are. If you
cut too sharply into the right lane,
you could hit a vehicle on the
right. Check the inside mirror or
glance over your shoulder before
changing lanes.
The passenger side mirror is convex
shaped. A convex mirror's surface is
curved so more can be seen from
the driver seat.
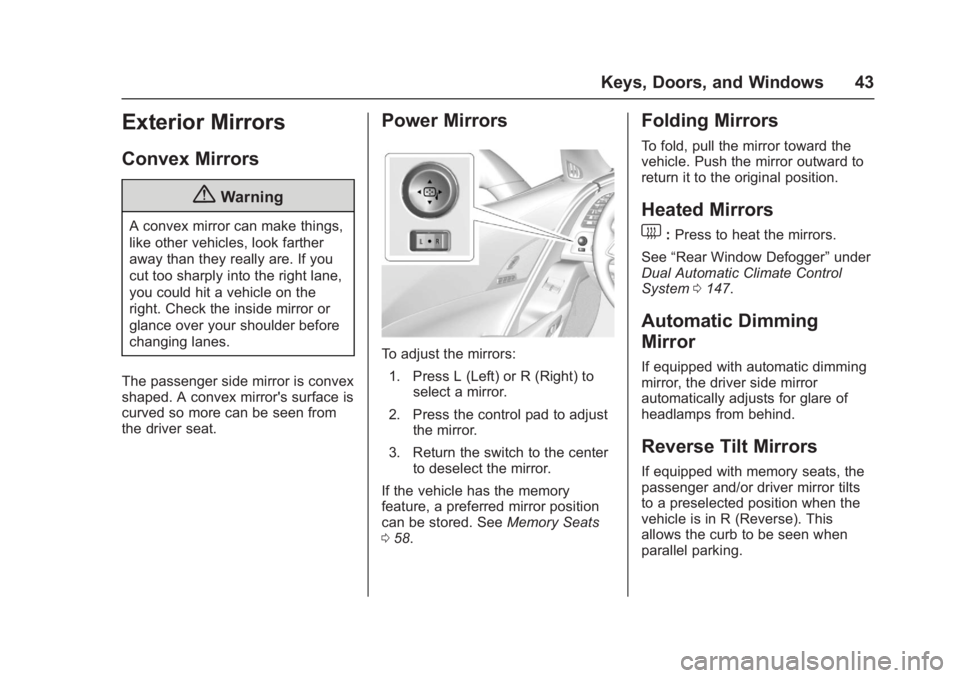
Power Mirrors
To adjust the mirrors: 1. Press L (Left) or R (Right) to select a mirror.
2. Press the control pad to adjust the mirror.
3. Return the switch to the center to deselect the mirror.
If the vehicle has the memory
feature, a preferred mirror position
can be stored. See Memory Seats
0 58.
Folding Mirrors
To fold, pull the mirror toward the
vehicle. Push the mirror outward to
return it to the original position.
Heated Mirrors
1
:Press to heat the mirrors.
See “Rear Window Defogger” under
Dual Automatic Climate Control
System 0147.
Automatic Dimming
Mirror
If equipped with automatic dimming
mirror, the driver side mirror
automatically adjusts for glare of
headlamps from behind.
Reverse Tilt Mirrors
If equipped with memory seats, the
passenger and/or driver mirror tilts
to a preselected position when the
vehicle is in R (Reverse). This
allows the curb to be seen when
parallel parking.
Page 45 of 353
Chevrolet Corvette Owner Manual (GMNA-Localizing-U.S./Canada/Mexico-
11374030) - 2018 - crc - 4/4/17
44 Keys, Doors, and Windows
The mirror(s) return to the original
position when:
.The vehicle is shifted out of
R (Reverse), or remains in
R (Reverse) for about
30 seconds.
. The ignition is turned off.
. The vehicle is driven in
R (Reverse) above a set speed.
To turn this feature on or off, see
Vehicle Personalization 0124.Interior Mirrors
Interior Rearview Mirrors
Adjust the rearview mirror for a clear
view of the area behind your
vehicle.
If equipped with OnStar, there are
three buttons at the bottom of the
mirror. See your dealer for more
information on the system and how
to subscribe to OnStar. See OnStar
Overview 0330.
To avoid accidental OnStar calls,
clean the mirror with the ignition off.
Do not spray glass cleaner directly
on the mirror. Use a soft towel
dampened with water.
Manual Rearview Mirror
Push the tab forward for daytime
use and pull it rearward for
nighttime use to avoid glare of the
headlamps from behind.
Automatic Dimming
Rearview Mirror
If equipped, automatic dimming
reduces the glare of headlamps
from behind. The dimming feature
comes on when the vehicle is
started.
Page 48 of 353
Chevrolet Corvette Owner Manual (GMNA-Localizing-U.S./Canada/Mexico-
11374030) - 2018 - crc - 4/4/17
Keys, Doors, and Windows 47
Sun Visors
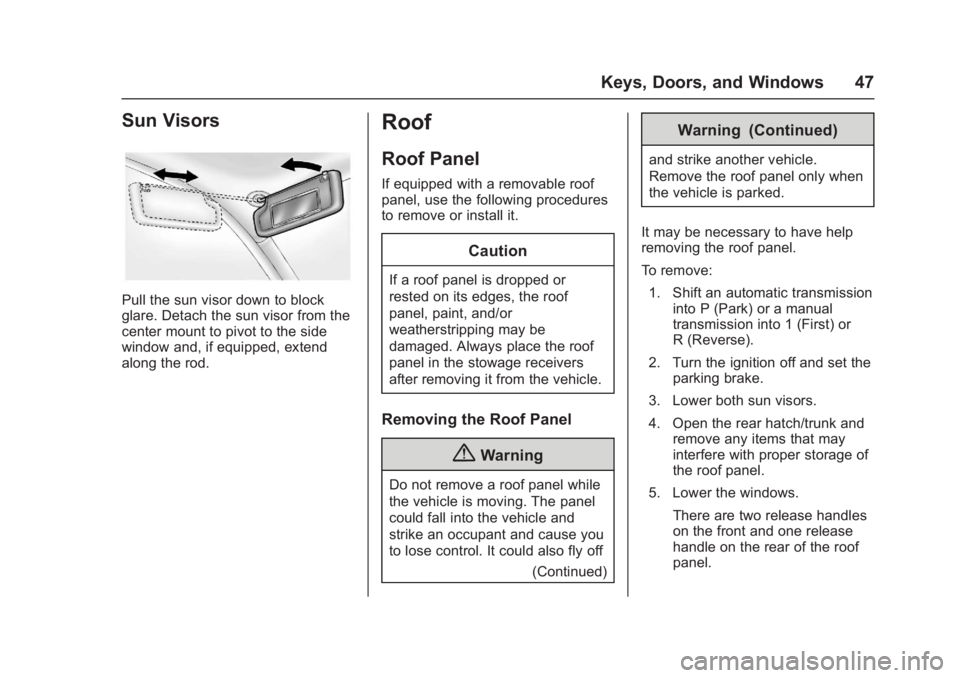
Pull the sun visor down to block
glare. Detach the sun visor from the
center mount to pivot to the side
window and, if equipped, extend
along the rod.
Roof
Roof Panel
If equipped with a removable roof
panel, use the following procedures
to remove or install it.
Caution
If a roof panel is dropped or
rested on its edges, the roof
panel, paint, and/or
weatherstripping may be
damaged. Always place the roof
panel in the stowage receivers
after removing it from the vehicle.
Removing the Roof Panel
{Warning
Do not remove a roof panel while
the vehicle is moving. The panel
could fall into the vehicle and
strike an occupant and cause you
to lose control. It could also fly off(Continued)
Warning (Continued)
and strike another vehicle.
Remove the roof panel only when
the vehicle is parked.
It may be necessary to have help
removing the roof panel.
To remove: 1. Shift an automatic transmission into P (Park) or a manual
transmission into 1 (First) or
R (Reverse).
2. Turn the ignition off and set the parking brake.
3. Lower both sun visors.
4. Open the rear hatch/trunk and remove any items that may
interfere with proper storage of
the roof panel.
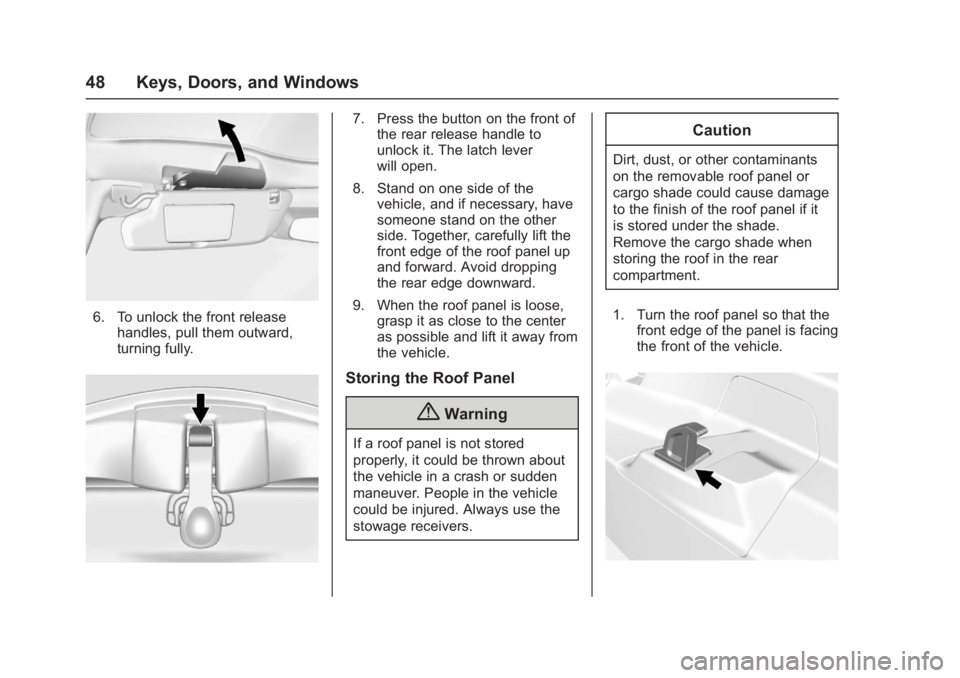
5. Lower the windows. There are two release handles
on the front and one release
handle on the rear of the roof
panel.
Page 49 of 353
Chevrolet Corvette Owner Manual (GMNA-Localizing-U.S./Canada/Mexico-
11374030) - 2018 - crc - 4/4/17
48 Keys, Doors, and Windows
6. To unlock the front releasehandles, pull them outward,
turning fully.
7. Press the button on the front ofthe rear release handle to
unlock it. The latch lever
will open.
8. Stand on one side of the vehicle, and if necessary, have
someone stand on the other
side. Together, carefully lift the
front edge of the roof panel up
and forward. Avoid dropping
the rear edge downward.
9. When the roof panel is loose, grasp it as close to the center
as possible and lift it away from
the vehicle.
Storing the Roof Panel
{Warning
If a roof panel is not stored
properly, it could be thrown about
the vehicle in a crash or sudden
maneuver. People in the vehicle
could be injured. Always use the
stowage receivers.
Caution
Dirt, dust, or other contaminants
on the removable roof panel or
cargo shade could cause damage
to the finish of the roof panel if it
is stored under the shade.
Remove the cargo shade when
storing the roof in the rear
compartment.
1. Turn the roof panel so that the front edge of the panel is facing
the front of the vehicle.
Page 56 of 353
Chevrolet Corvette Owner Manual (GMNA-Localizing-U.S./Canada/Mexico-
11374030) - 2018 - crc - 4/4/17
Keys, Doors, and Windows 55
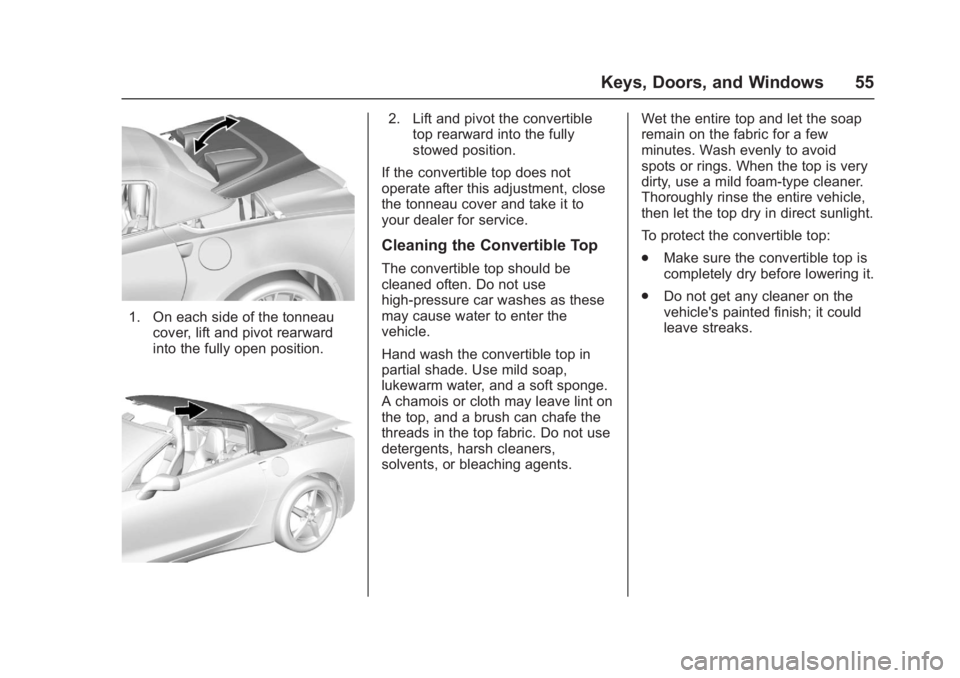
1. On each side of the tonneaucover, lift and pivot rearward
into the fully open position.
2. Lift and pivot the convertibletop rearward into the fully
stowed position.
If the convertible top does not
operate after this adjustment, close
the tonneau cover and take it to
your dealer for service.
Cleaning the Convertible Top
The convertible top should be
cleaned often. Do not use
high-pressure car washes as these
may cause water to enter the
vehicle.
Hand wash the convertible top in
partial shade. Use mild soap,
lukewarm water, and a soft sponge.
A chamois or cloth may leave lint on
the top, and a brush can chafe the
threads in the top fabric. Do not use
detergents, harsh cleaners,
solvents, or bleaching agents. Wet the entire top and let the soap
remain on the fabric for a few
minutes. Wash evenly to avoid
spots or rings. When the top is very
dirty, use a mild foam-type cleaner.
Thoroughly rinse the entire vehicle,
then let the top dry in direct sunlight.
To protect the convertible top:
.
Make sure the convertible top is
completely dry before lowering it.
. Do not get any cleaner on the
vehicle's painted finish; it could
leave streaks.
Page 68 of 353
Chevrolet Corvette Owner Manual (GMNA-Localizing-U.S./Canada/Mexico-
11374030) - 2018 - crc - 3/29/17
Seats and Restraints 67
locking feature may be
engaged. If this happens, let
the belt go back all the way
and start again.
Engaging the child restraint
locking feature in the front
outboard seating position may
affect the passenger sensing
system. SeePassenger
Sensing System 075.
If the shoulder portion of the
driver belt is pulled out all the
way, the Automatic Locking
Retractor (ALR) feature may be
engaged. If this happens, let
the belt go back all the way
and start again.
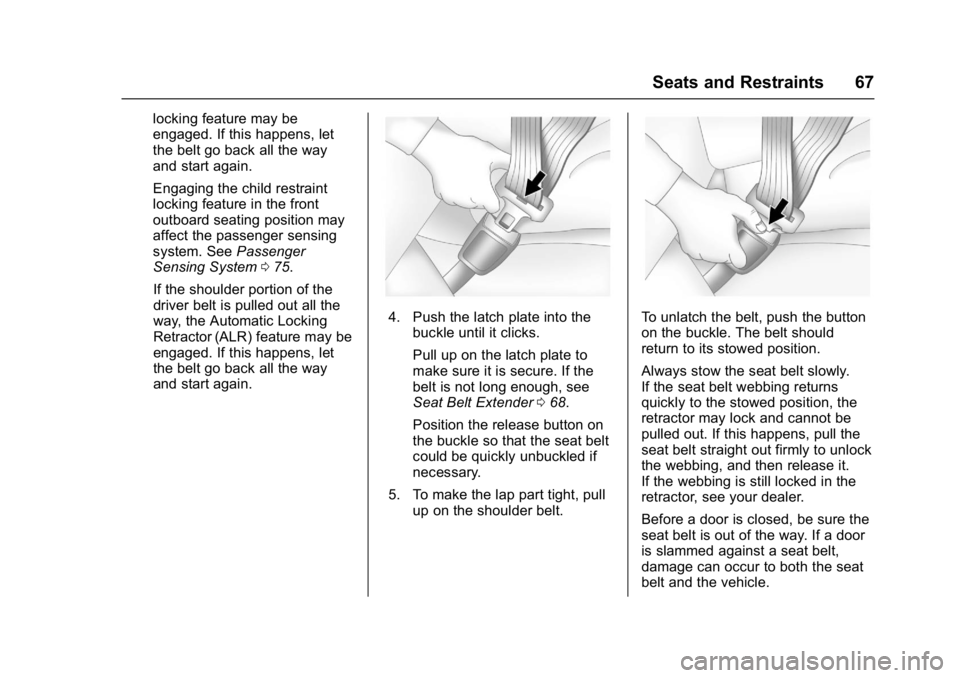
4. Push the latch plate into the buckle until it clicks.
Pull up on the latch plate to
make sure it is secure. If the
belt is not long enough, see
Seat Belt Extender 068.
Position the release button on
the buckle so that the seat belt
could be quickly unbuckled if
necessary.
5. To make the lap part tight, pull up on the shoulder belt.To unlatch the belt, push the button
on the buckle. The belt should
return to its stowed position.
Always stow the seat belt slowly.
If the seat belt webbing returns
quickly to the stowed position, the
retractor may lock and cannot be
pulled out. If this happens, pull the
seat belt straight out firmly to unlock
the webbing, and then release it.
If the webbing is still locked in the
retractor, see your dealer.
Before a door is closed, be sure the
seat belt is out of the way. If a door
is slammed against a seat belt,
damage can occur to both the seat
belt and the vehicle.
Page 74 of 353
Chevrolet Corvette Owner Manual (GMNA-Localizing-U.S./Canada/Mexico-
11374030) - 2018 - crc - 3/29/17
Seats and Restraints 73
Frontal airbags are not intended to
inflate during vehicle rollovers, in
rear impacts, or in many side
impacts.
In addition, the vehicle has
advanced technology frontal
airbags. Advanced technology
frontal airbags adjust the restraint
according to crash severity.
Seat-mounted side impact airbags
are designed to inflate in moderate
to severe side crashes depending
on the location of the impact.
Seat-mounted side impact airbags
are not designed to inflate in frontal
impacts, near frontal impacts,
rollovers, or rear impacts.
A seat-mounted side impact airbag
is designed to inflate on the side of
the vehicle that is struck.
In any particular crash, no one can
say whether an airbag should have
inflated simply because of the
vehicle damage or repair costs.What Makes an Airbag
Inflate?
In a deployment event, the sensing
system sends an electrical signal
triggering a release of gas from the
inflator. Gas from the inflator fills the
airbag causing the bag to break out
of the cover. The inflator, the airbag,
and related hardware are all part of
the airbag module.
For airbag locations, seeWhere Are
the Airbags? 071.
How Does an Airbag
Restrain?
In moderate to severe frontal or
near frontal collisions, even belted
occupants can contact the steering
wheel or the instrument panel. In
moderate to severe side collisions,
even belted occupants can contact
the inside of the vehicle.
Airbags supplement the protection
provided by seat belts by
distributing the force of the impact
more evenly over the
occupant's body. But airbags would not help in many
types of collisions, primarily
because the occupant's motion is
not toward those airbags. See
When
Should an Airbag Inflate? 072.
Airbags should never be regarded
as anything more than a supplement
to seat belts.
What Will You See after
an Airbag Inflates?
After the frontal and seat-mounted
side impact airbags inflate, they
quickly deflate, so quickly that some
people may not even realize the
airbags inflated. Some components
of the airbag module may be hot for
several minutes. For location of the
airbags, see Where Are the
Airbags? 071.
The parts of the airbag that come
into contact with you may be warm,
but not too hot to touch. There may
be some smoke and dust coming
from the vents in the deflated
airbags. Airbag inflation does not
prevent the driver from seeing out of
Page 80 of 353
Chevrolet Corvette Owner Manual (GMNA-Localizing-U.S./Canada/Mexico-
11374030) - 2018 - crc - 3/29/17
Seats and Restraints 79
{Warning
Stowing articles under the
passenger seat or between the
passenger seat cushion and
seatback may interfere with the
proper operation of the passenger
sensing system.
Servicing the
Airbag-Equipped Vehicle
Airbags affect how the vehicle
should be serviced. There are parts
of the airbag system in several
places around the vehicle. Your
dealer and the service manual have
information about servicing the
vehicle and the airbag system. To
purchase a service manual, see
Service Publications Ordering
Information0325.
{Warning
For up to 10 seconds after the
vehicle is turned off and the
battery is disconnected, an airbag
can still inflate during improper
service. You can be injured if you
are close to an airbag when it
inflates. Avoid yellow connectors.
They are probably part of the
airbag system. Be sure to follow
proper service procedures, and
make sure the person performing
work for you is qualified to do so.
Adding Equipment to the
Airbag-Equipped Vehicle
Adding accessories that change the
vehicle's frame, bumper system,
height, front end, or side sheet
metal may keep the airbag system
from working properly.
The operation of the airbag system
can also be affected by changing
any parts of the front seats, seat
belts, the airbag sensing and
diagnostic module, steering wheel, instrument panel, inner door seals
including the speakers, any of the
airbag modules, front sensors, side
impact sensors, or airbag wiring.
Your dealer and the service manual
have information about the location
of the airbag sensors, sensing and
diagnostic module, and airbag
wiring.
In addition, the vehicle has a
passenger sensing system for the
front outboard passenger position,
which includes sensors that are part
of the passenger seat. The
passenger sensing system may not
operate properly if the original seat
trim is replaced with non-GM
covers, upholstery or trim, or with
GM covers, upholstery or trim
designed for a different vehicle. Any
object, such as an aftermarket seat
heater or a comfort-enhancing pad
or device, installed under or on top
of the seat fabric, could also
interfere with the operation of the
passenger sensing system. This
could either prevent proper
deployment of the passenger
airbag(s) or prevent the passenger
sensing system from properly