air filter CHEVROLET CORVETTE GRAND SPORT 2015 Owners Manual
[x] Cancel search | Manufacturer: CHEVROLET, Model Year: 2015, Model line: CORVETTE GRAND SPORT, Model: CHEVROLET CORVETTE GRAND SPORT 2015Pages: 391, PDF Size: 5.36 MB
Page 176 of 391
Black plate (1,1)Chevrolet Corvette Owner Manual (GMNA-Localizing-U.S./Canada/Mexico-
7576293) - 2015 - crc - 6/17/14
Climate Controls 8-1
Climate Controls
Climate Control Systems
Dual Automatic Climate ControlSystem . . . . . . . . . . . . . . . . . . . . . . 8-1
Air Vents
Air Vents . . . . . . . . . . . . . . . . . . . . . . 8-5
Maintenance
Passenger Compartment AirFilter . . . . . . . . . . . . . . . . . . . . . . . . . 8-5
Climate Control Systems
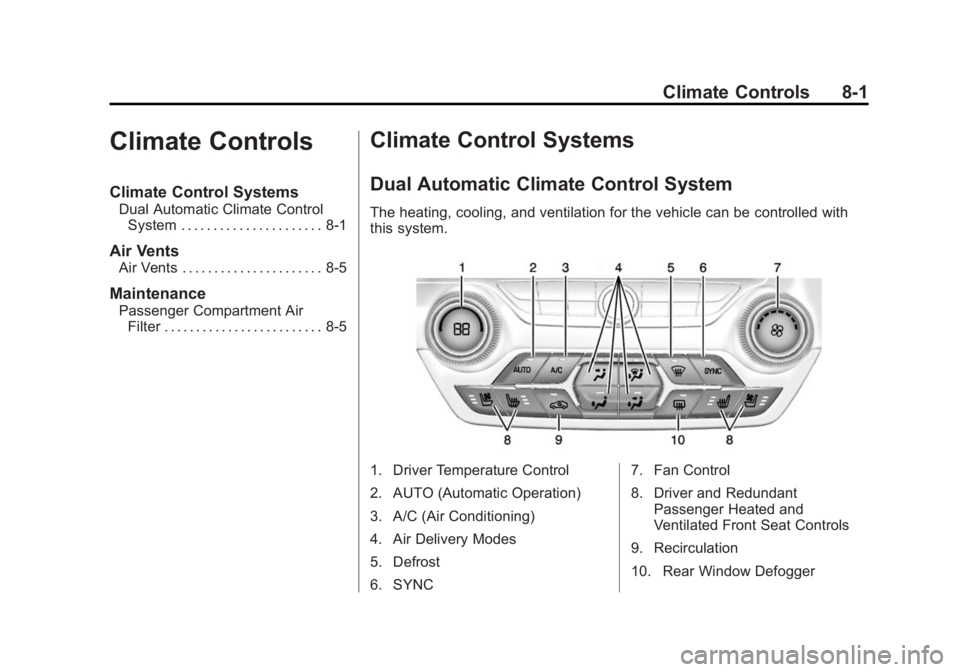
Dual Automatic Climate Control System
The heating, cooling, and ventilation for the vehicle can be controlled with
this system.
1. Driver Temperature Control
2. AUTO (Automatic Operation)
3. A/C (Air Conditioning)
4. Air Delivery Modes
5. Defrost
6. SYNC 7. Fan Control
8. Driver and Redundant
Passenger Heated and
Ventilated Front Seat Controls
9. Recirculation
10. Rear Window Defogger
Page 180 of 391
Black plate (5,1)Chevrolet Corvette Owner Manual (GMNA-Localizing-U.S./Canada/Mexico-
7576293) - 2015 - crc - 6/17/14
Climate Controls 8-5
Air Vents
Use the tab on the air outlets to
change the direction of the airflow.
Operation Tips
.Clear away any ice, snow,
or leaves from the air inlets at
the base of the windshield that
may block the flow of air into the
vehicle.
.Use of non-GM approved hood
deflectors may adversely affect
the performance of the system.
.Keep the area around the base
of the instrument panel console
and air path under the seats
clear of objects to help circulate
the air inside of the vehicle more
effectively.
Maintenance
Passenger Compartment
Air Filter
The passenger compartment air
filter reduces dust, pollen, and other
airborne irritants from outside air
that is pulled into the vehicle.
Reductions in airflow, which may
occur more often in dusty areas,
indicate that the filter may need to
be replaced. SeeMaintenance
Schedule on page 11-2.
{Caution
Driving without a passenger
compartment air filter in place can
cause water and small particles,
like paper and leaves, to be
pulled into your climate control
system which may cause damage
to it. Make sure you always
replace the old filter with a
new one. The passenger compartment air
filter is on the passenger side of the
engine compartment near the
coolant surge tank. See
Engine
Compartment Overview on
page 10-7.
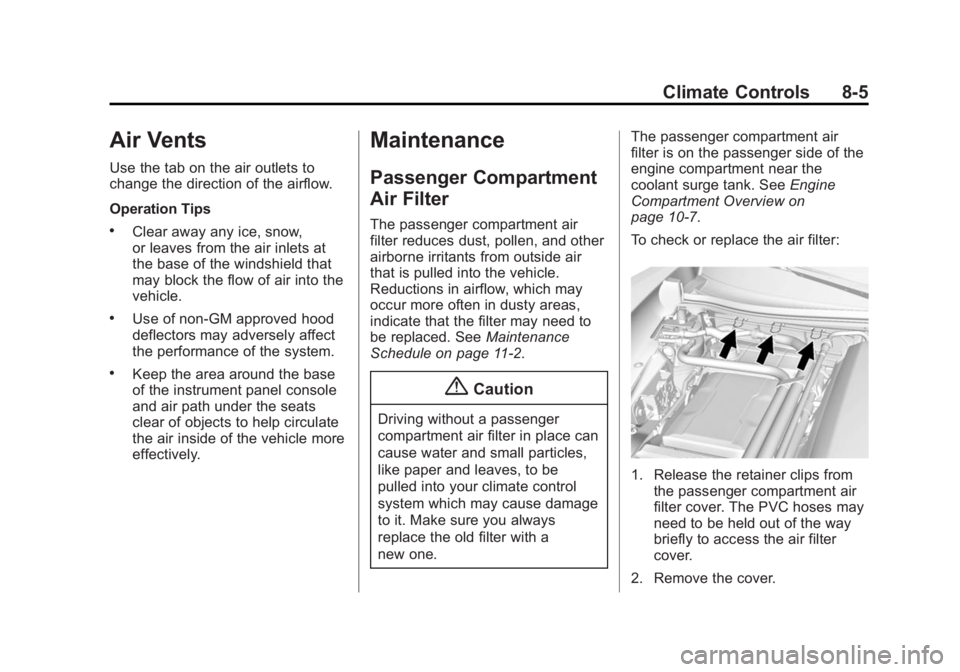
To check or replace the air filter:
1. Release the retainer clips from the passenger compartment air
filter cover. The PVC hoses may
need to be held out of the way
briefly to access the air filter
cover.
2. Remove the cover.
Page 181 of 391
Black plate (6,1)Chevrolet Corvette Owner Manual (GMNA-Localizing-U.S./Canada/Mexico-
7576293) - 2015 - crc - 6/17/14
8-6 Climate Controls
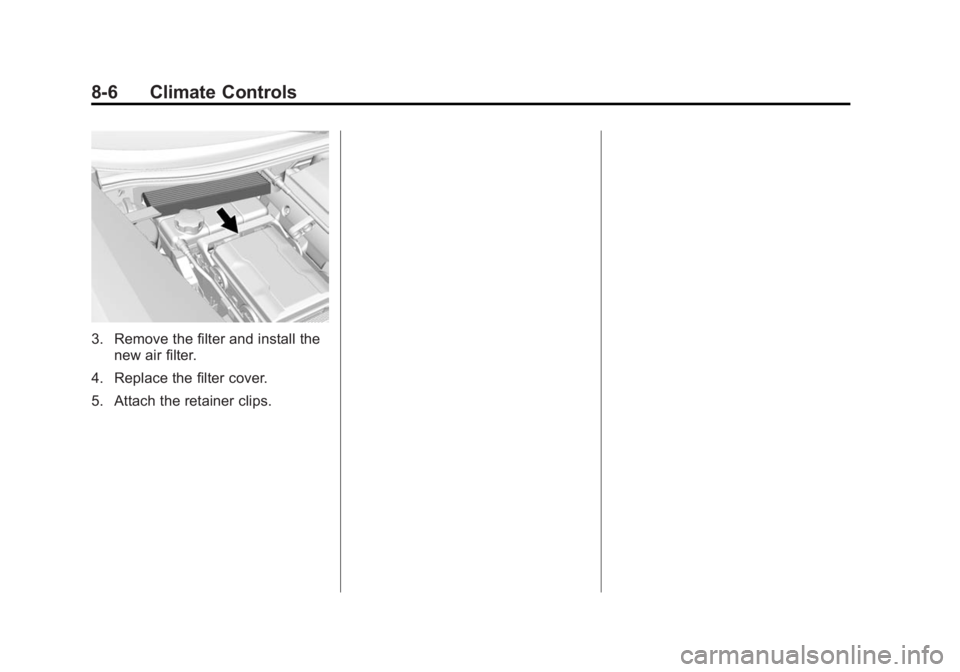
3. Remove the filter and install thenew air filter.
4. Replace the filter cover.
5. Attach the retainer clips.
Page 240 of 391
Black plate (1,1)Chevrolet Corvette Owner Manual (GMNA-Localizing-U.S./Canada/Mexico-
7576293) - 2015 - crc - 6/17/14
Vehicle Care 10-1
Vehicle Care
General Information
General Information . . . . . . . . . . 10-2
California Proposition65 Warning . . . . . . . . . . . . . . . . . 10-2
California Perchlorate Materials Requirements . . . . 10-2
Accessories and Modifications . . . . . . . . . . . . . . . 10-2
Lifting the Vehicle . . . . . . . . . . . . 10-3
Vehicle Checks
Doing Your Own Service Work . . . . . . . . . . . . . . . 10-5
Hood . . . . . . . . . . . . . . . . . . . . . . . . 10-6
Engine Compartment Overview . . . . . . . . . . . . . . . . . . . 10-7
Engine Oil . . . . . . . . . . . . . . . . . . 10-12
Engine Oil Life System . . . . . 10-18
Automatic Transmission Fluid . . . . . . . . . . . . . . . . . . . . . . 10-19
Manual Transmission Fluid . . . . . . . . . . . . . . . . . . . . . . 10-19
Hydraulic Clutch . . . . . . . . . . . . 10-19
Engine Air Cleaner/Filter . . . . 10-20
Cooling System (Engine) . . . 10-22 Cooling System (Aero
Panel) . . . . . . . . . . . . . . . . . . . . . 10-23
Engine Coolant . . . . . . . . . . . . . 10-24
Engine Overheating . . . . . . . . 10-27
Washer Fluid . . . . . . . . . . . . . . . 10-28
Brakes . . . . . . . . . . . . . . . . . . . . . 10-29
Brake Fluid . . . . . . . . . . . . . . . . . 10-32
Battery . . . . . . . . . . . . . . . . . . . . . 10-33
Rear Axle . . . . . . . . . . . . . . . . . . 10-34
Starter Switch Check . . . . . . . 10-35
Automatic Transmission Shift Lock Control Function
Check . . . . . . . . . . . . . . . . . . . . . 10-35
Park Brake and P (Park) Mechanism Check . . . . . . . . 10-36
Wiper Blade Replacement . . . . . . . . . . . . . . 10-36
Windshield Replacement . . . 10-37
Headlamp Aiming
Headlamp Aiming . . . . . . . . . . 10-37
Bulb Replacement
Bulb Replacement . . . . . . . . . . 10-37
High Intensity Discharge (HID) Lighting . . . . . . . . . . . . . 10-37
LED Lighting . . . . . . . . . . . . . . . 10-38
License Plate Lamp . . . . . . . . 10-38
Replacement Bulbs . . . . . . . . . 10-38
Electrical System
Electrical System Overload . . . . . . . . . . . . . . . . . . 10-39
Fuses . . . . . . . . . . . . . . . . . . . . . . 10-39
Engine Compartment Fuse Block . . . . . . . . . . . . . . . . . . . . . 10-39
Rear Compartment Fuse Block . . . . . . . . . . . . . . . . . . . . . 10-43
Wheels and Tires
Tires . . . . . . . . . . . . . . . . . . . . . . . . 10-46
Winter Tires . . . . . . . . . . . . . . . . 10-47
Run-Flat Tires . . . . . . . . . . . . . . 10-48
Low-Profile Tires . . . . . . . . . . . 10-49
Competition OrientedTires . . . . . . . . . . . . . . . . . . . . . . 10-49
Summer Tires . . . . . . . . . . . . . . 10-50
Tire Sidewall Labeling . . . . . . 10-51
Tire Designations . . . . . . . . . . . 10-52
Tire Terminology and Definitions . . . . . . . . . . . . . . . . 10-53
Tire Pressure . . . . . . . . . . . . . . . 10-55
Tire Pressure for High-Speed Operation . . . . . . . . . . . . . . . . . 10-57
Tire Pressure Monitor System . . . . . . . . . . . . . . . . . . . 10-57
Tire Pressure Monitor Operation . . . . . . . . . . . . . . . . . 10-58
Tire Inspection . . . . . . . . . . . . . . 10-61
Page 247 of 391
Black plate (8,1)Chevrolet Corvette Owner Manual (GMNA-Localizing-U.S./Canada/Mexico-
7576293) - 2015 - crc - 6/17/14
10-8 Vehicle Care
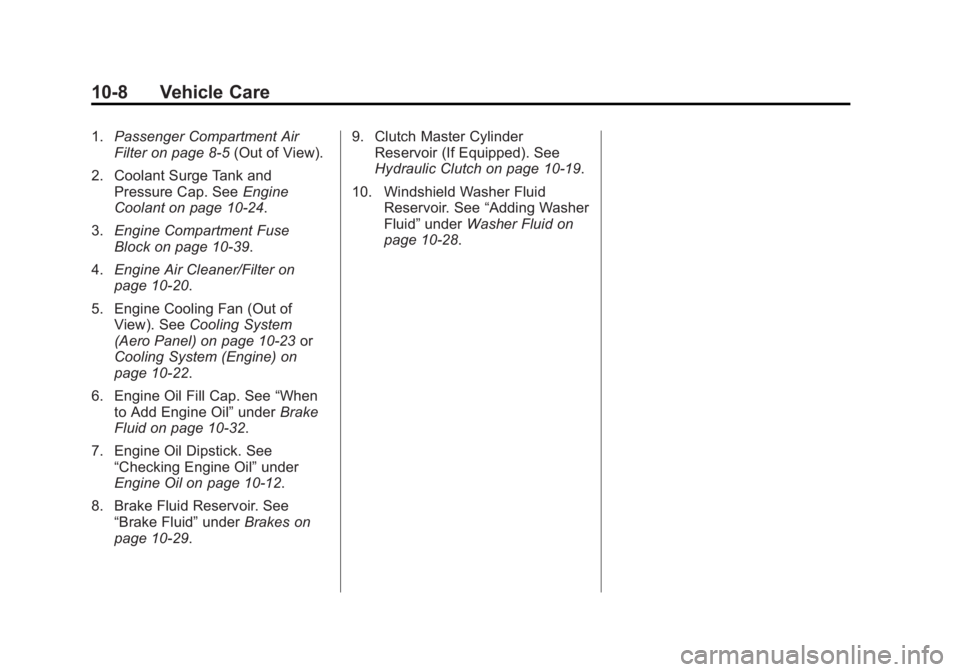
1.Passenger Compartment Air
Filter on page 8-5 (Out of View).
2. Coolant Surge Tank and Pressure Cap. See Engine
Coolant on page 10-24.
3. Engine Compartment Fuse
Block on page 10-39.
4. Engine Air Cleaner/Filter on
page 10-20.
5. Engine Cooling Fan (Out of View). See Cooling System
(Aero Panel) on page 10-23 or
Cooling System (Engine) on
page 10-22.
6. Engine Oil Fill Cap. See “When
to Add Engine Oil” underBrake
Fluid on page 10-32.
7. Engine Oil Dipstick. See “Checking Engine Oil” under
Engine Oil on page 10-12.
8. Brake Fluid Reservoir. See “Brake Fluid” underBrakes on
page 10-29. 9. Clutch Master Cylinder
Reservoir (If Equipped). See
Hydraulic Clutch on page 10-19.
10. Windshield Washer Fluid Reservoir. See “Adding Washer
Fluid” under Washer Fluid on
page 10-28.
Page 249 of 391
Black plate (10,1)Chevrolet Corvette Owner Manual (GMNA-Localizing-U.S./Canada/Mexico-
7576293) - 2015 - crc - 6/17/14
10-10 Vehicle Care
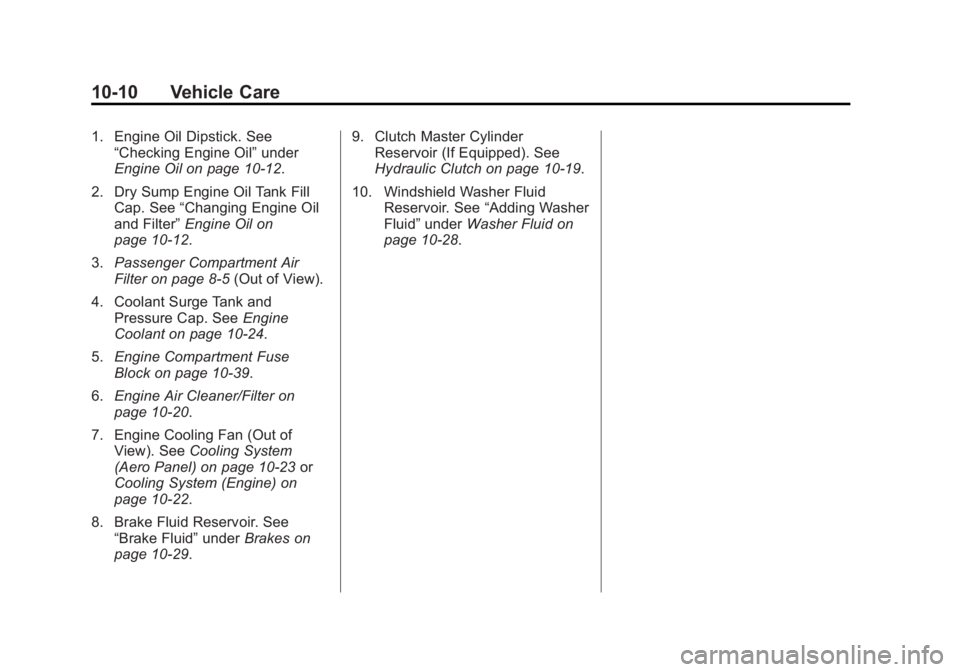
1. Engine Oil Dipstick. See“Checking Engine Oil” under
Engine Oil on page 10-12.
2. Dry Sump Engine Oil Tank Fill Cap. See “Changing Engine Oil
and Filter” Engine Oil on
page 10-12.
3. Passenger Compartment Air
Filter on page 8-5 (Out of View).
4. Coolant Surge Tank and Pressure Cap. See Engine
Coolant on page 10-24.
5. Engine Compartment Fuse
Block on page 10-39.
6. Engine Air Cleaner/Filter on
page 10-20.
7. Engine Cooling Fan (Out of View). See Cooling System
(Aero Panel) on page 10-23 or
Cooling System (Engine) on
page 10-22.
8. Brake Fluid Reservoir. See “Brake Fluid” underBrakes on
page 10-29. 9. Clutch Master Cylinder
Reservoir (If Equipped). See
Hydraulic Clutch on page 10-19.
10. Windshield Washer Fluid Reservoir. See “Adding Washer
Fluid” under Washer Fluid on
page 10-28.
Page 251 of 391
Black plate (12,1)Chevrolet Corvette Owner Manual (GMNA-Localizing-U.S./Canada/Mexico-
7576293) - 2015 - crc - 6/17/14
10-12 Vehicle Care
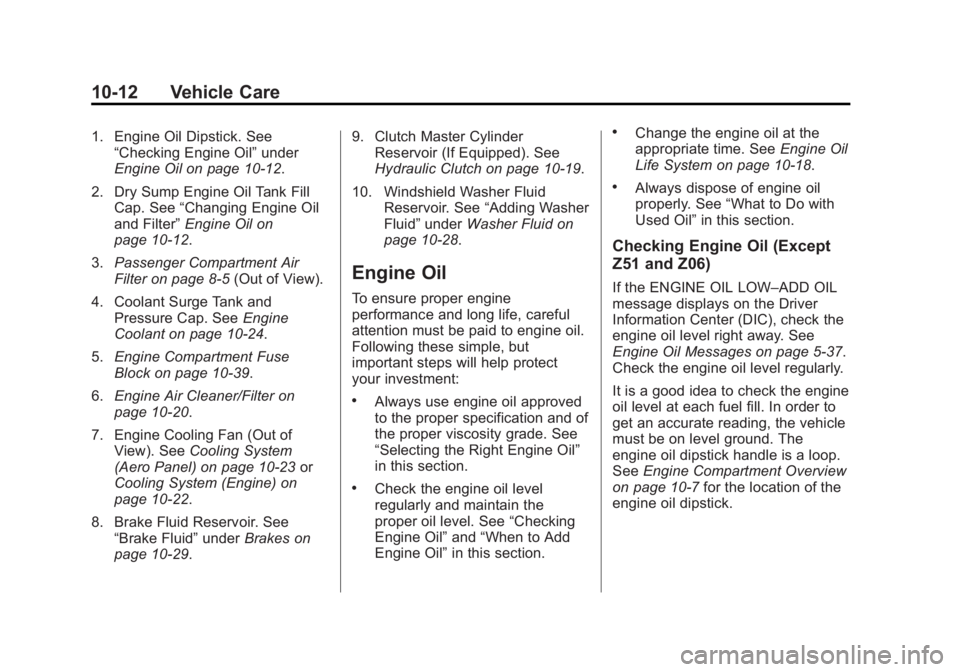
1. Engine Oil Dipstick. See“Checking Engine Oil” under
Engine Oil on page 10-12.
2. Dry Sump Engine Oil Tank Fill Cap. See “Changing Engine Oil
and Filter” Engine Oil on
page 10-12.
3. Passenger Compartment Air
Filter on page 8-5 (Out of View).
4. Coolant Surge Tank and Pressure Cap. See Engine
Coolant on page 10-24.
5. Engine Compartment Fuse
Block on page 10-39.
6. Engine Air Cleaner/Filter on
page 10-20.
7. Engine Cooling Fan (Out of View). See Cooling System
(Aero Panel) on page 10-23 or
Cooling System (Engine) on
page 10-22.
8. Brake Fluid Reservoir. See “Brake Fluid” underBrakes on
page 10-29. 9. Clutch Master Cylinder
Reservoir (If Equipped). See
Hydraulic Clutch on page 10-19.
10. Windshield Washer Fluid Reservoir. See “Adding Washer
Fluid” under Washer Fluid on
page 10-28.
Engine Oil
To ensure proper engine
performance and long life, careful
attention must be paid to engine oil.
Following these simple, but
important steps will help protect
your investment:
.Always use engine oil approved
to the proper specification and of
the proper viscosity grade. See
“Selecting the Right Engine Oil”
in this section.
.Check the engine oil level
regularly and maintain the
proper oil level. See “Checking
Engine Oil” and“When to Add
Engine Oil” in this section.
.Change the engine oil at the
appropriate time. See Engine Oil
Life System on page 10-18.
.Always dispose of engine oil
properly. See “What to Do with
Used Oil” in this section.
Checking Engine Oil (Except
Z51 and Z06)
If the ENGINE OIL LOW–ADD OIL
message displays on the Driver
Information Center (DIC), check the
engine oil level right away. See
Engine Oil Messages on page 5-37.
Check the engine oil level regularly.
It is a good idea to check the engine
oil level at each fuel fill. In order to
get an accurate reading, the vehicle
must be on level ground. The
engine oil dipstick handle is a loop.
SeeEngine Compartment Overview
on page 10-7 for the location of the
engine oil dipstick.
Page 258 of 391
Black plate (19,1)Chevrolet Corvette Owner Manual (GMNA-Localizing-U.S./Canada/Mexico-
7576293) - 2015 - crc - 6/17/14
Vehicle Care 10-19
Automatic Transmission
Fluid
How to Check Automatic
Transmission Fluid
It is not necessary to check the
transmission fluid level.
A transmission fluid leak is the only
reason for fluid loss. If a leak
occurs, take the vehicle to the
dealer and have it repaired as soon
as possible.
The vehicle is not equipped with a
transmission fluid level dipstick.
There is a special procedure for
checking and changing the
transmission fluid. Because this
procedure is difficult, this should be
done at the dealer. Contact the
dealer for additional information or
the procedure can be found in the
service manual. To purchase a
service manual, seeService
Publications Ordering Information
on page 13-11.
{Caution
Use of the incorrect automatic
transmission fluid may damage
the vehicle, and the damage may
not be covered by the vehicle
warranty. Always use the
automatic transmission fluid listed
in Recommended Fluids and
Lubricants on page 11-12.
Change the fluid and filter at the
intervals listed in Maintenance
Schedule on page 11-2, and be sure
to use the fluid listed in
Recommended Fluids and
Lubricants on page 11-12.
Manual Transmission
Fluid
It is not necessary to check the
manual transmission fluid level.
A transmission fluid leak is the only
reason for fluid loss. If a leak
occurs, take the vehicle to the
dealer and have it repaired as soon as possible. See
Recommended
Fluids and Lubricants on page 11-12
for the proper fluid to use.
Hydraulic Clutch
It is not necessary to regularly
check clutch fluid unless you
suspect there is a leak in the
system. Adding fluid will not correct
a leak. A fluid loss in this system
could indicate a problem. Have the
system inspected and repaired.
The fluid will darken over time. See
Maintenance Schedule on
page 11-2 for when to replace the
fluid.
When to Check and What
to Use
Page 259 of 391
Black plate (20,1)Chevrolet Corvette Owner Manual (GMNA-Localizing-U.S./Canada/Mexico-
7576293) - 2015 - crc - 6/17/14
10-20 Vehicle Care
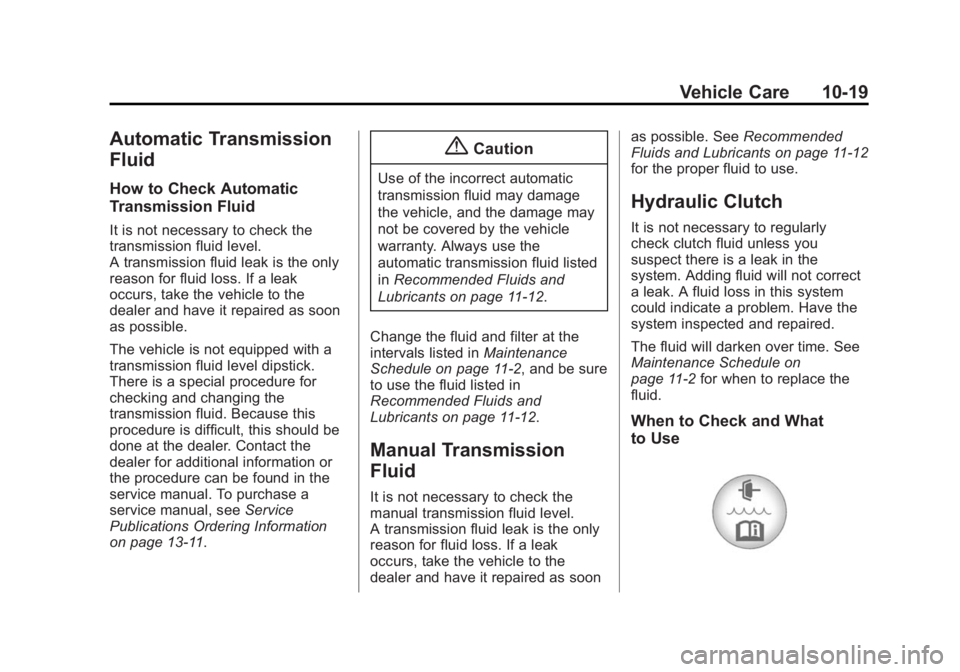
The hydraulic clutch fluid reservoir
cap has this symbol on it. See
Engine Compartment Overview on
page 10-7for reservoir location.
Refer to Recommended Fluids and
Lubricants on page 11-12 for the
proper fluid to use. The fluid
requires changing. See
Maintenance Schedule on
page 11-2.
How to Check and Add Fluid
Visually check the clutch fluid
reservoir to make sure the fluid level
is at the MIN (minimum) line on the
side of the reservoir. The hydraulic
clutch fluid system should be closed
and sealed.
Do not remove the cap to check the
fluid level or to top off the fluid level.
Remove the cap only when
necessary to add the proper fluid
until the level reaches the MIN line.
Engine Air Cleaner/Filter
See Engine Compartment Overview
on page 10-7 for the location of the
engine air cleaner/filter.
{Caution
If water is sprayed and enters the
engine air cleaner/filter intake and
housing, the engine could be
damaged. The repairs would not
be covered by the vehicle
warranty.
When to Inspect the Engine Air
Cleaner/Filter
Inspect or replace the air cleaner/
filter at the scheduled maintenance
intervals listed in Maintenance
Schedule on page 11-2. If driving in
dusty/dirty conditions, inspect the
filter at each engine oil change. How to Inspect the Engine Air
Cleaner/Filter
To inspect the air cleaner/filter,
remove the filter from the vehicle
and lightly shake the filter to release
loose dust and dirt. If the filter
remains covered with dirt, a new
filter is required.
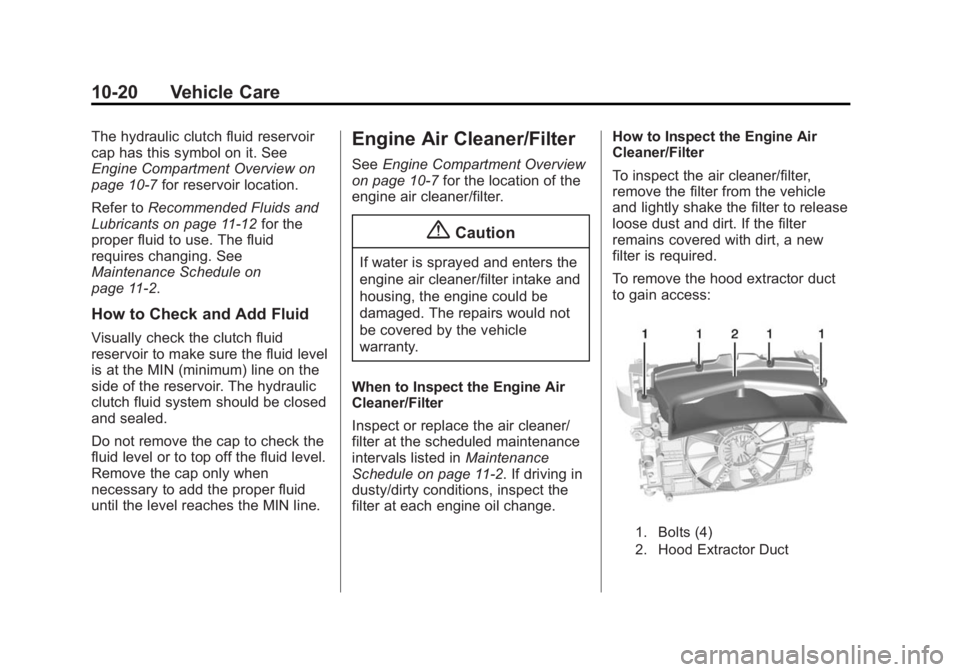
To remove the hood extractor duct
to gain access:
1. Bolts (4)
2. Hood Extractor Duct
Page 260 of 391
Black plate (21,1)Chevrolet Corvette Owner Manual (GMNA-Localizing-U.S./Canada/Mexico-
7576293) - 2015 - crc - 6/17/14
Vehicle Care 10-21
1. Open the hood. SeeHood on
page 10-6.
2. Remove the four bolts (1) and the hood extractor duct (2).
3. Reverse Step 2 to replace the hood extractor duct.
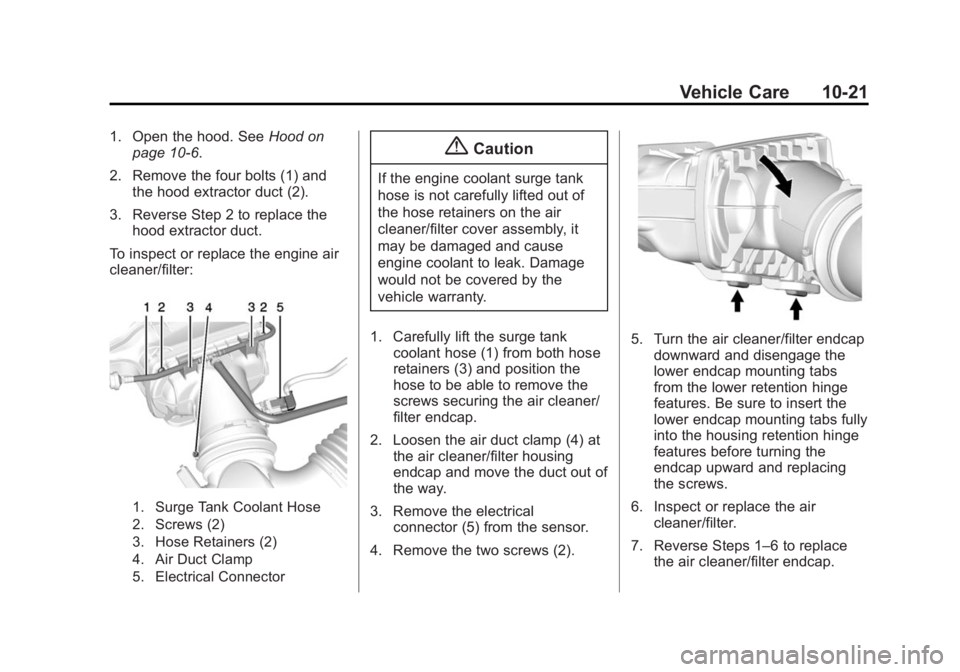
To inspect or replace the engine air
cleaner/filter:
1. Surge Tank Coolant Hose
2. Screws (2)
3. Hose Retainers (2)
4. Air Duct Clamp
5. Electrical Connector
{Caution
If the engine coolant surge tank
hose is not carefully lifted out of
the hose retainers on the air
cleaner/filter cover assembly, it
may be damaged and cause
engine coolant to leak. Damage
would not be covered by the
vehicle warranty.
1. Carefully lift the surge tank coolant hose (1) from both hose
retainers (3) and position the
hose to be able to remove the
screws securing the air cleaner/
filter endcap.
2. Loosen the air duct clamp (4) at the air cleaner/filter housing
endcap and move the duct out of
the way.
3. Remove the electrical connector (5) from the sensor.
4. Remove the two screws (2).
5. Turn the air cleaner/filter endcap downward and disengage the
lower endcap mounting tabs
from the lower retention hinge
features. Be sure to insert the
lower endcap mounting tabs fully
into the housing retention hinge
features before turning the
endcap upward and replacing
the screws.
6. Inspect or replace the air cleaner/filter.
7. Reverse Steps 1–6 to replace the air cleaner/filter endcap.