cooling CHEVROLET CORVETTE GRAND SPORT 2019 Owners Manual
[x] Cancel search | Manufacturer: CHEVROLET, Model Year: 2019, Model line: CORVETTE GRAND SPORT, Model: CHEVROLET CORVETTE GRAND SPORT 2019Pages: 367, PDF Size: 5.6 MB
Page 18 of 367
Chevrolet Corvette Owner Manual (GMNA-Localizing-U.S./Canada/Mexico-
12032182) - 2019 - crc - 5/8/18
In Brief 17
Climate Controls
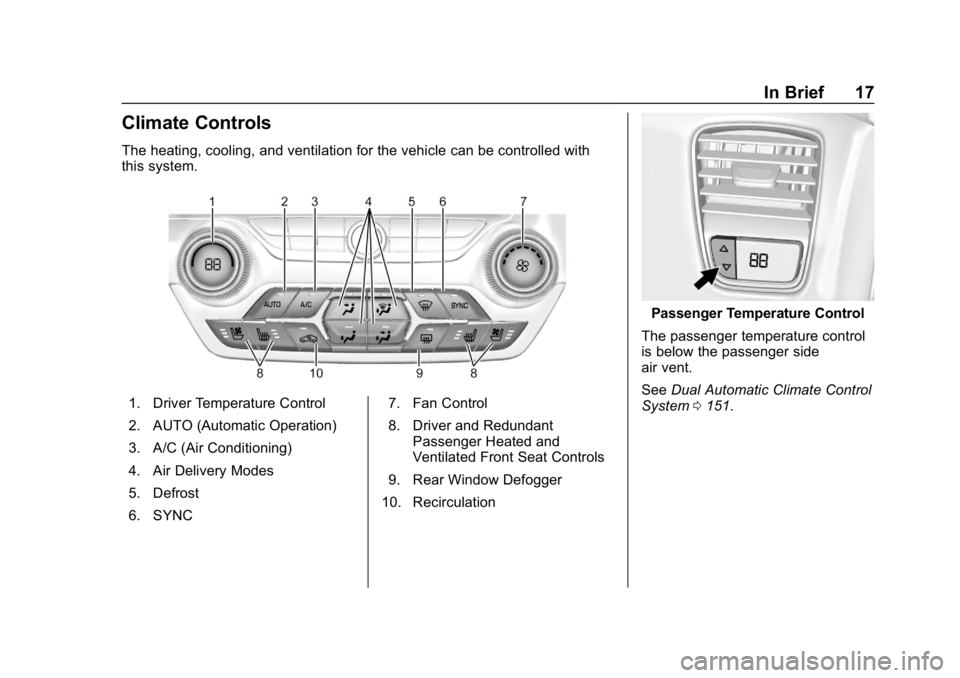
The heating, cooling, and ventilation for the vehicle can be controlled with
this system.
1. Driver Temperature Control
2. AUTO (Automatic Operation)
3. A/C (Air Conditioning)
4. Air Delivery Modes
5. Defrost
6. SYNC7. Fan Control
8. Driver and Redundant
Passenger Heated and
Ventilated Front Seat Controls
9. Rear Window Defogger
10. Recirculation
Passenger Temperature Control
The passenger temperature control
is below the passenger side
air vent.
See Dual Automatic Climate Control
System 0151.
Page 152 of 367
Chevrolet Corvette Owner Manual (GMNA-Localizing-U.S./Canada/Mexico-
12032182) - 2019 - crc - 5/8/18
Climate Controls 151
Climate Controls
Climate Control Systems
Dual Automatic ClimateControl System . . . . . . . . . . . . . 151
Air Vents
Air Vents . . . . . . . . . . . . . . . . . . . . . 155
Maintenance
Passenger Compartment AirFilter . . . . . . . . . . . . . . . . . . . . . . . . 155
Service . . . . . . . . . . . . . . . . . . . . . . . 156
Climate Control Systems
Dual Automatic Climate Control System
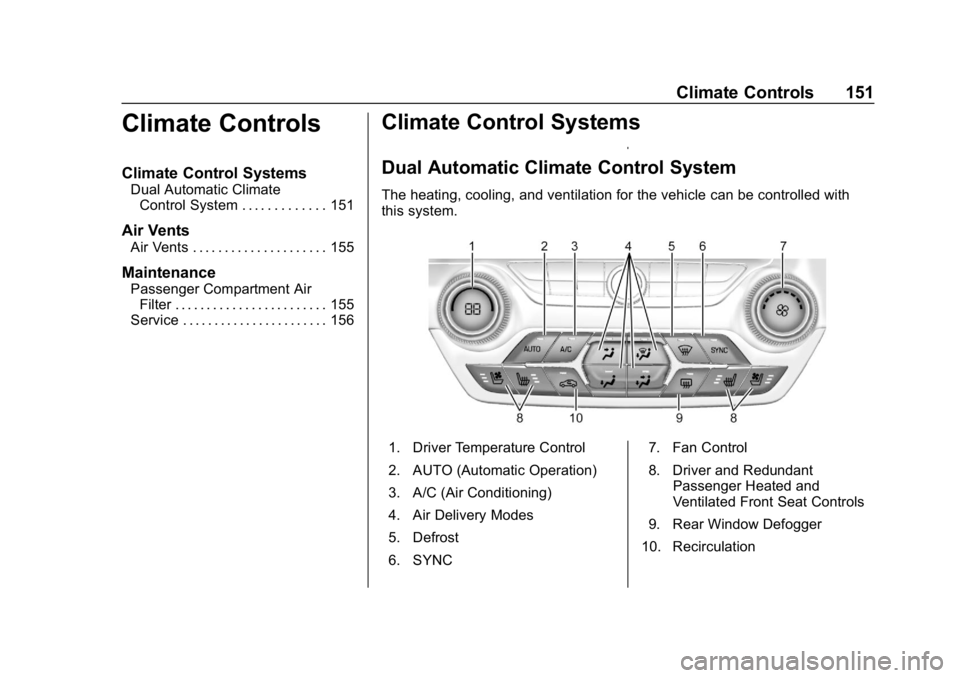
The heating, cooling, and ventilation for the vehicle can be controlled with
this system.
1. Driver Temperature Control
2. AUTO (Automatic Operation)
3. A/C (Air Conditioning)
4. Air Delivery Modes
5. Defrost
6. SYNC 7. Fan Control
8. Driver and Redundant
Passenger Heated and
Ventilated Front Seat Controls
9. Rear Window Defogger
10. Recirculation
Page 154 of 367
Chevrolet Corvette Owner Manual (GMNA-Localizing-U.S./Canada/Mexico-
12032182) - 2019 - crc - 5/8/18
Climate Controls 153
Changing the mode cancels the
automatic operation and the system
goes into manual mode. Press
AUTO to return to automatic
operation.
Y:Air is directed to the instrument
panel outlets.
[: Air is directed to the floor
outlets.
\: Air is directed to the instrument
panel outlets and the floor outlets.
-: Air is directed to the windshield
and floor outlets to clear the
windows of fog or moisture. The
recirculation mode cannot be
selected while in the defog mode.
0: Press to clear the windshield
of fog or frost more quickly. Air is
directed to the windshield and side
window outlets. The recirculation
mode cannot be selected while in
defrost mode.
For best results, clear all snow and
ice from the windshield before
defrosting.
Do not drive the vehicle until all the
windows are clear. A/C :
Press to turn the air
conditioning on or off. If the fan is
turned off, the air conditioner will not
run and the indicator light may
turn off.
Press AUTO to return to automatic
operation and the air conditioner
runs as needed. When the indicator
light is on, the air conditioner runs
automatically to cool the air inside
the vehicle or to dry the air as
needed to defog the windshield
faster.
Depending on the engine speed, the
air conditioning compressor may
shut off and turn on again and a
slight change in A/C cooling and
engine performance may be
noticed. This is normal. The system
is designed to make adjustments to
help with fuel economy while still
maintaining the selected
temperature.
If the A/C is turned off, automatic
operation is canceled.
/: Press to turn on
recirculation. An indicator light
comes on. Air is recirculated to quickly cool the inside of the vehicle
or reduce the entry of outside air
and odors. Recirculation mode is
not available in defrost or
defog mode.
Rear Window Defogger
=:
Press to turn the rear window
defogger on or off. An indicator light
on the button comes on to show that
the rear window defogger is on.
The defogger only works when the
ignition is on. The defogger turns off
if the ignition is off or in ACC/
ACCESSORY.
The rear window defogger can be
set to automatic operation. See
“Climate and Air Quality” under
Vehicle Personalization 0128.
When auto rear defog is selected,
the rear window defogger turns on
automatically when the interior
temperature is cold and the outside
temperature is about 4 °C (40 °F)
and below. The auto rear defogger
turns off automatically after about
10 minutes.
Page 166 of 367
Chevrolet Corvette Owner Manual (GMNA-Localizing-U.S./Canada/Mexico-
12032182) - 2019 - crc - 5/8/18
Driving and Operating 165
after every 24 hours of racing or
competitive driving. See
Recommended Fluids and
Lubricants0321.
General Information
If reduced performance is
experienced during track events or
competitive driving, turning off the
A/C will help to improve engine
performance.
Maintain a mixture of 40%
DEX-COOL coolant and 60% clean,
drinkable water to optimize engine
performance.
The front license plate bracket or
aero panel should be removed for
track events and competitive driving
to improve engine performance.
Brakes
{Warning
Braking above 200 mph:
(Continued)
Warning (Continued)
Applying and sustaining full force
braking at speeds exceeding
200 mph (322 km/h) can cause
serious damage to the braking
system. At any speed, braking
must be performed in a smooth
and controlled manner, but at
these speeds specifically, lower
initial brake pedal efforts are
recommended.
Brake Cooling
If additional brake cooling is
required, the grille mesh in the lower
corners of the front grille in front of
the brake duct can be removed.
This is not reversible, and a
replacement grille will not be
covered by the vehicle warranty.
If this is done, it is recommended
that the gap between the fascia and
the cooling duct be taped over. Brake Fluid
Replace existing brake fluid with a
qualified high performance brake
fluid from a sealed container. Brake
fluid with a dry boiling point >310 °C
(590 °F) is qualified. If high
performance brake fluid is used,
replace it with GM approved brake
fluid before driving on public roads.
If high performance brake fluid is in
the vehicle and the age of the brake
fluid is over a month old or
unknown, replace the brake fluid
before track events and competitive
driving. Do not use silicone or
DOT-5 brake fluids.
Brake Burnishing
New brake pads must be burnished
before racing or other competitive
driving.
Caution
Performing the brake burnish
procedure on a base brake
system can result in brake
damage.
Page 168 of 367
Chevrolet Corvette Owner Manual (GMNA-Localizing-U.S./Canada/Mexico-
12032182) - 2019 - crc - 5/8/18
Driving and Operating 167
2. Use enough pedal force tocompletely stop the vehicle in
four to five seconds. If ABS
activates, braking is too hard.
3. Repeat Steps 1 and 2 –20
consecutive times, this should
take about 5 minutes.
4. After completing the 20 stops, cool the brakes by driving for
8 km (5 mi) at 100 km/h
(60 mph).
As with all high performance brake
systems, some amount of brake
squeal is normal.
Racing/Track Brake Burnishing
Procedure (Grand Sport with J57,
Z06 with J57, and ZR1)
This procedure should only be run
on a track and only on dry
pavement.
Caution
Brake pedal fade will occur during
this track burnish procedure and
can cause brake pedal travel and (Continued)
Caution (Continued)
force to increase. This could
extend stopping distance until the
brakes are fully burnished.
1. Drive a normal first lap, not too aggressively.
2. Laps 2 and 3 should be gradually driven faster and
more aggressively, while
allowing for reduced brake
output and increased stopping
distance due to brake fade.
3. Drive Lap 4 near full speed, while allowing for reduced
brake output and increased
stopping distance due to
brake fade.
4. Laps 5 and 6 should be cool down laps.
5. Lap 7 should be normal driving or an easy out lap.
Exhaust Cooling
Hardware (ZR1)
The exhaust cooling hardware
should be installed prior to any track
event. These components will help
cool the exhaust system.
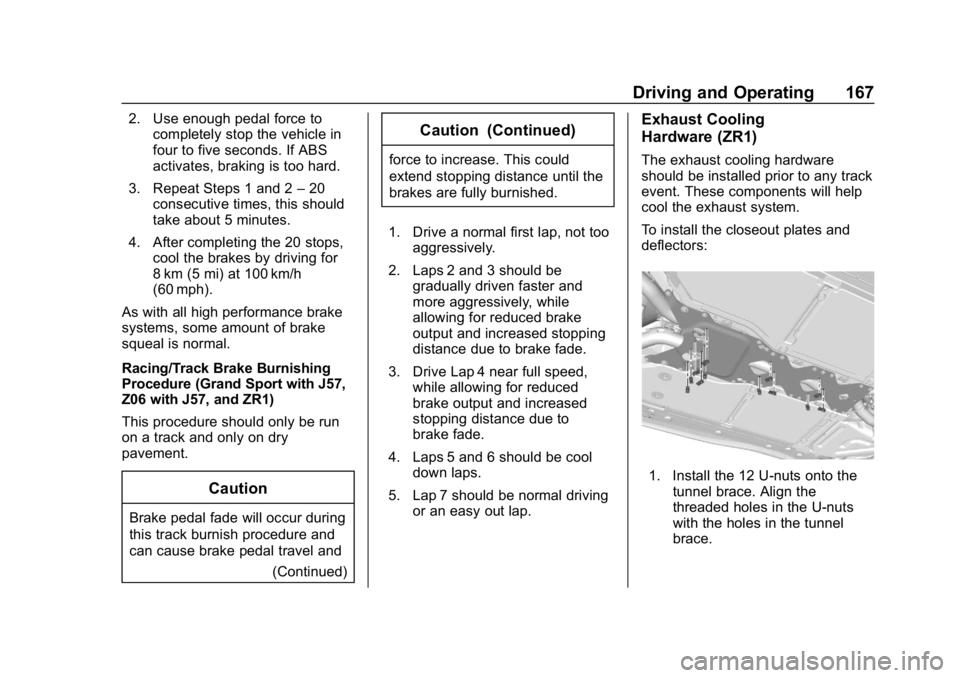
To install the closeout plates and
deflectors:
1. Install the 12 U-nuts onto the
tunnel brace. Align the
threaded holes in the U-nuts
with the holes in the tunnel
brace.
Page 169 of 367
Chevrolet Corvette Owner Manual (GMNA-Localizing-U.S./Canada/Mexico-
12032182) - 2019 - crc - 5/8/18
168 Driving and Operating
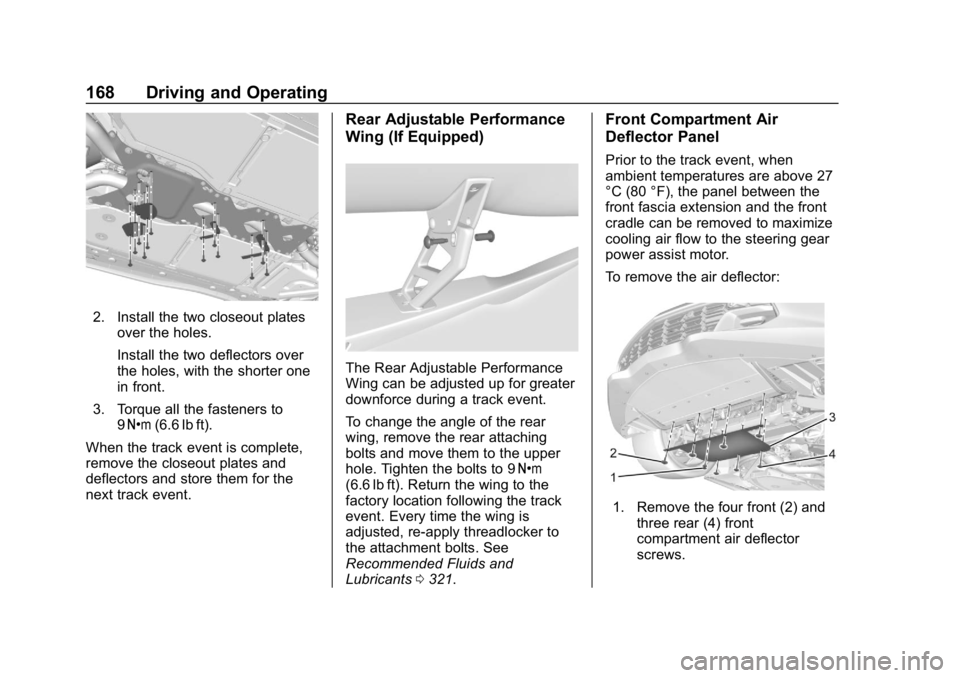
2. Install the two closeout platesover the holes.
Install the two deflectors over
the holes, with the shorter one
in front.
3. Torque all the fasteners to 9Y (6.6 lb ft).
When the track event is complete,
remove the closeout plates and
deflectors and store them for the
next track event.
Rear Adjustable Performance
Wing (If Equipped)
The Rear Adjustable Performance
Wing can be adjusted up for greater
downforce during a track event.
To change the angle of the rear
wing, remove the rear attaching
bolts and move them to the upper
hole. Tighten the bolts to 9 Y
(6.6 lb ft). Return the wing to the
factory location following the track
event. Every time the wing is
adjusted, re-apply threadlocker to
the attachment bolts. See
Recommended Fluids and
Lubricants 0321.
Front Compartment Air
Deflector Panel
Prior to the track event, when
ambient temperatures are above 27
°C (80 °F), the panel between the
front fascia extension and the front
cradle can be removed to maximize
cooling air flow to the steering gear
power assist motor.
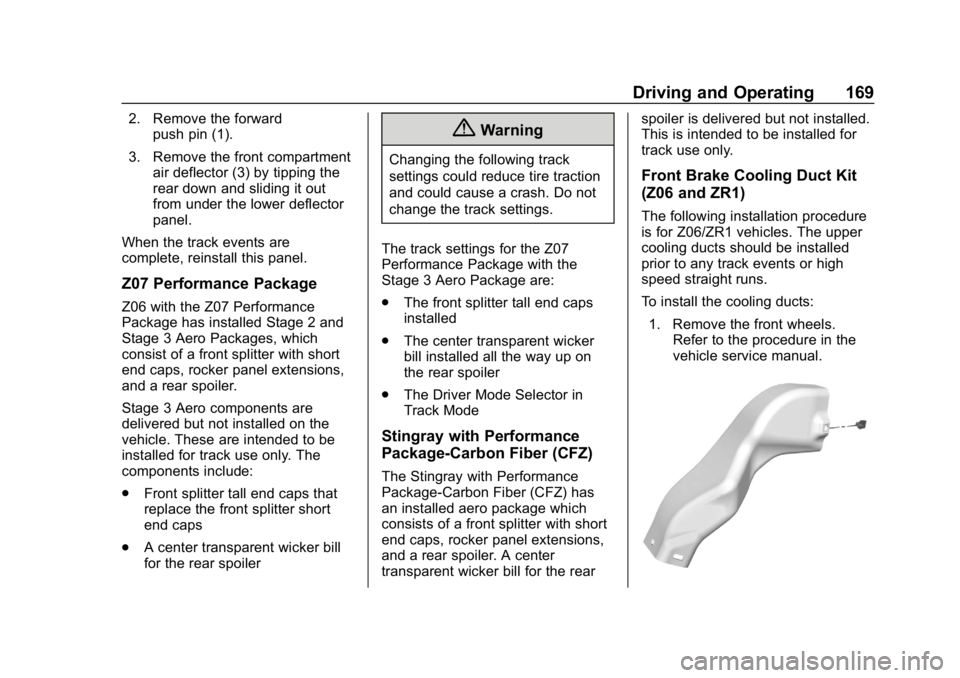
To remove the air deflector:
1. Remove the four front (2) and
three rear (4) front
compartment air deflector
screws.
Page 170 of 367
Chevrolet Corvette Owner Manual (GMNA-Localizing-U.S./Canada/Mexico-
12032182) - 2019 - crc - 5/8/18
Driving and Operating 169
2. Remove the forwardpush pin (1).
3. Remove the front compartment air deflector (3) by tipping the
rear down and sliding it out
from under the lower deflector
panel.
When the track events are
complete, reinstall this panel.
Z07 Performance Package
Z06 with the Z07 Performance
Package has installed Stage 2 and
Stage 3 Aero Packages, which
consist of a front splitter with short
end caps, rocker panel extensions,
and a rear spoiler.
Stage 3 Aero components are
delivered but not installed on the
vehicle. These are intended to be
installed for track use only. The
components include:
. Front splitter tall end caps that
replace the front splitter short
end caps
. A center transparent wicker bill
for the rear spoiler
{Warning
Changing the following track
settings could reduce tire traction
and could cause a crash. Do not
change the track settings.
The track settings for the Z07
Performance Package with the
Stage 3 Aero Package are:
. The front splitter tall end caps
installed
. The center transparent wicker
bill installed all the way up on
the rear spoiler
. The Driver Mode Selector in
Track Mode
Stingray with Performance
Package-Carbon Fiber (CFZ)
The Stingray with Performance
Package-Carbon Fiber (CFZ) has
an installed aero package which
consists of a front splitter with short
end caps, rocker panel extensions,
and a rear spoiler. A center
transparent wicker bill for the rear spoiler is delivered but not installed.
This is intended to be installed for
track use only.
Front Brake Cooling Duct Kit
(Z06 and ZR1)
The following installation procedure
is for Z06/ZR1 vehicles. The upper
cooling ducts should be installed
prior to any track events or high
speed straight runs.
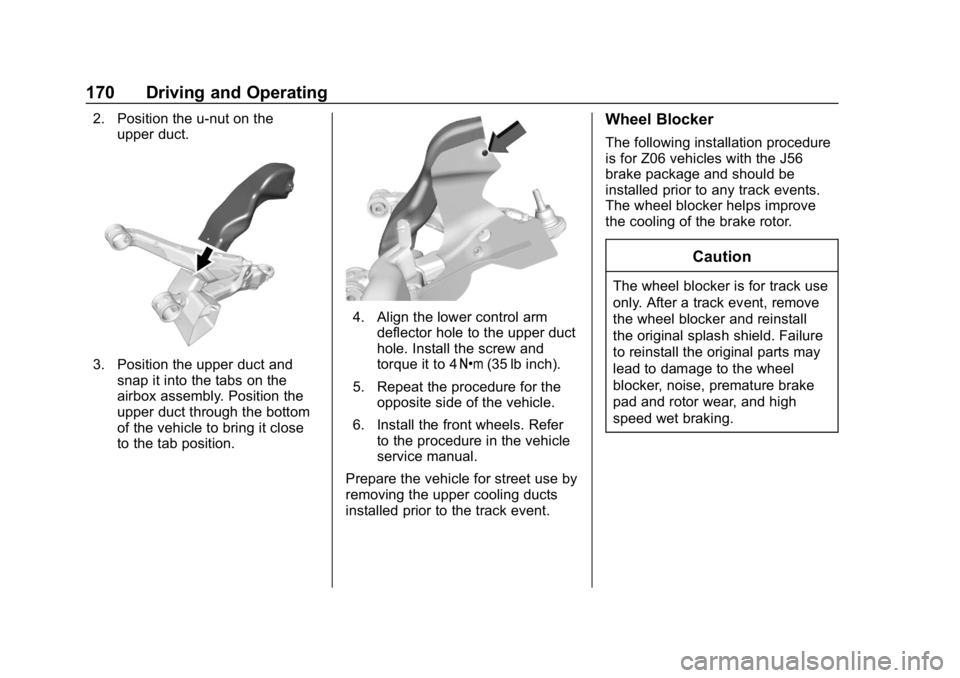
To install the cooling ducts:
1. Remove the front wheels. Refer to the procedure in the
vehicle service manual.
Page 171 of 367
Chevrolet Corvette Owner Manual (GMNA-Localizing-U.S./Canada/Mexico-
12032182) - 2019 - crc - 5/8/18
170 Driving and Operating
2. Position the u-nut on theupper duct.
3. Position the upper duct andsnap it into the tabs on the
airbox assembly. Position the
upper duct through the bottom
of the vehicle to bring it close
to the tab position.
4. Align the lower control arm
deflector hole to the upper duct
hole. Install the screw and
torque it to 4 Y(35 lb inch).
5. Repeat the procedure for the opposite side of the vehicle.
6. Install the front wheels. Refer to the procedure in the vehicle
service manual.
Prepare the vehicle for street use by
removing the upper cooling ducts
installed prior to the track event.
Wheel Blocker
The following installation procedure
is for Z06 vehicles with the J56
brake package and should be
installed prior to any track events.
The wheel blocker helps improve
the cooling of the brake rotor.
Caution
The wheel blocker is for track use
only. After a track event, remove
the wheel blocker and reinstall
the original splash shield. Failure
to reinstall the original parts may
lead to damage to the wheel
blocker, noise, premature brake
pad and rotor wear, and high
speed wet braking.
Page 174 of 367
Chevrolet Corvette Owner Manual (GMNA-Localizing-U.S./Canada/Mexico-
12032182) - 2019 - crc - 5/8/18
Driving and Operating 173
Other Rainy Weather Tips
Besides slowing down, other wet
weather driving tips include:
.Allow extra following distance.
. Pass with caution.
. Keep windshield wiping
equipment in good shape.
. Keep the windshield washer fluid
reservoir filled.
. Have good tires with proper
tread depth. See Tires0265.
. Turn off cruise control.
Hill and Mountain Roads
Driving on steep hills or through
mountains is different than driving
on flat or rolling terrain. Tips include:
.Keep the vehicle serviced and in
good shape.
. Check all fluid levels and brakes,
tires, cooling system, and
transmission.
. Shift to a lower gear when going
down steep or long hills.
{Warning
Using the brakes to slow the
vehicle on a long downhill slope
can cause brake overheating, can
reduce brake performance, and
could result in a loss of braking.
Shift the transmission to a lower
gear to let the engine assist the
brakes on a steep downhill slope.
{Warning
Coasting downhill in N (Neutral)
or with the ignition off is
dangerous. This can cause
overheating of the brakes and
loss of steering assist. Always
have the engine running and the
vehicle in gear.
. Drive at speeds that keep the
vehicle in its own lane. Do not
swing wide or cross the
center line. .
Be alert on top of hills;
something could be in your lane
(e.g., stalled car, crash).
. Pay attention to special road
signs (e.g., falling rocks area,
winding roads, long grades,
passing or no-passing zones)
and take appropriate action.
Winter Driving
Driving on Snow or Ice
Snow or ice between the tires and
the road creates less traction or
grip, so drive carefully. Wet ice can
occur at about 0 °C (32 °F) when
freezing rain begins to fall. Avoid
driving on wet ice or in freezing rain
until roads can be treated.
For Slippery Road Driving:
.Accelerate gently. Accelerating
too quickly causes the wheels to
spin and makes the surface
under the tires slick.
. Turn on Traction Control. See
Traction Control/Electronic
Stability Control 0198.
Page 219 of 367
Chevrolet Corvette Owner Manual (GMNA-Localizing-U.S./Canada/Mexico-
12032182) - 2019 - crc - 5/8/18
218 Vehicle Care
Vehicle Care
General Information
General Information . . . . . . . . . . 219
California Proposition65 Warning . . . . . . . . . . . . . . . . . 219
California Perchlorate Materials Requirements . . . . . 220
Accessories and Modifications . . . . . . . . . . . . . . . . 220
Lifting the Vehicle . . . . . . . . . . . . 220
Vehicle Checks
Doing Your Own Service Work . . . . . . . . . . . . . . . 223
Hood . . . . . . . . . . . . . . . . . . . . . . . . . 223
Engine Compartment Overview . . . . . . . . . . . . . . . . . . . . 225
Engine Oil . . . . . . . . . . . . . . . . . . . . 232
Engine Oil Life System . . . . . . . 237
Automatic Transmission Fluid . . . . . . . . . . . . . . . . . . . . . . . . 238
Manual Transmission Fluid . . . 239
Hydraulic Clutch . . . . . . . . . . . . . . 239
Engine Air Cleaner/Filter . . . . . . 239
Cooling System (Engine) . . . . . 242
Cooling System (Aero Panel) . . . . . . . . . . . . . . . . . . . . . . . 246 Cooling System (Intercooler on
LT4 and LT5 Engines) . . . . . . . 247
Engine Overheating . . . . . . . . . . 247
Washer Fluid . . . . . . . . . . . . . . . . . 248
Brakes . . . . . . . . . . . . . . . . . . . . . . . 249
Brake Fluid . . . . . . . . . . . . . . . . . . . 250
Battery - North America . . . . . . 251
Rear Axle . . . . . . . . . . . . . . . . . . . . 252
Starter Switch Check . . . . . . . . . 253
Park Brake and P (Park) Mechanism Check . . . . . . . . . . 254
Wiper Blade Replacement . . . . 254
Windshield Replacement . . . . . 255
Gas Strut(s) . . . . . . . . . . . . . . . . . . 255Headlamp Aiming
Headlamp Aiming . . . . . . . . . . . . 256
Bulb Replacement
Bulb Replacement . . . . . . . . . . . . 257
High Intensity Discharge (HID) Lighting . . . . . . . . . . . . . . . . . . . . . 257
LED Lighting . . . . . . . . . . . . . . . . . 257
License Plate Lamp . . . . . . . . . . 257
Electrical System
Electrical System Overload . . . 258
Fuses . . . . . . . . . . . . . . . . . . . . . . . . 258
Engine Compartment Fuse Block . . . . . . . . . . . . . . . . . . . . . . . . 259 Rear Compartment Fuse
Block . . . . . . . . . . . . . . . . . . . . . . . . 262
Wheels and Tires
Tires . . . . . . . . . . . . . . . . . . . . . . . . . . 265
Winter Tires . . . . . . . . . . . . . . . . . . 266
Run-Flat Tires . . . . . . . . . . . . . . . . 266
Low-Profile Tires . . . . . . . . . . . . . 267
Competition Oriented Tires . . . 268
Summer Tires . . . . . . . . . . . . . . . . 269
Tire Sidewall Labeling . . . . . . . . 269
Tire Designations . . . . . . . . . . . . . 270
Tire Terminology andDefinitions . . . . . . . . . . . . . . . . . . 271
Tire Pressure . . . . . . . . . . . . . . . . . 274
Tire Pressure for High-Speed Operation . . . . . . . . . . . . . . . . . . . 275
Tire Pressure Monitor System . . . . . . . . . . . . . . . . . . . . . . 275
Tire Pressure Monitor Operation . . . . . . . . . . . . . . . . . . . 276
Tire Inspection . . . . . . . . . . . . . . . . 278
Tire Rotation . . . . . . . . . . . . . . . . . 279
When It Is Time for New Tires . . . . . . . . . . . . . . . . . . . . . . . . 280
Buying New Tires . . . . . . . . . . . . . 280
Different Size Tires and Wheels . . . . . . . . . . . . . . . . . . . . . . 282
Uniform Tire Quality Grading . . . . . . . . . . . . . . . . . . . . . 282