psi CHEVROLET CRUZE 2011 1.G Owners Manual
[x] Cancel search | Manufacturer: CHEVROLET, Model Year: 2011, Model line: CRUZE, Model: CHEVROLET CRUZE 2011 1.GPages: 394, PDF Size: 6.89 MB
Page 60 of 394
Black plate (12,1)Chevrolet Cruze Owner Manual - 2011
3-12 Seats and Restraints
With safety belts, you slow down as
the vehicle does. You get more time
to stop. You stop over more
distance, and your strongest bones
take the forces. That is why safety
belts make such good sense.
Questions and Answers About
Safety Belts
Q: Will I be trapped in the vehicleafter a crash if I am wearing a
safety belt?
A: You could be—whether you are
wearing a safety belt or not. But
your chance of being conscious
during and after an accident, so
you canunbuckle and get out, is
much greater if you are belted.
And you can unbuckle a safety
belt, even if you are
upside down. Q: If my vehicle has airbags, why
should I have to wear safety
belts?
A: Airbags are supplemental
systems only; so they work with
safety belts —not instead of
them. Whether or not an airbag
is provided, all occupants still
have to buckle up to get the
most protection. That is true not
only in frontal collisions, but
especially in side and other
collisions. Q: If I am a good driver, and I
never drive far from home,
why should I wear safety
belts?
A: You may be an excellent driver,
but if you are in a crash —even
one that is not your fault —you
and your passenger(s) can be
hurt. Being a good driver does
not protect you from things
beyond your control, such as
bad drivers.
Most accidents occur within
40 km (25 miles) of home. And
the greatest number of serious
injuries and deaths occur at
speeds of less than
65 km/h (40 mph).
Safety belts are for everyone.
Page 138 of 394
Black plate (26,1)Chevrolet Cruze Owner Manual - 2011
5-26 Instruments and Controls
Fuel Used
This display shows the approximate
liters (L) or gallons (gal) of fuel that
have been used since last reset.
The fuel used can be reset by
pressing the SET/CLR button while
the Fuel Used display is showing.
Digital Speed
The speedometer shows how fast
the vehicle is moving in either
kilometers per hour (km/h) or miles
per hour (mph). The speedometer
cannot be reset.
Navigation
This display is used for the OnStar
or Navigation System Turn-by-Turn
guidance. See The OnStar Owner's
Guide or the Navigation manual,
if the vehicle has navigation, for
more information.
Blank Display
This display shows no information.Vehicle Information Menu
Items
Press MENU on the turn signal
lever until Vehicle Information menu
is displayed. Use
w xto scroll
through the following menu items:
.Units
.Tire Pressure
.Remaining Oil Life
.Battery Voltage
.Blank Display
Units
Move
w xto change between
Metric or US when the Unit display
is active. Press SET/CLR to confirm
the setting. This will change the
displays on the cluster and DIC to
either metric or English (US)
measurements. Tire Pressure
The display will show a vehicle with
the approximate pressures of all
four tires. Tire pressure is displayed
in either kilopascal (kPa) or in
pounds per square inch (psi). See
Tire Pressure Monitor System on
page 10‑52
andTire Pressure
Monitor Operation on page 10‑53 for
more information.
Remaining Oil Life
This display shows an estimate of
the oil's remaining useful life.
If REMAINING OIL LIFE 99% is
displayed, that means 99% of the
current oil life remains.
Page 298 of 394
Black plate (46,1)Chevrolet Cruze Owner Manual - 2011
10-46 Vehicle Care
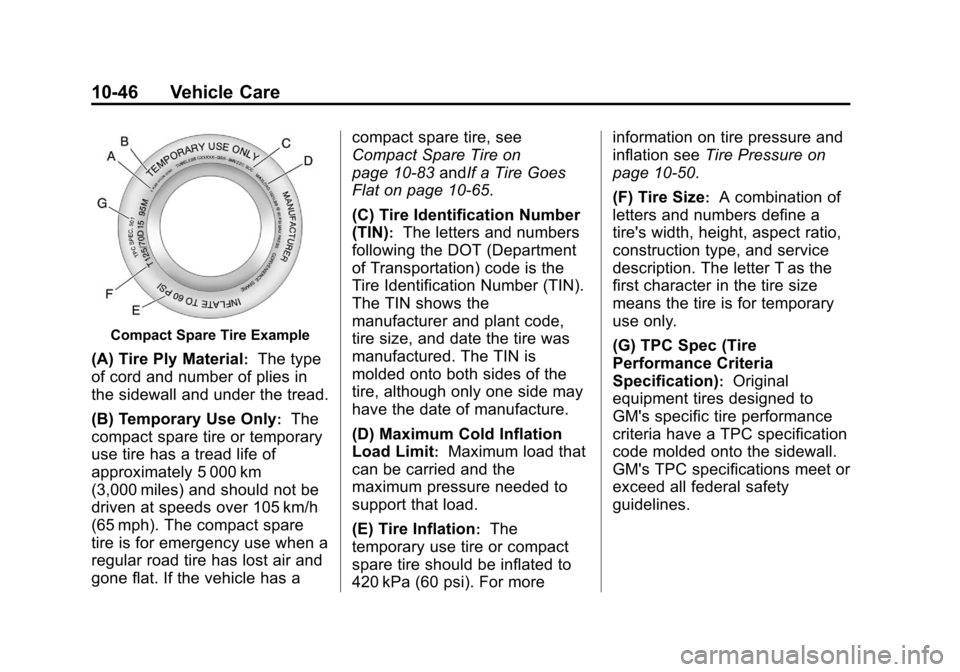
Compact Spare Tire Example
(A) Tire Ply Material:The type
of cord and number of plies in
the sidewall and under the tread.
(B) Temporary Use Only
:The
compact spare tire or temporary
use tire has a tread life of
approximately 5 000 km
(3,000 miles) and should not be
driven at speeds over 105 km/h
(65 mph). The compact spare
tire is for emergency use when a
regular road tire has lost air and
gone flat. If the vehicle has a compact spare tire, see
Compact Spare Tire on
page 10‑83
andIf a Tire Goes
Flat on page 10‑65.
(C) Tire Identification Number
(TIN)
:The letters and numbers
following the DOT (Department
of Transportation) code is the
Tire Identification Number (TIN).
The TIN shows the
manufacturer and plant code,
tire size, and date the tire was
manufactured. The TIN is
molded onto both sides of the
tire, although only one side may
have the date of manufacture.
(D) Maximum Cold Inflation
Load Limit
:Maximum load that
can be carried and the
maximum pressure needed to
support that load.
(E) Tire Inflation
:The
temporary use tire or compact
spare tire should be inflated to
420 kPa (60 psi). For more information on tire pressure and
inflation see
Tire Pressure on
page 10‑50.
(F) Tire Size
:A combination of
letters and numbers define a
tire's width, height, aspect ratio,
construction type, and service
description. The letter T as the
first character in the tire size
means the tire is for temporary
use only.
(G) TPC Spec (Tire
Performance Criteria
Specification)
:Original
equipment tires designed to
GM's specific tire performance
criteria have a TPC specification
code molded onto the sidewall.
GM's TPC specifications meet or
exceed all federal safety
guidelines.
Page 299 of 394
Black plate (47,1)Chevrolet Cruze Owner Manual - 2011
Vehicle Care 10-47
Tire Designations
Tire Size
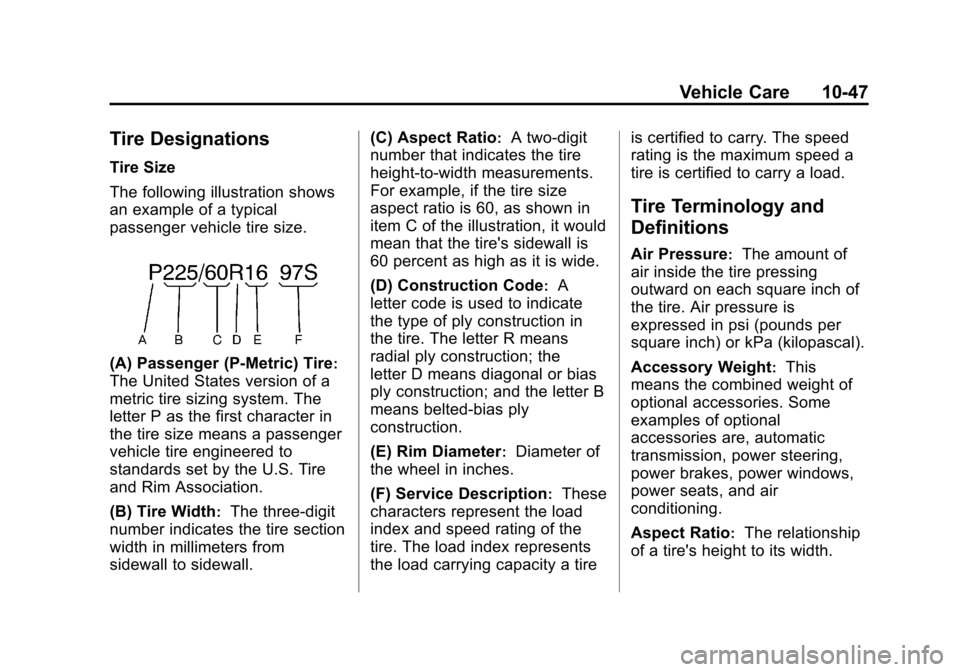
The following illustration shows
an example of a typical
passenger vehicle tire size.
(A) Passenger (P‐Metric) Tire:
The United States version of a
metric tire sizing system. The
letter P as the first character in
the tire size means a passenger
vehicle tire engineered to
standards set by the U.S. Tire
and Rim Association.
(B) Tire Width
:The three‐digit
number indicates the tire section
width in millimeters from
sidewall to sidewall. (C) Aspect Ratio
:A two‐digit
number that indicates the tire
height‐to‐width measurements.
For example, if the tire size
aspect ratio is 60, as shown in
item C of the illustration, it would
mean that the tire's sidewall is
60 percent as high as it is wide.
(D) Construction Code
:A
letter code is used to indicate
the type of ply construction in
the tire. The letter R means
radial ply construction; the
letter D means diagonal or bias
ply construction; and the letter B
means belted‐bias ply
construction.
(E) Rim Diameter
:Diameter of
the wheel in inches.
(F) Service Description
:These
characters represent the load
index and speed rating of the
tire. The load index represents
the load carrying capacity a tire is certified to carry. The speed
rating is the maximum speed a
tire is certified to carry a load.
Tire Terminology and
Definitions
Air Pressure:The amount of
air inside the tire pressing
outward on each square inch of
the tire. Air pressure is
expressed in psi (pounds per
square inch) or kPa (kilopascal).
Accessory Weight
:This
means the combined weight of
optional accessories. Some
examples of optional
accessories are, automatic
transmission, power steering,
power brakes, power windows,
power seats, and air
conditioning.
Aspect Ratio
:The relationship
of a tire's height to its width.
Page 300 of 394
Black plate (48,1)Chevrolet Cruze Owner Manual - 2011
10-48 Vehicle Care
Belt:A rubber coated layer of
cords that is located between
the plies and the tread. Cords
may be made from steel or other
reinforcing materials.
Bead
:The tire bead contains
steel wires wrapped by steel
cords that hold the tire onto
the rim.
Bias Ply Tire
:A pneumatic tire
in which the plies are laid at
alternate angles less than
90 degrees to the centerline of
the tread.
Cold Tire Pressure
:The
amount of air pressure in a tire,
measured in kPa (kilopascal)
or psi (pounds per square inch)
before a tire has built up heat
from driving. See Tire Pressure
on page 10‑50. Curb Weight
:The weight of a
motor vehicle with standard and
optional equipment including the
maximum capacity of fuel, oil,
and coolant, but without
passengers and cargo.
DOT Markings
:A code molded
into the sidewall of a tire
signifying that the tire is in
compliance with the U.S.
Department of Transportation
(DOT) motor vehicle safety
standards. The DOT code
includes the Tire Identification
Number (TIN), an alphanumeric
designator which can also
identify the tire manufacturer,
production plant, brand, and
date of production.
GVWR
:Gross Vehicle Weight
Rating. See Vehicle Load Limits
on page 9‑12. GAWR FRT
:Gross Axle Weight
Rating for the front axle. See
Vehicle Load Limits on
page 9‑12.
GAWR RR
:Gross Axle Weight
Rating for the rear axle. See
Vehicle Load Limits on
page 9‑12.
Intended Outboard Sidewall
:
The side of an asymmetrical tire,
that must always face outward
when mounted on a vehicle.
Kilopascal (kPa)
:The metric
unit for air pressure.
Light Truck (LT‐Metric) Tire
:A
tire used on light duty trucks and
some multipurpose passenger
vehicles.
Load Index
:An assigned
number ranging from 1 to 279
that corresponds to the load
carrying capacity of a tire.
Page 303 of 394
Black plate (51,1)Chevrolet Cruze Owner Manual - 2011
Vehicle Care 10-51
.Rough ride.
.Needless damage from
road hazards.
A vehicle-specific Tire and
Loading Information label is
attached to the vehicle. This
label shows the vehicle's original
equipment tires and the correct
inflation pressures for the tires
when they are cold. The
recommended cold tire inflation
pressure, shown on the label, is
the minimum amount of air
pressure needed to support the
vehicle's maximum load carrying
capacity.
For additional information
regarding how much weight the
vehicle can carry, and an
example of the Tire and Loading
Information label, see Vehicle
Load Limits on page 9‑12. How
you load the vehicle affects
vehicle handling and ride comfort. Never load the vehicle
with more weight than it was
designed to carry.
When to Check
Check the tires once a month or
more. Do not forget to check the
compact spare tire, if the vehicle
has one. The compact spare
should be at 420 kPa (60 psi).
For additional information
regarding the compact spare
tire, seeCompact Spare Tire on
page 10‑83.
How to Check
Use a good quality pocket-type
gauge to check tire pressure.
You cannot tell if the tires are
properly inflated simply by
looking at them. Radial tires may
look properly inflated even when
they are under‐inflated. Check
the tire's inflation pressure when
the tires are cold. Cold means
the vehicle has been sitting for
at least three hours or driven no
more than 1.6 km (1 mile).
Remove the valve cap from the
tire valve stem. Press the tire
gauge firmly onto the valve to
get a pressure measurement.
If the cold tire inflation pressure
matches the recommended
pressure on the Tire and
Loading Information label, no
further adjustment is necessary.
If the inflation pressure is low,
add air until you reach the
recommended amount.
If you overfill the tire, release air
by pushing on the metal stem in
the center of the tire valve.
Re‐check the tire pressure with
the tire gauge.
Be sure to put the valve caps
back on the valve stems. They
help prevent leaks by keeping
out dirt and moisture.
Page 323 of 394
Black plate (71,1)Chevrolet Cruze Owner Manual - 2011
Vehicle Care 10-71
Notice:If the recommended
pressure cannot be reached after
approximately 25 minutes, the
vehicle should not be driven
farther. The tire is too severely
damaged and the tire sealant and
compressor kit cannot inflate the
tire. Remove the power plug from
the accessory power outlet and
unscrew the inflating hose from
the tire valve. See Roadside
Assistance Program on
page 13‑6.
10. Press the on/off button (D) to turn the tire sealant and
compressor kit off.
The tire is not sealed and will
continue to leak air until the
vehicle is driven and the
sealant is distributed in the tire.
Therefore, Steps 11 through
17 must be done immediately
after Step 10.
Be careful while handling the
tire sealant and compressor kit
as it could be warm after
usage. 11. Unplug the power plug (C) from
the accessory power outlet in
the vehicle.
12. Turn the sealant/air hose (G) counterclockwise to remove it
from the tire valve stem.
13. Replace the tire valve stem cap.
14. Replace the sealant/air hose (G), and the power
plug (C) back in their original
location.
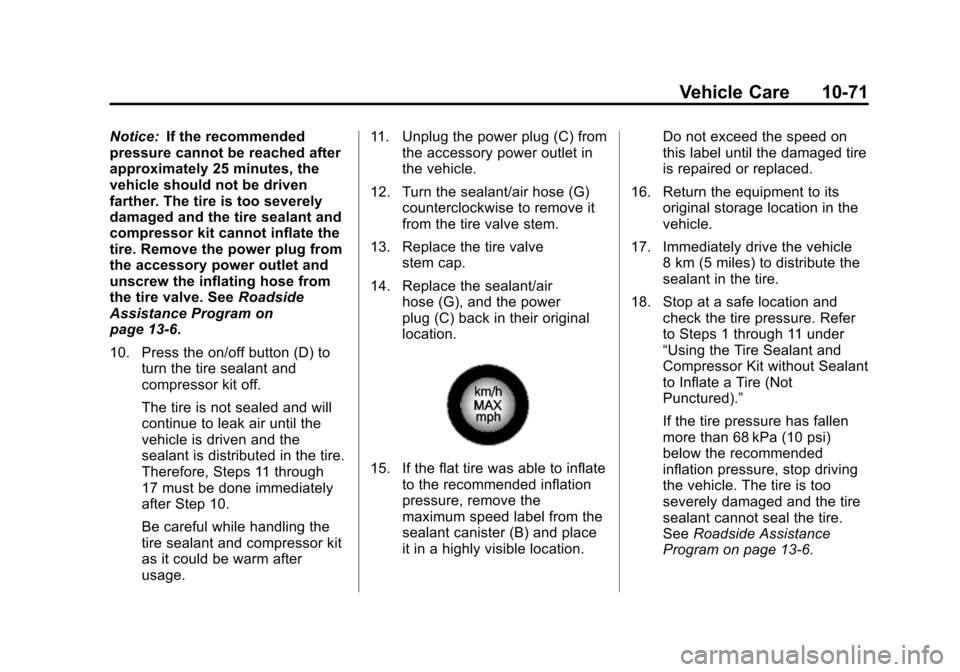
15. If the flat tire was able to inflateto the recommended inflation
pressure, remove the
maximum speed label from the
sealant canister (B) and place
it in a highly visible location. Do not exceed the speed on
this label until the damaged tire
is repaired or replaced.
16. Return the equipment to its original storage location in the
vehicle.
17. Immediately drive the vehicle 8 km (5 miles) to distribute the
sealant in the tire.
18. Stop at a safe location and check the tire pressure. Refer
to Steps 1 through 11 under
“Using the Tire Sealant and
Compressor Kit without Sealant
to Inflate a Tire (Not
Punctured).”
If the tire pressure has fallen
more than 68 kPa (10 psi)
below the recommended
inflation pressure, stop driving
the vehicle. The tire is too
severely damaged and the tire
sealant cannot seal the tire.
SeeRoadside Assistance
Program on page 13‑6.
Page 324 of 394
Black plate (72,1)Chevrolet Cruze Owner Manual - 2011
10-72 Vehicle Care
If the tire pressure has not
dropped more than 68 kPa
(10 psi) from the recommended
inflation pressure, inflate the
tire to the recommended
inflation pressure.
19. Wipe off any sealant from the wheel, tire or vehicle.
20. Dispose of the used sealant canister (B) and sealant/air
hose (G) assembly at a local
dealer or in accordance with
local state codes and practices.
21. Replace it with a new canister available from your dealer.
22. After temporarily sealing a tire using the tire sealant and
compressor kit, take the
vehicle to an authorized dealer
within 161 km (100 miles) of
driving to have the tire repaired
or replaced.Using the Tire Sealant and
Compressor Kit without
Sealant to Inflate a Tire
(Not Punctured)
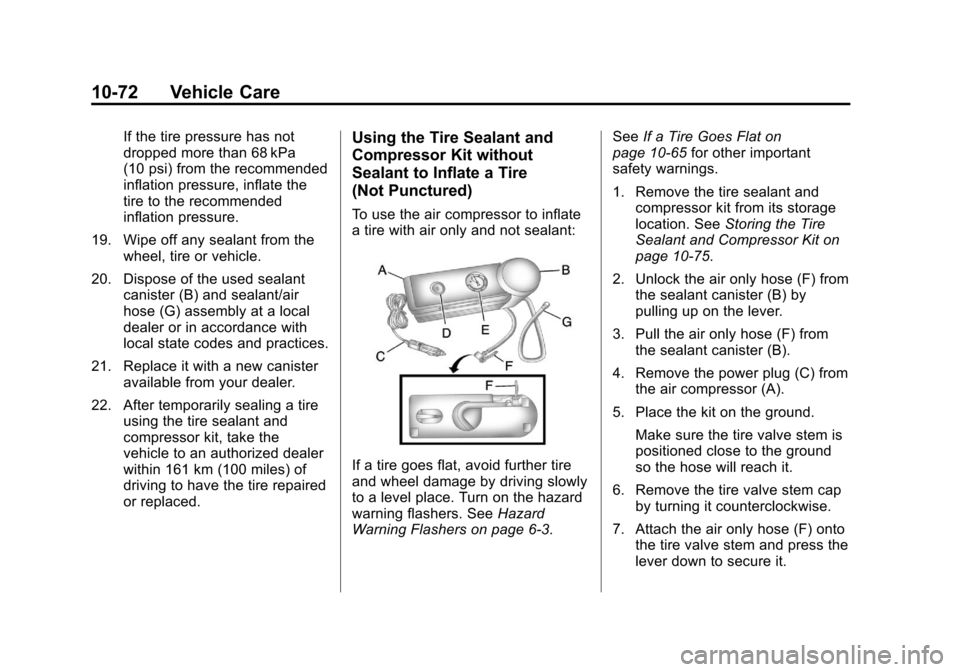
To use the air compressor to inflate
a tire with air only and not sealant:
If a tire goes flat, avoid further tire
and wheel damage by driving slowly
to a level place. Turn on the hazard
warning flashers. See Hazard
Warning Flashers on page 6‑3. See
If a Tire Goes Flat on
page 10‑65 for other important
safety warnings.
1. Remove the tire sealant and compressor kit from its storage
location. See Storing the Tire
Sealant and Compressor Kit on
page 10‑75.
2. Unlock the air only hose (F) from the sealant canister (B) by
pulling up on the lever.
3. Pull the air only hose (F) from the sealant canister (B).
4. Remove the power plug (C) from the air compressor (A).
5. Place the kit on the ground. Make sure the tire valve stem is
positioned close to the ground
so the hose will reach it.
6. Remove the tire valve stem cap by turning it counterclockwise.
7. Attach the air only hose (F) onto the tire valve stem and press the
lever down to secure it.
Page 335 of 394
Black plate (83,1)Chevrolet Cruze Owner Manual - 2011
Vehicle Care 10-83
Compact Spare Tire
{WARNING
Driving with more than one
compact spare tire at a time could
result in loss of braking and
handling. This could lead to a
crash and you or others could be
injured. Use only one compact
spare tire at a time.
If this vehicle has a compact spare
tire, it was fully inflated when the
vehicle was new; however, it can
lose air after a time. Check the
inflation pressure regularly. It should
be 420 kPa (60 psi). After installing the compact spare
on the vehicle, stop as soon as
possible and make sure the spare
tire is correctly inflated. The
compact spare is made to perform
well at speeds up to 105 km/h
(65 mph) for distances up to
5 000 km (3,000 miles), so you can
finish your trip and have the full-size
tire repaired or replaced at your
convenience. Of course, it is best to
replace the spare with a full-size tire
as soon as possible. The spare tire
will last longer and be in good
shape in case it is needed again.
Notice:
When the compact spare
is installed, do not take the
vehicle through an automatic car
wash with guide rails. The
compact spare can get caught on
the rails which can damage the
tire, wheel and other parts of the
vehicle.
Do not use the compact spare on
other vehicles.
Do not mix the compact spare tire or
wheel with other wheels or tires.
They will not fit. Keep the spare tire
and its wheel together.
Notice: Tire chains will not fit the
compact spare. Using them can
damage the vehicle and can
damage the chains too. Do not
use tire chains on the compact
spare.
Page 343 of 394
Black plate (91,1)Chevrolet Cruze Owner Manual - 2011
Vehicle Care 10-91
should not be used on plastic
parts, do not use it on the vehicle
or damage may occur and it
would not be covered by the
warranty.
Do not use cleaning agents that are
petroleum based or that contain
acid or abrasives, as they can
damage the paint, metal, or plastic
on the vehicle. Approved cleaning
products can be obtained from your
dealer. Follow all manufacturer
directions regarding correct product
usage, necessary safety
precautions, and appropriate
disposal of any vehicle care
product.
Rinse the vehicle well, before
washing and after, to remove all
cleaning agents completely. If they
are allowed to dry on the surface,
they could stain.Dry the finish with a soft, clean
chamois or an all-cotton towel to
avoid surface scratches and water
spotting.
High pressure car washes could
cause water to enter the vehicle.
Avoid using high pressure washes
closer than 30 cm (12 in) to the
surface of the vehicle. Use of power
washers exceeding 8,274 kPa
(1,200 psi) can result in damage or
removal of paint and decals.
Notice:
Conveyor systems on
some automatic car washes could
damage the vehicle. There may
not be enough clearance for the
undercarriage. Check with the car
wash manager before using the
automatic car wash.Shutter System Cleaning
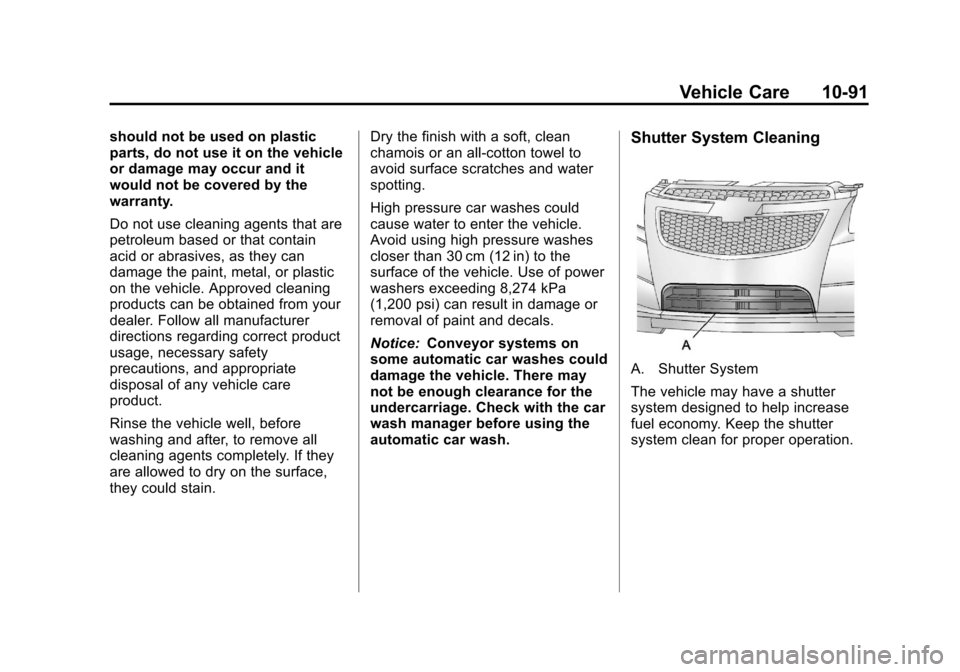
A. Shutter System
The vehicle may have a shutter
system designed to help increase
fuel economy. Keep the shutter
system clean for proper operation.