Information displays CHEVROLET CRUZE 2013 1.G Owners Manual
[x] Cancel search | Manufacturer: CHEVROLET, Model Year: 2013, Model line: CRUZE, Model: CHEVROLET CRUZE 2013 1.GPages: 394, PDF Size: 6.82 MB
Page 1 of 394

Black plate (1,1)Chevrolet Cruze Owner Manual - 2013 - crc - 10/16/12
2013 Chevrolet Cruze Owner ManualM
In Brief. . . . . . . . . . . . . . . . . . . . . . . . 1-1
Instrument Panel . . . . . . . . . . . . . . 1-2
Initial Drive Information . . . . . . . . 1-4
Vehicle Features . . . . . . . . . . . . . 1-14
Performance and Maintenance . . . . . . . . . . . . . . . . 1-18
Keys, Doors, and Windows . . . . . . . . . . . . . . . . . . . . 2-1
Keys and Locks . . . . . . . . . . . . . . . 2-1
Doors . . . . . . . . . . . . . . . . . . . . . . . . 2-12
Vehicle Security . . . . . . . . . . . . . . 2-14
Exterior Mirrors . . . . . . . . . . . . . . . 2-15
Interior Mirrors . . . . . . . . . . . . . . . . 2-17
Windows . . . . . . . . . . . . . . . . . . . . . 2-17
Roof . . . . . . . . . . . . . . . . . . . . . . . . . . 2-20
Seats and Restraints . . . . . . . . . 3-1
Head Restraints . . . . . . . . . . . . . . . 3-2
Front Seats . . . . . . . . . . . . . . . . . . . . 3-3
Rear Seats . . . . . . . . . . . . . . . . . . . . 3-6
Safety Belts . . . . . . . . . . . . . . . . . . . . 3-8
Airbag System . . . . . . . . . . . . . . . . 3-17
Child Restraints . . . . . . . . . . . . . . 3-31 Storage
. . . . . . . . . . . . . . . . . . . . . . . 4-1
Storage Compartments . . . . . . . . 4-1
Additional Storage Features . . . 4-2
Instruments and Controls . . . . 5-1
Controls . . . . . . . . . . . . . . . . . . . . . . . 5-2
Warning Lights, Gauges, and
Indicators . . . . . . . . . . . . . . . . . . . . 5-7
Information Displays . . . . . . . . . . 5-22
Vehicle Messages . . . . . . . . . . . . 5-26
Vehicle Personalization . . . . . . . 5-32
Lighting . . . . . . . . . . . . . . . . . . . . . . . 6-1
Exterior Lighting . . . . . . . . . . . . . . . 6-1
Interior Lighting . . . . . . . . . . . . . . . . 6-5
Lighting Features . . . . . . . . . . . . . . 6-6
Infotainment System . . . . . . . . . 7-1
Introduction . . . . . . . . . . . . . . . . . . . . 7-1
Radio . . . . . . . . . . . . . . . . . . . . . . . . . . 7-7
Audio Players . . . . . . . . . . . . . . . . 7-14
Phone . . . . . . . . . . . . . . . . . . . . . . . . 7-18
Trademarks and License Agreements . . . . . . . . . . . . . . . . . 7-30 Climate Controls
. . . . . . . . . . . . . 8-1
Climate Control Systems . . . . . . 8-1
Air Vents . . . . . . . . . . . . . . . . . . . . . . . 8-6
Maintenance . . . . . . . . . . . . . . . . . . . 8-7
Driving and Operating . . . . . . . . 9-1
Driving Information . . . . . . . . . . . . . 9-2
Starting and Operating . . . . . . . 9-14
Engine Exhaust . . . . . . . . . . . . . . 9-25
Automatic Transmission . . . . . . 9-26
Manual Transmission . . . . . . . . . 9-30
Brakes . . . . . . . . . . . . . . . . . . . . . . . 9-32
Ride Control Systems . . . . . . . . 9-34
Cruise Control . . . . . . . . . . . . . . . . 9-36
Object Detection Systems . . . . 9-39
Fuel . . . . . . . . . . . . . . . . . . . . . . . . . . 9-46
Towing . . . . . . . . . . . . . . . . . . . . . . . 9-50
Conversions and Add-Ons . . . 9-56
Vehicle Care . . . . . . . . . . . . . . . . . 10-1
General Information . . . . . . . . . . 10-2
Vehicle Checks . . . . . . . . . . . . . . . 10-3
Headlamp Aiming . . . . . . . . . . . 10-26
Bulb Replacement . . . . . . . . . . 10-27
Electrical System . . . . . . . . . . . . 10-32
Wheels and Tires . . . . . . . . . . . 10-38
Page 34 of 394
Black plate (6,1)Chevrolet Cruze Owner Manual - 2013 - crc - 10/16/12
2-6 Keys, Doors, and Windows
Programming Transmitters to
the Vehicle
Only RKE transmitters programmed
to the vehicle will work. If a
transmitter is lost or stolen, a
replacement can be purchased and
programmed through your dealer.
The vehicle can be reprogrammed
so that lost or stolen transmitters no
longer work. Any remaining
transmitters will need to be
reprogrammed. Each vehicle can
have up to eight transmitters
matched to it.
Programming with a Recognized
Transmitter (Keyless Access
Vehicles Only)
A new transmitter can be
programmed to the vehicle when
there is one recognized transmitter.
To program, the vehicle must be off
and all of the transmitters, both
currently recognized and new, must
be with you.
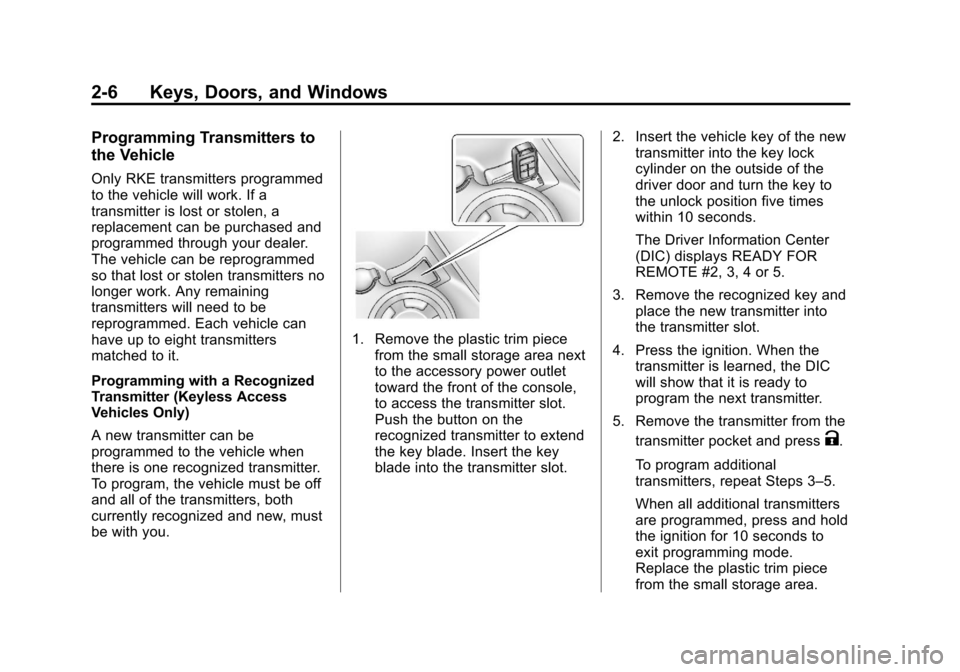
1. Remove the plastic trim piecefrom the small storage area next
to the accessory power outlet
toward the front of the console,
to access the transmitter slot.
Push the button on the
recognized transmitter to extend
the key blade. Insert the key
blade into the transmitter slot. 2. Insert the vehicle key of the new
transmitter into the key lock
cylinder on the outside of the
driver door and turn the key to
the unlock position five times
within 10 seconds.
The Driver Information Center
(DIC) displays READY FOR
REMOTE #2, 3, 4 or 5.
3. Remove the recognized key and place the new transmitter into
the transmitter slot.
4. Press the ignition. When the transmitter is learned, the DIC
will show that it is ready to
program the next transmitter.
5. Remove the transmitter from the transmitter pocket and press
K.
To program additional
transmitters, repeat Steps 3–5.
When all additional transmitters
are programmed, press and hold
the ignition for 10 seconds to
exit programming mode.
Replace the plastic trim piece
from the small storage area.
Page 35 of 394
Black plate (7,1)Chevrolet Cruze Owner Manual - 2013 - crc - 10/16/12
Keys, Doors, and Windows 2-7
Programming without a
Recognized Transmitter (Keyless
Access Vehicles Only)
If there are no currently recognized
transmitters available, follow this
procedure to program up to five
transmitters. This feature is not
available in Canada. This procedure
will take approximately 30 minutes
to complete. The vehicle must be off
and all of the transmitters you wish
to program must be with you.
1. Insert the vehicle key of thetransmitter into the key lock
cylinder on the outside of the
driver door and turn the key to
the unlock position five times
within 10 seconds.
The Driver Information Center
(DIC) displays REMOTE LEARN
PENDING, PLEASE WAIT. 2. Wait for 10 minutes until the DIC
displays PRESS ENGINE
START BUTTON TO LEARN
and then press the ignition.
The DIC displays will again
show REMOTE LEARN
PENDING, PLEASE WAIT.
3. Repeat Step 2 two additional times. After the third time all
previously known transmitters
will no longer work with the
vehicle. Remaining transmitters
can be relearned during the next
steps.
The DIC display should now
show READY FOR
REMOTE # 1.
4. Remove the plastic trim piece
from the small storage area next
to the accessory power outlet
toward the front of the console,
to access the transmitter slot.
Push the button on the
recognized transmitter to extend
the key blade. Insert the key
blade into the transmitter slot.
5. Press the ignition. When the transmitter is learned the DIC
will show that it is ready to
program the next transmitter.
Page 36 of 394
Black plate (8,1)Chevrolet Cruze Owner Manual - 2013 - crc - 10/16/12
2-8 Keys, Doors, and Windows
6. Remove the transmitter from thetransmitter slot and press
K.
To program additional
transmitters, repeat Steps 4–6.
When all additional transmitters
are programmed, press and hold
the ignition for 10 seconds to
exit programming mode.
Replace the plastic trim piece
from the small storage area.
Starting the Vehicle with a Low
Transmitter Battery
If the transmitter battery is weak, the
DIC may display NO REMOTE
DETECTED when you try to start
the vehicle. The REPLACE
BATTERY IN REMOTE KEY
message may also be displayed at
this time.
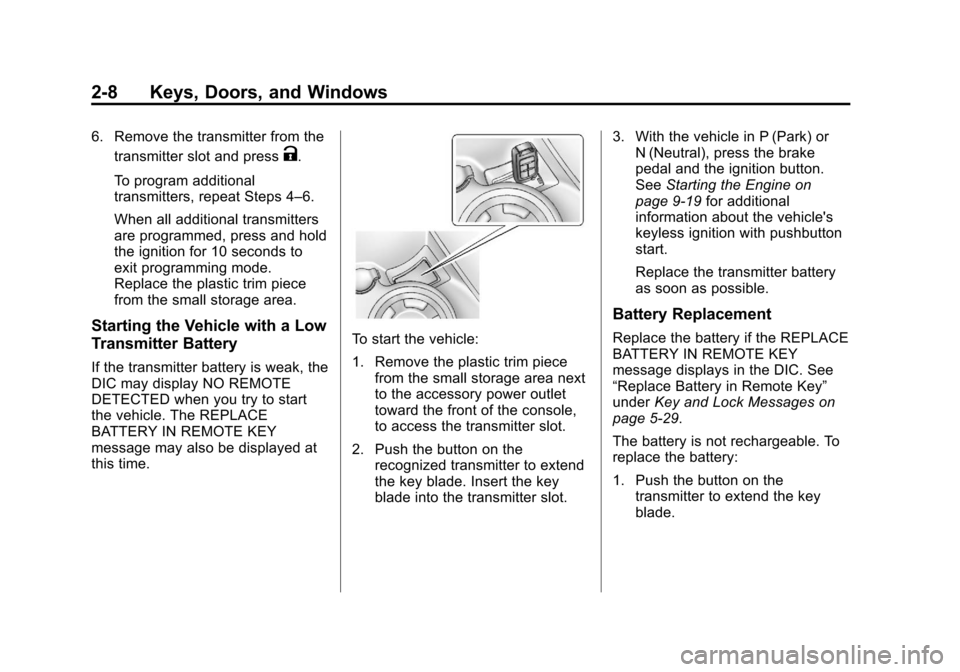
To start the vehicle:
1. Remove the plastic trim piece from the small storage area next
to the accessory power outlet
toward the front of the console,
to access the transmitter slot.
2. Push the button on the recognized transmitter to extend
the key blade. Insert the key
blade into the transmitter slot. 3. With the vehicle in P (Park) or
N (Neutral), press the brake
pedal and the ignition button.
See Starting the Engine on
page 9‑19 for additional
information about the vehicle's
keyless ignition with pushbutton
start.
Replace the transmitter battery
as soon as possible.
Battery Replacement
Replace the battery if the REPLACE
BATTERY IN REMOTE KEY
message displays in the DIC. See
“Replace Battery in Remote Key”
under Key and Lock Messages on
page 5‑29.
The battery is not rechargeable. To
replace the battery:
1. Push the button on the transmitter to extend the key
blade.
Page 103 of 394
Black plate (1,1)Chevrolet Cruze Owner Manual - 2013 - crc - 10/16/12
Instruments and Controls 5-1
Instruments and
Controls
Controls
Steering Wheel Adjustment . . . 5-2
Steering Wheel Controls . . . . . . 5-2
Horn . . . . . . . . . . . . . . . . . . . . . . . . . . 5-3
Windshield Wiper/Washer . . . . . 5-3
Compass . . . . . . . . . . . . . . . . . . . . . 5-4
Clock . . . . . . . . . . . . . . . . . . . . . . . . . 5-4
Power Outlets . . . . . . . . . . . . . . . . . 5-6
Cigarette Lighter . . . . . . . . . . . . . . 5-6
Ashtrays . . . . . . . . . . . . . . . . . . . . . . 5-6
Warning Lights, Gauges, and
Indicators
Warning Lights, Gauges, andIndicators . . . . . . . . . . . . . . . . . . . . 5-7
Instrument Cluster . . . . . . . . . . . . 5-8
Speedometer . . . . . . . . . . . . . . . . . 5-9
Odometer . . . . . . . . . . . . . . . . . . . . . 5-9
Trip Odometer . . . . . . . . . . . . . . . . . 5-9
Tachometer . . . . . . . . . . . . . . . . . . . 5-9
Fuel Gauge . . . . . . . . . . . . . . . . . . . 5-9
Engine Coolant Temperature Gauge . . . . . . . . . . . . . . . . . . . . . . 5-10
Safety Belt Reminders . . . . . . . 5-10 Airbag Readiness Light . . . . . . 5-11
Passenger Airbag Status
Indicator . . . . . . . . . . . . . . . . . . . . 5-12
Charging System Light . . . . . . 5-13
Malfunction Indicator Lamp . . . . . . . . . . . . . 5-13
Brake System Warning Light . . . . . . . . . . . . . . . . . . . . . . . 5-16
Antilock Brake System (ABS) Warning Light . . . . . . . . . . . . . . 5-16
Up-Shift Light . . . . . . . . . . . . . . . . 5-17
Power Steering Warning Light . . . . . . . . . . . . . . . . . . . . . . . 5-17
Traction Off Light . . . . . . . . . . . . 5-17
StabiliTrak
®OFF Light . . . . . . . 5-18
Traction Control System (TCS)/StabiliTrak
®Light . . . . 5-18
Tire Pressure Light . . . . . . . . . . 5-18
Engine Oil Pressure Light . . . . 5-19
Low Fuel Warning Light . . . . . . 5-19
Security Light . . . . . . . . . . . . . . . . 5-20
Reduced Engine Power Light . . . . . . . . . . . . . . . . . . . . . . . 5-20
High-Beam On Light . . . . . . . . . 5-20
Front Fog Lamp Light . . . . . . . . 5-21
Lamps On Reminder . . . . . . . . . 5-21
Cruise Control Light . . . . . . . . . 5-21
Door Ajar Light . . . . . . . . . . . . . . 5-21
Information Displays
Driver Information Center (DIC) . . . . . . . . . . . . . . . 5-22
Vehicle Messages
Vehicle Messages . . . . . . . . . . . 5-26
Battery Voltage and ChargingMessages . . . . . . . . . . . . . . . . . . 5-27
Brake System Messages . . . . 5-27
Compass Messages . . . . . . . . . 5-27
Cruise Control Messages . . . . 5-27
Door Ajar Messages . . . . . . . . . 5-27
Engine Cooling System Messages . . . . . . . . . . . . . . . . . . 5-28
Engine Oil Messages . . . . . . . . 5-28
Engine Power Messages . . . . 5-29
Fuel System Messages . . . . . . 5-29
Key and Lock Messages . . . . . 5-29
Lamp Messages . . . . . . . . . . . . . 5-29
Object Detection System Messages . . . . . . . . . . . . . . . . . . 5-30
Ride Control System Messages . . . . . . . . . . . . . . . . . . 5-30
Airbag System Messages . . . . 5-30
Security Messages . . . . . . . . . . 5-31
Service Vehicle Messages . . . 5-31
Starting the Vehicle Messages . . . . . . . . . . . . . . . . . . 5-31
Page 111 of 394
Black plate (9,1)Chevrolet Cruze Owner Manual - 2013 - crc - 10/16/12
Instruments and Controls 5-9
Speedometer
The speedometer shows the
vehicle's speed in either kilometers
per hour (km/h) or miles per
hour (mph).
Odometer
The odometer shows how far the
vehicle has been driven, in either
kilometers or miles.
This vehicle has a tamper‐resistant
odometer. The digital odometer will
read 999,999 if it is turned back.
If the vehicle needs a new odometer
installed, it must be set to the
mileage total of the old odometer.
If that is not possible, then it must
be set at zero and a label must be
put on the driver door to show the
old mileage reading when the new
odometer was installed.
Trip Odometer
The trip odometer can show how far
the vehicle has been driven since
the trip odometer was last reset.
The trip odometer is accessed and
reset through the Driver Information
Center (DIC). SeeDriver
Information Center (DIC) on
page 5‑22.
Tachometer
The tachometer displays the engine
speed in revolutions per
minute (rpm).
Notice: If the engine is operated
with the tachometer in the shaded
warning area, the vehicle could
be damaged, and the damages
would not be covered by the
vehicle warranty. Do not operate
the engine with the tachometer in
the shaded warning area.
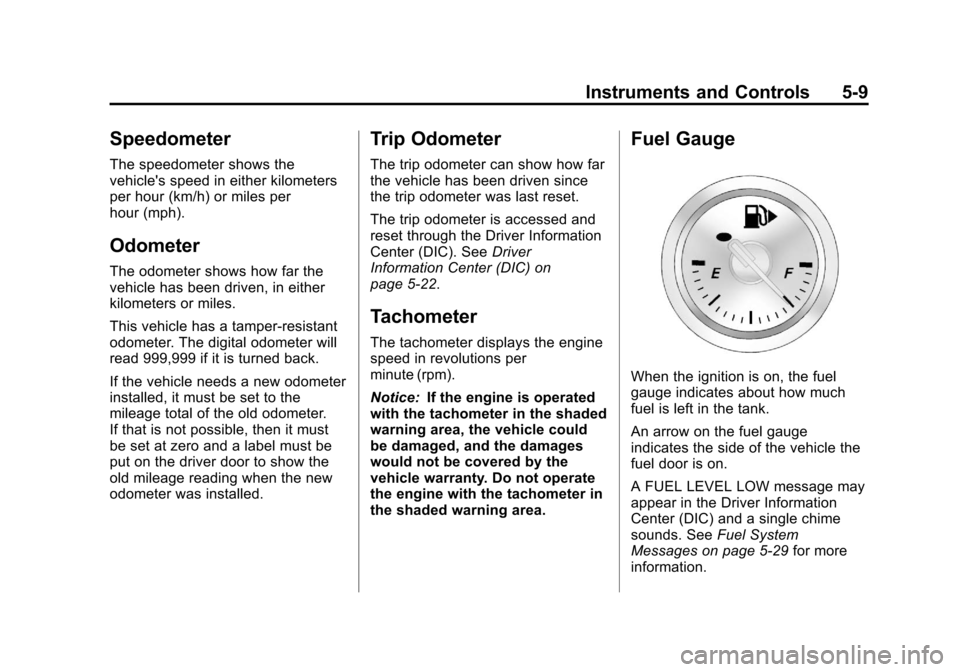
Fuel Gauge
When the ignition is on, the fuel
gauge indicates about how much
fuel is left in the tank.
An arrow on the fuel gauge
indicates the side of the vehicle the
fuel door is on.
A FUEL LEVEL LOW message may
appear in the Driver Information
Center (DIC) and a single chime
sounds. See Fuel System
Messages on page 5‑29 for more
information.
Page 122 of 394
Black plate (20,1)Chevrolet Cruze Owner Manual - 2013 - crc - 10/16/12
5-20 Instruments and Controls
The low fuel warning light comes on
and a chime sounds when the
vehicle is low on fuel. The light turns
off when fuel is added to the
fuel tank.
For vehicles with a Driver
Information Center (DIC), seeDriver
Information Center (DIC) on
page 5‑22 for more information.
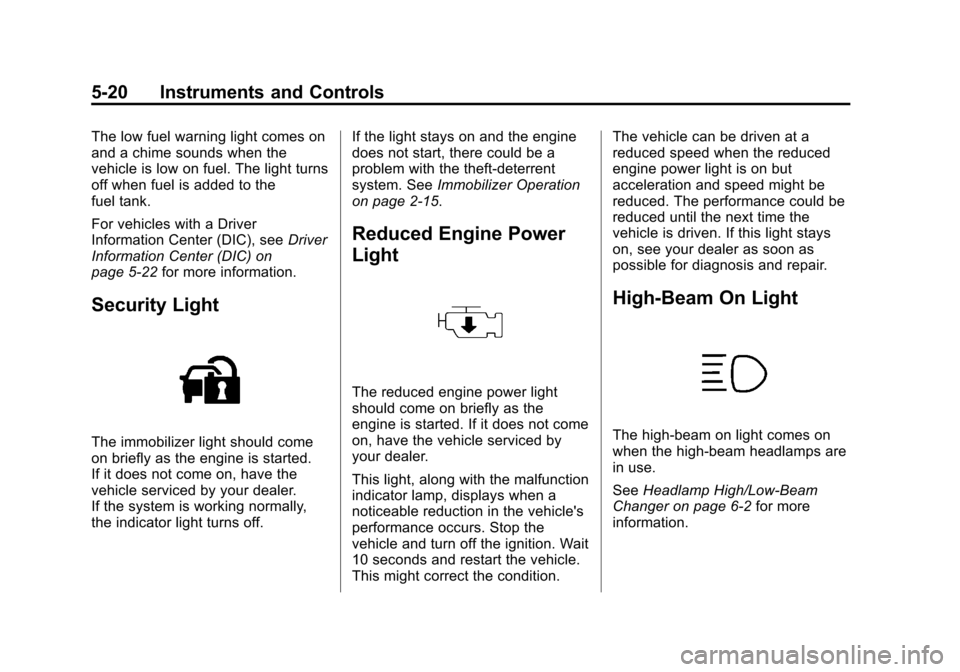
Security Light
The immobilizer light should come
on briefly as the engine is started.
If it does not come on, have the
vehicle serviced by your dealer.
If the system is working normally,
the indicator light turns off. If the light stays on and the engine
does not start, there could be a
problem with the theft-deterrent
system. See
Immobilizer Operation
on page 2‑15.
Reduced Engine Power
Light
The reduced engine power light
should come on briefly as the
engine is started. If it does not come
on, have the vehicle serviced by
your dealer.
This light, along with the malfunction
indicator lamp, displays when a
noticeable reduction in the vehicle's
performance occurs. Stop the
vehicle and turn off the ignition. Wait
10 seconds and restart the vehicle.
This might correct the condition. The vehicle can be driven at a
reduced speed when the reduced
engine power light is on but
acceleration and speed might be
reduced. The performance could be
reduced until the next time the
vehicle is driven. If this light stays
on, see your dealer as soon as
possible for diagnosis and repair.
High-Beam On Light
The high‐beam on light comes on
when the high-beam headlamps are
in use.
See
Headlamp High/Low-Beam
Changer on page 6‑2 for more
information.
Page 124 of 394
Black plate (22,1)Chevrolet Cruze Owner Manual - 2013 - crc - 10/16/12
5-22 Instruments and Controls
Information Displays
Driver Information
Center (DIC)
The DIC displays information about
your vehicle. It also displays
warning messages if a system
problem is detected. SeeVehicle
Messages on page 5‑26. All
messages appear in the DIC display
in the center of the instrument
cluster.
DIC Operation and Displays
The DIC has different displays
which can be accessed by using the
DIC buttons on the turn signal lever.
The DIC displays trip, fuel, and
warning messages if a system
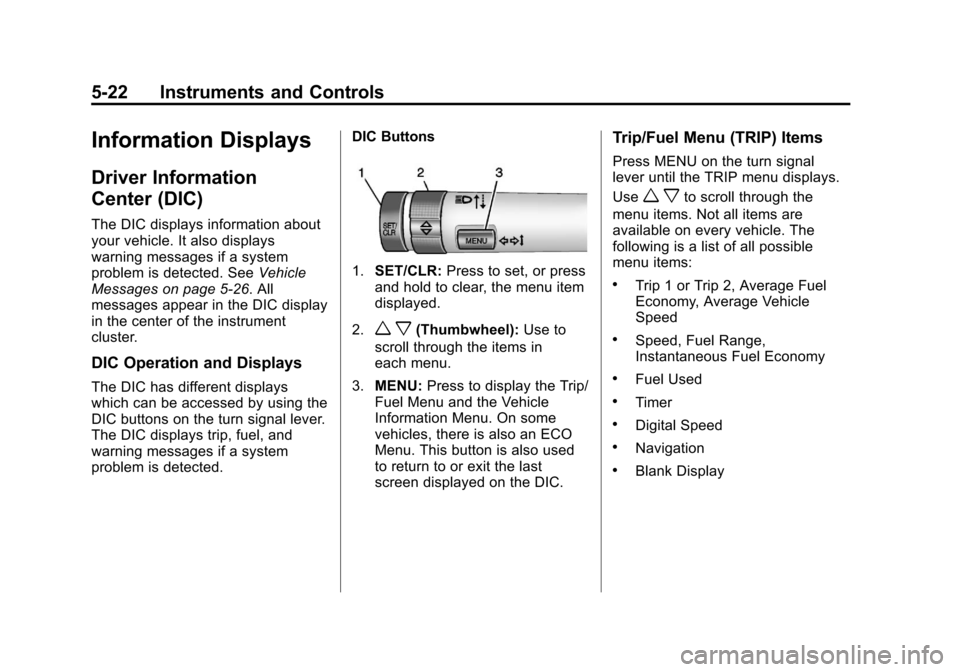
problem is detected. DIC Buttons
1.
SET/CLR: Press to set, or press
and hold to clear, the menu item
displayed.
2.
w x(Thumbwheel): Use to
scroll through the items in
each menu.
3. MENU: Press to display the Trip/
Fuel Menu and the Vehicle
Information Menu. On some
vehicles, there is also an ECO
Menu. This button is also used
to return to or exit the last
screen displayed on the DIC.
Trip/Fuel Menu (TRIP) Items
Press MENU on the turn signal
lever until the TRIP menu displays.
Use
w xto scroll through the
menu items. Not all items are
available on every vehicle. The
following is a list of all possible
menu items:
.Trip 1 or Trip 2, Average Fuel
Economy, Average Vehicle
Speed
.Speed, Fuel Range,
Instantaneous Fuel Economy
.Fuel Used
.Timer
.Digital Speed
.Navigation
.Blank Display
Page 126 of 394
Black plate (24,1)Chevrolet Cruze Owner Manual - 2013 - crc - 10/16/12
5-24 Instruments and Controls
last reset, not including time the
ignition is off. Time will continue to
be counted as long as the ignition is
on, even if another display is being
shown on the DIC. The timer will
record up to 99 hours, 59 minutes,
and 59 seconds (99:59:59) after
which the display will return to zero.
To stop the timer, press SET/CLR
briefly while Timer is displayed. To
reset the timer to zero, press and
hold SET/CLR.
Digital Speed
The speedometer shows how fast
the vehicle is moving in either
kilometers per hour (km/h) or miles
per hour (mph). The speedometer
cannot be reset.
Navigation
This display is used for the OnStar
or navigation system Turn-by-Turn
guidance. SeeOnStar Overview on
page 14‑1 or the navigation manual,
if the vehicle has navigation, for
more information. Blank Display
This display shows no information.
Vehicle Information Menu
(OPTION) Items
Press MENU on the turn signal
lever until the OPTION menu is
displayed. Use
w xto scroll
through the menu items. Not all
items are available on every vehicle.
The following is a list of all possible
menu items:
.Units
.Tire Pressure
.Remaining Oil Life
.Battery Voltage
Units
Move
w xto change between
Metric or US when the Unit display
is active. Press SET/CLR to confirm
the setting. On some models, you
will have to select 1, 2, or 3 for the
Unit display. 1 is Imperial units, 2 is
US units, and 3 is metric units. This will change the displays on the
cluster and DIC to the type of
measurements you select.
Tire Pressure
The display may show a vehicle
with the approximate pressures of
all four tires. Tire pressure is
displayed in either kilopascal (kPa)
or in pounds per square inch (psi).
On some models, this display only
allows for matching of the TPMS
sensors. In this case, the display
will show TIRE LEARN. See
Tire
Pressure Monitor System on
page 10‑48 andTire Pressure
Monitor Operation on page 10‑49.
Remaining Oil Life
This display shows an estimate of
the oil's remaining useful life.
If REMAINING OIL LIFE 99% is
displayed, that means 99% of the
current oil life remains. This display
may be shown as
:%.
Page 127 of 394
Black plate (25,1)Chevrolet Cruze Owner Manual - 2013 - crc - 10/16/12
Instruments and Controls 5-25
When the remaining oil life is low,
the CHANGE ENGINE OIL SOON
message will appear on the display.
SeeEngine Oil Messages on
page 5‑28. The oil should be
changed as soon as possible. See
Engine Oil on page 10‑9. In addition
to the engine oil life system
monitoring the oil life, additional
maintenance is recommended in the
Maintenance Schedule in this
manual. See Maintenance Schedule
on page 11‑2.
Remember, the Oil Life display must
be reset after each oil change. It will
not reset itself. Also, be careful not
to reset the Oil Life display
accidentally at any time other than
when the oil has just been changed.
It cannot be reset accurately until
the next oil change. To reset the
engine oil life system press the
SET/CLR button while the Oil Life
display is active. See Engine Oil
Life System on page 10‑11. Battery Voltage
This display, available on some
vehicles, shows the current battery
voltage. If the voltage is in the
normal range, the value will display.
For example, the display may read
Battery Voltage 15.0 Volts. The
vehicle's charging system regulates
voltage based on the state of the
battery. The battery voltage can
fluctuate while viewing this
information on the DIC. This is
normal. See
Charging System Light
on page 5‑13. If there is a problem
with the battery charging system,
the DIC will display a message. See
Battery Voltage and Charging
Messages on page 5‑27.ECO Drive Assist Menu (ECO)
Items
This menu is only available on some
vehicles. Press MENU on the turn
signal lever until the ECO menu is
displayed. Use
w xto scroll
through the menu items. Not all
items are available on every vehicle.
The following is a list of all possible
menu items:
.Best Average Fuel Economy
.ECO Index
.Economy Trend
Best Average Fuel Economy
The right hand side displays the
best average fuel economy (AFE)
that is achieved for a selected
distance. The left hand side displays
a running average of fuel economy
for the most recently traveled
selected distance. The center bar
graph displays the instantaneous
fuel economy. Quickly press the
SET/CLR button to display a page
for selecting one of the distance