ECU CHEVROLET CRUZE 2014 1.G Owners Manual
[x] Cancel search | Manufacturer: CHEVROLET, Model Year: 2014, Model line: CRUZE, Model: CHEVROLET CRUZE 2014 1.GPages: 420, PDF Size: 5.92 MB
Page 1 of 420

Black plate (1,1)Chevrolet Cruze Owner Manual (GMNA-Localizing-U.S./Canada-6007168) -
2014 - 2nd Edition - 7/15/13
2014 Chevrolet Cruze Owner ManualM
In Brief. . . . . . . . . . . . . . . . . . . . . . . . 1-1
Instrument Panel . . . . . . . . . . . . . . 1-2
Initial Drive Information . . . . . . . . 1-4
Vehicle Features . . . . . . . . . . . . . 1-15
Performance and Maintenance . . . . . . . . . . . . . . . . 1-19
Keys, Doors, and Windows . . . . . . . . . . . . . . . . . . . . 2-1
Keys and Locks . . . . . . . . . . . . . . . 2-1
Doors . . . . . . . . . . . . . . . . . . . . . . . . 2-14
Vehicle Security . . . . . . . . . . . . . . 2-16
Exterior Mirrors . . . . . . . . . . . . . . . 2-18
Interior Mirrors . . . . . . . . . . . . . . . . 2-19
Windows . . . . . . . . . . . . . . . . . . . . . 2-20
Roof . . . . . . . . . . . . . . . . . . . . . . . . . . 2-23
Seats and Restraints . . . . . . . . . 3-1
Head Restraints . . . . . . . . . . . . . . . 3-2
Front Seats . . . . . . . . . . . . . . . . . . . . 3-3
Rear Seats . . . . . . . . . . . . . . . . . . . . 3-6
Safety Belts . . . . . . . . . . . . . . . . . . . . 3-8
Airbag System . . . . . . . . . . . . . . . . 3-16
Child Restraints . . . . . . . . . . . . . . 3-30 Storage
. . . . . . . . . . . . . . . . . . . . . . . 4-1
Storage Compartments . . . . . . . . 4-1
Additional Storage Features . . . 4-2
Instruments and Controls . . . . 5-1
Controls . . . . . . . . . . . . . . . . . . . . . . . 5-2
Warning Lights, Gauges, and
Indicators . . . . . . . . . . . . . . . . . . . . 5-7
Information Displays . . . . . . . . . . 5-23
Vehicle Messages . . . . . . . . . . . . 5-27
Vehicle Personalization . . . . . . . 5-35
Lighting . . . . . . . . . . . . . . . . . . . . . . . 6-1
Exterior Lighting . . . . . . . . . . . . . . . 6-1
Interior Lighting . . . . . . . . . . . . . . . . 6-4
Lighting Features . . . . . . . . . . . . . . 6-5
Infotainment System . . . . . . . . . 7-1
Introduction . . . . . . . . . . . . . . . . . . . . 7-1
Radio . . . . . . . . . . . . . . . . . . . . . . . . . . 7-7
Audio Players . . . . . . . . . . . . . . . . 7-14
Phone . . . . . . . . . . . . . . . . . . . . . . . . 7-18
Trademarks and License Agreements . . . . . . . . . . . . . . . . . 7-29 Climate Controls
. . . . . . . . . . . . . 8-1
Climate Control Systems . . . . . . 8-1
Air Vents . . . . . . . . . . . . . . . . . . . . . . . 8-6
Maintenance . . . . . . . . . . . . . . . . . . . 8-7
Driving and Operating . . . . . . . . 9-1
Driving Information . . . . . . . . . . . . . 9-2
Starting and Operating . . . . . . . 9-14
Engine Exhaust . . . . . . . . . . . . . . 9-26
Automatic Transmission . . . . . . 9-33
Manual Transmission . . . . . . . . . 9-37
Brakes . . . . . . . . . . . . . . . . . . . . . . . 9-39
Ride Control Systems . . . . . . . . 9-41
Cruise Control . . . . . . . . . . . . . . . . 9-43
Driver Assistance Systems . . . 9-45
Fuel . . . . . . . . . . . . . . . . . . . . . . . . . . 9-52
Trailer Towing . . . . . . . . . . . . . . . . 9-63
Conversions and Add-Ons . . . 9-69
Vehicle Care . . . . . . . . . . . . . . . . . 10-1
General Information . . . . . . . . . . 10-2
Vehicle Checks . . . . . . . . . . . . . . . 10-3
Headlamp Aiming . . . . . . . . . . . 10-32
Bulb Replacement . . . . . . . . . . 10-32
Electrical System . . . . . . . . . . . . 10-37
Wheels and Tires . . . . . . . . . . . 10-43
Page 29 of 420
Black plate (23,1)Chevrolet Cruze Owner Manual (GMNA-Localizing-U.S./Canada-6007168) -
2014 - 2nd Edition - 7/15/13
In Brief 1-23
As the DEF tank becomes low on
fluid, warnings begin with
approximately 1600 km
(1,000 miles) of remaining range.
These warnings will increase in
intensity as the tank becomes
empty. Once the tank is empty, the
vehicle speed will be limited. If there
is an issue with the quality of the
fluid or the exhaust fluid system,
warnings will be displayed in the
Driver Information Center (DIC).
SeeDiesel Exhaust Fluid on
page 9-27.
Roadside Assistance
Program
U.S.: 1-800-243-8872
TTY Users (U.S. Only):
1-888-889-2438
Canada: 1-800-268-6800
As the owner of a new Chevrolet,
you are automatically enrolled in the
Roadside Assistance program.
See Roadside Assistance Program
on page 13-5.
OnStar®
If equipped, this vehicle has a
comprehensive, in-vehicle system
that can connect to a live Advisor
for Emergency, Security, Navigation,
Connection, and Diagnostic
Services. See OnStar Overview on
page 14-1.
Page 31 of 420
Black plate (1,1)Chevrolet Cruze Owner Manual (GMNA-Localizing-U.S./Canada-6007168) -
2014 - 2nd Edition - 7/15/13
Keys, Doors, and Windows 2-1
Keys, Doors, and
Windows
Keys and Locks
Keys . . . . . . . . . . . . . . . . . . . . . . . . . . 2-1
Remote Keyless Entry (RKE)System . . . . . . . . . . . . . . . . . . . . . . 2-3
Remote Keyless Entry (RKE) System Operation . . . . . . . . . . . 2-3
Remote Vehicle Start . . . . . . . . 2-10
Door Locks . . . . . . . . . . . . . . . . . . 2-11
Power Door Locks . . . . . . . . . . . 2-12
Automatic Door Locks . . . . . . . 2-12
Safety Locks . . . . . . . . . . . . . . . . . 2-13
Doors
Trunk . . . . . . . . . . . . . . . . . . . . . . . . 2-14
Vehicle Security
Vehicle Security . . . . . . . . . . . . . . 2-16
Vehicle Alarm System . . . . . . . 2-16
Immobilizer . . . . . . . . . . . . . . . . . . 2-17
Immobilizer Operation . . . . . . . 2-17
Exterior Mirrors
Convex Mirrors . . . . . . . . . . . . . . 2-18
Manual Mirrors . . . . . . . . . . . . . . . 2-18
Power Mirrors . . . . . . . . . . . . . . . . 2-19
Folding Mirrors . . . . . . . . . . . . . . . 2-19
Heated Mirrors . . . . . . . . . . . . . . . 2-19
Interior Mirrors
Interior Rearview Mirrors . . . . . 2-19
Manual Rearview Mirror . . . . . . 2-19
Automatic Dimming Rearview Mirror . . . . . . . . . . . . . . . . . . . . . . . 2-20
Windows
Windows . . . . . . . . . . . . . . . . . . . . . 2-20
Power Windows . . . . . . . . . . . . . 2-20
Sun Visors . . . . . . . . . . . . . . . . . . . 2-22
Roof
Sunroof . . . . . . . . . . . . . . . . . . . . . . 2-23
Keys and Locks
Keys
{Warning
Leaving children in a vehicle with
the ignition key is dangerous and
children or others could be
seriously injured or killed. They
could operate the power windows
or other controls or make the
vehicle move. The windows will
function with the keys in the
ignition, and children or others
could be caught in the path of a
closing window. Do not leave
children in a vehicle with the
ignition key.
Page 36 of 420
Black plate (6,1)Chevrolet Cruze Owner Manual (GMNA-Localizing-U.S./Canada-6007168) -
2014 - 2nd Edition - 7/15/13
2-6 Keys, Doors, and Windows
Programming Transmitters to
the Vehicle
Only RKE transmitters programmed
to the vehicle will work. If a
transmitter is lost or stolen, a
replacement can be purchased and
programmed through your dealer.
The vehicle can be reprogrammed
so that lost or stolen transmitters no
longer work. Any remaining
transmitters will need to be
reprogrammed. Each vehicle can
have up to eight transmitters
matched to it.
Programming with a Recognized
Transmitter (Key Vehicles Only)
To program a new key:
1. Insert the original, alreadyprogrammed key in the ignition
and turn the key to the ON/RUN
position.
2. Turn the key to LOCK/OFF, and remove the key. 3. Insert the new key to be
programmed and turn it to the
ON/RUN position within
five seconds.
The security light will turn off
once the key has been
programmed.
4. Repeat Steps 1–3 if additional keys are to be programmed.
If a key is lost or damaged, see your
dealer to have a new key made.
Programming without a
Recognized Transmitter (Key
Vehicles Only)
Program a new key to the vehicle
when a recognized key is not
available. Canadian regulations
require that owners see their dealer.
If there are no currently recognized
keys available, follow this procedure
to program the first key. This procedure will take
approximately 30 minutes to
complete for the first key. The
vehicle must be off and all of the
keys you wish to program must be
with you.
1. Insert the new vehicle key into
the ignition.
2. Turn to ON/RUN. The security light will come on.
3. Wait 10 minutes until the security light turns off.
4. Turn the ignition to LOCK/OFF.
5. Repeat Steps 2–4 two more times. After the third time, turn to
ON/RUN; the key is learned and
all previously known keys will no
longer work with the vehicle.
Remaining keys can be learned by
following the procedure in
“Programming with a Recognized
Transmitter (Key Vehicles Only).”
Page 45 of 420
Black plate (15,1)Chevrolet Cruze Owner Manual (GMNA-Localizing-U.S./Canada-6007168) -
2014 - 2nd Edition - 7/15/13
Keys, Doors, and Windows 2-15
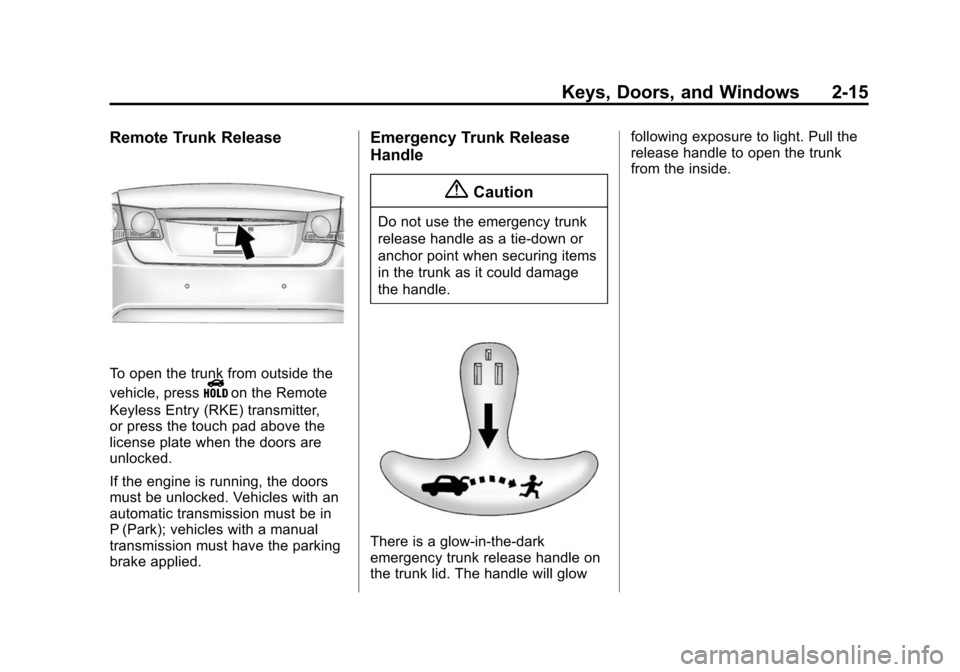
Remote Trunk Release
To open the trunk from outside the
vehicle, press
Yon the Remote
Keyless Entry (RKE) transmitter,
or press the touch pad above the
license plate when the doors are
unlocked.
If the engine is running, the doors
must be unlocked. Vehicles with an
automatic transmission must be in
P (Park); vehicles with a manual
transmission must have the parking
brake applied.
Emergency Trunk Release
Handle
{Caution
Do not use the emergency trunk
release handle as a tie-down or
anchor point when securing items
in the trunk as it could damage
the handle.
There is a glow-in-the-dark
emergency trunk release handle on
the trunk lid. The handle will glow following exposure to light. Pull the
release handle to open the trunk
from the inside.
Page 46 of 420
Black plate (16,1)Chevrolet Cruze Owner Manual (GMNA-Localizing-U.S./Canada-6007168) -
2014 - 2nd Edition - 7/15/13
2-16 Keys, Doors, and Windows
Vehicle Security
This vehicle has theft-deterrent
features; however, they do not make
the vehicle impossible to steal.
Vehicle Alarm System
This vehicle has a anti-theft alarm
system.
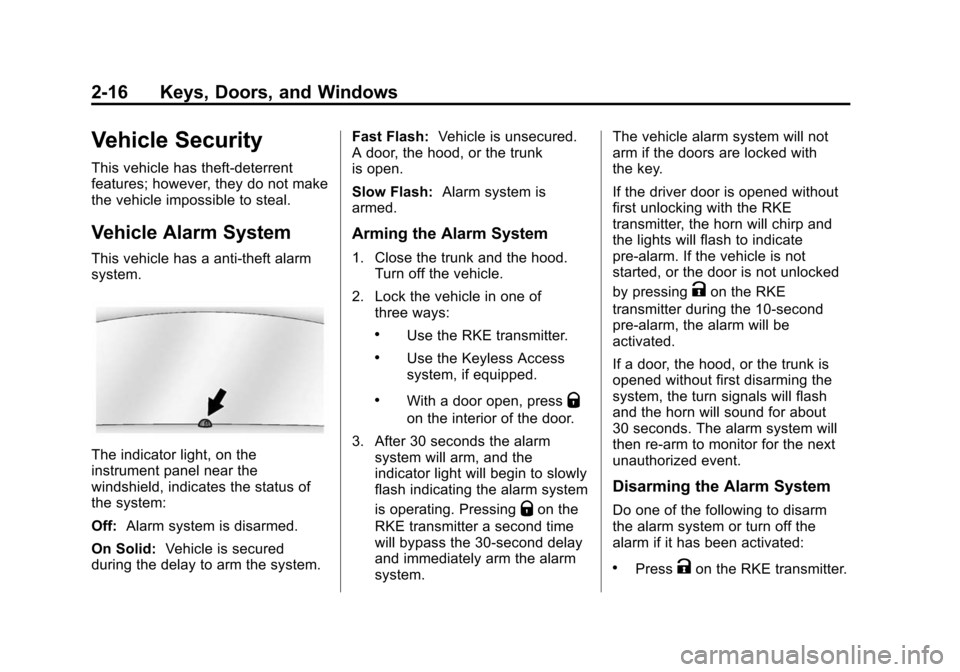
The indicator light, on the
instrument panel near the
windshield, indicates the status of
the system:
Off:Alarm system is disarmed.
On Solid: Vehicle is secured
during the delay to arm the system. Fast Flash:
Vehicle is unsecured.
A door, the hood, or the trunk
is open.
Slow Flash: Alarm system is
armed.
Arming the Alarm System
1. Close the trunk and the hood. Turn off the vehicle.
2. Lock the vehicle in one of three ways:
.Use the RKE transmitter.
.Use the Keyless Access
system, if equipped.
.With a door open, pressQ
on the interior of the door.
3. After 30 seconds the alarm system will arm, and the
indicator light will begin to slowly
flash indicating the alarm system
is operating. Pressing
Qon the
RKE transmitter a second time
will bypass the 30-second delay
and immediately arm the alarm
system. The vehicle alarm system will not
arm if the doors are locked with
the key.
If the driver door is opened without
first unlocking with the RKE
transmitter, the horn will chirp and
the lights will flash to indicate
pre-alarm. If the vehicle is not
started, or the door is not unlocked
by pressing
Kon the RKE
transmitter during the 10-second
pre-alarm, the alarm will be
activated.
If a door, the hood, or the trunk is
opened without first disarming the
system, the turn signals will flash
and the horn will sound for about
30 seconds. The alarm system will
then re-arm to monitor for the next
unauthorized event.
Disarming the Alarm System
Do one of the following to disarm
the alarm system or turn off the
alarm if it has been activated:
.PressKon the RKE transmitter.
Page 47 of 420
Black plate (17,1)Chevrolet Cruze Owner Manual (GMNA-Localizing-U.S./Canada-6007168) -
2014 - 2nd Edition - 7/15/13
Keys, Doors, and Windows 2-17
.Unlock the vehicle using the
Keyless Access system,
if equipped.
.Start the vehicle.
To avoid setting off the alarm by
accident:
.Lock the vehicle after all
occupants have left the vehicle
and all doors are closed.
.Always unlock a door with the
RKE transmitter or use the
Keyless Access system,
if equipped.
Unlocking the driver door with the
key will not disarm the system or
turn off the alarm.
How to Detect a Tamper
Condition
IfKis pressed on the RKE
transmitter and the horn chirps three
times, an alarm occurred previously
while the alarm system was armed. If the alarm has been activated, a
message will appear on the DIC.
See
Security Messages on
page 5-32.
Immobilizer
See Radio Frequency Statement on
page 13-15.
Immobilizer Operation
This vehicle has a passive
theft-deterrent system.
The system does not have to be
manually armed or disarmed.
The vehicle is automatically
immobilized when the key is
removed from the ignition.
The system is automatically
disarmed when the vehicle is
started with the correct key. The key
uses a transponder that matches an
immobilizer control unit in the
vehicle and automatically disarms
the system. Only an authorized key
starts the vehicle. The vehicle may
not start if the key is damaged.
The security light in the instrument
cluster comes on if there is a
problem with arming or disarming
the theft-deterrent system.
When trying to start the vehicle, the
security light comes on briefly when
the ignition is turned on.
If the engine does not start and the
security light stays on, there is a
problem with the system. Turn the
ignition off and try again.
If the engine still does not start, and
the key appears to be undamaged
or the light continues to stay on, try
another ignition key. If the engine
does not start with the other key, the
vehicle needs service. If the vehicle
does start, the first key may be
damaged. See your dealer who can
service the theft-deterrent system
and have a new key made.
Page 55 of 420
Black plate (1,1)Chevrolet Cruze Owner Manual (GMNA-Localizing-U.S./Canada-6007168) -
2014 - 2nd Edition - 7/15/13
Seats and Restraints 3-1
Seats and
Restraints
Head Restraints
Head Restraints . . . . . . . . . . . . . . . 3-2
Front Seats
Seat Adjustment . . . . . . . . . . . . . . 3-3
Power Seat Adjustment . . . . . . . 3-4
Reclining Seatbacks . . . . . . . . . . 3-4
Heated Front Seats . . . . . . . . . . . 3-5
Rear Seats
Rear Seats . . . . . . . . . . . . . . . . . . . . 3-6
Safety Belts
Safety Belts . . . . . . . . . . . . . . . . . . . 3-8
How to Wear Safety BeltsProperly . . . . . . . . . . . . . . . . . . . . . 3-9
Lap-Shoulder Belt . . . . . . . . . . . 3-10
Safety Belt Use During Pregnancy . . . . . . . . . . . . . . . . . . 3-14 Safety Belt Extender . . . . . . . . . 3-15
Safety System Check . . . . . . . . 3-15
Safety Belt Care . . . . . . . . . . . . . 3-15
Replacing Safety Belt System
Parts after a Crash . . . . . . . . . 3-15
Airbag System
Airbag System . . . . . . . . . . . . . . . 3-16
Where Are the Airbags? . . . . . 3-18
When Should an Airbag
Inflate? . . . . . . . . . . . . . . . . . . . . . 3-20
What Makes an Airbag Inflate? . . . . . . . . . . . . . . . . . . . . . 3-21
How Does an Airbag Restrain? . . . . . . . . . . . . . . . . . . . 3-21
What Will You See after an Airbag Inflates? . . . . . . . . . . . . 3-22
Passenger Sensing System . . . . . . . . . . . . . . . . . . . . . 3-23
Servicing the Airbag-Equipped Vehicle . . . . . . . . . . . . . . . . . . . . . 3-27 Adding Equipment to the
Airbag-Equipped Vehicle . . . 3-28
Airbag System Check . . . . . . . . 3-29
Replacing Airbag System Parts after a Crash . . . . . . . . . 3-29
Child Restraints
Older Children . . . . . . . . . . . . . . . 3-30
Infants and Young
Children . . . . . . . . . . . . . . . . . . . . 3-32
Child Restraint Systems . . . . . 3-34
Where to Put the Restraint . . . 3-36
Lower Anchors and Tethers for Children (LATCH
System) . . . . . . . . . . . . . . . . . . . . 3-37
Replacing LATCH System Parts After a Crash . . . . . . . . . 3-43
Securing Child Restraints (Front Passenger Seat) . . . . 3-44
Securing Child Restraints (Rear Seat) . . . . . . . . . . . . . . . . . 3-47
Page 57 of 420
Black plate (3,1)Chevrolet Cruze Owner Manual (GMNA-Localizing-U.S./Canada-6007168) -
2014 - 2nd Edition - 7/15/13
Seats and Restraints 3-3
The front seat outboard head
restraints are not designed to be
removed.
If you are installing a child restraint
in the rear seat, see“Securing a
Child Restraint Designed for the
LATCH System” underLower
Anchors and Tethers for Children
(LATCH System) on page 3-37.Front Seats
Seat Adjustment
{Warning
You can lose control of the
vehicle if you try to adjust a driver
seat while the vehicle is moving.
Adjust the driver seat only when
the vehicle is not moving.
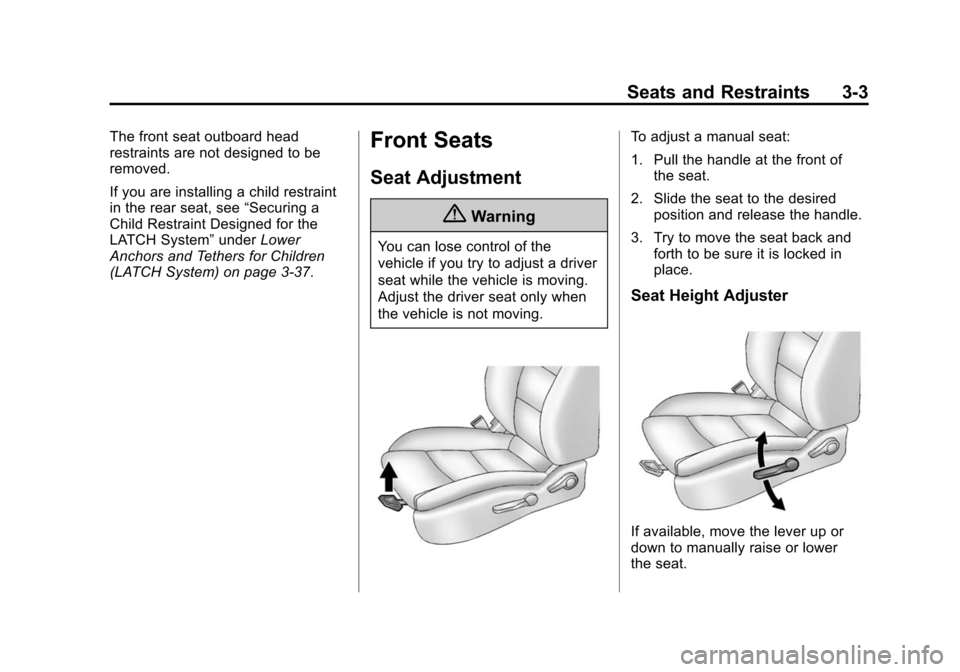
To adjust a manual seat:
1. Pull the handle at the front of the seat.
2. Slide the seat to the desired position and release the handle.
3. Try to move the seat back and forth to be sure it is locked in
place.
Seat Height Adjuster
If available, move the lever up or
down to manually raise or lower
the seat.
Page 65 of 420
Black plate (11,1)Chevrolet Cruze Owner Manual (GMNA-Localizing-U.S./Canada-6007168) -
2014 - 2nd Edition - 7/15/13
Seats and Restraints 3-11
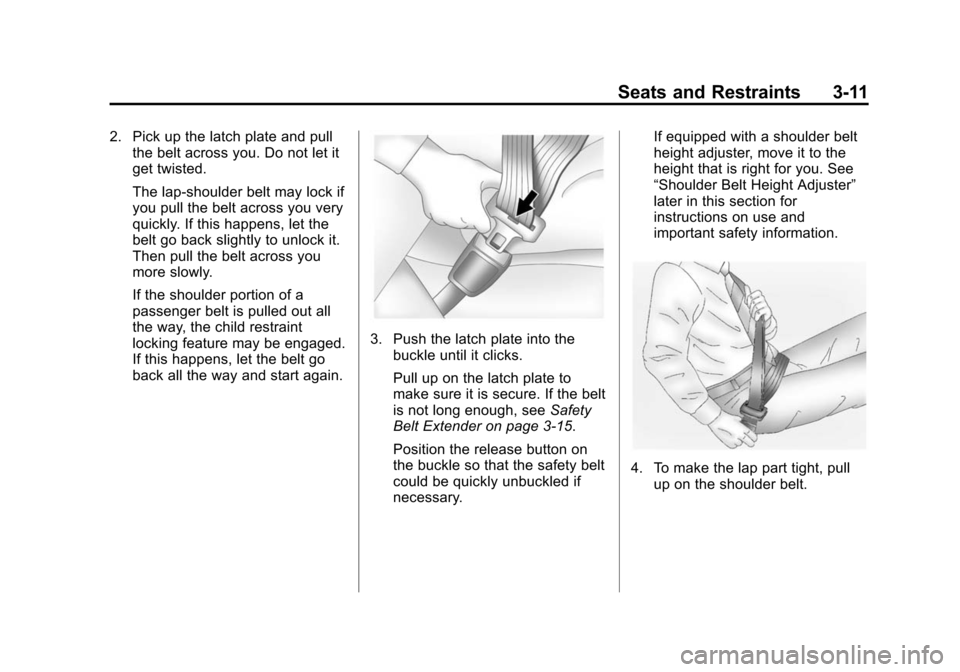
2. Pick up the latch plate and pullthe belt across you. Do not let it
get twisted.
The lap-shoulder belt may lock if
you pull the belt across you very
quickly. If this happens, let the
belt go back slightly to unlock it.
Then pull the belt across you
more slowly.
If the shoulder portion of a
passenger belt is pulled out all
the way, the child restraint
locking feature may be engaged.
If this happens, let the belt go
back all the way and start again.
3. Push the latch plate into the
buckle until it clicks.
Pull up on the latch plate to
make sure it is secure. If the belt
is not long enough, see Safety
Belt Extender on page 3-15.
Position the release button on
the buckle so that the safety belt
could be quickly unbuckled if
necessary. If equipped with a shoulder belt
height adjuster, move it to the
height that is right for you. See
“Shoulder Belt Height Adjuster”
later in this section for
instructions on use and
important safety information.
4. To make the lap part tight, pull
up on the shoulder belt.